Spring Cloud(一):发现和注册服务(eureka)
最近的项目需要将原来的项目重构为Spring Boot项目,正好也能利用一些Spring Cloud的工具,就正好学习学习_(:з」∠*)_。
首先需要新建2个Spring Boot项目,一个作为服务注册中心,一个作为服务生产者/提供者。
如下
PS.我这里用的是Spring Boot 2.X版本
一.服务注册中心
新建Spring Boot项目SpringCloudServiceCenter
(1)pom.xml
<?xml version="1.0" encoding="UTF-8"?><project xmlns="http://maven.apache.org/POM/4.0.0" xmlns:xsi="http://www.w3.org/2001/XMLSchema-instance"xsi:schemaLocation="http://maven.apache.org/POM/4.0.0 http://maven.apache.org/xsd/maven-4.0.0.xsd"><modelVersion>4.0.0</modelVersion><groupId>com.service.center</groupId><artifactId>SpringCloundServiceCenter</artifactId><version>0.0.1-SNAPSHOT</version><packaging>jar</packaging><name>SpringCloundServiceCenter</name><description>com.service.center</description><parent><groupId>org.springframework.boot</groupId><artifactId>spring-boot-starter-parent</artifactId><version>2.1.0.RELEASE</version><relativePath/> <!-- lookup parent from repository --></parent><properties><project.build.sourceEncoding>UTF-8</project.build.sourceEncoding><project.reporting.outputEncoding>UTF-8</project.reporting.outputEncoding><java.version>1.8</java.version><spring-cloud.version>Greenwich.M1</spring-cloud.version></properties><dependencies><dependency><groupId>org.springframework.cloud</groupId><artifactId>spring-cloud-starter-netflix-eureka-server</artifactId></dependency><dependency><groupId>org.springframework.boot</groupId><artifactId>spring-boot-starter-test</artifactId><scope>test</scope></dependency></dependencies><dependencyManagement><dependencies><dependency><groupId>org.springframework.cloud</groupId><artifactId>spring-cloud-dependencies</artifactId><version>${spring-cloud.version}</version><type>pom</type><scope>import</scope></dependency></dependencies></dependencyManagement><build><plugins><plugin><groupId>org.springframework.boot</groupId><artifactId>spring-boot-maven-plugin</artifactId></plugin></plugins></build><repositories><repository><id>spring-milestones</id><name>Spring Milestones</name><url>https://repo.spring.io/milestone</url><snapshots><enabled>false</enabled></snapshots></repository></repositories></project>
(2)application.properties配置
#服务端口server.port=8761#服务名称eureka.instance.hostname=serviceCenter#禁止本身注册eureka.client.register-with-eureka=false#禁止本身注册eureka.client.fetch-registry=false#服务中心地址eureka.client.service-url.defaultZone=http://${eureka.instance.hostname}:${server.port}/eureka/
(3)SpringCloundServiceCenterApplication.java启动文件中添加@EnableEurekaServer
package com.service.center;import org.springframework.boot.SpringApplication;import org.springframework.boot.autoconfigure.SpringBootApplication;import org.springframework.cloud.netflix.eureka.server.EnableEurekaServer;@SpringBootApplication@EnableEurekaServerpublic class SpringCloundServiceCenterApplication {public static void main(String[] args) {SpringApplication.run(SpringCloundServiceCenterApplication.class, args);}}
来表明该服务为服务发现和注册中心
整体结构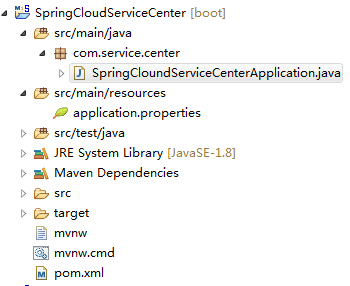
(4)配置完成后启动,然后访问http://localhost:8761/ 就能进入eureka server监控界面,可以看到红框中的信息,现在还没有服务注册。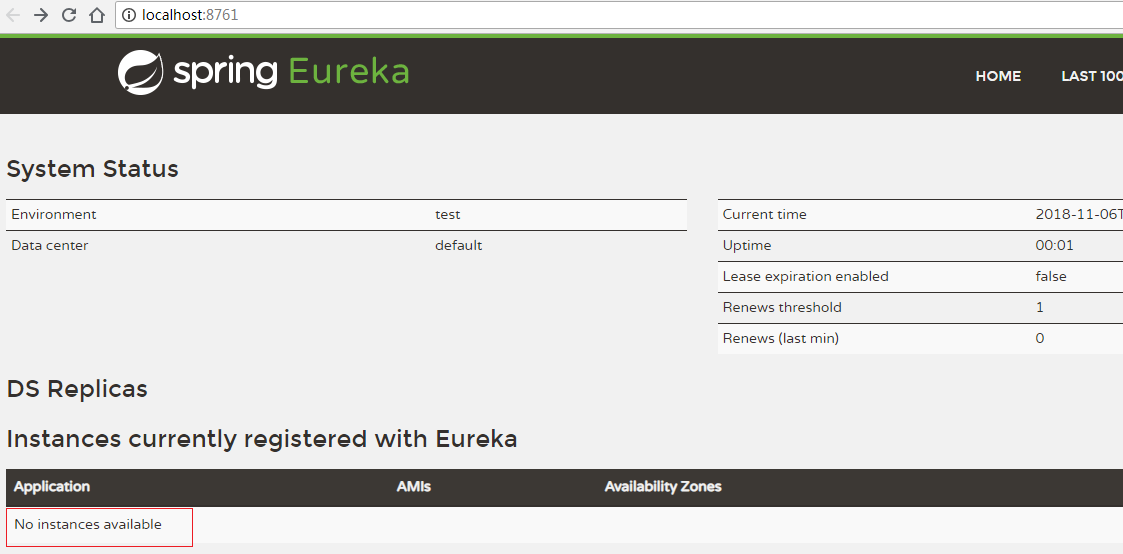
二.服务生产者
新建spring boot项目SpringCloudServiceI
(1)pom.xml配置
<?xml version="1.0" encoding="UTF-8"?><project xmlns="http://maven.apache.org/POM/4.0.0" xmlns:xsi="http://www.w3.org/2001/XMLSchema-instance"xsi:schemaLocation="http://maven.apache.org/POM/4.0.0 http://maven.apache.org/xsd/maven-4.0.0.xsd"><modelVersion>4.0.0</modelVersion><groupId>com.my.serviceI</groupId><artifactId>SpringCloundServiceI</artifactId><version>0.0.1-SNAPSHOT</version><packaging>jar</packaging><name>SpringCloundServiceI</name><description>com.my.serviceI</description><parent><groupId>org.springframework.boot</groupId><artifactId>spring-boot-starter-parent</artifactId><version>2.1.0.RELEASE</version><relativePath/> <!-- lookup parent from repository --></parent><properties><project.build.sourceEncoding>UTF-8</project.build.sourceEncoding><project.reporting.outputEncoding>UTF-8</project.reporting.outputEncoding><java.version>1.8</java.version><spring-cloud.version>Greenwich.M1</spring-cloud.version></properties><dependencies><dependency><groupId>org.springframework.boot</groupId><artifactId>spring-boot-starter-web</artifactId></dependency><dependency><groupId>org.springframework.cloud</groupId><artifactId>spring-cloud-starter-netflix-eureka-client</artifactId></dependency><dependency><groupId>org.springframework.boot</groupId><artifactId>spring-boot-starter-test</artifactId><scope>test</scope></dependency></dependencies><dependencyManagement><dependencies><dependency><groupId>org.springframework.cloud</groupId><artifactId>spring-cloud-dependencies</artifactId><version>${spring-cloud.version}</version><type>pom</type><scope>import</scope></dependency></dependencies></dependencyManagement><build><plugins><plugin><groupId>org.springframework.boot</groupId><artifactId>spring-boot-maven-plugin</artifactId></plugin></plugins></build><repositories><repository><id>spring-milestones</id><name>Spring Milestones</name><url>https://repo.spring.io/milestone</url><snapshots><enabled>false</enabled></snapshots></repository></repositories></project>
(2)application.properties配置
server.servlet.context-path=/myServiceIserver.port=8762spring.application.name=myServiceI #服务名,在注册时所用eureka.client.service-url.defautZone=http://serviceCenter:8761/eureka/
(3)在启动文件SpringCloundServiceIApplication.java中添加@EnableEurekaClient
package com.my.serviceI;import org.springframework.boot.SpringApplication;import org.springframework.boot.autoconfigure.SpringBootApplication;import org.springframework.cloud.context.config.annotation.RefreshScope;import org.springframework.cloud.netflix.eureka.EnableEurekaClient;@SpringBootApplication@EnableEurekaClientpublic class SpringCloundServiceIApplication {public static void main(String[] args) {SpringApplication.run(SpringCloundServiceIApplication.class, args);}}
(4)新建一个controller文件,提供服务
例ServiceApiController.java
package com.my.serviceI.controller;import org.springframework.stereotype.Controller;import org.springframework.web.bind.annotation.RequestMapping;import org.springframework.web.bind.annotation.ResponseBody;@Controller@RequestMapping(value="/Api")public class ServiceApiController {@ResponseBody@RequestMapping(value="/getInfo")public String getInfo() {return "123+";}}
整体结构如下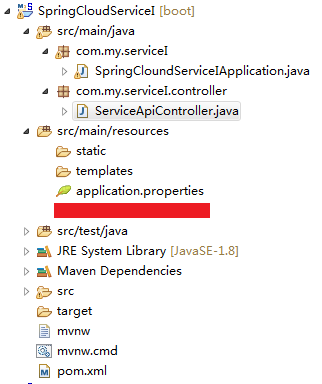
可以启动测试下是否能访问接口服务,因为spring boot会内置一个tomcat容器,且在启动时会省略掉项目名,所以我这里在application.properties中配置server.servlet.context-path=/myServiceI 来把项目名加上了,所以现在接口的访问路径为http://localhost:8762/myServiceI/Api/getInfo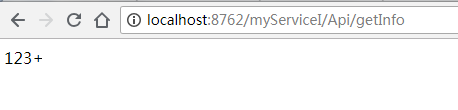
然后刷新下eureka server监控界面,就能看到刚才的服务了,能从信息中得知服务的名字和端口号,上面红条是另一个服务。


还没有评论,来说两句吧...