Spring Cloud 如何使用Eureka注册服务
要使用Eureka实现服务发现,需要项目中包含Eureka的服务端发现组件以及客户端发现组件。
搭建Maven父工程
创建一个Maven父工程xcservice-springcloud,并在工程的pom.xml中添加Spring Cloud的版本依赖等信息,如文件4-1所示。
文件4-1 pom.xml
<project xmlns="http://maven.apache.org/POM/4.0.0" xmlns:xsi="http://www.w3.org/2001/XMLSchema-instance"xsi:schemaLocation="http://maven.apache.org/POM/4.0.0http://maven.apache.org/xsd/maven-4.0.0.xsd"><modelVersion>4.0.0</modelVersion><groupId>com.xc</groupId><artifactId>xcservice-springcloud</artifactId><version>0.0.1-SNAPSHOT</version><packaging>pom</packaging><parent><groupId>org.springframework.boot</groupId><artifactId>spring-boot-starter-parent</artifactId><version>1.5.6.RELEASE</version><relativePath/></parent><properties><project.build.sourceEncoding>UTF-8</project.build.sourceEncoding><project.reporting.outputEncoding>UTF-8</project.reporting.outputEncoding><java.version>1.8</java.version></properties><dependencyManagement><dependencies><dependency><groupId>org.springframework.cloud</groupId><artifactId>spring-cloud-dependencies</artifactId><version>Dalston.SR3</version><type>pom</type><scope>import</scope></dependency></dependencies></dependencyManagement><build><plugins><!--Spring Boot的编译插件 --><plugin><groupId>org.springframework.boot</groupId><artifactId>spring-boot-maven-plugin</artifactId></plugin></plugins></build></project>
搭建服务端工程
在父工程xcservice-springcloud中,创建Maven子模块xcservice-eureka-server作为服务端工程,该模块是一个基础的Spring Boot工程,其主要文件代码的实现过程如下。
(1)添加依赖。
在pom.xml中添加Eureka Server的依赖,如文件4-2所示。
文件4-2 pom.xml
<?xml version="1.0" encoding="UTF-8"?><project xmlns="http://maven.apache.org/POM/4.0.0" xmlns:xsi="http://www.w3.org/2001/XMLSchema-instance"xsi:schemaLocation="http://maven.apache.org/POM/4.0.0 http://maven.apache.org/xsd/maven-4.0.0.xsd"><modelVersion>4.0.0</modelVersion><parent><groupId>com.xc</groupId><artifactId>xcservice-springcloud</artifactId><version>0.0.1-SNAPSHOT</version></parent><groupId>com.xc</groupId><artifactId>xcservice-eureka-server</artifactId><version>0.0.1-SNAPSHOT</version><name>xcservice-eureka-server</name><description>服务端工程</description><dependencies><dependency><groupId>org.springframework.cloud</groupId><artifactId>spring-cloud-starter-eureka-server</artifactId></dependency><dependency><groupId>org.springframework.boot</groupId><artifactId>spring-boot-starter-test</artifactId><scope>test</scope></dependency></dependencies><build><plugins><plugin><groupId>org.springframework.boot</groupId><artifactId>spring-boot-maven-plugin</artifactId></plugin></plugins></build></project>
(2)编写配置文件。
在配置文件中增加端口号等配置信息,如文件4-3所示。
文件4-3 application.yml
server:port: 8761eureka:instance:hostname: localhostclient:register-with-eureka: falsefetch-registry: falseservice-url:defaultZone: http://${eureka.instance.hostname}:${server.port}/eureka/#server:#enable-self-preservation: false #关闭保护机制,以确保注册中心可以将不可用的实例正确删除
上述代码中,首先配置了端口号为8761,所有服务的实例都需要向此端口注册。接下来配置了实例名为localhost。由于本项目是一个注册中心,是不需要向自己注册和检索服务的,所以register-with-eureka和fetch-registry都需要设置为false。最后defaultZone中的地址是注册中心的地址。
(3)修改服务端Java代码。
在项目的引导类上添加注解@EnableEurekaServer,该注解用于声明标注类是一个EurekaServer,如文件4-4所示。
文件4-4 EurekaApplication.java
package com.xc.xcserviceeurekaserver;import org.springframework.boot.SpringApplication;import org.springframework.boot.autoconfigure.SpringBootApplication;import org.springframework.cloud.netflix.eureka.server.EnableEurekaServer;/*** http://localhost:8761/*/@SpringBootApplication@EnableEurekaServerpublic class XcserviceEurekaServerApplication {public static void main(String[] args) {SpringApplication.run(XcserviceEurekaServerApplication.class, args);}}
(4)启动应用,查看信息。
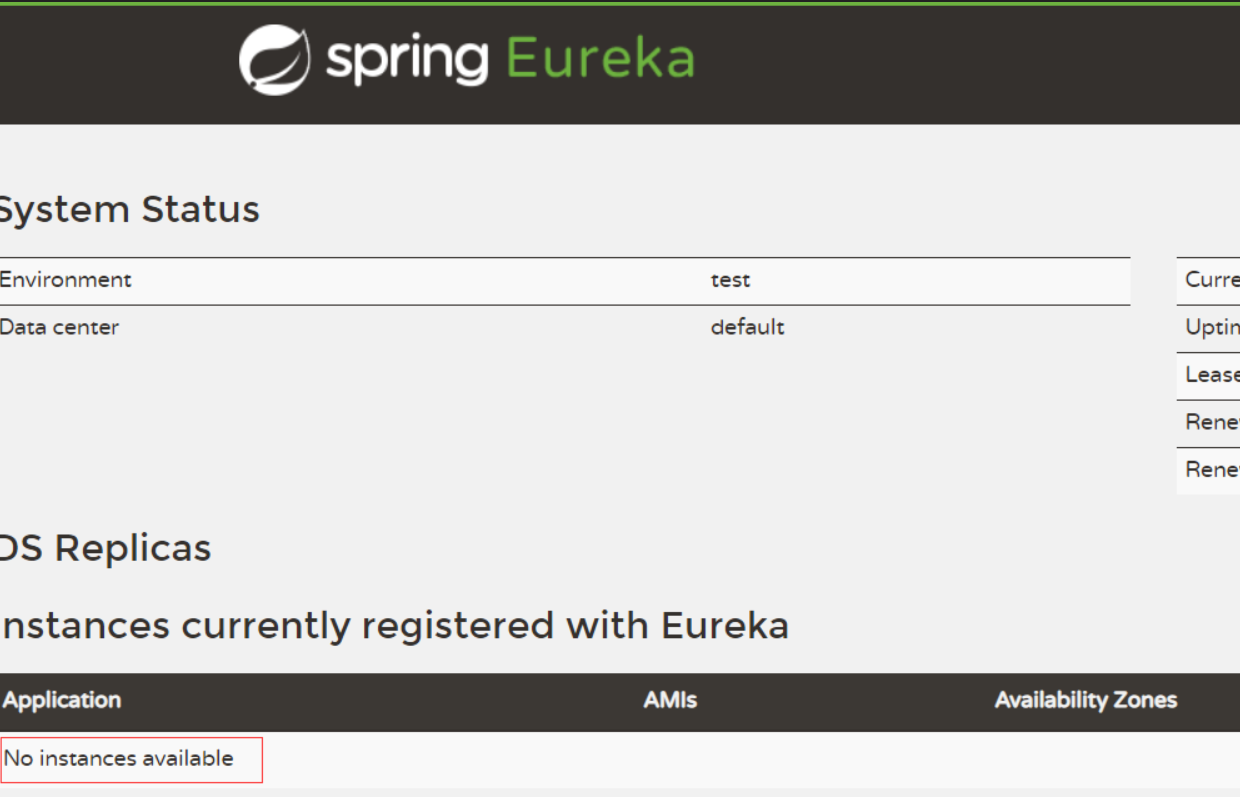
完成上述配置后,启动应用程序并在浏览器中访问地址http://localhost:8761/即可看到Eureka的信息面板。

可以看出,Eureka Server的信息页面已经成功显示,但此时“Instances currently registered with Eureka”下的显示信息为“No instances available”,这表示该注册中心还没有注册任何可用的实例。
在这里给大家风向一波免费Java资源包括分布式,微服务,并发,面试,Java架构师成长路线等等资源
加QQ:2995457287 或 vx:gupao-cola 免费获取。
搭建客户端工程
在父工程xcservice-springcloud中,创建Maven子模块xcservice-eureka-user作为客户端工程,该模块也是一个基础的Spring Boot工程,其主要文件代码的实现过程如下。
(1)添加依赖。在pom.xml中添加Eureka依赖,如文件4-5所示。
文件4-5 pom.xml
<?xml version="1.0" encoding="UTF-8"?><project xmlns="http://maven.apache.org/POM/4.0.0" xmlns:xsi="http://www.w3.org/2001/XMLSchema-instance"xsi:schemaLocation="http://maven.apache.org/POM/4.0.0 http://maven.apache.org/xsd/maven-4.0.0.xsd"><modelVersion>4.0.0</modelVersion><parent><groupId>com.xc</groupId><artifactId>xcservice-springcloud</artifactId><version>0.0.1-SNAPSHOT</version></parent><groupId>com.xc</groupId><artifactId>xcservice-eureka-user</artifactId><version>0.0.1-SNAPSHOT</version><name>xcservice-eureka-user</name><description>客户端工程</description><dependencies><dependency><groupId>org.springframework.cloud</groupId><artifactId>spring-cloud-starter-eureka</artifactId></dependency><dependency><groupId>org.springframework.boot</groupId><artifactId>spring-boot-starter-test</artifactId><scope>test</scope></dependency></dependencies><build><plugins><plugin><groupId>org.springframework.boot</groupId><artifactId>spring-boot-maven-plugin</artifactId></plugin></plugins></build></project>
(2)编写配置文件。在配置文件中添加Eureka服务实例的端口号、服务端地址等信息,如文件4-6所示。
文件4-6 application.yml
server:port:8000 # 指定该Eureka实例的端口号eureka:instance:prefer-ip-address: true # 是否显示主机的IP#instance-id: ${spring.cloud.client.ipAddress}:${server.port} #将Status中的显示内容也以“IP:端口号”的形式显示client:service-url:defaultZone: http://localhost:8761/eureka/ # 指定Eureka服务端地址spring:application:name: microservice-eureka-user # 指定应用名称
(3)修改客户端Java代码。
在项目的引导类上添加注解@EnableEurekaClient,该注解用于声明标注类是一个Eureka客户端组件,如文件4-7所示。
文件4-7 Application.java
package com.xc.xcserviceeurekauser;import org.springframework.boot.SpringApplication;import org.springframework.boot.autoconfigure.SpringBootApplication;import org.springframework.cloud.netflix.eureka.EnableEurekaClient;import org.springframework.web.bind.annotation.RequestMapping;import org.springframework.web.bind.annotation.RestController;@SpringBootApplication@EnableEurekaClient@RestControllerpublic class XcserviceEurekaUserApplication {@RequestMapping("/hello")public String home() {return "hello world!";}public static void main(String[] args) {SpringApplication.run(XcserviceEurekaUserApplication.class, args);}}
(4)启动应用,查看信息。
完成上述配置后,分别启动服务器工程和客户端工程,在浏览器中访问地址http://local-host:8761/后,我们可以从Eureka的信息面板中看到注册的服务信息,如图4-5所示。
[外链图片转存失败(img-WiZFWg7q-1563022278362)(https://upload-images.jianshu.io/upload_images/13341631-44ae0e749eba128a.png?imageMogr2/auto-orient/strip|imageView2/2/w/1240)]
从图4-5中可以看出,服务已经成功注册到了注册中心,注册后的服务就可以直接被其他服务调用了。


还没有评论,来说两句吧...