使用axios发送请求
声明**:** 本文主要是照着官网教学自己对部分知识敲了一遍,纯属动手练习,没什么技术含量;更多细节、更多功能可详见https://github.com/axios/axios。
axios发送请求的语法:
写法一(以get为例)**:**
axios({method: 'get',url: 'https://github.com/axios/axios',data: {firstName: 'Fred',lastName: 'Flintstone'}//......}).then(response => {// handle successthis.resultTwo.successInfo = response.data;}).catch(error => {// handle errorthis.resultTwo.failureInfo = error;}).then(() => {// always executed});
写法二(以get为例)**:**
axios.get('https://github.com/axios/axios', {params: {firstName: 'Fred',lastName: 'Flintstone'}}).then(response => {// handle successthis.resultTwo.successInfo = response.data;}).catch(error => {// handle errorthis.resultTwo.failureInfo = error;}).then(() => {// always executed});
简单示例:
" class="reference-link">提供三个可访问后端接口,以便前端进行请求测试: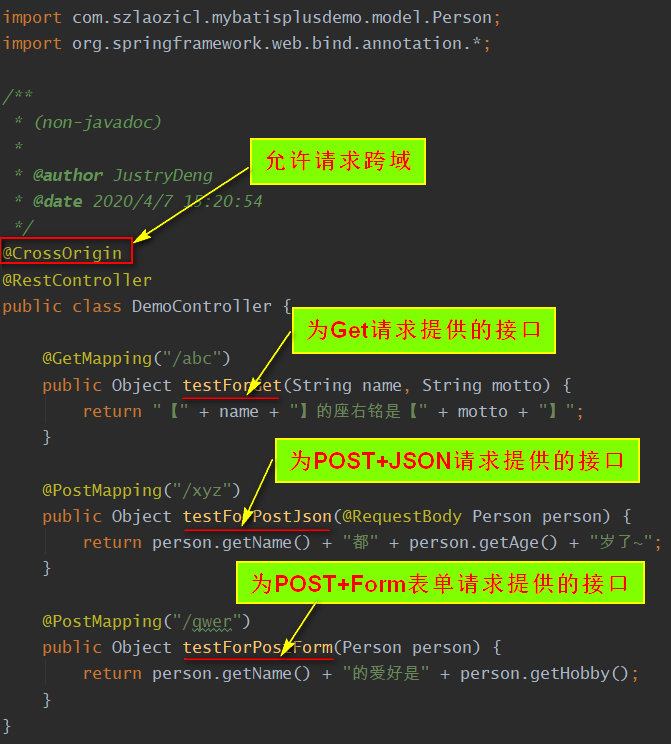
使用axios发送请求(示例):
发送GET请求**:**
<!DOCTYPE html><html lang="en"><head><meta charset="UTF-8"><meta name="viewport" content="width=device-width, initial-scale=1.0"><title>axios发送请求</title><!-- 引入vue支持 --><script src="../../../node.js/repository/node_modules/vue/dist/vue.js"></script><!-- 引入axios支持 --><script src="../../../node.js/repository/node_modules/_axios@0.19.2@axios/dist/axios.js"></script><script> window.onload = function () { let vm = new Vue({ el: '#myId', data() { return { resultOne: { successInfo: '', failureInfo: '' }, resultTwo: { successInfo: '', failureInfo: '' } } }, methods: { getTestOne() { // 发送get请求, 参数直接手动拼接在url后面 axios.get('http://localhost:8080/abc?name=张三&motto=我不是黄蓉') .then((response) => { // handle success this.resultOne.successInfo = response.data; }).catch(error => { // handle error this.resultOne.failureInfo = error; }).then(() => { // always executed }); }, getTestTwo() { // 发送请求, 通过params拼接参数 axios.get('http://localhost:8080/abc', { params: { name: '邓沙利文', motto: '我是一只小小小小鸟~嗷!嗷!' } }).then(response => { // handle success this.resultTwo.successInfo = response.data; }).catch(error => { // handle error this.resultTwo.failureInfo = error; }).then(() => { // always executed }); } } }); } </script></head><body><div id="myId"><button @click="getTestOne">axios发送get请求(测试一)</button><p>{{resultOne.successInfo}}</p><p>{{resultOne.failureInfo}}</p><button @click="getTestTwo">axios发送get请求(测试二)</button><p>{{resultTwo.successInfo}}</p><p>{{resultTwo.failureInfo}}</p></div></body></html>
测试一下:

发送POST + JSON请求**: 提示**:
默认的,axios调用post等方法时进行请求时,ContentType为application/json;charset=UTF-8。<!DOCTYPE html><html lang="en"><head><meta charset="UTF-8"><meta name="viewport" content="width=device-width, initial-scale=1.0"><title>axios发送请求</title><!-- 引入vue支持 --><script src="../../../node.js/repository/node_modules/vue/dist/vue.js"></script><!-- 引入axios支持 --><script src="../../../node.js/repository/node_modules/_axios@0.19.2@axios/dist/axios.js"></script><script> window.onload = function () { let vm = new Vue({ el: '#myId', data() { return { result: { successInfo: '', failureInfo: '' } } }, methods: { postJsonTest() { // 发送(请求内容为json的)post请求 axios.post('http://localhost:8080/xyz', { name: '邓沙利文', age: 26 }).then((response) => { // handle success this.result.successInfo = response.data; }).catch(error => { // handle error this.result.failureInfo = error; }).then(() => { // always executed }); } } }); } </script></head><body><div id="myId"><button @click="postJsonTest">axios发送post + json请求(测试)</button><p>{{result.successInfo}}</p><p>{{result.failureInfo}}</p></div></body></html>
测试一下:
发送POST + Form表单请求**: 提示**: 可以借助其它插件/类库来完成参数转换的功能。
<!DOCTYPE html><html lang="en"><head><meta charset="UTF-8"><meta name="viewport" content="width=device-width, initial-scale=1.0"><title>axios发送请求</title><!-- 引入vue支持 --><script src="../../../node.js/repository/node_modules/vue/dist/vue.js"></script><!-- 引入axios支持 --><script src="../../../node.js/repository/node_modules/_axios@0.19.2@axios/dist/axios.js"></script><script> window.onload = function () { let vm = new Vue({ el: '#myId', data: { resultOne: { successInfo: '', failureInfo: '' }, resultTwo: { successInfo: '', failureInfo: '' }, person: { name: '邓沙利文', hobby: '游戏、台球、撸代码' } }, methods: { /* * 参数本身就是形如【k1=v1&k2=v2】这样的形式 */ postJsonTestOne() { // 发送(请求内容为form表单的)post请求 axios.post( // url 'http://localhost:8080/qwer', // data 'name=JustryDeng&hobby=吃海鲜' ).then((response) => { // handle success this.resultOne.successInfo = response.data; }).catch(error => { // handle error this.resultOne.failureInfo = error; }).then(() => { // always executed }); }, /* * 参数本身是对象,使用transformRequest将其转换为形如【k1=v1&k2=v2】这样的形式 */ postJsonTestTwo() { // 发送(请求内容为form表单的)post请求 axios.post('http://localhost:8080/qwer', this.person, { // transformRequest里面会将请求参数(即:这里的this.person)进行转换,转换为'name=JustryDeng&hobby=吃海鲜'的形式 transformRequest: [ function (data) { let params = ''; for (let key in data) { params += key + '=' + data[key] + '&'; } if (params.length > 0) { // 去除最后的那个& params = params.substring(0, params.length - 1) } // console.log(params); return params; } ] }).then((response) => { // handle success this.resultTwo.successInfo = response.data; }).catch(error => { // handle error this.resultTwo.failureInfo = error; }).then(() => { // always executed }); } } }); } </script></head><body><div id="myId"><button @click="postJsonTestOne">axios发送post + form请求(测试一)</button><p>{{resultOne.successInfo}}</p><p>{{resultOne.failureInfo}}</p><button @click="postJsonTestTwo">axios发送post + form请求(测试二)</button><p>{{resultTwo.successInfo}}</p><p>{{resultTwo.failureInfo}}</p></div></body></html>
测试一下:
再次声明: 本文只是按照https://github.com/axios/axios所述,敲的非常简单、非常基础的demo,更多细节、更多功能可详见该地址。
^_^ 如有不当之处,欢迎指正
^_^ 学习链接
https://github.com/axios/axios
^_^ 本文已经被收录进《程序员成长笔记(六)》,笔者JustryDeng


还没有评论,来说两句吧...