Python实现多人脸识别系统
资源下载地址:https://download.csdn.net/download/sheziqiong/88284343 资源下载地址:https://download.csdn.net/download/sheziqiong/88284343 Face recognition from camera with Dlib
Introduction
调用摄像头进行人脸识别, 支持多张人脸同时识别
Tkinter 人脸录入界面, 支持录入时设置 (中文) 姓名
 {.align-center
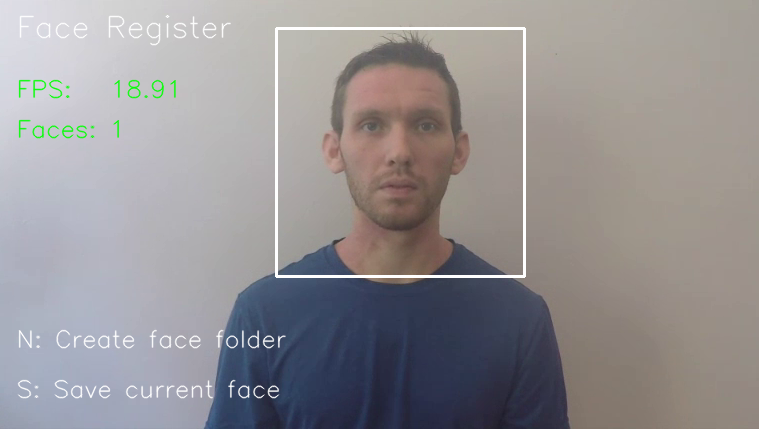
width=“1000px”}简单的 OpenCV 摄像头人脸录入界面
 {.align-center
width=“1000px”}离摄像头过近, 人脸超出摄像头范围时, 会有 “OUT OF RANGE” 提醒
 {.align-center
width=“1000px”}- 提取特征建立人脸数据库
利用摄像头进行人脸识别
face_reco_from_camera.py, 对于每一帧都做检测识别
 {.align-center width=“1000px”}
face_reco_from_camera_single_face.py, 对于人脸<=1,
只有新人脸出现才进行再识别来提高 FPS {.align-center
width=“1000px”}face_reco_from_camera_ot.py, 利用 OT 来实现再识别提高 FPS
 {.align-center
width=“1000px”}定制显示名字, 可以写中文
 {.align-center
width=“1000px”}
关于精度 :
- 当使用 0.6 的距离阈值时,dlib 模型在标准 LFW 人脸识别基准上获得 99.38% 的精度。
关于算法
- 基于 Residual Neural Network / 残差网络的 CNN 模型;
- This model is a ResNet network with 29 conv layers.
本质上是 ResNet-34 网络的一个版本,来自 He,Zhang,Ren 和 Sun 的论文 Deep Residual Learning for Image Recognition,去掉了几层,每层过滤器的数量减少了一半。
概述
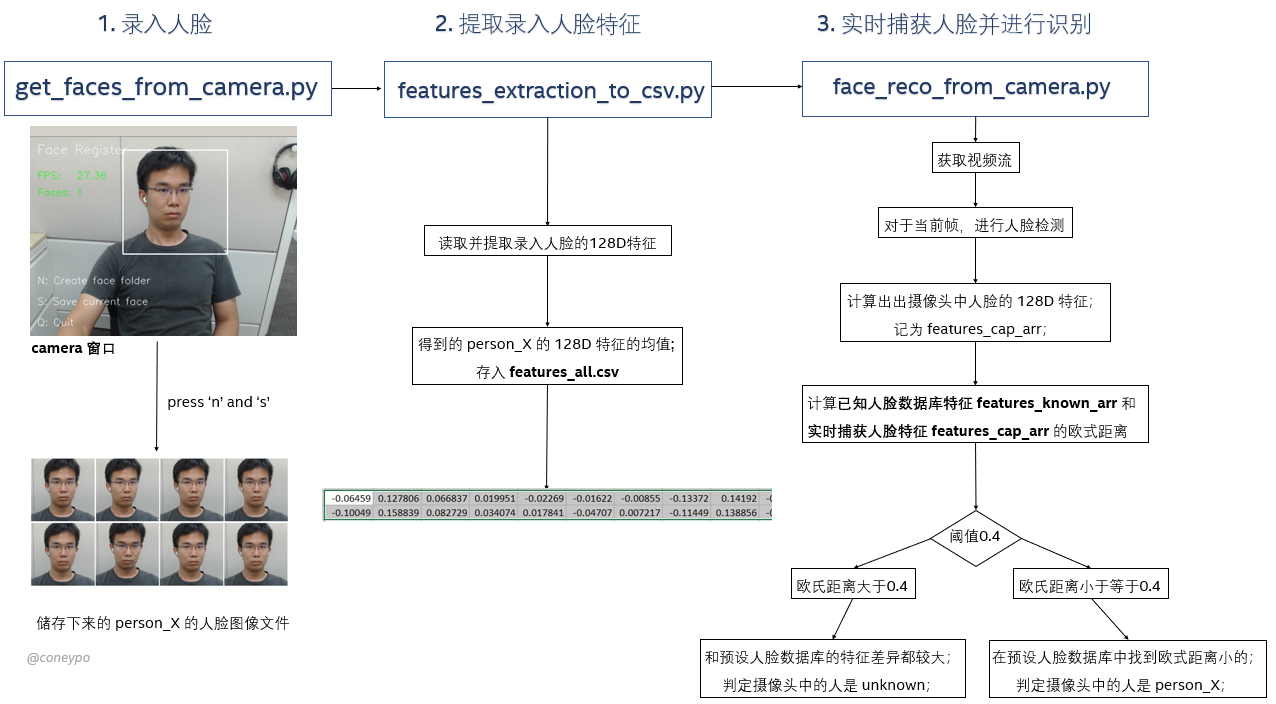
此项目中人脸识别的实现流程 (no OT, 每一帧都进行检测 + 识别)
 {.align-center width=“1000px”}
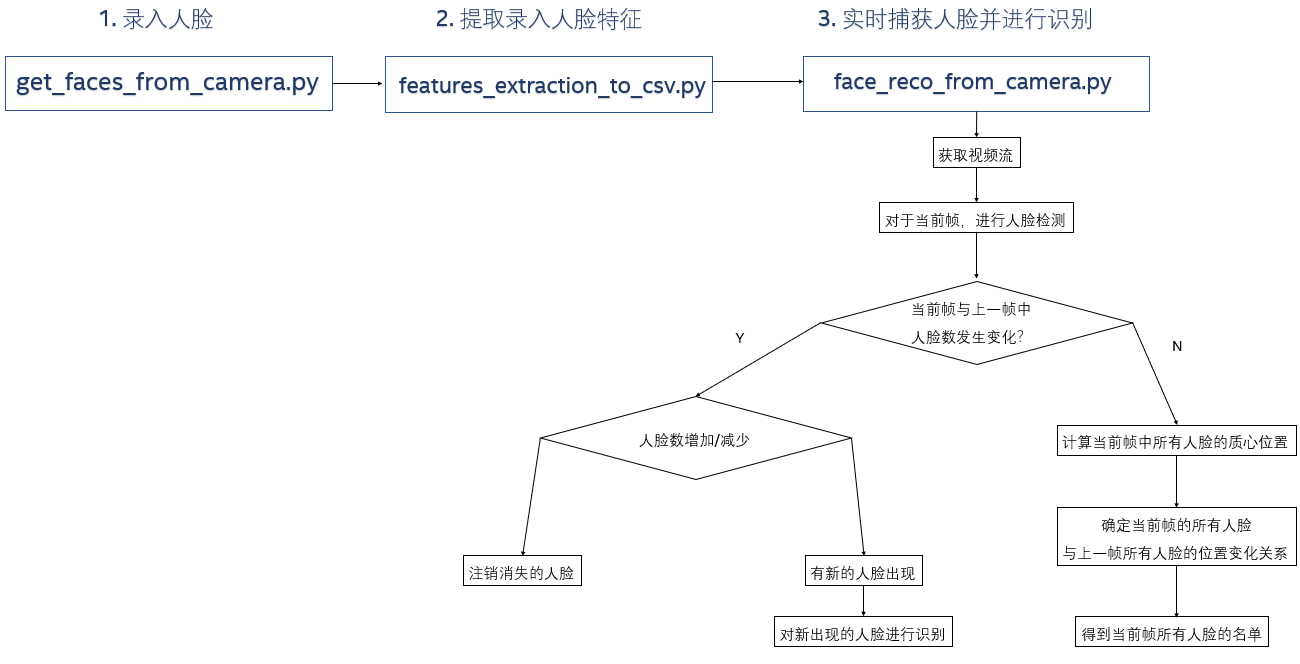
实现流程 (with OT, 初始帧进行检测 + 识别, 后续帧检测 + 质心跟踪) / OT used:
 {.align-center
width=“1000px”}
如果利用 OT 来跟踪, 可以大大提高 FPS,因为做识别时候需要提取特征描述子的耗时很多
Steps
/ Git clone source code
```{.bash}
git clone https://git.writebug.com/goodwill/DlibFaceRecognition.git安装依赖库
```{.bash}
pip install -r requirements.txt
进行人脸信息采集录入,
# Install Tkintersudo apt-get install python3-tk python3-pil python3-pil.imagetkpython3 get_faces_from_camera_tkinter.py
进行人脸信息采集录入, OpenCV GUI
python3 get_face_from_camera.py
提取所有录入人脸数据存入
features_all.csvpython3 features_extraction_to_csv.py
调用摄像头进行实时人脸识别
python3 face_reco_from_camera.py
对于人脸数<=1, 调用摄像头进行实时人脸识别
python3 face_reco_from_camera_single_face.py
利用 OT 算法, 调用摄像头进行实时人脸识别
python3 face_reco_from_camera_ot.py
源代码相关
代码结构 :
.├── get_faces_from_camera.py # Step 1. Face register GUI with OpenCV├── get_faces_from_camera_tkinter.py # Step 1. Face register GUI with Tkinter├── features_extraction_to_csv.py # Step 2. Feature extraction├── face_reco_from_camera.py # Step 3. Face recognizer├── face_reco_from_camera_single_face.py # Step 3. Face recognizer for single person├── face_reco_from_camera_ot.py # Step 3. Face recognizer with OT├── face_descriptor_from_camera.py # Face descriptor computation├── how_to_use_camera.py # Use the default camera by opencv├── data│ ├── data_dlib # Dlib's model│ │ ├── dlib_face_recognition_resnet_model_v1.dat│ │ └── shape_predictor_68_face_landmarks.dat│ ├── data_faces_from_camera # Face images captured from camera (will generate after step 1)│ │ ├── person_1│ │ │ ├── img_face_1.jpg│ │ │ └── img_face_2.jpg│ │ └── person_2│ │ └── img_face_1.jpg│ │ └── img_face_2.jpg│ └── features_all.csv # CSV to save all the features of known faces (will generate after step 2)├── README.rst└── requirements.txt # Some python packages needed
用到的 Dlib 相关模型函数
Dlib 正向人脸检测器
<class 'dlib.dlib.rectangles'>/ Dlib frontal face detectordetector = dlib.get_frontal_face_detector()faces = detector(img_gray, 0)
Dlib 人脸 landmark 特征点检测器, output:
<class 'dlib.dlib.full_object_detection'>/ Dlib face landmark
predictor, will useshape_predictor_68_face_landmarks.dat# This is trained on the ibug 300-W dataset (https://ibug.doc.ic.ac.uk/resources/facial-point-annotations/)# Also note that this model file is designed for use with dlib's HOG face detector.# That is, it expects the bounding boxes from the face detector to be aligned a certain way,the way dlib's HOG face detector does it.# It won't work as well when used with a face detector that produces differently aligned boxes,# such as the CNN based mmod_human_face_detector.dat face detector.predictor = dlib.shape_predictor("data/data_dlib/shape_predictor_68_face_landmarks.dat")shape = predictor(img_rd, faces[i])
Dlib 特征描述子 / Face recognition model, the object maps human
faces into 128D vectorsface_rec = dlib.face_recognition_model_v1("data/data_dlib/dlib_face_recognition_resnet_model_v1.dat")
Python 源码介绍如下
get_face_from_camera.py:人脸信息采集录入
- 请注意存储人脸图片时, 矩形框不要超出摄像头范围,
要不然无法保存到本地; - 超出会有 “out of range” 的提醒;
- 请注意存储人脸图片时, 矩形框不要超出摄像头范围,
get_faces_from_camera_tkinter.py:进行人脸信息采集录入 Tkinter GUI
features_extraction_to_csv.py:从上一步存下来的图像文件中, 提取人脸数据存入 CSV
from face images saved in step 1;- 会生成一个存储所有特征人脸数据的
features_all.csv - Size:
n*129, n means n faces you registered and 129 means
face name + 128D features of this face
- 会生成一个存储所有特征人脸数据的
face_reco_from_camera.py:这一步将调用摄像头进行实时人脸识别;
real-time face recognition;- 将捕获到的人脸数据和之前存的人脸数据进行对比计算欧式距离,
由此判断是否是同一个人; - Compare the faces captured from camera with the faces you have
registered which are saved infeatures_all.csv;
- 将捕获到的人脸数据和之前存的人脸数据进行对比计算欧式距离,
face_reco_from_camera_single_face.py:针对于人脸数 <=1 的场景, 区别于
face_reco_from_camera.py
(对每一帧都进行检测 + 识别), 只有人脸出现的时候进行识别;face_reco_from_camera_ot.py:只会对初始帧做检测 + 识别, 对后续帧做检测 + 质心跟踪;
(optional)
face_descriptor_from_camera.py调用摄像头进行实时特征描述子计算;
computation;
资源下载地址:https://download.csdn.net/download/sheziqiong/88284343
资源下载地址:https://download.csdn.net/download/sheziqiong/88284343


还没有评论,来说两句吧...