SpringBoot中定时任务开启多线程避免多任务堵塞
场景
SpringBoot中定时任务与异步定时任务的实现:
SpringBoot中定时任务与异步定时任务的实现_霸道流氓气质的博客-CSDN博客
使用SpringBoot原生方式实现定时任务,已经开启多线程支持,以上是方式之一。
除此之外还可通过如下方式。
为什么Spring Boot 定时任务是单线程的?
查看注解@EnableScheduling源码可知
protected void scheduleTasks() {if (this.taskScheduler == null) {this.localExecutor = Executors.newSingleThreadScheduledExecutor();this.taskScheduler = new ConcurrentTaskScheduler(this.localExecutor);}

![Image 1][]
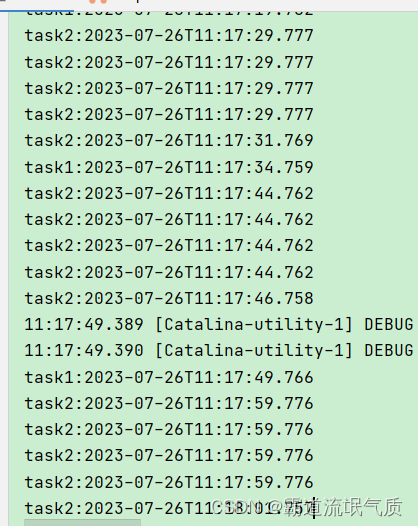
为了验证单线程,所以编写模拟堵塞的测试方法
import org.springframework.scheduling.annotation.EnableScheduling;import org.springframework.scheduling.annotation.Scheduled;import org.springframework.stereotype.Component;import java.time.LocalDateTime;import java.util.concurrent.TimeUnit;@Component@EnableSchedulingpublic class TestTask {@Scheduled(fixedRateString = "15000")public void test1() throws InterruptedException {System.out.println("task1:"+LocalDateTime.now());//moni yanchiTimeUnit.SECONDS.sleep(10);}@Scheduled(fixedRateString = "3000")public void test2() {System.out.println("task2:"+LocalDateTime.now());}}
执行结果
![Image 1][]
注:
博客:
霸道流氓气质_C#,架构之路,SpringBoot-CSDN博客
实现
1、方案一
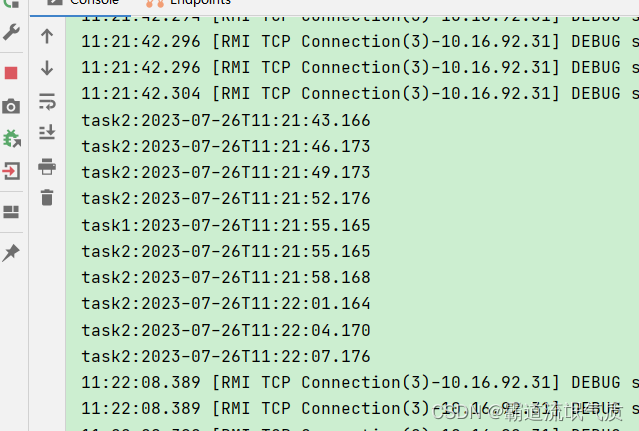
Spring Boot quartz 已经提供了一个配置用来配置线程池的大小
添加如下配置
spring:task:scheduling:pool:size: 10
再次进行堵塞测试发现正常
![Image 1][]
2、方案二
重写SchedulingConfigurer#configureTasks()
import org.springframework.context.annotation.Configuration;import org.springframework.scheduling.annotation.SchedulingConfigurer;import org.springframework.scheduling.config.ScheduledTaskRegistrar;import java.util.concurrent.Executors;//直接实现SchedulingConfigurer这个接口,设置taskScheduler@Configurationpublic class ScheduleConfig implements SchedulingConfigurer {@Overridepublic void configureTasks(ScheduledTaskRegistrar taskRegistrar) {taskRegistrar.setScheduler(Executors.newScheduledThreadPool(10));}}
3、方案三
参考上面结合@Async的方式。
[Image 1]:


还没有评论,来说两句吧...