SpringBoot中@Scheduled实现多线程并发定时任务
SpringBoot中@Scheduled实现多线程并发定时任务
1.背景
Spring Boot实现定时任务非常容易,只需要使用Spring自带的Schedule注解
@Scheduled(cron = “0 /1 ?”)
public void cancleOrderTask() {//实现业务}记得在启动类中开启定时任务
@EnableScheduling //开启定时任务定时任务开启成功,但所有的任务都是在同一个线程池中的同一个线程来完成的。在实际开发过程中,我们当然不希望所有的任务都运行在一个线程中

2.方案解决
首选:
package com.example.demo.test;import org.springframework.context.annotation.Bean;import org.springframework.context.annotation.Configuration;import org.springframework.context.annotation.Primary;import org.springframework.scheduling.annotation.EnableAsync;import org.springframework.scheduling.concurrent.ThreadPoolTaskExecutor;import java.util.concurrent.ThreadPoolExecutor;@Configurationpublic class ThreadPoolConfig {/** 获取当前系统的CPU 数目*/static int cpuNums = Runtime.getRuntime().availableProcessors();/** 线程池核心池的大小*/private static int corePoolSize = cpuNums*2+1;/** 线程池的最大线程数*/private static int maximumPoolSize = cpuNums * 5;/*** @Primary 优先使用该全局配置线程池* 如果不加@primary @async注解默认采用SimpleAsyncTaskExecutor* 不加@primary 可使用@async("threadPoolTaskExecutor")指定线程池*/@Primary@Beanpublic ThreadPoolTaskExecutor threadPoolTaskExecutor() {ThreadPoolTaskExecutor threadPoolTaskExecutor = new ThreadPoolTaskExecutor();/** 核心线程数,默认为1 **/threadPoolTaskExecutor.setCorePoolSize(corePoolSize);/** 最大线程数,默认为Integer.MAX_VALUE **/threadPoolTaskExecutor.setMaxPoolSize(maximumPoolSize);/** 队列最大长度,一般需要设置值: 大于等于notifyScheduledMainExecutor.maxNum;默认为Integer.MAX_VALUE **/threadPoolTaskExecutor.setQueueCapacity(50);/** 线程池维护线程所允许的空闲时间,默认为60s **/threadPoolTaskExecutor.setKeepAliveSeconds(60);/*** 线程池对拒绝任务(无线程可用)的处理策略,目前只支持AbortPolicy、CallerRunsPolicy;默认为后者** AbortPolicy:直接抛出java.util.concurrent.RejectedExecutionException异常* CallerRunsPolicy:主线程直接执行该任务,执行完之后尝试添加下一个任务到线程池中,可以有效降低向线程池内添加任务的速度* DiscardOldestPolicy:抛弃旧的任务、暂不支持;会导致被丢弃的任务无法再次被执行* DiscardPolicy:抛弃当前任务、暂不支持;会导致被丢弃的任务无法再次被执行*/threadPoolTaskExecutor.setRejectedExecutionHandler(new ThreadPoolExecutor.CallerRunsPolicy());threadPoolTaskExecutor.setThreadNamePrefix("task--thread");//执行初始化会自动执行afterPropertiesSet()初始化threadPoolTaskExecutor.initialize();return threadPoolTaskExecutor;}}
方案一:
1:通过ScheduleConfig配置文件实现SchedulingConfigurer接口,并重写setSchedulerfang方法
package com.lds.springbootdemo.config;import org.springframework.context.annotation.Bean;import org.springframework.context.annotation.Configuration;import org.springframework.scheduling.TaskScheduler;import org.springframework.scheduling.annotation.SchedulingConfigurer;import org.springframework.scheduling.concurrent.ThreadPoolTaskScheduler;import org.springframework.scheduling.config.ScheduledTaskRegistrar;import java.util.concurrent.Executor;import java.util.concurrent.Executors;@Configurationpublic class ScheduledConfig implements SchedulingConfigurer {@Overridepublic void configureTasks(ScheduledTaskRegistrar scheduledTaskRegistrar) {scheduledTaskRegistrar.setScheduler(setTaskExecutors());}@Bean(destroyMethod="shutdown")public Executor setTaskExecutors(){// 10个线程来处理。return Executors.newScheduledThreadPool(10);}}
2:创建Bean
package com.example.morningrundata.config;import org.springframework.context.annotation.Bean;import org.springframework.context.annotation.Configuration;import org.springframework.scheduling.TaskScheduler;import org.springframework.scheduling.concurrent.ThreadPoolTaskScheduler;@Configurationpublic class TaskSchedulerConfig {//线程池应该交给容器管理@Beanpublic TaskScheduler taskScheduler() {ThreadPoolTaskScheduler scheduler = new ThreadPoolTaskScheduler();scheduler.setPoolSize(10);return scheduler;}}方案二:
1.@Async异步+线程池的两种方式
在启动类加上@EnableAsync(不一定是启动类,可以是controller、service等启动时加载)
package com.example.worktest.async;@SpringBootApplication@EnableAsyncpublic class AsyncApplication {public static void main(String[] args) {SpringApplication.run(AsyncApplication.class, args);}}@Async注解,可以在类,方法,controller,service
package com.example.morningrundata.task;import lombok.extern.slf4j.Slf4j;import org.springframework.scheduling.annotation.Async;import org.springframework.scheduling.annotation.EnableScheduling;import org.springframework.scheduling.annotation.Scheduled;import org.springframework.stereotype.Component;
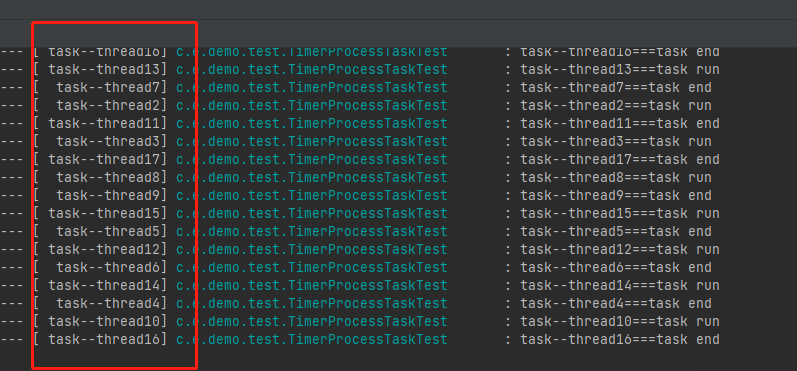
/*** 定时查询学生晨跑记录* @author Administrator*/@Component@Slf4j@EnableScheduling@Asyncpublic class TimerProcessTaskTest {@Scheduled(cron = "0/2 * * * * ?")public void doTask() throws InterruptedException {log.info(Thread.currentThread().getName()+"===task run");Thread.sleep(5);}@Scheduled(cron = "0/2 * * * * ?")public void doTask1() throws InterruptedException {log.info(Thread.currentThread().getName()+"===task end");}}![image-20211229145908541][]
解释
@Async异步方法默认使用Spring创建ThreadPoolTaskExecutor(参考TaskExecutionAutoConfiguration),
其中默认核心线程数为8, 默认最大队列和默认最大线程数都是Integer.MAX_VALUE. 创建新线程的条件是队列填满时, 而
这样的配置队列永远不会填满, 如果有@Async注解标注的方法长期占用线程(比如HTTP长连接等待获取结果),
在核心8个线程数占用满了之后, 新的调用就会进入队列, 外部表现为没有执行.
解决:手动配置相应属性即可. 比如spring.task.execution.pool.queueCapacity=4spring.task.execution.pool.coreSize=20备注:此处没有配置maxSize, 仍是默认的Integer.MAX_VALUE. 如果配置的话, 请考虑达到最大线程数时的处理策略(JUC包查找RejectedExecutionHandler的实现类)(默认为拒绝执行AbortPolicy, 即抛出异常)AbortPolicy: 直接抛出java.util.concurrent.RejectedExecutionException异常CallerRunsPolicy: 主线程直接执行该任务,执行完之后尝试添加下一个任务到线程池中,可以有效降低向线程池内添加任务的速度DiscardOldestPolicy: 抛弃旧的任务DiscardPolicy: 抛弃当前任务//更好的解释AbortPolicy:直接抛出 RejectedExecutionException 异常并阻止系统正常运行。CallerRunsPolicy:“调用者运行”机制,该策略既不会抛弃任务,也不会抛出异常,而是将某些任务回退到调用者,由调用者来完成任务。DiscardOldestPolicy:抛弃队列中等待最久的任务,然后把当前任务加入队列中尝试再次提交当前任务。DiscarePolicy:直接丢弃任务,不予任何处理也不抛出异常。如果允许任务丢失,这是最好的一种方案。package com.example.morningrundata.config;import org.springframework.context.annotation.Configuration;import org.springframework.scheduling.annotation.AsyncConfigurer;import org.springframework.scheduling.concurrent.ThreadPoolTaskExecutor;import java.util.concurrent.Executor;import java.util.concurrent.ThreadPoolExecutor;@Configurationpublic class TaskExecutorConfig implements AsyncConfigurer {/*** Set the ThreadPoolExecutor's core pool size.*/private static final int CORE_POOL_SIZE = 5;/*** Set the ThreadPoolExecutor's maximum pool size.*/private static final int MAX_POOL_SIZE = 5;/*** Set the capacity for the ThreadPoolExecutor's BlockingQueue.*/private static final int QUEUE_CAPACITY = 1000;/*** 通过重写getAsyncExecutor方法,制定默认的任务执行由该方法产生* <p>* 配置类实现AsyncConfigurer接口并重写getAsyncExcutor方法,并返回一个ThreadPoolTaskExevutor* 这样我们就获得了一个基于线程池的TaskExecutor*/@Overridepublic Executor getAsyncExecutor() {ThreadPoolTaskExecutor taskExecutor = new ThreadPoolTaskExecutor();//cpu核数*2+1taskExecutor.setCorePoolSize(CORE_POOL_SIZE);taskExecutor.setMaxPoolSize(MAX_POOL_SIZE);taskExecutor.setQueueCapacity(QUEUE_CAPACITY);taskExecutor.setThreadNamePrefix("test-");taskExecutor.setKeepAliveSeconds(3);taskExecutor.initialize();//设置线程池拒绝策略,四种线程池拒绝策略,具体使用哪种策略,还得根据实际业务场景才能做出抉择taskExecutor.setRejectedExecutionHandler(new ThreadPoolExecutor.CallerRunsPolicy());return taskExecutor;}}4.彻彻底底解决Spring中@EnableAsync、@Async异步调用的使用、原理及源码分析源码解释如下:https://www.jianshu.com/p/5f3bf8a12e26
配置文件:
#核心线程数spring.task.execution.pool.core-size=200#最大线程数spring.task.execution.pool.max-size=1000#空闲线程保留时间spring.task.execution.pool.keep-alive=3s#队列容量spring.task.execution.pool.queue-capacity=1000#线程名称前缀spring.task.execution.thread-name-prefix=test-thread-spring:profiles:# active: prodactive: test#自用task:execution:pool:core-size: 10 #cpu核数*2+1keep-alive: 3smax-size: 20queue-capacity: 200thread-name-prefix: thread-配置类是TaskExecutionProperties【org.springframework.boot.autoconfigure.task.TaskExecutionProperties】

3.springboot的线程池的创建的两种方法
使用static代码块创建
这样的方式创建的好处是当代码用到线程池的时候才会初始化核心线程数
public class HttpApiThreadPool {/** 获取当前系统的CPU 数目*/static int cpuNums = Runtime.getRuntime().availableProcessors();/** 线程池核心池的大小*/private static int corePoolSize = 10;/** 线程池的最大线程数*/private static int maximumPoolSize = cpuNums * 5;public static ExecutorService httpApiThreadPool = null;
/*** 静态方法*/static{System.out.println("创建线程数:"+corePoolSize+",最大线程数:"+maximumPoolSize);//建立10个核心线程,线程请求个数超过20,则进入队列等待httpApiThreadPool = new ThreadPoolExecutor(corePoolSize, maximumPoolSize, 0L,TimeUnit.MILLISECONDS, new ArrayBlockingQueue<Runnable>(100),new ThreadFactoryBuilder().setNameFormat("PROS-%d").build());}}使用方法:public static void main(String[] args) {HttpApiThreadPool.httpApiThreadPool.execute(()->System.out.println("测试"));}**注意:**1.不能使用**Executors**的方法创建线程池,这个是大量的生产事故得出来的结论2.maximumPoolSize本程序使用的是cup数的5倍,你可以看你实际情况用3.new ThreadFactoryBuilder().setNameFormat(“PROS-%d”).build() 给每个线程已名字,可以方便调试
使用static代码块创建
@Configurationpublic class TreadPoolConfig {private Logger logger = LoggerFactory.getLogger(TreadPoolConfig.class);/** 获取当前系统的CPU 数目*/int cpuNums = Runtime.getRuntime().availableProcessors();/** 线程池核心池的大小*/private int corePoolSize = 10;/** 线程池的最大线程数*/private int maximumPoolSize = cpuNums * 5;/*** 消费队列线程* @return*/@Bean(value = "httpApiThreadPool")public ExecutorService buildHttpApiThreadPool(){logger.info("TreadPoolConfig创建线程数:"+corePoolSize+",最大线程数:"+maximumPoolSize);ExecutorService pool = new ThreadPoolExecutor(corePoolSize, maximumPoolSize, 0L,TimeUnit.MILLISECONDS, new ArrayBlockingQueue<Runnable>(100),new ThreadFactoryBuilder().setNameFormat("PROS-%d").build());return pool ;}}使用方法:
//注入@Resourceprivate TreadPoolConfig treadPoolConfig;//调用public void test() {treadPoolConfig.buildHttpApiThreadPool().execute(()->System.out.println("tre"));}
4.其他创建线程池的方法(没有用过)
推荐方式1:
首先引入:commons-lang3包
ScheduledExecutorService executorService = new ScheduledThreadPoolExecutor(1,new BasicThreadFactory.Builder().namingPattern("example-schedule-pool-%d").daemon(true).build());推荐方式 2:
首先引入:com.google.guava包
ThreadFactory namedThreadFactory = new ThreadFactoryBuilder().setNameFormat("demo-pool-%d").build();//Common Thread PoolExecutorService pool = new ThreadPoolExecutor(5, 200,0L, TimeUnit.MILLISECONDS,new LinkedBlockingQueue<Runnable>(1024), namedThreadFactory, new ThreadPoolExecutor.AbortPolicy());pool.execute(()-> System.out.println(Thread.currentThread().getName()));pool.shutdown();//gracefully shutdown推荐方式 3:spring配置线程池方式:自定义线程工厂bean需要实现ThreadFactory,可参考该接口的其它默认实现类,使用方式直接注入bean
调用execute(Runnable task)方法即可
<bean id="userThreadPool"class="org.springframework.scheduling.concurrent.ThreadPoolTaskExecutor"><property name="corePoolSize" value="10" /><property name="maxPoolSize" value="100" /><property name="queueCapacity" value="2000" /><property name="threadFactory" value= threadFactory /><property name="rejectedExecutionHandler"><ref local="rejectedExecutionHandler" /></property></bean>//in codeuserThreadPool.execute(thread);


")


还没有评论,来说两句吧...