P02:如何新建Page页面和Component组件
Next.js 教程
- 新建页面和访问路径
- Component组件的制作
新建页面和访问路径
直接在根目录下的 pages 文件夹下,新建一个 willem.js 页面。然后写入下面的代码:
next-create\pages\willem.js
function Willem(){return (<button>willem</button>)}export default Willem;
只要写完上面的代码,Next框架就自动作好了路由,这个也算是Next的一个重要优点,给我们节省了大量的时间。
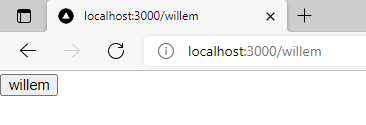
在浏览器访问http://localhost:3000/willem,可以看到如下界面:

现在要作一个更深的页面,比如把有关博客的界面都放在这样的路径下http://localhost:3000/blog/aboutBlog,其实只要在 pages 文件夹下再建立一个新的文件夹blog,然后进入blog文件夹,新建一个aboutBlog.js文件,就可以实现了。
aboutBlog.js 文件内容,我们这里就用最简单的写法了
next-create\pages\blog\aboutBlog.js
export default ()=><div>aboutBlog page</div>
写完后,就可以直接在浏览器中访问了,是不是发现Next框架真的减轻了我们大量的工作。

Component组件的制作
制作组件也同样方便,比如要建立一个 willem 组件,直接在 components 目录下建立一个文件 willem.js 然后写入下面代码:
next-create\components\willem.js
export default ({children})=><button>{children}</button>
组件写完后需要先引入,比如我们在Index页面里进行引入:
import Willem from '../components/willem'
使用就非常简单了,直接写入标签就可以。
<Willem>按钮</Willem>
一个自定义组件的创建和使用也是这么简单, 如果你React的基础很好,那本文的内容对你来说就更加简单了。也就是说Next框架并没有给我们带来太多的学习成本,但是为我们减轻了很多配置工作。
next-create\pages\index.js
import Head from 'next/head'import Image from 'next/image'import styles from '../styles/Home.module.css'import Willem from '../components/willem'export default function Home() {return (<div className={styles.container}><Head><title>Create Next App</title><meta name="description" content="Generated by create next app" /><link rel="icon" href="/favicon.ico" /></Head><main className={styles.main}><h1 className={styles.title}>Welcome to <a href="https://nextjs.org">Next.js!</a></h1><p className={styles.description}>Get started by editing{' '}<code className={styles.code}>pages/index.js</code></p><Willem>按钮</Willem></main></div>)}


还没有评论,来说两句吧...