02 Spring_IOC 控制反转
目录
一、SpringIOC_控制反转思想
二、SpringIOC_自定义对象容器
三、SpringIOC_Spring实现IOC
四、SpringIOC_Spring容器类型
1.容器接口(BeanFactory、ApplicationContext)
五、SpringIOC_对象的创建方式
1.使用无参构造方法
2.使用工厂类的普通方法构建对象
3.使用工厂类的静态方法构建对象
4.知识点整理:
六、SpringIOC_对象的五种创建策略
七、SpringIOC_对象的销毁时机:
八、SpringIOC_声明周期方法
九、SpringIOC_获取Bean对象的方式
1.通过id/name获取
2.通过类型获取
3.通过 id/name+类型 获取
4.整体代码段:
一、SpringIOC_控制反转思想

1.IOC介绍:
IOC(Inversion of Control) :程序将创建对象的权利交给框架。
之前在开发过程中,对象实例的创建是由调用者管理的,代码如下:
public interface StudentDao {// 根据id查询学生Student findById(int id);}public class StudentDaoImpl implements StudentDao{@Overridepublic Student findById(int id) {// 模拟从数据库查找出学生return new Student(1,"百战程序员","北 京");}}public class StudentService {public Student findStudentById(int id){// 此处就是调用者在创建对象StudentDao studentDao = new StudentDaoImpl();return studentDao.findById(1);}}
2.上述写法中有两个缺点:
(1)浪费资源: StudentService 调用方法时即会创建一个对象,如果不断调用方法则会创建大量StudentDao 对象。
(2)代码耦合度高:假设随着开发,我们创建了 StudentDao 另一个更加完善的实现类StudentDaoImpl2 ,如果在 StudentService中想使用StudentDaoImpl2 ,则必须修改源码。
而 IOC思想是将创建对象的权利交给框架,框架会帮助我们创建对象,分配对象的使用,控制权由程序代码转移到了框架中,控制权发生了反转,这就是Spring的IOC 思想。而 IOC 思想可以完美的解决以上两个问题。
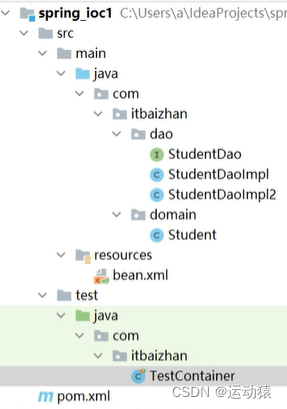
二、SpringIOC_自定义对象容器
注意:(不需要记代码,只是模拟IOC思想,帮助理解)
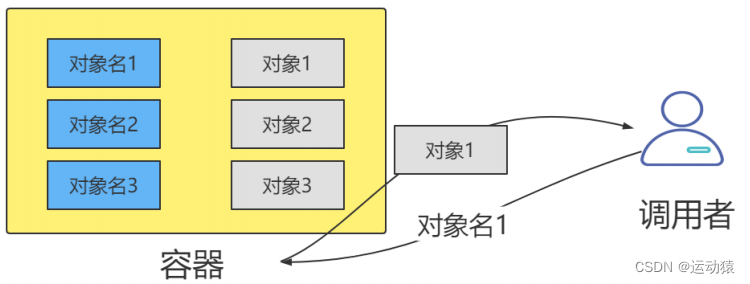
接下来我们通过一段代码模拟 IOC 思想。创建一个集合容器,先将对象创建出来放到容器中,需要使用对象时,只需要从容器中获取对象即可,而不需要重新创建,此时容器就是对象的管理者。
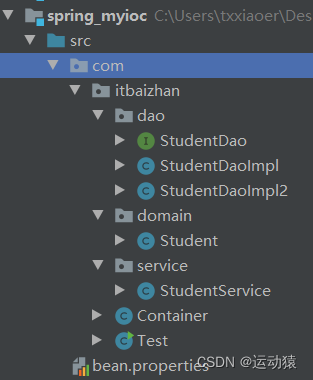
1.创建实体类
public class Student {private int id;private String name;private String address;// 省略getter/setter/构造方法/tostring}
2.创建Dao接口和实现类
public interface StudentDao {// 根据id查询学生Student findById(int id);}public class StudentDaoImpl implements StudentDao{@Overridepublic Student findById(int id) {// 模拟从数据库查找出学生return new Student(1,"百战程序员","北京");}}public class StudentDaoImpl2 implements StudentDao{@Overridepublic Student findById(int id) {// 模拟根据id查询学生System.out.println("新方法!!!");return new Student(1,"百战程序员","北京");}}
3.创建配置文件bean.properties,该文件中定义管理的对象
studentDao=com.itbaizhan.dao.StudentDaoImpl
4.创建容器管理类,该类在类加载时读取配置文件,将配置文件中配置的对象全部创建并放入容器中。
//容器类,负责管理对象,在类加载时读取配置文件并创建对象public class Container {static Map<String,Object> map = new HashMap();// 读取配置文件并创建对象static {InputStream is = Container.class.getClassLoader().getResourceAsStream("bean.properties");Properties properties = new Properties();try{properties.load(is);}catch (IOException e) {e.printStackTrace();}// 遍历配置文件中的所有对象Enumeration<Object> keys = properties.keys();while (keys.hasMoreElements()){String key = keys.nextElement().toString();String value = properties.getProperty(key);// 创建对象try {Object o = Class.forName(value).newInstance();// 把对象放入集合当中map.put(key,o);} catch (InstantiationException e) {e.printStackTrace();} catch (IllegalAccessException e) {e.printStackTrace();} catch (ClassNotFoundException e) {e.printStackTrace();}}}// 从容器中获取对象public static Object getBean(String key){return map.get(key);}}
5.创建Dao对象的调用者StudentService
public class StudentService {public Student findStudentById(int id){// 从容器中获取对象StudentDao studentDao = (StudentDao) Container.getBean("studentDao");System.out.println(studentDao.hashCode());return studentDao.findById(id);}}
6.测试StudentService
public class Test {public static void main(String[] args) {StudentService studentService = (StudentService) Container.getBean("studentService");System.out.println(studentService.findStudentById(1));System.out.println(studentService.findStudentById(1));}}
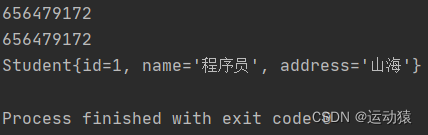
7.测试结果
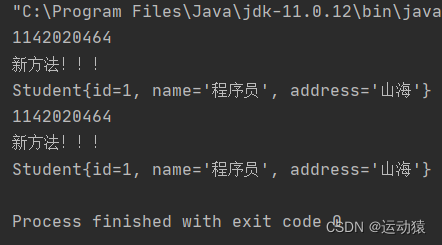
8.测试结论:
(1)StudentService从容器中每次拿到的都是同一个StudentDao对象,节约了资源。
studentDao=com.itbaizhan.dao.StudentDaoImpl2(2)如果想使用StudentDaoImpl2 对象,只需要修改bean.properties的内容即可,无需修改Java 源码。
(3)在IOC思想中,将创建好的对象保存到“容器中”
三、SpringIOC_Spring实现IOC
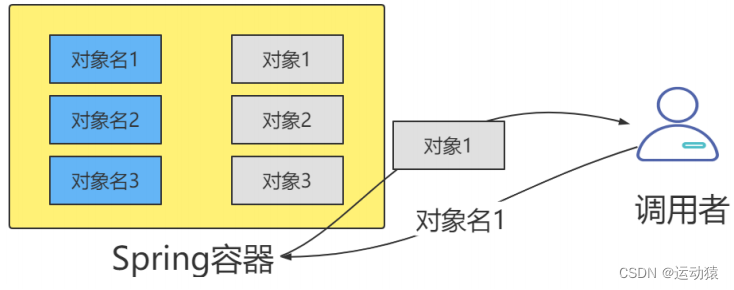
接下来我们使用Spring实现IOC,Spring内部也有一个容器用来管理对象。
1.创建Maven工程,引入依赖
<dependencies><!--spring核心模块--><dependency><groupId>org.springframework</groupId><artifactId>spring-context</artifactId><version>5.3.13</version></dependency><!--junit--><dependency><groupId>junit</groupId><artifactId>junit</artifactId><version>4.12</version><scope>test</scope></dependency></dependencies>
2.创建POJO类、Dao类和接口
public class Student {private int id;private String name;private String address;// 省略getter/setter/构造方法/tostring}public interface StudentDao {// 根据id查询学生Student findById(int id);}public class StudentDaoImpl implements StudentDao{@Overridepublic Student findById(int id) {// 模拟从数据库查找出学生return new Student(1,"百战程序员","北京");}}
3.编写xml配置文件,配置文件中配置需要Spring帮我们创建的对象
<?xml version="1.0" encoding="UTF-8"?><beans xmlns="http://www.springframework.org/schema/beans"xmlns:xsi="http://www.w3.org/2001/XMLSchema-instance"xsi:schemaLocation="http://www.springframework.org/schema/beanshttp://www.springframework.org/schema/beans/spring-beans.xsd"><!--配置spring对象容器 id:为对象起名字 class:传入要配置的类对象的全类名 --><bean id="studentDao" class="com.itbaizhan.dao.StudentDaoImpl"></bean></beans>
4.测试从Spring容器中获取对象
public class TestContainer {@Testpublic void t1(){// 创建Spring容器/*** ApplicationContext:容器接口* ClassPathXmlApplicationContext:容器接口实现类,该类可以从项目中读取配置文件,传入相对路径* FileSystemXmlApplicationContext:容器接口实现类,该类从磁盘中读取配置文件,传入绝对路径*/ApplicationContext ac = new ClassPathXmlApplicationContext("bean.xml");// ApplicationContext ac = new FileSystemXmlApplicationContext("C:\\Users\\txxiaoer\\Desktop\\SSM框架Demo\\springdemo\\spring_ioc1\\src\\main\\resources\\bean.xml");// 从容器中获取对象StudentDao studentDao1 = (StudentDao) ac.getBean("studentDao");StudentDao studentDao2 = (StudentDao) ac.getBean("studentDao");System.out.println(studentDao1.hashCode());System.out.println(studentDao2.hashCode());System.out.println(studentDao1.findById(1));}}
5.测试结果
6.知识点整理:
(1)创建的studentDao1和studentDao2两个对象是同一个对象,并可以调用方法。
(2)Spring配置文件中,通过配置标签“
”配置容器中的对象 。(3)Spring配置文件中,
标签的 属性为配置“对象名”, 属性可以配置“对象类型”。
四、SpringIOC_Spring容器类型
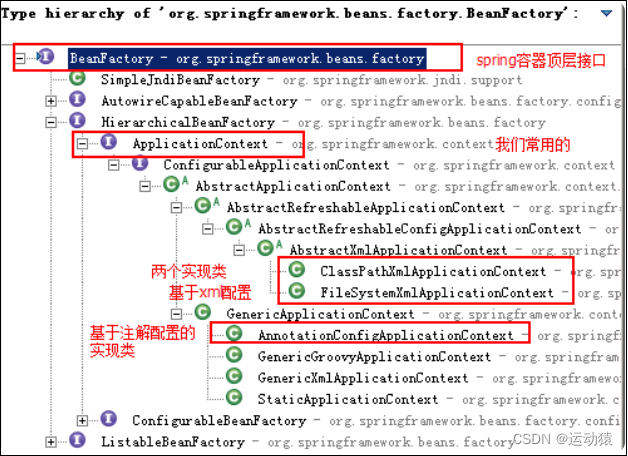
1.容器接口(BeanFactory、ApplicationContext)
(1)BeanFactory:BeanFactory是Spring容器中的顶层接口,它可以对Bean对象进行管理。
(2)ApplicationContext:ApplicationContext是BeanFactory的子接口。它除了继承BeanFactory的所有功能外,还添加了对国际化、资源访问、事件传播等方面的良好支持。(一般ApplicationContext用的比较多)
2.ApplicationContext有以下三个常用实现类:
(1) ClassPathXmlApplicationContext:该类可以从项目中读取配置文件,传入想对路径
(2) FileSystemXmlApplicationContext:该类可以从磁盘中读取配置文件,传入绝对路径
(3) AnnotationConfigApplicationContext:使用该类不读取配置文件,而是会读取注解
3.代码演示如:
public class TestContainer {@Testpublic void t1(){// 创建Spring容器/*** ApplicationContext:容器接口* ClassPathXmlApplicationContext:容器接口实现类,该类可以从项目中读取配置文件,传入相对路径* FileSystemXmlApplicationContext:容器接口实现类,该类从磁盘中读取配置文件,传入绝对路径*/ApplicationContext ac = new ClassPathXmlApplicationContext("bean.xml");// ApplicationContext ac = new FileSystemXmlApplicationContext("C:\\Users\\txxiaoer\\Desktop\\SSM框架Demo\\springdemo\\spring_ioc1\\src\\main\\resources\\bean.xml");// 从容器中获取对象StudentDao studentDao1 = (StudentDao) ac.getBean("studentDao");StudentDao studentDao2 = (StudentDao) ac.getBean("studentDao");System.out.println(studentDao1.hashCode());System.out.println(studentDao2.hashCode());System.out.println(studentDao1.findById(1));}}
五、SpringIOC_对象的创建方式
Spring 会帮助我们创建 bean ,那么它底层是调用什么方法进行创建的呢?
1.使用无参构造方法
Spring默认使用类的空参构造方法创建bean:
// 假如类没有空参构造方法,将无法完成bean的创建public class StudentDaoImpl implements StudentDao{// 设置一个有参的构造方法,默认去除了无参的构造方法public StudentDaoImpl(int a){}@Overridepublic Student findById(int id) {// 模拟根据id查询学生return new Student(1,"百战程序员","北 京");}}

如上,IDEA会报红提示没有无参构造方法,不能通过编译。
2.使用工厂类的普通方法构建对象
Spring 可以调用工厂类的方法创建 bean :
(1)创建工厂类,工厂类提供创建对象的方法:
public class StudentDaoFactory {public StudentDao getStudentDao(){//return new StudentDaoImpl(1):返回StudentDaoImpl对象,利用有参构造方法return new StudentDaoImpl(1);}}
(2)在配置文件中配置创建bean的方式为工厂方式。
<!--2.利用普通工厂构建对象--><!--id:为对象起名字(对象名) class:传入要配置的类对象的全类名 --><bean id="studentDaoFactory" class="com.itbaizhan.dao.StudentDaoFactory"></bean><!--factory-bean:传入上面<bean>标签中<id>的对象名 factory-method:传入StudentFactory类中的方法名(获取对象的那个方法)--><bean id="studentDao" factory-bean="studentDaoFactory" factory-method="getStudentDao"></bean>
3.使用工厂类的静态方法构建对象
Spring 可以调用工厂类的静态方法创建 bean :
1
(1)创建工厂类,工厂提供创建对象的静态方法。
public class StudentDaoFactory2 {public static StudentDao getStudentDao(){return new StudentDaoImpl(1);}}
(2)在配置文件中配置创建bean的方式为工厂静态方法。
<!--3.利用静态工厂构建对象--><!--id:为对象起名字(对象名) class:传入要配置的类对象的全类名 factory-method:传入工厂类的静态方法名--><bean id="studentDao" class="com.itbaizhan.dao.StudentDaoFactory2" factory-method="getStudentDao"></bean>
4.知识点整理:
(1)Spring不可以使用“有参构造方法”创建bean对象;可以使用“空参构造方法”、“工厂方法”、“静态工厂方法”创建bean对象。
(2)Spring调用工厂类的普通方法创建bean对象需要配置“工厂对象和被创建的对象”
六、SpringIOC_对象的五种创建策略

Spring通过配置
1.singleton:
单例,默认策略。整个项目只会创建一个对象,通过
lazy-init=”false”(默认) :立即创建,在容器启动时会创建配置文件中的所有Bean 对象。
lazy-init=”true” :延迟创建,第一次使用 Bean 对象时才会创建。
(1)配置单例策略:
<!--配置spring对象容器 id:为全类名起名字 class:传入要配置的类的全类名scope:创建策略(singleton:单例,整个项目只创建一个对象 prototype:多例,每次从容器中获取时都会创建对象)lazy-init:false(默认)立即创建 true:第一次使用Bean对象时才会创建--><bean id="studentDao" class="com.itbaizhan.dao.StudentDaoImpl2" scope="singleton" lazy-init="false" ></bean><!-- <bean id="studentDao" class="com.itbaizhan.dao.StudentDaoImpl2"></bean>-->
(2)测试单例策略:
public class StudentDaoImpl2 implements StudentDao{public StudentDaoImpl2(){System.out.println("创建了StudentDao!");}}@Testpublic void t2(){// 创建Spring容器ApplicationContext ac = new ClassPathXmlApplicationContext("bean2.xml");// StudentDao studentDao = new StudentDaoImpl2();等同于下面的创建方式,下面的创建方式是从Spring容器中拿到对象// 从容器中获取对象StudentDao studentDao1 = (StudentDao) ac.getBean("studentDao");StudentDao studentDao2 = (StudentDao) ac.getBean("studentDao");StudentDao studentDao3 = (StudentDao) ac.getBean("studentDao");System.out.println(studentDao1.hashCode());System.out.println(studentDao2.hashCode());System.out.println(studentDao3.hashCode());}
(3)测试结果:
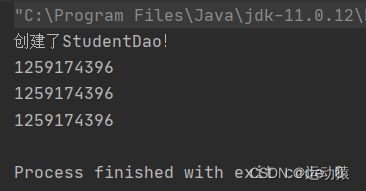
(4)结论:
lazy-init=”false”(默认):立即创建,在容器启动时会创建配置文件中的所有Bean对象。
2.prototype:
多例,每次从容器中获取时都会创建新的对象。
(1)配置多例策略:
<!--配置多例策略--><bean id="studentDao" class="com.itbaizhan.dao.StudentDaoImpl2" scope="prototype" ></bean>
(2)测试多例策略:
@Testpublic void t2(){// 创建Spring容器ApplicationContext ac = new ClassPathXmlApplicationContext("bean2.xml");// StudentDao studentDao = new StudentDaoImpl2();等同于下面的创建方式,下面的创建方式是从Spring容器中拿到对象// 从容器中获取对象StudentDao studentDao1 = (StudentDao) ac.getBean("studentDao");StudentDao studentDao2 = (StudentDao) ac.getBean("studentDao");StudentDao studentDao3 = (StudentDao) ac.getBean("studentDao");System.out.println(studentDao1.hashCode());System.out.println(studentDao2.hashCode());System.out.println(studentDao3.hashCode());}
(3)测试结果:

(4)结论:
每次从容器中获取时都会创建新的对象。
3.request :每次请求创建一个对象,只在 web 环境有效。
4.session :每次会话创建一个对象,只在 web 环境有效。
5.gloabal-session :一次集群环境的会话创建一个对象,只在 web
环境有效。
七、SpringIOC_对象的销毁时机:

对象的创建策略不同,销毁时机也不同:
1.singleton :对象随着容器的销毁而销毁。(因为整个项目中只有一个对象,并且存在容器当中,如果对象被随意地销毁的话,再想获取对象就获取不到了,所以正常情况下单例的对象不会销毁,只会随着容器的销毁而销毁)
2.prototype :使用 JAVA 垃圾回收机制销毁对象。(每次获取对象时都会创建新的对象,不存在容器当中,不然容器中要存很多这种对象。所以多例对象也不由Spring来销毁,因为太多了,所以直接使用Java的垃圾回收机制销毁对象,什么时候对象没用了就将其销毁。)
3.request :当处理请求结束, bean 实例将被销毁。
4.session :当 HTTP Session 最终被废弃的时候, bean 也会被销毁掉。
5.gloabal-session :集群环境下的 session 销毁, bean 实例也将被销毁。
八、SpringIOC_声明周期方法
Bean对象的生命周期包含创建——使用——销毁,Spring可以配置Bean对象在创建和销毁时自动执行的方法:
1.定义声明周期方法
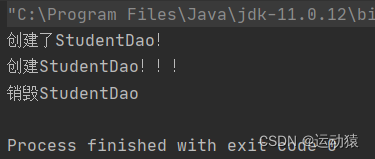
public class StudentDaoImpl2 implements StudentDao{//创建时自动执行的方法public void init(){System.out.println("创建StudentDao!!!");}//销毁时自动执行的方法public void destroy(){System.out.println("销毁StudentDao");}// 构造方法在创建对象的时候被调用public StudentDaoImpl2(){System.out.println("创建了StudentDao!");}}
2.配置声明周期方法
<!--init-method:创建时执行的方法,一般放一些资源(传入方法名)destroy-method:销毁时执行的方法,一般关闭一些资源(传入方法名) --><bean id="studentDao" class="com.itbaizhan.dao.StudentDaoImpl2" scope="singleton"init-method="init" destroy-method="destroy" ></bean>
3.测试方法
@Testpublic void t3(){// 创建Spring容器ClassPathXmlApplicationContext ac = new ClassPathXmlApplicationContext("bean2.xml");// 销毁Spring容器,// ClassPathXmlApplicationContext才有销毁容器的方法,ApplicationContext引用没有销毁容器的方法ac.close();}
4.测试结果
5.知识点整理:
(1)在Spring中,
中配置“init-method ”属性可以定义创建对象时执行的方法,一般放入一些资源 (2)在Spring中,
中配置“destroy-method ”属性可以定义销毁对象时执行的方法,一般放入一些资源关闭
九、SpringIOC_获取Bean对象的方式
Spring 有多种获取容器中对象的方式:
1.通过id/name获取
(1)配置文件
<bean name="studentDao" class="com.itbaizhan.dao.StudentDaoImpl2"></bean><bean id="studentDao" class="com.itbaizhan.dao.StudentDaoImpl2"></bean>
(2)获取对象
StudentDao studentDao = (StudentDao) ac.getBean("studentDao");
2.通过类型获取
(1)配置文件
<bean name="studentDao" class="com.itbaizhan.dao.StudentDaoImpl2"></bean>
(2)获取对象
StudentDao studentDao2 = ac.getBean(StudentDao.class);
3.通过 id/name+类型 获取
虽然使用类型获取不需要强转,但如果在容器中有一个接口的多个实现类对象,则获取时会报错,此时需要使用类型+id/name 获取:
(1)配置文件
<bean name="studentDao" class="com.itbaizhan.dao.StudentDaoImpl2"></bean><bean name="studentDao1" class="com.itbaizhan.dao.StudentDaoImpl"></bean>
(2)获取对象
//传入id/name属性值+类型StudentDao studentDao2 = ac.getBean("studentDao",StudentDao.class);
4.整体代码段:
(1)配置文件:
<bean name="studentDao" class="com.itbaizhan.dao.StudentDaoImpl2"></bean><bean name="studentDao1" class="com.itbaizhan.dao.StudentDaoImpl"></bean>
(2)测试方法中获取对象
@Testpublic void t4(){// 创建Spring容器ApplicationContext ac = new ClassPathXmlApplicationContext("bean2.xml");// 第一种方式:根据name获取对象(需要进行类型强转)StudentDao studentDao1 = (StudentDao) ac.getBean("studentDao");System.out.println(studentDao1);// 第二种方式:根据类型获取对象(不需要进行类型强转,因为传入的就是确切的类型)// 这种方式有个问题:整个容器中同类型对象有可能有多个,这种情况就很难分辨了。// 如:StudentDao接口有多个实现类,这时就无法分辨具体要创建哪个实现类的对象了StudentDao studentDao2 = ac.getBean(StudentDao.class);System.out.println(studentDao2);// 第三种方式:根据name/id+类型获取对象StudentDao studentDao3 = ac.getBean("studentDao",StudentDao.class);System.out.println(studentDao3);}


![java工程师进阶JVM[1]-Java内存结构](https://image.dandelioncloud.cn/images/20221123/51fce8e20e194db0ae600618ec5ff1d3.png "java工程师进阶JVM[1]-Java内存结构")


还没有评论,来说两句吧...