如何利用Mybatis-Plus自动生成代码(超详细注解)
如何利用Mybatis-Plus自动生成代码(超详细注解)
- 1、简介
- 2、代码生成器
- 3、详细使用教程
- 3.1 两个mysql数据库:
- 3.2 创建springboot项目
- 3.3 添加依赖
- 3.5 编辑application.yml文件
- 3.6 主启动类
- 4、运行
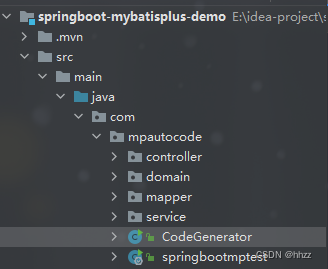
- 4.1 项目最终结构
- 4.2 运行代码生成器类
- 4.3 测试运行controller
1、简介
MyBatis-Plus (opens new window)(简称 MP)是一个 MyBatis (opens new window)的增强工具,在 MyBatis 的基础上只做增强不做改变,为简化开发、提高效率而生。
特性
- 无侵入:只做增强不做改变,引入它不会对现有工程产生影响,如丝般顺滑
- 损耗小:启动即会自动注入基本 CURD,性能基本无损耗,直接面向对象操作
- 强大的 CRUD 操作:内置通用 Mapper、通用 Service,仅仅通过少量配置即可实现单表大部分 CRUD 操作,更有强大的条件构造器,满足各类使用需求
- 支持 Lambda 形式调用:通过 Lambda 表达式,方便的编写各类查询条件,无需再担心字段写错
- 支持主键自动生成:支持多达 4 种主键策略(内含分布式唯一 ID 生成器 - Sequence),可自由配置,完美解决主键问题
- 支持 ActiveRecord 模式:支持 ActiveRecord 形式调用,实体类只需继承 Model 类即可进行强大的 CRUD 操作
- 支持自定义全局通用操作:支持全局通用方法注入( Write once, use anywhere )
- 内置代码生成器:采用代码或者 Maven 插件可快速生成 Mapper 、 Model 、 Service 、 Controller 层代码,支持模板引擎,更有超多自定义配置等您来使用
- 内置分页插件:基于 MyBatis 物理分页,开发者无需关心具体操作,配置好插件之后,写分页等同于普通 List 查询
- 分页插件支持多种数据库:支持 MySQL、MariaDB、Oracle、DB2、H2、HSQL、SQLite、Postgre、SQLServer 等多种数据库
内置性能分析插件:可输出 SQL 语句以及其执行时间,建议开发测试时启用该功能,能快速揪出慢查询
内置全局拦截插件:提供全表 delete 、 update 操作智能分析阻断,也可自定义拦截规则,预防误操作
支持数据库
任何能使用 MyBatis 进行 CRUD, 并且支持标准 SQL 的数据库,具体支持情况如下,如果不在下列表查看分页部分教程 PR 您的支持。
MySQL,Oracle,DB2,H2,HSQL,SQLite,PostgreSQL,SQLServer,Phoenix,Gauss
,ClickHouse,Sybase,OceanBase,Firebird,Cubrid,Goldilocks,csiidb,informix,TDengine,redshift达梦数据库,虚谷数据库,人大金仓数据库,南大通用(华库)数据库,南大通用数据库,神通数据库,瀚高数据库,优炫数据库
2、代码生成器
AutoGenerator 是 MyBatis-Plus 的代码生成器,通过 AutoGenerator 可以快速生成 Entity、Mapper、Mapper XML、Service、Controller 等各个模块的代码,极大的提升了开发效率。
/*** <p>* mysql 代码生成器* </p>*/public class CodeGenerator {/*** 运行启动*/public static void main(String[] args) {//获取控制台的数据Scanner scanner = new Scanner(System.in);// 代码生成器AutoGenerator mpg = new AutoGenerator();//~~~~~~~~~~~~~~~~~~~~~全局配置~~~~~~~~~~开始~~~~~~~~~GlobalConfig gc = new GlobalConfig();//System.out.println("请输入文件输出目录的模块或者项目的地址:");//String projectPath = scanner.nextLine();String projectPath = System.getProperty("user.dir"); //工程根目录System.out.println(projectPath);gc.setOutputDir(projectPath + "/src/main/java"); //生成文件的输出目录gc.setAuthor("tigerhhzz"); //作者gc.setFileOverride(true); //是否覆蓋已有文件 默认值:falsegc.setOpen(false); //是否打开输出目录 默认值:truegc.setBaseColumnList(true); //开启 baseColumnList 默认falsegc.setBaseResultMap(true); //开启 BaseResultMap 默认false//gc.setEntityName("%sEntity"); //实体命名方式 默认值:null 例如:%sEntity 生成 UserEntitygc.setMapperName("%sMapper"); //mapper 命名方式 默认值:null 例如:%sDao 生成 UserDaogc.setXmlName("%sMapper"); //Mapper xml 命名方式 默认值:null 例如:%sDao 生成 UserDao.xmlgc.setServiceName("%sService"); //service 命名方式 默认值:null 例如:%sBusiness 生成 UserBusinessgc.setServiceImplName("%sServiceImpl"); //service impl 命名方式 默认值:null 例如:%sBusinessImpl 生成 UserBusinessImplgc.setControllerName("%sController"); //controller 命名方式 默认值:null 例如:%sAction 生成 UserActionmpg.setGlobalConfig(gc);//~~~~~~~~~~~~~~~~~~~~~全局配置~~~~~~~~~~结束~~~~~~~~~//~~~~~~~~~~~~~~~~~~~~~数据源配置~~~~~~~~~~开始~~~~~~~~~DataSourceConfig dsc = new DataSourceConfig();dsc.setUrl("jdbc:mysql://localhost:3306/tigervueblog?useUnicode=true&useSSL=false&characterEncoding=utf8");// dsc.setSchemaName("public");dsc.setDriverName("com.mysql.cj.jdbc.Driver");dsc.setUsername("root");dsc.setPassword("123456");mpg.setDataSource(dsc);//~~~~~~~~~~~~~~~~~~~~~数据源配置~~~~~~~~~~结束~~~~~~~~~//~~~~~~~~~~~~~~~~~~~~~包配置~~~~~~~~~~开始~~~~~~~~~PackageConfig pc = new PackageConfig();// pc.setModuleName(scanner("模块名"));// pc.setParent("com.stu");System.out.println("请输入模块名:");String name = scanner.nextLine();//自定义包配置pc.setParent(name);pc.setModuleName(null);pc.setMapper("mapper");pc.setEntity("domain");pc.setService("service");pc.setServiceImpl("service.impl");pc.setController("controller");mpg.setPackageInfo(pc);//~~~~~~~~~~~~~~~~~~~~~包配置~~~~~~~~~~结束~~~~~~~~~//~~~~~~~~~~~~~~~~~~~~~自定义配置~~~~~~~~~~开始~~~~~~~~~InjectionConfig cfg = new InjectionConfig() {@Overridepublic void initMap() {// to do nothing}};List<FileOutConfig> focList = new ArrayList<>();focList.add(new FileOutConfig("/templates/mapper.xml.ftl") {@Overridepublic String outputFile(TableInfo tableInfo) {// 自定义输入文件名称return projectPath + "/src/main/resources/mapper/" + /*pc.getModuleName() + "/" +*/tableInfo.getEntityName() + "Mapper" +StringPool.DOT_XML;}});cfg.setFileOutConfigList(focList);mpg.setCfg(cfg);//~~~~~~~~~~~~~~~~~~~~~自定义配置~~~~~~~~~~结束~~~~~~~~~//这里不自动生成xml,改为自定义生成mpg.setTemplate(new TemplateConfig().setXml(null));//~~~~~~~~~~~~~~~~~~~~~策略配置~~~~~~~~~~开始~~~~~~~~~// 策略配置 数据库表配置,通过该配置,可指定需要生成哪些表或者排除哪些表StrategyConfig strategy = new StrategyConfig();strategy.setNaming(NamingStrategy.underline_to_camel); //表名生成策略strategy.setColumnNaming(NamingStrategy.underline_to_camel);//数据库表字段映射到实体的命名策略, 未指定按照 naming 执行// strategy.setCapitalMode(true); // 全局大写命名 ORACLE 注意// strategy.setTablePrefix("prefix"); //表前缀// strategy.setSuperEntityClass("com.stu.domain"); //自定义继承的Entity类全称,带包名// strategy.setSuperEntityColumns(new String[] { "test_id", "age" }); //自定义实体,公共字段strategy.setEntityLombokModel(true); //【实体】是否为lombok模型(默认 falsestrategy.setRestControllerStyle(true); //生成 @RestController 控制器// strategy.setSuperControllerClass("com.baomidou.ant.common.BaseController"); //自定义继承的Controller类全称,带包名// strategy.setInclude(scanner("表名")); //需要包含的表名,允许正则表达式(与exclude二选一配置)System.out.println("请输入映射的表名(多个表名英文逗号分割):");String tables = scanner.nextLine();String[] num = tables.split(",");strategy.setInclude(num); // 需要生成的表可以多张表// strategy.setExclude(new String[]{"test"}); // 排除生成的表//如果数据库有前缀,生成文件时是否要前缀acl_// strategy.setTablePrefix("bus_");// strategy.setTablePrefix("sys_");strategy.setControllerMappingHyphenStyle(true); //驼峰转连字符strategy.setTablePrefix(pc.getModuleName() + "_"); //是否生成实体时,生成字段注解mpg.setStrategy(strategy);//~~~~~~~~~~~~~~~~~~~~~策略配置~~~~~~~~~~结束~~~~~~~~~//模板引擎配置,使用Freemarker,默认 Velocity 可选模板引擎 Beetl\mpg.setTemplateEngine(new FreemarkerTemplateEngine());mpg.execute();}}
3、详细使用教程
3.1 两个mysql数据库:
m_user脚本:
CREATE TABLE `m_user` (`id` bigint NOT NULL AUTO_INCREMENT COMMENT '自动递增id',`username` varchar(64) CHARACTER SET utf8 COLLATE utf8_general_ci DEFAULT NULL COMMENT '用户名',`avatar` varchar(255) CHARACTER SET utf8 COLLATE utf8_general_ci DEFAULT NULL COMMENT '用户头像',`email` varchar(64) CHARACTER SET utf8 COLLATE utf8_general_ci DEFAULT NULL COMMENT '邮箱地址',`password` varchar(64) CHARACTER SET utf8 COLLATE utf8_general_ci DEFAULT NULL COMMENT '密码',`status` int NOT NULL DEFAULT '0' COMMENT '0代表正常,-1代表被锁定',`created` datetime DEFAULT NULL COMMENT '注册时间',`last_login` datetime DEFAULT NULL COMMENT '最后登录时间',PRIMARY KEY (`id`),KEY `UK_USERNAME` (`username`) USING BTREE) ENGINE=InnoDB AUTO_INCREMENT=14 DEFAULT CHARSET=utf8;
m_blog脚本:
CREATE TABLE `m_blog` (`id` bigint NOT NULL AUTO_INCREMENT,`user_id` bigint NOT NULL,`title` varchar(255) NOT NULL,`description` varchar(255) NOT NULL,`content` longtext,`created` datetime NOT NULL ON UPDATE CURRENT_TIMESTAMP,`status` tinyint DEFAULT NULL,PRIMARY KEY (`id`)) ENGINE=InnoDB AUTO_INCREMENT=31 DEFAULT CHARSET=utf8mb4 COLLATE=utf8mb4_0900_ai_ci;
3.2 创建springboot项目

3.3 添加依赖
MyBatis-Plus 从 3.0.3 之后移除了代码生成器与模板引擎的默认依赖,需要手动添加相关依赖:
项目完整pom文件:(注意版本号)
<?xml version="1.0" encoding="UTF-8"?><project xmlns="http://maven.apache.org/POM/4.0.0" xmlns:xsi="http://www.w3.org/2001/XMLSchema-instance"xsi:schemaLocation="http://maven.apache.org/POM/4.0.0 https://maven.apache.org/xsd/maven-4.0.0.xsd"><modelVersion>4.0.0</modelVersion><parent><groupId>org.springframework.boot</groupId><artifactId>spring-boot-starter-parent</artifactId><version>2.6.6</version><relativePath/> <!-- lookup parent from repository --></parent><groupId>com.tigerhhzz</groupId><artifactId>springboot-mybatisplus-demo</artifactId><version>0.0.1-SNAPSHOT</version><name>springboot-mybatisplus-demo</name><description>Demo project for Spring Boot MP</description><dependencies><dependency><groupId>org.springframework.boot</groupId><artifactId>spring-boot-starter</artifactId></dependency><!-- 包含spirng Mvc ,tomcat的包包含requestMapping restController 等注解 --><dependency><groupId>org.springframework.boot</groupId><artifactId>spring-boot-starter-web</artifactId></dependency><dependency><groupId>org.springframework.boot</groupId><artifactId>spring-boot-starter-test</artifactId><scope>test</scope></dependency><dependency><groupId>org.springframework.boot</groupId><artifactId>spring-boot-starter-actuator</artifactId></dependency><dependency><groupId>org.springframework.boot</groupId><artifactId>spring-boot-starter-aop</artifactId></dependency><!--mysql数据库 --><dependency><groupId>mysql</groupId><artifactId>mysql-connector-java</artifactId><version>8.0.28</version></dependency><!-- druid 连接池 --><!-- <dependency>--><!-- <groupId>com.alibaba</groupId>--><!-- <artifactId>druid</artifactId>--><!-- <version>1.2.8</version>--><!-- </dependency>--><!-- mybatis版本必须与druid版本兼容,否则无法创建DataSource --><dependency><groupId>com.baomidou</groupId><artifactId>mybatis-plus-boot-starter</artifactId><version>3.2.0</version></dependency><!-- 引入freemarker模板引擎供mp生成代码--><dependency><groupId>org.springframework.boot</groupId><artifactId>spring-boot-starter-freemarker</artifactId></dependency><!--mp代码生成器--><dependency><groupId>com.baomidou</groupId><artifactId>mybatis-plus-generator</artifactId><version>3.3.0</version></dependency><!-- hutool工具类--><dependency><groupId>cn.hutool</groupId><artifactId>hutool-all</artifactId><version>5.3.3</version></dependency><!-- lombok注解--><dependency><groupId>org.projectlombok</groupId><artifactId>lombok</artifactId><optional>true</optional></dependency><!-- 日志打印--><dependency><groupId>log4j</groupId><artifactId>log4j</artifactId><version>1.2.12</version></dependency><!-- 单元测试--><dependency><groupId>junit</groupId><artifactId>junit</artifactId><version>4.12</version></dependency></dependencies><build><plugins><plugin><groupId>org.springframework.boot</groupId><artifactId>spring-boot-maven-plugin</artifactId><configuration><excludes><exclude><groupId>org.projectlombok</groupId><artifactId>lombok</artifactId></exclude></excludes></configuration></plugin></plugins></build></project>
3.5 编辑application.yml文件
server:port: 8082servlet:context-path: /spring:datasource:driver-class-name: com.mysql.cj.jdbc.Driver# test-mybatisurl: jdbc:mysql://127.0.0.1:3306/tigervueblog?serverTimezone=Asia/Shanghai&useUnicode=true&characterEncoding=utf-8&zeroDateTimeBehavior=convertToNull&useSSL=false&allowPublicKeyRetrieval=trueusername: rootpassword: 123456jackson:date-format: yyyy-MM-dd HH:mm:sstime-zone: GMT+8serialization:write-dates-as-timestamps: falsemybatis-plus:configuration:map-underscore-to-camel-case: trueauto-mapping-behavior: fulllog-impl: org.apache.ibatis.logging.stdout.StdOutImplmapper-locations: classpath*:mapper/**/*Mapper.xmlglobal-config:# ��ɾ������db-config:# ɾ��ǰlogic-not-delete-value: 1# ɾ����logic-delete-value: 0
3.6 主启动类
package com.mpautocode;import lombok.extern.slf4j.Slf4j;import org.springframework.boot.SpringApplication;import org.springframework.boot.autoconfigure.SpringBootApplication;/*** @author tigerhhzz* @date 2023/4/28 9:16*/@Slf4j@SpringBootApplicationpublic class springbootmptest {public static void main(String[] args) {SpringApplication.run(springbootmptest.class, args);log.info("springbootmptest启动成功~~~~^…^~~~~^…^~~~~~^…^~~~~");}}
4、运行
4.1 项目最终结构
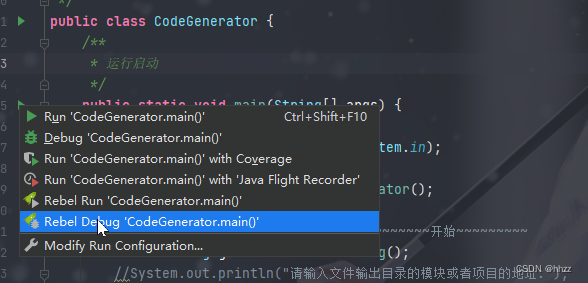
4.2 运行代码生成器类
输入模块名: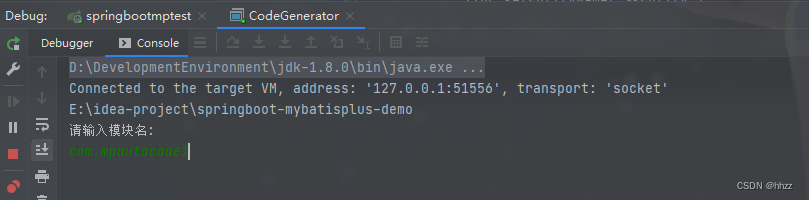
请输入映射的表名(多个表名英文逗号分割):
生成完成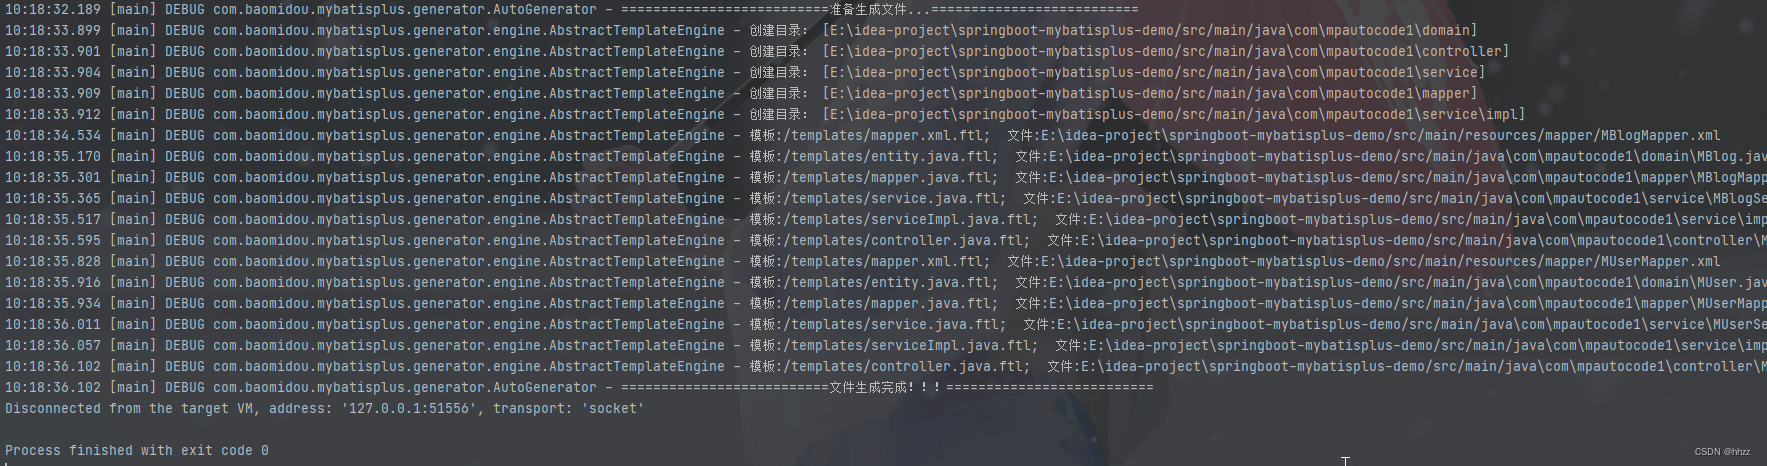
4.3 测试运行controller
在运行主启动类之前,检查在生成好的mapper接口中加入@Mapper注解。
编写一个usercontroller
package com.mpautocode.controller;import com.mpautocode.domain.MUser;import com.mpautocode.service.MUserService;import com.tigerhhzz.springbootmybatisplusdemo.entities.CommonResult;import com.tigerhhzz.springbootmybatisplusdemo.entities.User;import com.tigerhhzz.springbootmybatisplusdemo.service.UserService;import org.springframework.beans.factory.annotation.Autowired;import org.springframework.web.bind.annotation.GetMapping;import org.springframework.web.bind.annotation.RequestMapping;import org.springframework.web.bind.annotation.RestController;import java.util.List;/*** <p>* 前端控制器* </p>** @author tigerhhzz* @since 2023-04-28*/@RestController@RequestMapping("/m-user")public class MUserController {@AutowiredMUserService userService;/*** list(查询所有)* @return*/@GetMapping("/list")public CommonResult list(){// 查询所有List<MUser> list = userService.list();return new CommonResult(200,"查询数据成功",list);}}
运行结果: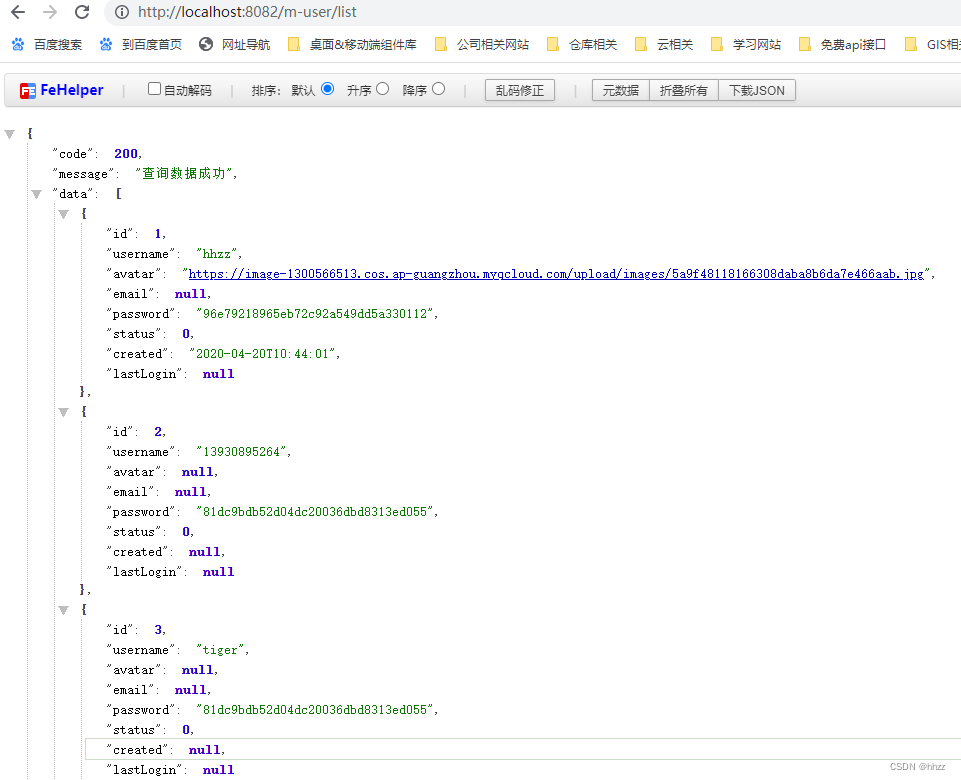


还没有评论,来说两句吧...