vue-03-路由-二三级路由跳转
1、新建项目之后,在 components 文件夹下,新建 about 文件夹
2、引入二级路由,同样的是在main.js 文件下引入,这四个组件都是在 components/about 这个文件夹下,所以路径要写对
//二级路由引入import Contact from './components/about/Contact'import Delivery from './components/about/Delivery'import History from './components/about/History'import OrderingGuide from './components/about/OrderingGuide'
3、配置二级路由,因为二级路由都是在 about.vue 页面显示的,所以应该写在一级路由 about 的内部,在内部添加一个 children 属性,值为一个数组,数组内部存在多个路由对象,对象内部存在 path 、name、component 三个属性
//配置路由const routes = [{ path: '/', name:"indexLink", component: Home },{ path: '/menu', name:"menuLink", component: Menu },{ path: '/login', name:"loginLink", component: Login },{ path: '/register', name:"registerLink", component: Register },{ path: '/admin', name:"adminLink", component: Admin },{ path: '/about', name:"aboutLink", component: About ,children:[{ path: '/about/contact', name:'contactLink' , component: Contact },{ path: './delivery', name:'deliveryLink' , component: Delivery },{ path: './history', name:'historyLink' , component: History },{ path: './orderingGuide', name:'orderingGuideLink' , component: OrderingGuide },]},{ path: '*', redirect: "/menu" },]
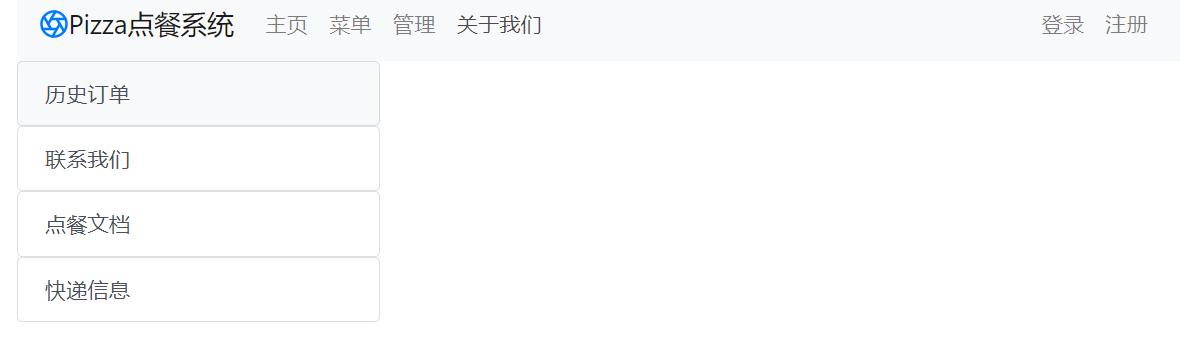
页面效果
4、配置3级路由。若是还存在三级路由,那就找到对应页面,在对应页面路由的内部继续引入,我现在是在联系我们内部引入的,所以新建一个文件夹,用来盛放三级路由
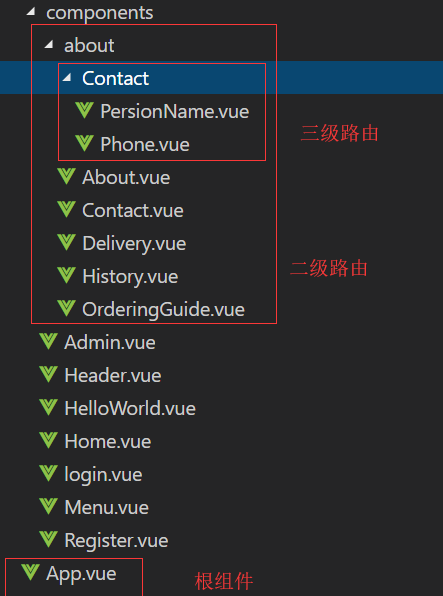
5、 重复上述引入二级路由步骤,引入三级路由,注意路由路径。components文件夹下的一级文件,就是一级路由,
about文件夹下的一级文件,就是二级路由,contact文件夹下的一级文件,就是三级路由
//三级路由引入import Phone from './components/about/Contact/Phone'import PersionName from './components/about/Contact/PersionName'
6、重复上述配置二级路由步骤,配置三级路由
//配置路由const routes = [// 一级路由{ path: '/', name:"indexLink", component: Home },{ path: '/menu', name:"menuLink", component: Menu },{ path: '/login', name:"loginLink", component: Login },{ path: '/register', name:"registerLink", component: Register },{ path: '/admin', name:"adminLink", component: Admin },{ path: '/about', name:"aboutLink", redirect: "/about/contact", component: About ,children:[// 二级路由{ path: '/about/contact', name:'contactLink' ,redirect:"/about/contact/phoneLink", component: Contact ,children:[// 三级路由{ path: '/about/contact/phoneLink',name:"phoneLink", component: Phone },{ path: './persionNameLink',name:"persionNameLink", component: PersionName }]},{ path: './delivery', name:'deliveryLink' , component: Delivery },{ path: './history', name:'historyLink' , component: History },{ path: './orderingGuide', name:'orderingGuideLink' , component: OrderingGuide },]},{ path: '*', redirect: "/menu" },]
7、二级路由页面。点击切换二级路由
<template><div class="row mb-5"><div class="col-4"><!-- 导航 --><div class="list-group mb-5"><router-link tag="li" :to="{name: 'historyLink'}"><a class="list-group-item list-group-item-action">历史订单</a></router-link><router-link tag="li" :to="{name: 'contactLink'}"><a class="list-group-item list-group-item-action">联系我们</a></router-link><router-link tag="li" :to="{name: 'orderingGuideLink'}"><a class="list-group-item list-group-item-action">点餐文档</a></router-link><router-link tag="li" :to="{name: 'deliveryLink'}"><a class="list-group-item list-group-item-action">快递信息</a></router-link></div></div><div class="col-8"><!-- 导航所对应的内容 点击切换对应的二级路由页面 且 展示--><router-view></router-view></div></div></template>
8、三级路由页面。点击切换三级路由
<template><div class="card text-dark bg-light mb-3"><div class="card-header">联系我们</div><div class="card-body"><h4 class="card-title">联系我们</h4><p class="cad-text">3104527996@qq.com</p><div><router-link :to="{name :'phoneLink'}">电话</router-link><router-link :to="{name :'persionNameLink'}">联系人</router-link><!-- 点击上面的 router-link 切换对应三级路由 且 展示--><router-view></router-view></div></div></div></template>
此时,页面已经可以正常切换二级和三级路由了,但是在二级和三级路由中,没有设置默认显示页面,所以在配置 二级 和 三级 路由时设置 redirect 属性,以此来指定显示的二级 和三级 路由, ps:但是,需要注意的是,在一级路由里指定二级路由时,需要是完全一样的路径,其实
path: ‘./delivery’, 和 path: ‘/about/contact’, 两个在页面中显示的路径都是一样的,但是指定的时候必须要写成 path: ‘/about/contact’, 这样的
//配置路由const routes = [{ path: '/', name:"indexLink", component: Home },{ path: '/menu', name:"menuLink", component: Menu },{ path: '/login', name:"loginLink", component: Login },{ path: '/register', name:"registerLink", component: Register },{ path: '/admin', name:"adminLink", component: Admin },{ path: '/about', name:"aboutLink", redirect: "/about/contact", component: About ,children:[{ path: '/about/contact', name:'contactLink' ,redirect:"/about/contact/phoneLink", component: Contact ,children:[{ path: '/about/contact/phoneLink',name:"phoneLink", component: Phone },{ path: './persionNameLink',name:"persionNameLink", component: PersionName }]},{ path: './delivery', name:'deliveryLink' , component: Delivery },{ path: './history', name:'historyLink' , component: History },{ path: './orderingGuide', name:'orderingGuideLink' , component: OrderingGuide },]},{ path: '*', redirect: "/menu" },]
还有就是,路径配置时,直接写 /about 类似的就是直接在根目录下的,若是写成 ./delivery 类似的,前面加 . 的,就代表是在当前路径下


还没有评论,来说两句吧...