Netty简单源码分析
Netty是基于NIO的一个异步网络框架,它将NIO的selector、channel、buffer封装在底层,提供了一层易于使用的api。
Netty模型结构
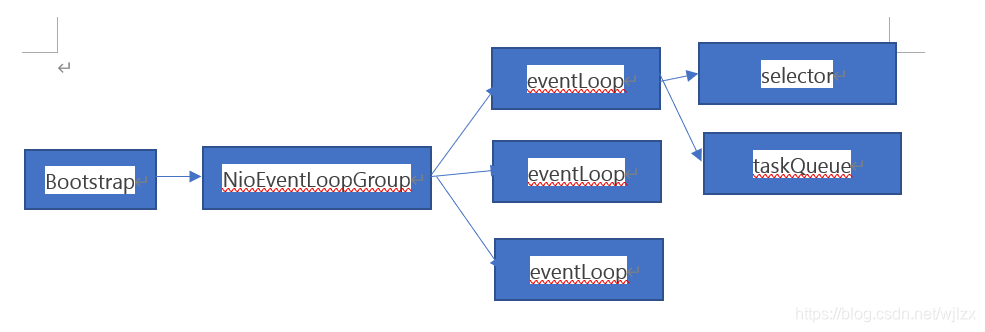
如上图所示,netty的入口是AbstractBootstrap:
- 服务端使用的是ServerBootstrap,接收2个NioEventLoopGroup实例,按照职责划分成boss和work,boss负责处理accept请求,work负责处理read、write请求
- 客户端使用的是Bootstrap,接收一个NioEventLoopGroup实例,负责处理read、write请求
Netty服务的创建和初始化
NioEventLoopGroup里面管理着多个eventLoop,创建NioEventLoopGroup实例时,默认会创建处理器数量的两倍的eventLoop实例,每个eventLoop会维护一个selector和taskQueue,selector即是NIO里面的多路复用器,taskQueue是存放请求任务的队列。
源码如下:
/*MultithreadEventLoopGroup为EventLoopGroup的父类,创建实例时会调用以下方法,其中DEFAULT_EVENT_LOOP_THREADS为处理器数量的两倍*/protected MultithreadEventLoopGroup(int nThreads, Executor executor, Object... args) {super(nThreads == 0 ? DEFAULT_EVENT_LOOP_THREADS : nThreads, executor, args);}protected MultithreadEventExecutorGroup(int nThreads, Executor executor,EventExecutorChooserFactory chooserFactory, Object... args) {if (nThreads <= 0) {throw new IllegalArgumentException(String.format("nThreads: %d (expected: > 0)", nThreads));}if (executor == null) {executor = new ThreadPerTaskExecutor(newDefaultThreadFactory());}children = new EventExecutor[nThreads];//这里遍历了nThreads次,调用了nThreads次newChild方法,创建了nThreads个NioEventLoop实例for (int i = 0; i < nThreads; i ++) {boolean success = false;try {children[i] = newChild(executor, args);success = true;} catch (Exception e) {// TODO: Think about if this is a good exception typethrow new IllegalStateException("failed to create a child event loop", e);} finally {if (!success) {for (int j = 0; j < i; j ++) {children[j].shutdownGracefully();}for (int j = 0; j < i; j ++) {EventExecutor e = children[j];try {while (!e.isTerminated()) {e.awaitTermination(Integer.MAX_VALUE, TimeUnit.SECONDS);}} catch (InterruptedException interrupted) {// Let the caller handle the interruption.Thread.currentThread().interrupt();break;}}}}}chooser = chooserFactory.newChooser(children);final FutureListener<Object> terminationListener = new FutureListener<Object>() {@Overridepublic void operationComplete(Future<Object> future) throws Exception {if (terminatedChildren.incrementAndGet() == children.length) {terminationFuture.setSuccess(null);}}};for (EventExecutor e: children) {e.terminationFuture().addListener(terminationListener);}Set<EventExecutor> childrenSet = new LinkedHashSet<EventExecutor>(children.length);Collections.addAll(childrenSet, children);readonlyChildren = Collections.unmodifiableSet(childrenSet);}//创建NioEventLoop实例protected EventLoop newChild(Executor executor, Object... args) throws Exception {return new NioEventLoop(this, executor, (SelectorProvider) args[0],((SelectStrategyFactory) args[1]).newSelectStrategy(), (RejectedExecutionHandler) args[2]);}
到这里,就已经创建了NIO里的多路复用器selector,接下来就是把channel注册到selector里去,netty的处理有点复杂,我也没有完全摸透,这里简单讲下我的理解(建议去看看狼哥的博客,讲得很详细,以下图片也来源于他的博客)
以ServerBootstrap为例,上图是ServerBootstrap创建的流程,我们重点看下initAndRegister方法:
- 先创建了一个netty对NIO的ServerSocketChannel封装的channel对象
- 通过chooser策略找到EventLoopGroup里的某个EventLoop
- 将channel注册到EventLoop的selector中
AbstractBootStrap的initAndRegister方法源码如下:
final ChannelFuture initAndRegister() {Channel channel = null;try {//这里的channel是netty对NIO的channel自己封装的对象,用于接收Accept请求channel = channelFactory.newChannel();init(channel);} catch (Throwable t) {if (channel != null) {channel.unsafe().closeForcibly();return new DefaultChannelPromise(channel, GlobalEventExecutor.INSTANCE).setFailure(t);}return new DefaultChannelPromise(new FailedChannel(), GlobalEventExecutor.INSTANCE).setFailure(t);}//这里的group就是上面讲到的EventLoopGroupChannelFuture regFuture = config().group().register(channel);if (regFuture.cause() != null) {if (channel.isRegistered()) {channel.close();} else {channel.unsafe().closeForcibly();}}return regFuture;}
MultithreadEventLoopGroup注册源码如下:
//因为EventLoopGroup中维护了多个eventLoop,next方法会调用chooser策略找到下一个eventLoop,并执行eventLoop的register方法注册到eventLoop里的selectorpublic ChannelFuture register(Channel channel) {return next().register(channel);}public EventLoop next() {return (EventLoop) super.next();}public EventExecutor next() {return chooser.next();}
Netty请求响应
如上面所说,netty注册到EventLoop的是自己封装的Channel对象,每个channel内部都会持有一个ChannelPipeline对象,ChannelPipeline的默认实现DefaultChannelPipeline类内部维护了一个ChannelHandlerContext链表,包括一个链表头head和链表尾tail。将channel注册到EventLoop的selector多路复用器之后,当有请求时,EventLoop的处理方式也跟NIO类似:
- EventLoop会根据不同的key类型,调用channel的NioUnsafe对象中不同的方法来处理
- 在NioUnsafe的处理方法中,会遍历Channel里ChannelPipeline的ChannelHandlerContext链表,找到第一个符合要求的hanler类,执行其中的方法。
这里简单说下netty的事件在handler处理链中的传播:
- read事件是靠调用ChannelHandlerContext.fireChannelRead()方法,会往后寻找下个Inboundhandler的channelRead方法,若调用channel或ChannelPipeline的fireChannelRead()方法,则从头开始找下个Inboundhandler;
- writer事件则是靠ChannelHandlerContext.writer()方法,会往前找上一个outboundhandler,若调用channel或ChannelPipeline的writer()方法,则从尾开始找上个outboundhandler。
处理selectKey的源码如下:
private void processSelectedKey(SelectionKey k, AbstractNioChannel ch) {final AbstractNioChannel.NioUnsafe unsafe = ch.unsafe();if (!k.isValid()) {final EventLoop eventLoop;try {eventLoop = ch.eventLoop();} catch (Throwable ignored) {return;}if (eventLoop != this || eventLoop == null) {return;}unsafe.close(unsafe.voidPromise());return;}//根据不同的key类型执行不同处理方法try {int readyOps = k.readyOps();if ((readyOps & SelectionKey.OP_CONNECT) != 0) {int ops = k.interestOps();ops &= ~SelectionKey.OP_CONNECT;k.interestOps(ops);unsafe.finishConnect();}if ((readyOps & SelectionKey.OP_WRITE) != 0) {ch.unsafe().forceFlush();}if ((readyOps & (SelectionKey.OP_READ | SelectionKey.OP_ACCEPT)) != 0 || readyOps == 0) {unsafe.read();}} catch (CancelledKeyException ignored) {unsafe.close(unsafe.voidPromise());}}
实际的处理链源码如下(这里以read请求为例):
//NioUnsafe的read方法public void read() {//其他操作···//调用pipeline的fireChannelRead和fireChannelReadComplete方法int size = readBuf.size();for (int i = 0; i < size; i ++) {readPending = false;pipeline.fireChannelRead(readBuf.get(i));}readBuf.clear();allocHandle.readComplete();pipeline.fireChannelReadComplete();}//pipeline的fireChannelRead方法public final ChannelPipeline fireChannelRead(Object msg) {//调用ChannelHandlerContext的invokeChannelRead方法AbstractChannelHandlerContext.invokeChannelRead(head, msg);return this;}//ChannelHandlerContext的invokeChannelRead方法static void invokeChannelRead(final AbstractChannelHandlerContext next, Object msg) {final Object m = next.pipeline.touch(ObjectUtil.checkNotNull(msg, "msg"), next);EventExecutor executor = next.executor();if (executor.inEventLoop()) {//这里最终会找到第一个符合条件的handler类,执行里面的channelRead0方法next.invokeChannelRead(m);} else {executor.execute(new Runnable() {@Overridepublic void run() {next.invokeChannelRead(m);}});}}
Netty服务端处理Accept请求
上面已经简单介绍了netty请求响应的过程,但似乎都是EvenLoop处理自己接收到的selectKey的流程,那netty是怎么把不同的请求分配到不同的EvenLoop里的呢,这里要从ServerBootstrap的初始化重新讲起:
- 之前说过,ServerBootstrap初始化时,会创建一个Channel,这个Channel是用于绑定我们指定的端口和接收Accept请求,然后在ServerBootstrap的init()里,会为这个Channel里ChannelPipeline的ChannelHandlerContext链表插入一个ServerBootstrapAcceptor处理类,然后按上面Netty请求响应的逻辑,在接收到Accept请求后,调用ServerBootstrapAcceptor里的channelRead方法
- 在ServerBootstrapAcceptor的channelRead方法里,会找到ServerBootstrap的workGroup(用于处理read、writer请求的group),然后跟之前注册channel的流程一样,通过chooser策略找到workGroup里的某个EventLoop,将这次Accept请求的channel注册到EventLoop的selector里
ServerBootStrap的init方法源码如下:
void init(Channel channel) throws Exception {final Map<ChannelOption<?>, Object> options = options0();synchronized (options) {setChannelOptions(channel, options, logger);}final Map<AttributeKey<?>, Object> attrs = attrs0();synchronized (attrs) {for (Entry<AttributeKey<?>, Object> e: attrs.entrySet()) {@SuppressWarnings("unchecked")AttributeKey<Object> key = (AttributeKey<Object>) e.getKey();channel.attr(key).set(e.getValue());}}ChannelPipeline p = channel.pipeline();final EventLoopGroup currentChildGroup = childGroup;final ChannelHandler currentChildHandler = childHandler;final Entry<ChannelOption<?>, Object>[] currentChildOptions;final Entry<AttributeKey<?>, Object>[] currentChildAttrs;synchronized (childOptions) {currentChildOptions = childOptions.entrySet().toArray(newOptionArray(childOptions.size()));}synchronized (childAttrs) {currentChildAttrs = childAttrs.entrySet().toArray(newAttrArray(childAttrs.size()));}//为ChannelPipeline的handler链表插入ServerBootstrapAcceptor处理类p.addLast(new ChannelInitializer<Channel>() {@Overridepublic void initChannel(final Channel ch) throws Exception {final ChannelPipeline pipeline = ch.pipeline();ChannelHandler handler = config.handler();if (handler != null) {pipeline.addLast(handler);}ch.eventLoop().execute(new Runnable() {@Overridepublic void run() {pipeline.addLast(new ServerBootstrapAcceptor(ch, currentChildGroup, currentChildHandler, currentChildOptions, currentChildAttrs));}});}});}
ServerBootstrapAcceptor的channelRead方法源码如下:
public void channelRead(ChannelHandlerContext ctx, Object msg) {final Channel child = (Channel) msg;child.pipeline().addLast(childHandler);setChannelOptions(child, childOptions, logger);for (Entry<AttributeKey<?>, Object> e: childAttrs) {child.attr((AttributeKey<Object>) e.getKey()).set(e.getValue());}try {//这里的childGroup就是ServerBootStrap的workGroupchildGroup.register(child).addListener(new ChannelFutureListener() {@Overridepublic void operationComplete(ChannelFuture future) throws Exception {if (!future.isSuccess()) {forceClose(child, future.cause());}}});} catch (Throwable t) {forceClose(child, t);}}


![[亲测]java.sql.SQLException: Parameter number X is not an OUT parameter](https://image.dandelioncloud.cn/dist/img/NoSlightly.png "[亲测]java.sql.SQLException: Parameter number X is not an OUT parameter")


还没有评论,来说两句吧...