总线——设备——驱动模型实际应用(点灯)
在之前的输入子系统中,我们了解到分层的概念,可以将原来的一个.c文件分为软件层、硬件层和核心层。而输入子系统帮我们写好了软件层和核心层,我们只需要写硬件层即可。那如果我们不使用系统提供的输入子系统呢?那我们就需要自己编写软件层、硬件层和核心层,也就是我们所说的总线——设备——驱动模型。
总线是虚拟的概念,驱动部分就是较为稳定的代码,不会轻易改变,设备就是硬件相关的代码。
总线、驱动和设备都有专用的结构体。
驱动的结构体: struct platform_driver
设备的结构体: struct platform_device
而总线的结构体在平台驱动的device_driver结构体的bus_type中,如下图所示: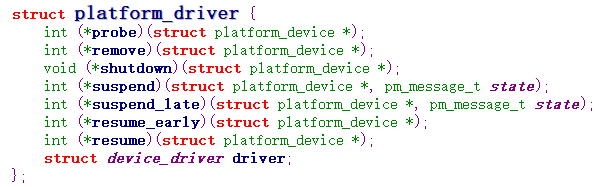


当我们构造好平台驱动结构体,并调用平台驱动注册函数后,驱动的名字就会放入虚拟总线中,也就是bus的结构体中,等待设备和其匹配,当有设备匹配成功,那么就会调用平台驱动中的probe函数,进行一系列操作。
driver.c文件内容
#include <linux/module.h>#include <linux/version.h>#include <linux/init.h>#include <linux/fs.h>#include <linux/interrupt.h>#include <linux/irq.h>#include <linux/sched.h>#include <linux/pm.h>#include <linux/sysctl.h>#include <linux/proc_fs.h>#include <linux/delay.h>#include <linux/platform_device.h>#include <linux/input.h>#include <linux/irq.h>#include <asm/uaccess.h>#include <asm/io.h>static struct class *led_class;static volatile unsigned long *gpio_con;static volatile unsigned long *gpio_dat;static int pin1;static int pin2 ;static int pin3;static int led_open(struct inode *inode, struct file *file){*gpio_con &= ~((3 << (2*pin1)) | (3 << (2*pin2)) | (3 << (2*pin3)));*gpio_con |= ((1 << (2*pin1)) | (1 << (2*pin2)) | (1 << (2*pin3)));return 0;}static void delay(int time){volatile int i = time;while(i--);}static void led_light(void) //流水灯函数{int val = 0;int tmp;int time = 100;*gpio_dat &= ~((1 << pin1) | (1 << pin2) | (1 << pin3));delay(10000000);*gpio_dat |= ((1 << pin1) | (1 << pin2) | (1 << pin3));delay(10000000);while (time--){tmp = ~val;tmp &= 7;*gpio_dat &= ~(7<<4);*gpio_dat |= (tmp<<4);delay(10000000);val++;if (val == 8)val =0;}}static ssize_t led_write(struct file *file, const char __user *buf, size_t count, loff_t * ppos){int val;copy_from_user(&val, buf, count);if (val == 1) {*gpio_dat &= ~(1 << pin1);printk("led is light\n");}else if (val == 2){printk("water lamp\n");led_light();}else {*gpio_dat |= ((1 << pin1) | (1 << pin2) | (1 << pin3));printk("led is unlight");}return 0;}static struct file_operations led_ops = {//注册file_operations结构体,便于上层应用进行调用.owner = THIS_MODULE,.open = led_open,.write = led_write,};int major;static int led_probe(struct platform_device *pdev) //构造probe函数,当驱动和设备匹配后就会调用probe函数{printk("led device is connected\n");struct resource *res;res = platform_get_resource(pdev, IORESOURCE_MEM, 0); //获取设备资源gpio_con = ioremap(res->start, res->end - res->start + 1); //进行io映射gpio_dat = gpio_con + 1;res = platform_get_resource(pdev, IORESOURCE_IRQ, 0);pin1 = res->start;pin2 = pin1 + 1;pin3 = pin1 + 2;major = register_chrdev(0, "myled", &led_ops);led_class = class_create(THIS_MODULE, "myled"); //创建类和设备class_device_create(led_class, NULL, MKDEV(major, 0), NULL, "led"); //在linux系统上就会显示为 /dev/led文件return 0;}static int led_remove(struct platform_device *pdev){printk("led is remove\n");class_device_destroy(led_class, MKDEV(major, 0));class_destroy(led_class);unregister_chrdev(major, "myled");iounmap(gpio_con);return 0;}static struct platform_driver led_drv = {.probe = led_probe,.remove = led_remove,.driver = {.name = "myled",},};static void led_dev_init(void){platform_driver_register(&led_drv); //注册平台驱动}static void led_dev_exit(void){platform_driver_unregister(&led_drv);}module_init(led_dev_init);module_exit(led_dev_exit);MODULE_LICENSE("GPL");
device.c内容,硬件方面的,便于改动
#include <linux/module.h>#include <linux/version.h>#include <linux/init.h>#include <linux/kernel.h>#include <linux/types.h>#include <linux/interrupt.h>#include <linux/list.h>#include <linux/timer.h>#include <linux/init.h>#include <linux/serial_core.h>#include <linux/platform_device.h>static struct resource led_resource[] = {[0] = {.start = 0x56000050,.end = 0x56000050 + 8 - 1,.flags = IORESOURCE_MEM,},[1] = {.start = 4,.end = 4,.flags = IORESOURCE_IRQ,},};static void led_release(void){}static struct platform_device led_dev = {.name = "myled",.id = -1,.num_resources = ARRAY_SIZE(led_resource),.resource = led_resource,.dev = {.release = led_release,},};static void led_dev_init(void){platform_device_register(&led_dev);}static void led_dev_exit(void){platform_device_unregister(&led_dev);}module_init(led_dev_init);module_exit(led_dev_exit);MODULE_LICENSE("GPL");
应用层内容 test.c
#include <sys/types.h>#include <sys/stat.h>#include <fcntl.h>#include <stdio.h>int main(int argc, char **argv){int fd;int val = 0;if ((fd=open("/dev/led", O_RDWR)) < 0) {//打开设备,实际上调用的是驱动中的led_open函数printf("can't open /dev/led\n");}if (strcmp("on", argv[1]) == 0) {//根据输入的不同内容变换点灯方式val = 1;}else if (strcmp("water", argv[1]) == 0) {val = 2;}else {val = 3;}printf("val = %d\n", val);write(fd, &val, 4);return 0;}


")


还没有评论,来说两句吧...