Android高级UI组件
Android高级UI组件
- 进度条类组件
- 图像类组件
- 列表类组件
- 通用组件
一、进度条
用ProgressBar来标记。
1.Andorid提供了水平进度条、圆形进度条,不加设置默认为圆形进度条。
想展示实时进度:使用水平进度条
只想显示在加载:圆形进度条
2.属性:
①style来修改进度条的样式:特别注意无前缀andorid
style的属性值:
?android:attr/progressBarStyleHorizontal,细水平长条进度条
?android:attr/progressBarStyleSmall,小圆形进度条
?android:attr/progressBarStyleLarge,大圆形进度条
@android:style/Widget.ProgressBar.Horizontal,粗水平长条进度条
@android:style/Widget.ProgressBar.Large,旋转画面的大圆形进度条
@android:style/Widget.ProgressBar.Small,旋转画面的小圆形进度条
②android:max,设置最大值,属性值可为具体数值。
③android:progress,设置当前进度,属性值为具体数值
3.事件监听器
实现进度条的实时改变:需创建线程,在线程中循环获取耗时的进度,并更新进度。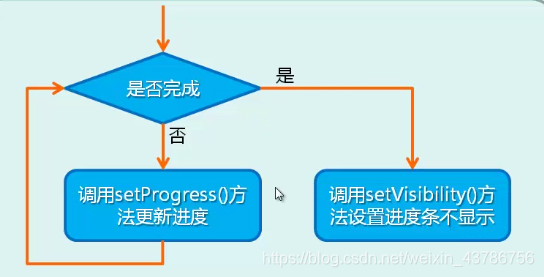
在Android中不支持在主线程中更新UI组件,可以实例化一个Handler对象,即消息处理对象,通过发送消息来更新UI组件。、
对于耗时操作可通过一个线程来模拟
progressBar= (ProgressBar) findViewById(R.id.pg);//消息处理mHandler=new Handler() {@Overridepublic void handleMessage(Message msg) {if(msg.what==0x111){progressBar.setProgress(mProgress);}else{Toast.makeText(MainActivity.this, "耗时操作已完成", Toast.LENGTH_SHORT).show();progressBar.setVisibility(View.GONE);}}};//创建一个线程,模拟耗时操作new Thread(new Runnable() {@Overridepublic void run() {while(true){mProgress=doWork();Message m=new Message();if(mProgress<100){m.what=0x111;//耗时操作未完成,为自定义代码,一般以0x开头mHandler.sendMessage(m);}else{m.what=0x110;//耗时操作已完成mHandler.sendMessage(m);break;}}}private int doWork(){mProgress+=Math.random()*10;try {Thread.sleep(200);} catch (InterruptedException e) {e.printStackTrace();}return mProgress;}}).start();//开始线程}
二、拖动条
1.用SeekBar来标记。
2.为进度条的子类,具有进度条拥有的属性。
3.属性:
①android:thumb,修改拖动条的小点,属性值可为图片资源
②android:max,设置最大值,属性值可为具体数值。
③android:progress,设置当前进度,属性值为具体数值
三、星级评分条
用RatingBar标记,默认星星为灰色的
1.属性
①android:numStars,设置评分条的星星个数
②android:rating,属性值为数值,设置初始点亮个数
③android:stepSize,设置最小点亮星数。
④android:isIndicator,属性值为布尔类型,为true时,评分条只能看不能改
四、图像视图
用来显示图片,用ImageView来添加。
为图像组件,属性:
①android:src,显示图片
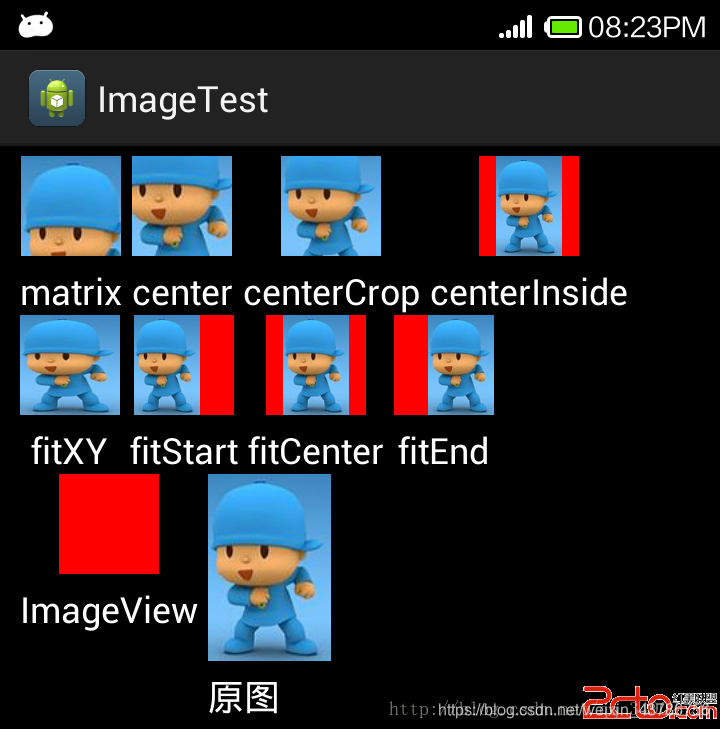
②设置缩放方式
android:scaleType=“fitXY” //把图片按照指定的大小在ImageView中显示,拉伸显示图片,不保持原比例,填满ImageView.
android:scaleType=“fitStart”//把原图按照比例放大缩小到ImageView的高度,显示在ImageView的start(前部/上部)
…
③设置最大宽度、高度:
android:adjustViewBounds=“true”//可设置最大高度,宽度…
android:maxWidth=“100dp”
android:maxHeight=“100dp”
④设置图片着色
android:tint,
扩展:只允许横屏模式,则在manifests的activity后添加android:screenOrientation="landscape">
五、图像切换器
实现带动画效果的图片切换功能。
使用ImageSwitcher来添加。
设置初始图片:
imageSwitcher.setFactory(new ViewSwitcher.ViewFactory() {@Overridepublic View makeView() {//创建一个图片对象ImageView imageView=new ImageView(MainActivity.this);//给该对象设置图片imageView.setImageResource(arrayPicture[index]);return imageView;}});
使用Java代码来实现切换动画效果
ImageSwitcher imageSwitcher;imageSwitcher.setOutAnimation(AnimationUtils.loadAnimation(MainActivity.this,android.R.anim.fade_out));//设置淡出
六、网格视图
按行列分布方式显示多个组件
用GridView添加网格视图。
要显示图片,要设置一个适配器(Adapter),适配器:连接后端数据与前端显示的接口,是数据和UI组件中的重要纽带。要添加适配器,要在Java文件中写代码
四个常用适配器:
ArrayAdapter,数组适配器,将数组的多个值包装成列表项,只能显示一行文字。
SmipleAdapter,把List的多个值包装成多个列表项。
SmipleCursorAdapter,将数据库的内容以列表的形式展示出来。
BaseAdapter,对各个列表项进行最大限度的定制。
属性:
android:numColumns,设置列数,属性值为数值或auto_fit(自动排列)。
**MainActivity.java**package com.mingrisoft.qqal;import android.content.Context;import android.support.v7.app.ActionBarActivity;import android.os.Bundle;import android.view.View;import android.view.ViewGroup;import android.widget.BaseAdapter;import android.widget.GridView;import android.widget.ImageButton;import android.widget.ImageView;public class MainActivity extends ActionBarActivity {//放置图片资源id的int数组。private int[] picture=new int[]{R.drawable.t1,R.drawable.t2,R.drawable.t3,R.drawable.t4,R.drawable.t5,R.drawable.t6,R.drawable.t7,R.drawable.t8,R.drawable.t9};@Overrideprotected void onCreate(Bundle savedInstanceState) {super.onCreate(savedInstanceState);setContentView(R.layout.activity_main);//获取网格视图GridView gridView= (GridView) findViewById(R.id.gridview);//将适配器加入到网格视图中gridView.setAdapter(new ImageAdpter(this));}//自定义一个适配器,继承自BaseAdapterpublic class ImageAdpter extends BaseAdapter{//上下文对象private Context mContext;public ImageAdpter(Context c){mContext=c;}@Overridepublic int getCount() {return picture.length;}@Overridepublic Object getItem(int i) {return null;}@Overridepublic long getItemId(int i) {return 0;}@Overridepublic View getView(int i, View view, ViewGroup viewGroup) {ImageView imageView;if(view==null){imageView=new ImageView(mContext);//设置大小imageView.setLayoutParams(new GridView.LayoutParams(100,90));//设置显示形式imageView.setScaleType(ImageView.ScaleType.CENTER_CROP);}else{imageView=(ImageView)view;}imageView.setImageResource(picture[i]);return imageView;}}}**layout.xml文件**<?xml version="1.0" encoding="utf-8"?><LinearLayout xmlns:android="http://schemas.android.com/apk/res/android"xmlns:tools="http://schemas.android.com/tools"android:layout_width="match_parent"android:layout_height="match_parent"android:orientation="vertical"android:paddingBottom="@dimen/activity_vertical_margin"android:paddingLeft="@dimen/activity_horizontal_margin"android:paddingRight="@dimen/activity_horizontal_margin"android:paddingTop="@dimen/activity_vertical_margin"tools:context="com.mingrisoft.qqal.MainActivity"><TextViewandroid:layout_width="match_parent"android:layout_height="wrap_content"android:text="2020年2月7日" /><GridViewandroid:id="@+id/gridview"android:layout_width="match_parent"android:layout_height="match_parent"android:numColumns="auto_fit"android:layout_gravity="center"android:verticalSpacing="5dp"android:columnWidth="100dp"></GridView></LinearLayout>
七、下拉列表框
使用Spinner添加
属性:
android:entries,添加下拉列表项,属性值为数组资源。
下拉列表框可使用entries来设置或使用适配器来指定。
一般使用适配器
1、使用适配器:
//字符串数组,数据源String[] ctype=new String[]{ "全部","美术","音乐","体育"};//设置常量(final)数组适配器,内含元素为字符串,第一个参数this为上下文指针// 第二个参数android.R.layout.simple_spinner_item为android提供的外观形式,第三个参数为显示文字final ArrayAdapter<String> adapter=new ArrayAdapter<String>(this,android.R.layout.simple_spinner_item,ctype);//设置下拉菜单样式,android.R.layout.simple_spinner_dropdown_item为android提供的外观样式adapter.setDropDownViewResource(android.R.layout.simple_spinner_dropdown_item);//获取下拉列表框Spinner spinner= (Spinner) findViewById(R.id.spinner);//将ArrayAdapter 添加Spinner 对象中spinner.setAdapter(adapter);//事件监听器,此时为:项目被选择时监听器spinner.setOnItemSelectedListener(new AdapterView.OnItemSelectedListener() {@Overridepublic void onItemSelected(AdapterView<?> adapterView, View view, int i, long l) {//获取选中值,并将其变成字符串。String str = adapterView.getItemAtPosition(i).toString();//输出Toast.makeText(MainActivity.this, str, Toast.LENGTH_LONG).show();}@Overridepublic void onNothingSelected(AdapterView<?> adapterView) {}});}
2、使用entries
android:entries="@array/ctype"//在value中新建一个array.xml<?xml version="1.0" encoding="utf-8"?><resources><string-array name="ctype"><item>全部</item><item>电影/电视</item><item>图书</item><item>唱片</item><item>小事</item><item>用户</item><item>小组</item><item>群聊</item><item>游戏/应用</item><item>活动</item></string-array></resources>
特别注意:在下拉列表中,设置的是选择事件监听器,在列表视图中是点击事件监听器!!
八、列表视图
用ListView来标记。
列表项可使用entries来设置或使用适配器来指定。
使用适配器
//字符串数组String[] ctype=new String[]{ "全部","图书","游戏","电视"};//设置适配器,元素为String、ArrayAdapter<String> adapter=new ArrayAdapter<String>(this,android.R.layout.simple_list_item_1,ctype);//获取列表视图ListView listView= (ListView) findViewById(R.id.listview);//将适配器放入列表视图listView.setAdapter(adapter);listView.setOnItemClickListener(new AdapterView.OnItemClickListener() {@Overridepublic void onItemClick(AdapterView<?> adapterView, View view, int i, long l) {String str=adapterView.getItemAtPosition(i).toString();Toast.makeText(MainActivity.this, str, Toast.LENGTH_SHORT).show();}});
九、滚动视图
使用ScrollView/HorizontalScrollView来添加。
其中,HorizontalScrollView为水平滚动条,ScrollView为竖直滚动条。
特别注意,一个滚动视图中只能添加一个组件,若想放置多个,需用一个布局管理器括起来
添加滚动视图的两种方法:
1、在xml文件中添加
2、在Java文件中添加
在xml中添加
<?xml version="1.0" encoding="utf-8"?><RelativeLayout xmlns:android="http://schemas.android.com/apk/res/android"xmlns:tools="http://schemas.android.com/tools"android:layout_width="match_parent"android:layout_height="match_parent"android:paddingBottom="@dimen/activity_vertical_margin"android:paddingLeft="@dimen/activity_horizontal_margin"android:paddingRight="@dimen/activity_horizontal_margin"android:paddingTop="@dimen/activity_vertical_margin"tools:context="com.mingrisoft.demo.MainActivity"><HorizontalScrollViewandroid:layout_width="match_parent"android:layout_height="wrap_content"><LinearLayoutandroid:layout_width="match_parent"android:layout_height="match_parent"android:orientation="vertical"><TextViewandroid:layout_width="match_parent"android:layout_height="match_parent"android:textSize="50sp"android:text="@string/content"/><TextViewandroid:layout_width="match_parent"android:layout_height="match_parent"android:textSize="50sp"android:text="@string/content"/></LinearLayout></HorizontalScrollView></RelativeLayout>
在Java文件中添加
- 使用构造方法ScrollView(Context c)创建一个滚动式图
- 应用addView()方法添加组件到滚动视图中
- 将滚动视图添加到布局管理器中。
例子如下:
acitivity_main.xml文件
<?xml version="1.0" encoding="utf-8"?><LinearLayout xmlns:android="http://schemas.android.com/apk/res/android"xmlns:tools="http://schemas.android.com/tools"android:id="@+id/ll"android:layout_width="match_parent"android:layout_height="match_parent"android:orientation="vertical"android:paddingBottom="@dimen/activity_vertical_margin"android:paddingLeft="@dimen/activity_horizontal_margin"android:paddingRight="@dimen/activity_horizontal_margin"android:paddingTop="@dimen/activity_vertical_margin"tools:context="com.mingrisoft.javascrollview.MainActivity"></LinearLayout>
Activity_main.java文件
package com.mingrisoft.javascrollview;import android.support.v7.app.ActionBarActivity;import android.os.Bundle;import android.widget.ImageView;import android.widget.LinearLayout;import android.widget.ScrollView;import android.widget.TextView;public class MainActivity extends ActionBarActivity {@Overrideprotected void onCreate(Bundle savedInstanceState) {super.onCreate(savedInstanceState);setContentView(R.layout.activity_main);//获得xml中的根布局管理器LinearLayout ll= (LinearLayout) findViewById(R.id.ll);//创建一个布局管理器对象,用来将两个组件(ImageView和TextView)括起来LinearLayout ll2=new LinearLayout(MainActivity.this);//设置为垂直线性ll2.setOrientation(LinearLayout.VERTICAL);//创建滚动视图ScrollView scrollView=new ScrollView(MainActivity.this);//把滚动视图放入根布局管理器ll.addView(scrollView);//将垂直线性管理器放入根布局管理器scrollView.addView(ll2);//创建图像视图并添加ImageView imageView=new ImageView(MainActivity.this);imageView.setImageResource(R.drawable.tt1);ll2.addView(imageView);//创建文本框并添加TextView textView=new TextView(MainActivity.this);textView.setText(R.string.context);ll2.addView(textView);}}
十、选项卡
多标签页界面
作用:使界面简洁大方,减少窗体个数。
如何添加,使用选项卡?
不能通过具体组件在xml文件中直接添加,需4个步骤。
- 在布局文件中添加TabHost、TabWidget、TabContent组件。前两个在布局文件中有具体标记,后一个需要FrameLayout来实现。
- 编写各标签页的XML布局文件,即有几个标签页就编写几个布局文件,布局文件中的内容即为选项卡中显示的内容。
- 获取并初始化TabHost组件。
- 为TabHost对象添加标签页
实例:

activity_main.xml文件
<?xml version="1.0" encoding="utf-8"?><TabHost xmlns:android="http://schemas.android.com/apk/res/android"xmlns:tools="http://schemas.android.com/tools"android:id="@android:id/tabhost"android:layout_width="match_parent"android:layout_height="match_parent"tools:context="com.mingrisoft.demo2.MainActivity"><!--因为要添加两个组件,所以要用LinearLayout括起来 --><LinearLayoutandroid:layout_width="match_parent"android:layout_height="match_parent"android:orientation="vertical"><!-- id为android预定好的id --><TabWidgetandroid:id="@android:id/tabs"android:layout_width="match_parent"android:layout_height="wrap_content"></TabWidget><!-- TabContent--><FrameLayoutandroid:id="@android:id/tabcontent"android:layout_width="match_parent"android:layout_height="match_parent"></FrameLayout></LinearLayout></TabHost>
设计视图:其中上面的TAB LABEL为添加的TabWeiget,下面为FrameLayout
tab1.xml文件
<?xml version="1.0" encoding="utf-8"?><LinearLayout xmlns:android="http://schemas.android.com/apk/res/android"android:layout_width="match_parent"android:layout_height="match_parent"android:id="@+id/left"android:orientation="vertical"><ImageViewandroid:layout_width="match_parent"android:layout_height="match_parent"android:src="@drawable/s1"/></LinearLayout>
tab2.xml文件
<?xml version="1.0" encoding="utf-8"?><LinearLayout xmlns:android="http://schemas.android.com/apk/res/android"android:layout_width="match_parent"android:layout_height="match_parent"android:id="@+id/right"android:orientation="vertical"><ImageViewandroid:layout_width="match_parent"android:layout_height="match_parent"android:src="@drawable/s2"/></LinearLayout>
MainActivity.java文件
package com.mingrisoft.demo2;import android.support.v7.app.ActionBarActivity;import android.os.Bundle;import android.view.LayoutInflater;import android.widget.TabHost;public class MainActivity extends ActionBarActivity {@Overrideprotected void onCreate(Bundle savedInstanceState) {super.onCreate(savedInstanceState);setContentView(R.layout.activity_main);//获取xml中TabHost对象TabHost tabHost= (TabHost) findViewById(android.R.id.tabhost);//对组件初始化tabHost.setup();//添加2个标签页,需声明并实例化LayoutInflaterLayoutInflater inflater=LayoutInflater.from(this);inflater.inflate(R.layout.tab1,tabHost.getTabContentView());inflater.inflate(R.layout.tab2,tabHost.getTabContentView());//addTab为添加标签页,newTabSpec指定标签页,,setIndicator指定文字,setContent指定内容tabHost.addTab(tabHost.newTabSpec("tab1").setIndicator("文字").setContent(R.id.left));tabHost.addTab(tabHost.newTabSpec("tab2").setIndicator("主题").setContent(R.id.right));}}


还没有评论,来说两句吧...