SpringBoot学习(四)—— springboot快速整合Mybatis组件
SpringBoot学习(一)—— idea 快速搭建 Spring boot 框架
SpringBoot学习(二)—— springboot快速整合spring security组件
SpringBoot学习(三)—— springboot快速整合swagger文档
SpringBoot学习(四)—— springboot快速整合Mybatis组件
SpringBoot学习(五)—— springboot快速整合Druid
SpringBoot学习(六)—— springboot快速整合RabbitMQ
SpringBoot学习(七)—— springboot快速整合Redis
MyBatis
文章目录
- MyBatis
- 简介
- 优点
- 劣势
- 引入mybatis组件
- 代码实战
简介
优点
最大的优点是SQL语句灵活,适合调优情景,业务复杂情景
劣势
最大的劣势是不同数据库之间的迁移
引入mybatis组件
pom.xml中加入
<dependency><groupId>mysql</groupId><artifactId>mysql-connector-java</artifactId></dependency><dependency><groupId>org.mybatis.spring.boot</groupId><artifactId>mybatis-spring-boot-starter</artifactId><version>2.1.1</version></dependency>
application.properties中加入
#dateSourcespring.datasource.driverClassName=com.mysql.cj.jdbc.Driverspring.datasource.url=jdbc:mysql://localhost:3306/test?serverTimezone=UTC&useUnicode=true&characterEncoding=utf8&useSSL=falsespring.datasource.username=rootspring.datasource.password=root# mybatis# 下划线转驼峰开启mybatis.configuration.map-underscore-to-camel-case=true# mapper扫描位置mybatis.mapper-locations=classpath:mapper/*.xml
需要说明的是,我引入的mysql驱动为 com.mysql.cj.jdbc.Driver,而不是 com.mysql.jdbc.Driver。以下是一些参数的说明;
- serverTimezone:该驱动需要指定某时区。
- useUnicode:开启指定编码。
- characterEncoding:指定读取数据库的编码,因为项目采用UTF-8,存取数据库信息时保持一致。
- useSSL:是否建立SSL连接,我显示选的否,因为这要为服务器证书验证提供信任库,暂时没条件。
代码实战
本地的 mysql 版本为 5.7.20。
建表语句
CREATE TABLE USER_INFO(user_id DECIMAL(10) PRIMARY KEY NOT NULL,user_name VARCHAR(20) DEFAULT "" NOT NULL);CREATE UNIQUE INDEX USER_INFO_user_id_uindex ON USER_INFO (user_id);ALTER TABLE USER_INFO COMMENT = '用户基本信息表';
插入数据
INSERT INTO test.user_info (user_id, user_name) VALUES (1, '特朗普');INSERT INTO test.user_info (user_id, user_name) VALUES (2, '唐纳德');
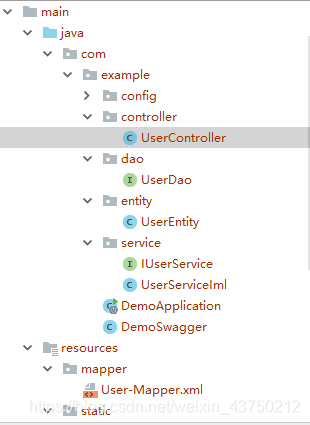
现在的项目路径为
在SpringBoot的入口类中加 @MapperScan 注解,以扫描 DAO 类,不用在每个dao接口加个@Mapper 注解。
package com.example;import org.mybatis.spring.annotation.MapperScan;import org.springframework.boot.SpringApplication;import org.springframework.boot.autoconfigure.SpringBootApplication;@SpringBootApplication@MapperScan("com.example.dao")public class DemoApplication {public static void main(String[] args) {SpringApplication.run(DemoApplication.class, args);}}
注:如果没有分拆项目成微服务架构,或分布式架构,application主类中的@SpringBootApplication自动会扫描本包中的@Controller,@Service,@Resource等,是不需要浪费另一行@ComponentScan注解,配置路径的。
UserController.java
package com.example.controller;import org.springframework.beans.factory.annotation.Autowired;import org.springframework.stereotype.Controller;import org.springframework.web.bind.annotation.RequestMapping;import org.springframework.web.bind.annotation.ResponseBody;import com.example.service.IUserService;@Controller@RequestMapping("user")public class UserController {@Autowiredprivate IUserService userService;@RequestMapping("/queryUser")@ResponseBodyvoid queryUser() {this.userService.queryUser();}}
IUserService.java
package com.example.service;public interface IUserService {void queryUser();}
UserServiceIml.java
package com.example.service;import com.example.dao.UserDao;import com.example.entity.UserEntity;import org.springframework.stereotype.Service;import javax.annotation.Resource;import java.util.List;@Service("userService")public class UserServiceIml implements IUserService {@Resourceprivate UserDao userDao;@Overridepublic void queryUser() {List<UserEntity> userList = this.userDao.queryUser();System.out.println("================");System.out.println(userList);System.out.println("================");}}
注:如果是SSM架构过来的,这个@Resource注解可能比较陌生,因为我估计会和我之前一样用@Autowired,但是我是没有在dao层用 @Repository 注解的,之前用了在主类用了@MapperScan自动去扫描所有的dao,所以不能再用之前的@Autowired。
UserDao.java
package com.example.dao;import com.example.entity.UserEntity;import java.util.List;public interface UserDao {List<UserEntity> queryUser();}
UserEntity.java
package com.example.entity;public class UserEntity {private long userId;private String userName;public long getUserId() {return userId;}public void setUserId(long userId) {this.userId = userId;}public String getUserName() {return userName;}public void setUserName(String userName) {this.userName = userName;}@Overridepublic String toString() {return "UserEntity{" +"userId=" + userId +", userName='" + userName + '\'' +'}';}}
如果你运行不成功,请对比引入的包的版本,和数据库配置是否是根据你本地的,顺便看看注解是否和文中一样。
效果图如下;

注:如果是跟着本教程来的,因为一开始就引入了spring security,而新增的路径不在刚才的权限中,所以我给zs用户改成了皆可访问。如果没有跟着之前配置spring security,无需理会如下内容
//http.authorizeRequests().antMatchers("/user/addUser").hasRole("AAA")http.authorizeRequests().antMatchers("/**").hasRole("AAA")


、methods、watch的区别")


还没有评论,来说两句吧...