SpringBoot学习(二)—— springboot快速整合spring security组件
SpringBoot学习(一)—— idea 快速搭建 Spring boot 框架
SpringBoot学习(二)—— springboot快速整合spring security组件
SpringBoot学习(三)—— springboot快速整合swagger文档
SpringBoot学习(四)—— springboot快速整合Mybatis组件
SpringBoot学习(五)—— springboot快速整合Druid
SpringBoot学习(六)—— springboot快速整合RabbitMQ
SpringBoot学习(七)—— springboot快速整合Redis
Spring Security
简介
spring security的核心功能为认证(Authentication),授权(Authorization),即认证用户是否能访问该系统,和授权用户可以在系统中进行哪些操作。
引入spring security组件
在 pom.xml 中加入
<dependency><groupId>org.springframework.boot</groupId><artifactId>spring-boot-starter-security</artifactId></dependency><dependency><groupId>org.springframework.security</groupId><artifactId>spring-security-test</artifactId><scope>test</scope></dependency>
验证组件是否起到作用,现在不更改框架内的任何内容,启动项目,浏览器中依旧输入 http://localhost:8080 ,可看到如下界面,之前可以直接进入spring boot的初始界面,现在已经看不见了,spring security 导入后默认已经开启了验证,必须先登录验证通过后才能访问。
![\[外链图片转存失败,源站可能有防盗链机制,建议将图片保存下来直接上传(img-4UZ4rXKM-1573807374683)(assets/1573802625147.png)\]](https://img-blog.csdnimg.cn/20191115164334995.png?x-oss-process=image/watermark,type_ZmFuZ3poZW5naGVpdGk,shadow_10,text_aHR0cHM6Ly9ibG9nLmNzZG4ubmV0L3dlaXhpbl80Mzc1MDIxMg==,size_16,color_FFFFFF,t_70)
如果代码中不做任何设置,默认的账户是 user,默认的密码随着项目的启动,会打印在控制台中。
输入账号密码,即可进入默认的初始界面。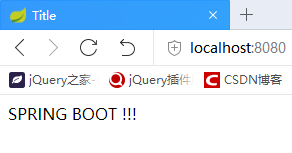
代码实战
为了最快最简单最直接的认识这个组件,直接把用户密码写入内存中,项目启动即存在,避免还有建表,实体类,数据库操作等与之无关的内容。命名使用最为简单粗暴的方式,排除一切干扰,用最少的精力掌握该组件的使用。
新增代码目录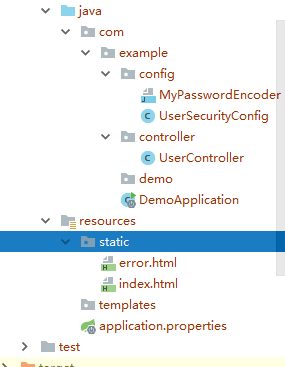
index.html
<!DOCTYPE html><html lang="en"><head><meta charset="UTF-8"><title>Title</title></head><body>SPRING BOOT !!!</body></html>
error.html
<!DOCTYPE html><html lang="en"><head><meta charset="UTF-8"><title>Title</title></head><body>错误</body></html>
UserController
package com.example.controller;import org.springframework.stereotype.Controller;import org.springframework.web.bind.annotation.RequestMapping;import org.springframework.web.bind.annotation.ResponseBody;@Controller@RequestMapping("user")public class UserController {@RequestMapping("/addUser")@ResponseBodyString addUser() {return "这是添加用户!!!";}@RequestMapping("/deleteUser")@ResponseBodyString deleteUser() {return "这是删除用户!!!";}@RequestMapping("/updateUser")@ResponseBodyString updateUser() {return "这是修改用户!!!";}@RequestMapping("/findAllUsers")@ResponseBodyString findAllUsers() {return "这是查询用户!!!";}}
UserSecurityConfig
package com.example.config;import org.springframework.security.config.annotation.authentication.builders.AuthenticationManagerBuilder;import org.springframework.security.config.annotation.web.builders.HttpSecurity;import org.springframework.security.config.annotation.web.configuration.EnableWebSecurity;import org.springframework.security.config.annotation.web.configuration.WebSecurityConfigurerAdapter;//注解开启 Spring Security 安全认证与授权@EnableWebSecuritypublic class UserSecurityConfig extends WebSecurityConfigurerAdapter {//用户认证@Overrideprotected void configure(AuthenticationManagerBuilder auth) throws Exception {//内存里面放着auth.inMemoryAuthentication().passwordEncoder(new MyPasswordEncoder())//添加用户,密码,角色.withUser("zs").password("123456").roles("AAA")//链式编程.and().withUser("ls").password("123456").roles("BBB").and().withUser("ww").password("123456").roles("CCC", "primary").and().withUser("zl").password("123456").roles("primary");}//用户授权@Overrideprotected void configure(HttpSecurity http) throws Exception {/** * permitAll():允许一切用户访问 * hasRole():url请求允许访问的角色 * hasAnyRole() : url请求允许访问的多个角色 * access():允许访问的角色,permitAll、hasRole、hasAnyRole 底层都是调用 access 方法 * access("permitAll") 等价于 permitAll() */http.authorizeRequests().antMatchers("/").permitAll(); // "/":应用首页所以用户都可以访问http.authorizeRequests().antMatchers("/user/addUser").hasRole("AAA") // 首斜杠"/"表示应用上下文,/user/addUser 请求允许 AAA 角色访问.antMatchers("/user/deleteUser/**").hasAnyRole("AAA", "BBB") //"/user/deleteUser/**"允许 "AAA", "BBB" 角色访问,/**匹配任意.antMatchers("/user/updateUser").hasAnyRole("AAA", "BBB", "CCC")//除了这种链式编程,也可以分开写.antMatchers("/user/findAllUsers").access("permitAll");http.authorizeRequests().anyRequest().authenticated();/*** formLogin:指定支持基于表单的身份验证* 当用户没有登录、没有权限时就会自动跳转到登录页面(默认 /login)* 当登录失败时,默认跳转到 /error* 登录成功时会放行*/http.formLogin();}}
MyPasswordEncoder
package com.example.config;import org.springframework.security.crypto.password.PasswordEncoder;//密码编码,Spring Security 高版本必须进行密码编码,否则报错public class MyPasswordEncoder implements PasswordEncoder {@Overridepublic String encode(CharSequence charSequence) {return charSequence.toString();}@Overridepublic boolean matches(CharSequence charSequence, String s) {return s.equals(charSequence.toString());}}
亲测效果是
以用户名 zs 登录(其角色权限为AAA),可以进入系统,浏览器输入地址可以访问, localhost:8080,localhost:8080/user/addUser,localhost:8080/user/deleteUser,localhost:8080/user/updateUser,localhost:8080/user/findAllUsers
以用户名 ls 登录(其角色权限为BBB),可以进入系统,浏览器输入地址可以访问, localhost:8080,localhost:8080/user/deleteUser,localhost:8080/user/updateUser,localhost:8080/user/findAllUsers
以用户名 ww 登录(其角色权限为CCC),可以进入系统,浏览器输入地址可以访问, localhost:8080,localhost:8080/user/deleteUser,localhost:8080/user/updateUser,localhost:8080/user/findAllUsers
以用户名 zl 登录(其角色权限为CCC),可以进入系统,浏览器输入地址可以访问, localhost:8080,localhost:8080/user/updateUser,localhost:8080/user/findAllUsers
以用户名 admin 登录,不可以进入系统,因为系统中还没有该用户。


")


还没有评论,来说两句吧...