分布式服务框架Dubbo入门实例
Dubbo的官网中是这样介绍Dubbo的。DUBBO是一个分布式服务框架,致力于提供高性能和透明化的RPC远程服务调用方案,是阿里巴巴SOA服务化治理方案的核心框架,每天为2,000+个服务提供3,000,000,000+次访问量支持,并被广泛应用于阿里巴巴集团的各成员站点。
本文是对Dubbo的框架的一次学习步骤记录。
所需环境:Centos7 x64,Win7 x64,eclipse,maven,zookeeper,Dubbo
1.zookeeper安装与配置
先到 zookeeper官网下载一个zookeeper安装文件下来,我这里下载3.4.8稳定版。
在Linux系统中运行:
wget http://mirrors.hust.edu.cn/apache/zookeeper/zookeeper-3.4.8/zookeeper-3.4.8.tar.gz
解压:
#tar zxvf zookeeper-3.4.8.tar.gz
配置:
切换到解压目录,进入conf目录,复制默认的zoo_sample.cfg文件,改名为zoo.cfg
#cp zoo_sample.cfg zoo.cfg
[root@localhost conf]# ll总用量 16-rw-rw-r-- 1 jk145 jk145 535 2月 6 11:46 configuration.xsl-rw-rw-r-- 1 jk145 jk145 2161 2月 6 11:46 log4j.properties-rw-r--r-- 1 root root 1056 7月 3 21:21 zoo.cfg-rw-rw-r-- 1 jk145 jk145 922 2月 6 11:46 zoo_sample.cfg[root@localhost conf]#
之后切换到zookeeper的bin 目录,运行zookeeper就好。
在bin目录下,执行./zkServer.sh start
[root@localhost bin]# pwd/usr/local/zookeeper/zookeeper-3.4.8/bin[root@localhost bin]# ./zkServer.sh startZooKeeper JMX enabled by defaultUsing config: /usr/local/zookeeper/zookeeper-3.4.8/bin/../conf/zoo.cfgStarting zookeeper ... STARTED[root@localhost bin]#
2.Dubbo服务端搭建
新建立一个manven工程,可以是jar也可以是war工程。
在pom中加入依赖
<project xmlns="http://maven.apache.org/POM/4.0.0" xmlns:xsi="http://www.w3.org/2001/XMLSchema-instance"xsi:schemaLocation="http://maven.apache.org/POM/4.0.0 http://maven.apache.org/xsd/maven-4.0.0.xsd"><modelVersion>4.0.0</modelVersion><groupId>com.haiyang</groupId><artifactId>dubbo</artifactId><version>0.0.1-SNAPSHOT</version><packaging>war</packaging><properties><spring.version>4.1.3.RELEASE</spring.version><dubbo.version>2.5.3</dubbo.version><zookeeper.version>3.4.8</zookeeper.version></properties><dependencies><dependency><groupId>com.alibaba</groupId><artifactId>dubbo</artifactId><version>${dubbo.version}</version><exclusions><exclusion><groupId>org.springframework</groupId><artifactId>spring</artifactId></exclusion></exclusions></dependency><dependency><groupId>org.apache.zookeeper</groupId><artifactId>zookeeper</artifactId><version>${zookeeper.version}</version></dependency><!-- Spring --><dependency><groupId>org.springframework</groupId><artifactId>spring-beans</artifactId><version>${spring.version}</version></dependency><dependency><groupId>org.springframework</groupId><artifactId>spring-webmvc</artifactId><version>${spring.version}</version></dependency><dependency><groupId>org.springframework</groupId><artifactId>spring-aspects</artifactId><version>${spring.version}</version></dependency><dependency><groupId>com.github.sgroschupf</groupId><artifactId>zkclient</artifactId><version>0.1</version></dependency></dependencies><build><plugins><!-- java编译插件 --><plugin><groupId>org.apache.maven.plugins</groupId><artifactId>maven-compiler-plugin</artifactId><version>3.2</version><configuration><source>1.7</source><target>1.7</target><encoding>UTF-8</encoding></configuration></plugin></plugins></build></project>
3.Dubbo服务端服务代码
服务接口类:
package com.haiyang.service;public interface HelloService {String sayHello(String str);}
服务实现类:
package com.haiyang.service.impl;import org.springframework.stereotype.Service;import com.haiyang.service.HelloService;@Service("helloService")public class HelloServiceImpl implements HelloService {public String sayHello(String str) {return "Hello " + str;}}
4.Dubbo服务端Spring文件配置
Spring-context.xml配置:
<?xml version="1.0" encoding="UTF-8"?><beans xmlns="http://www.springframework.org/schema/beans" xmlns:xsi="http://www.w3.org/2001/XMLSchema-instance" xmlns:p="http://www.springframework.org/schema/p" xmlns:context="http://www.springframework.org/schema/context" xmlns:aop="http://www.springframework.org/schema/aop"xmlns:tx="http://www.springframework.org/schema/tx"xsi:schemaLocation="http://www.springframework.org/schema/beanshttp://www.springframework.org/schema/beans/spring-beans-3.2.xsdhttp://www.springframework.org/schema/aophttp://www.springframework.org/schema/aop/spring-aop-3.2.xsdhttp://www.springframework.org/schema/txhttp://www.springframework.org/schema/tx/spring-tx-3.2.xsdhttp://www.springframework.org/schema/contexthttp://www.springframework.org/schema/context/spring-context-3.2.xsd"default-autowire="byName" default-lazy-init="false"><!-- 采用注释的方式配置bean --><context:annotation-config /><!-- 配置要扫描的包 --><context:component-scan base-package="com.haiyang" /><!-- proxy-target-class默认"false",更改为"ture"使用CGLib动态代理 --><aop:aspectj-autoproxy proxy-target-class="true" /><import resource="dubbo-provider.xml" /></beans>
dubbo-provider.xml配置:
<?xml version="1.0" encoding="UTF-8"?><beans xmlns="http://www.springframework.org/schema/beans"xmlns:xsi="http://www.w3.org/2001/XMLSchema-instance" xmlns:dubbo="http://code.alibabatech.com/schema/dubbo"xsi:schemaLocation="http://www.springframework.org/schema/beanshttp://www.springframework.org/schema/beans/spring-beans.xsdhttp://code.alibabatech.com/schema/dubbohttp://code.alibabatech.com/schema/dubbo/dubbo.xsd"><!-- 提供方应用名称信息,这个相当于起一个名字,我们dubbo管理页面比较清晰是哪个应用暴露出来的 --><dubbo:application name="test_provider" /><!-- 使用zookeeper注册中心暴露服务地址 --><dubbo:registry protocol="zookeeper"address="zookeeper://192.168.138.129:2181" check="false" subscribe="false"register=""></dubbo:registry><!-- 用dubbo协议在20880端口暴露服务 --><dubbo:protocol name="dubbo" port="20880" /><!-- 用户服务接口 --><dubbo:service interface="com.haiyang.service.HelloService"ref="helloService" /></beans>
5.Dubbo服务端测试类
package com.haiyang;import org.springframework.context.support.ClassPathXmlApplicationContext;public class DubboProvider {public static void main(String[] args) {try {ClassPathXmlApplicationContext context = new ClassPathXmlApplicationContext("classpath:spring/spring-context.xml");context.start();} catch (Exception e) {e.printStackTrace();}synchronized (DubboProvider.class) {while (true) {try {DubboProvider.class.wait();} catch (InterruptedException e) {e.printStackTrace();}}}}}
5.Dubbo客户端搭建
和上面的Dubbo服务端一样,加入相同的jar文件,另外,再加入上一个工程,将它作为一个依赖,同时记得将上面的Dubbo服务工程用maven install下
pom清单如下:
<project xmlns="http://maven.apache.org/POM/4.0.0" xmlns:xsi="http://www.w3.org/2001/XMLSchema-instance"xsi:schemaLocation="http://maven.apache.org/POM/4.0.0 http://maven.apache.org/xsd/maven-4.0.0.xsd"><modelVersion>4.0.0</modelVersion><groupId>com.haiyang</groupId><artifactId>dubbo-use</artifactId><version>0.0.1-SNAPSHOT</version><packaging>war</packaging><properties><spring.version>4.1.3.RELEASE</spring.version><dubbo.version>2.5.3</dubbo.version><zookeeper.version>3.4.8</zookeeper.version></properties><dependencies><dependency><groupId>com.alibaba</groupId><artifactId>dubbo</artifactId><version>${dubbo.version}</version><exclusions><exclusion><groupId>org.springframework</groupId><artifactId>spring</artifactId></exclusion></exclusions></dependency><dependency><groupId>org.apache.zookeeper</groupId><artifactId>zookeeper</artifactId><version>${zookeeper.version}</version></dependency><!-- Spring --><dependency><groupId>org.springframework</groupId><artifactId>spring-beans</artifactId><version>${spring.version}</version></dependency><dependency><groupId>org.springframework</groupId><artifactId>spring-webmvc</artifactId><version>${spring.version}</version></dependency><dependency><groupId>org.springframework</groupId><artifactId>spring-aspects</artifactId><version>${spring.version}</version></dependency><dependency><groupId>com.github.sgroschupf</groupId><artifactId>zkclient</artifactId><version>0.1</version></dependency><!-- 服务类 --><dependency><groupId>com.haiyang</groupId><artifactId>dubbo</artifactId><version>0.0.1-SNAPSHOT</version></dependency></dependencies><build><plugins><!-- java编译插件 --><plugin><groupId>org.apache.maven.plugins</groupId><artifactId>maven-compiler-plugin</artifactId><version>3.2</version><configuration><source>1.7</source><target>1.7</target><encoding>UTF-8</encoding></configuration></plugin></plugins></build></project>
6.Dubbo客户端Spring配置
spring-context.xml配置如下:
<?xml version="1.0" encoding="UTF-8"?><beans xmlns="http://www.springframework.org/schema/beans" xmlns:xsi="http://www.w3.org/2001/XMLSchema-instance" xmlns:p="http://www.springframework.org/schema/p" xmlns:context="http://www.springframework.org/schema/context" xmlns:aop="http://www.springframework.org/schema/aop"xmlns:tx="http://www.springframework.org/schema/tx"xsi:schemaLocation="http://www.springframework.org/schema/beanshttp://www.springframework.org/schema/beans/spring-beans-3.2.xsdhttp://www.springframework.org/schema/aophttp://www.springframework.org/schema/aop/spring-aop-3.2.xsdhttp://www.springframework.org/schema/txhttp://www.springframework.org/schema/tx/spring-tx-3.2.xsdhttp://www.springframework.org/schema/contexthttp://www.springframework.org/schema/context/spring-context-3.2.xsd"default-autowire="byName" default-lazy-init="false"><!-- 采用注释的方式配置bean --><context:annotation-config /><!-- 配置要扫描的包 --><context:component-scan base-package="com.haiyang" /><!-- proxy-target-class默认"false",更改为"ture"使用CGLib动态代理 --><aop:aspectj-autoproxy proxy-target-class="true" /><import resource="dubbo-consumer.xml" /></beans>
dubbo-consumer.xml配置如下:
<?xml version="1.0" encoding="UTF-8"?><beans xmlns="http://www.springframework.org/schema/beans"xmlns:xsi="http://www.w3.org/2001/XMLSchema-instance" xmlns:dubbo="http://code.alibabatech.com/schema/dubbo"xsi:schemaLocation="http://www.springframework.org/schema/beanshttp://www.springframework.org/schema/beans/spring-beans.xsdhttp://code.alibabatech.com/schema/dubbohttp://code.alibabatech.com/schema/dubbo/dubbo.xsd"><!-- 消费方应用名,用于计算依赖关系,不是匹配条件,不要与提供方一样 --><dubbo:application name="dubbo-use" /><!-- 使用zookeeper注册中心暴露服务地址 --><!-- 注册中心地址 --><dubbo:registry protocol="zookeeper" address="192.168.138.129:2181" /><!-- 用户服务接口,和服务类名对应 --><dubbo:reference interface="com.haiyang.service.HelloService"id="helloService" /></beans>
7.Dubbo客户端测试类
package com.haiyang.test;import org.springframework.context.support.ClassPathXmlApplicationContext;import com.haiyang.service.HelloService;public class HaiTest {public static void main(String[] args) {ClassPathXmlApplicationContext context = new ClassPathXmlApplicationContext(new String[] { "spring/dubbo-consumer.xml" });context.start();HelloService demoService = (HelloService) context.getBean("helloService");System.out.println(demoService.sayHello("world"));synchronized (DubboTest.class) {while (true) {try {DubboTest.class.wait();} catch (InterruptedException e) {e.printStackTrace();}}}}}
8.Dubbo整体测试
为了观察方便,先在zookeeper的服务器上查看日志文件,对应目录为:
{path}/zookeeper/bin/zookeeper.out
用tail -f命令监听此日志文件
[ping@javaEE bin]$ tail -f zookeeper.out
同时,为了观察方便,区别下,将之前服务端HelloServiceImpl这个类的return “Hello:” + str;改为return “Hello Dubbo:” + str;
运行Dubbo服务端测试类(DubboProvider.java)

运行Dubbo客户端测试类(HaiTest.java)
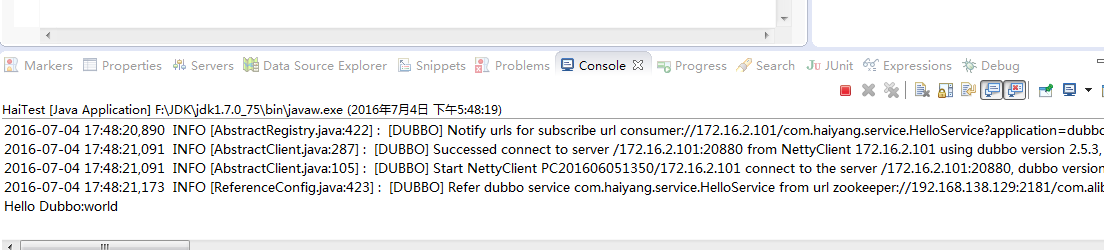
从这里可以看出,成功调用了服务端的方法
同时,zookeeper监听的日志文件也记录到了日志信息。

9.Dubbo管理控制台安装
同时,为了Dubbo也自带了管理控制台,在这里,也顺便安装下。
在百度上搜一下dubbo-admin-2.5.4.war ,将它下下来,再传到Linux中去.
在crt中输入rz,选择dubbo-admin-2.5.4.war文件,上传,并将它解压到linux的tomcat的webapps目录下。
运行unzip -d解压,将它解压,并将名称改为ROOT
$ unzip dubbo-admin-2.5.4.war -d ROOT
再进入解压后的ROOT目录下,修改配置文件
$ vim ROOT/WEB-INF/dubbo.properties
dubbo.registry.address=zookeeper://192.168.138.129
dubbo.admin.root.password=root
dubbo.admin.guest.password=guest
保存:x
最后再启动此Tomcat就可以了!
最后在浏览器里连接下
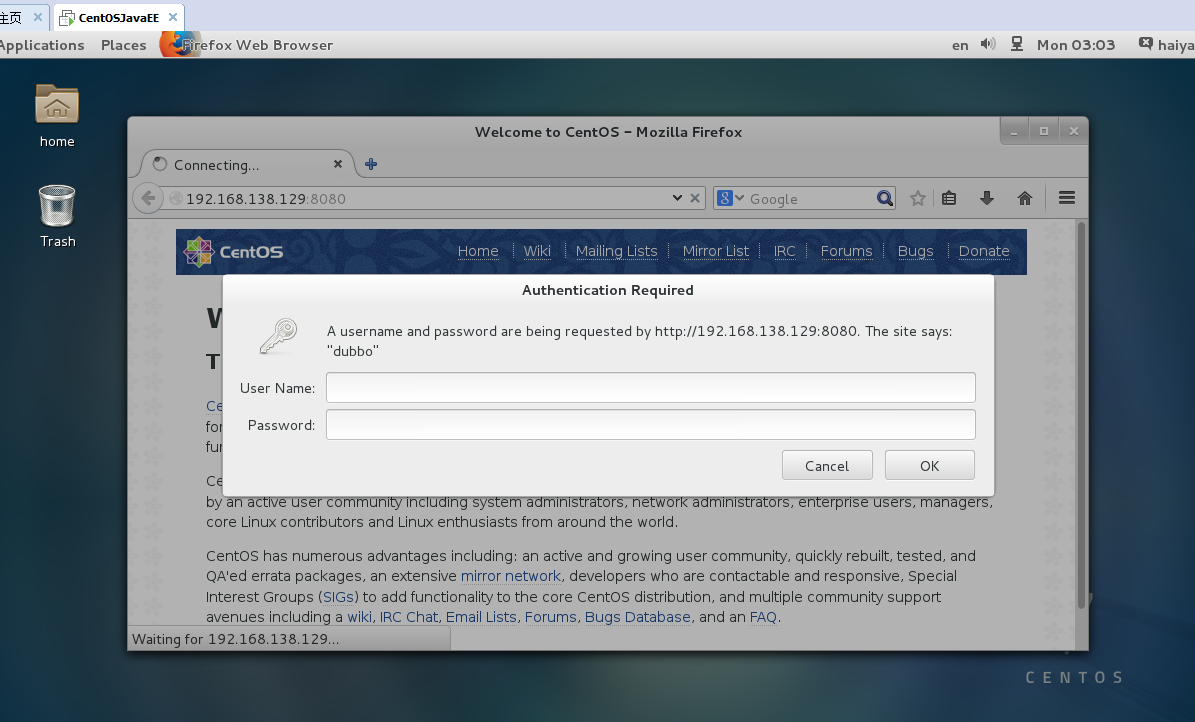
输入刚刚配置的密码和用户名:root root
登录

能成功进入了,并且也能检测到目前连上的服务。


还没有评论,来说两句吧...