CentOS 7 安装Redis单机版和集群
Redis下载
http://download.redis.io/releases/redis-4.0.11.tar.gz
一、单机版搭建
1.上传压缩包到 /usr/download (我自定义放安装包的目录)
2.安装gcc编译环境,命令 yum install gcc-c++
3.解压 redis-4.0.11.tar.gz 文件,命令 tar -zxvf redis-4.0.11.tar.gz (此时会解压到当前目录,我的是在 usr/download下,文件夹名是redis-4.0.11)
4.将解压出来的 redis-4.0.11 移动到 /usr/local 下并且命名为 redis ,命令 mv /usr/download/redis-4.0.11 /usr/local/redis
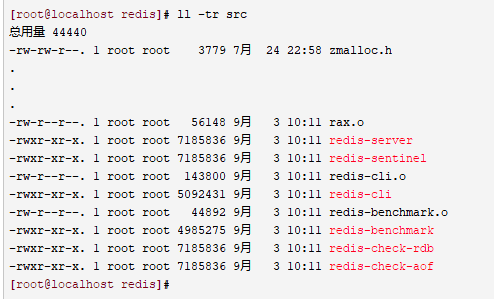
5.进入redis文件夹,cd /usr/local/redis ,执行命令make install PREFIX=/usr/local/redis(指定安装路径为/usr/local/redis),可以看到在src目录下生成了几个新的文件,如图(/usr/local/redis目录下):
6.启动
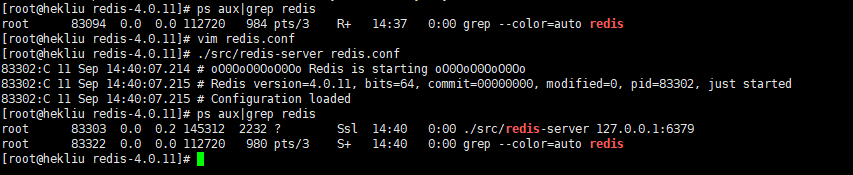
方式一:进入redis的src目录下,执行 ./redis-server
方式二:修改redis.conf,进入编辑模式 vim /usr/local/redis/redis.conf 修改daemonize yes(默认是 no ),:wq (保存退出),使用命令启动:./src/redis-server redis.conf(在安装目录/usr/local/redis/执行)
方式三:为了使用方便,我们需要将上面第5步make后生成的这个几个文件加到/usr/local/bin目录下去。这个目录在Path下面的话,就可以直接执行这几个命令了。
[root@localhost redis]# make installcd src && make installmake[1]: Entering directory `/usr/local/redis/src'CC Makefile.depmake[1]: Leaving directory `/usr/local/redis/src'make[1]: Entering directory `/usr/local/redis/src'Hint: It's a good idea to run 'make test' ;)INSTALL installINSTALL installINSTALL installINSTALL installINSTALL installmake[1]: Leaving directory `/usr/local/redis/src'[root@localhost redis]# cd ..[root@localhost local]# ll总用量 44drwxr-xr-x. 2 root root 4096 9月 3 10:16 bindrwxr-xr-x. 2 root root 4096 9月 3 10:04 datadrwxr-xr-x. 2 root root 4096 9月 23 2011 etcdrwxr-xr-x. 2 root root 4096 9月 23 2011 gamesdrwxr-xr-x. 2 root root 4096 9月 23 2011 includedrwxr-xr-x. 2 root root 4096 9月 23 2011 libdrwxr-xr-x. 2 root root 4096 9月 23 2011 libexecdrwxrwxr-x. 6 root root 4096 7月 24 22:58 redisdrwxr-xr-x. 2 root root 4096 9月 23 2011 sbindrwxr-xr-x. 5 root root 4096 4月 1 04:48 sharedrwxr-xr-x. 2 root root 4096 9月 23 2011 src[root@localhost local]# ll bin总用量 30908-rwxr-xr-x. 1 root root 4985275 9月 3 10:16 redis-benchmark-rwxr-xr-x. 1 root root 7185836 9月 3 10:16 redis-check-aof-rwxr-xr-x. 1 root root 7185836 9月 3 10:16 redis-check-rdb-rwxr-xr-x. 1 root root 5092431 9月 3 10:16 redis-clilrwxrwxrwx. 1 root root 12 9月 3 10:16 redis-sentinel -> redis-server-rwxr-xr-x. 1 root root 7185836 9月 3 10:16 redis-server[root@localhost local]#
可以看到,这几个文件就已经被加载到bin目录下了,下面启动服务器,来看看安装是否成功。使用redis-server命令。
[root@localhost local]# redis-server9190:C 03 Sep 10:19:09.291 # oO0OoO0OoO0Oo Redis is starting oO0OoO0OoO0Oo9190:C 03 Sep 10:19:09.292 # Redis version=4.0.1, bits=32, commit=00000000, modified=0, pid=9190, just started9190:C 03 Sep 10:19:09.292 # Warning: no config file specified, using the default config. In order to specify a config file use redis-server /path/to/redis.conf9190:M 03 Sep 10:19:09.295 * Increased maximum number of open files to 10032 (it was originally set to 1024).9190:M 03 Sep 10:19:09.312 # Warning: 32 bit instance detected but no memory limit set. Setting 3 GB maxmemory limit with 'noeviction' policy now._.__.-``__ ''-.__.-`` `. `_. ''-._ Redis 4.0.1 (00000000/0) 32 bit.-`` .-```. ```\/ _.,_ ''-._( ' , .-` | `, ) Running in standalone mode|`-._`-...-` __...-.``-._|'` _.-'| Port: 6379| `-._ `._ / _.-' | PID: 9190`-._ `-._ `-./ _.-' _.-'|`-._`-._ `-.__.-' _.-'_.-'|| `-._`-._ _.-'_.-' | http://redis.io`-._ `-._`-.__.-'_.-' _.-'|`-._`-._ `-.__.-' _.-'_.-'|| `-._`-._ _.-'_.-' |`-._ `-._`-.__.-'_.-' _.-'`-._ `-.__.-' _.-'`-._ _.-'`-.__.-'9190:M 03 Sep 10:19:09.316 # WARNING: The TCP backlog setting of 511 cannot be enforced because /proc/sys/net/core/somaxconn is set to the lower value of 128.9190:M 03 Sep 10:19:09.316 # Server initialized9190:M 03 Sep 10:19:09.318 # WARNING overcommit_memory is set to 0! Background save may fail under low memory condition. To fix this issue add 'vm.overcommit_memory = 1' to /etc/sysctl.conf and then reboot or run the command 'sysctl vm.overcommit_memory=1' for this to take effect.9190:M 03 Sep 10:19:09.318 * Ready to accept connections
看到这个界面的话,就表示安装成功了。
下面通过在启动一个linux客户端,通过server-cli shutdown来关闭服务器。
[root@localhost ~]# redis-cli shutdown[root@localhost ~]#下面是刚刚服务器启动的客户端的log9190:M 03 Sep 10:20:45.566 # User requested shutdown...9190:M 03 Sep 10:20:45.566 * Saving the final RDB snapshot before exiting.9190:M 03 Sep 10:20:45.631 * DB saved on disk9190:M 03 Sep 10:20:45.631 # Redis is now ready to exit, bye bye...[root@localhost local]#此处参考:[https://www.cnblogs.com/zerotomax/p/7468833.html][https_www.cnblogs.com_zerotomax_p_7468833.html]
方式四:设置redis开机自启动
(1)在/etc 目录下新建redis目录
mkdir redis
(2)将/usr/local/redis/redis.conf文件拷贝一份到/etc/redis目录下,并命名6379.conf
cp /usr/local/redis/redis.conf /etc/redis/6379.conf
(3)将redis的启动脚本复制一份放到/etc/init.d目录下
cp /usr/local/redis/utils/redis_init_script /etc/init.d/redisd
(4)先切换到/etc/init.d目录下,然后执行自启命令
chkconfig redisd on
service redisd does not support chkconfig
看结果是redisd不支持chkconfig
解决方法:
使用vim编辑redisd文件,在第一行加入如下两行注释,保存退出
# chkconfig: 2345 90 10# description: Redis is a persistent key-value database
注释的意思是,redis服务必须在运行级2,3,4,5下被启动或关闭,启动的优先级是90,关闭的优先级是10。

(5)再次执行开机自启命令,成功
chkconfig redisd on
现在可以直接已服务的形式启动和关闭redis了
启动:
service redisd start
关闭:
service redisd stop
到此,开机自启设置完成。。。
7.查看是否启动 ps aux | grep redis
到此,单机版安装完成。下面是集群搭建。
二、集群搭建
Redis 集群至少要有三个节点,每个节点有一备份节点,需要6台服务器。
1.创建一个文件夹:mkdir redis-cluster (我是在/usr/local/下执行命令)
2.将单机版的redis拷贝到redis-cluster文件夹下:cp redis redis-cluster/ -r (我是在/usr/local/下执行命令)
3.将redis-cluster下的redis重命名为redis01,使用命令mv redis redis01 (我是在/usr/local/redis-cluster/下执行命令)
4.删除redis01文件夹下的dump.rdb,使用命令rm dump.rdb(/usr/local/redis-cluster/redis01/)
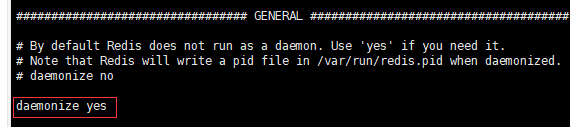
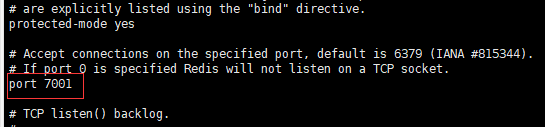
5.修改配置文件,使用命令vi redis.conf打开配置文件,使用insert键切换到可编辑状态,依次修改以下三个地方:
①开启后台启动:
②修改端口:
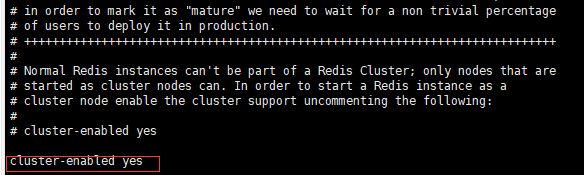
③打开集群注释:
6.再拷贝5个单机版redis,分别修改配置文件,更改端口由7002至7006
cp -r redis01/ redis02cp -r redis01/ redis03cp -r redis01/ redis04cp -r redis01/ redis05cp -r redis01/ redis06
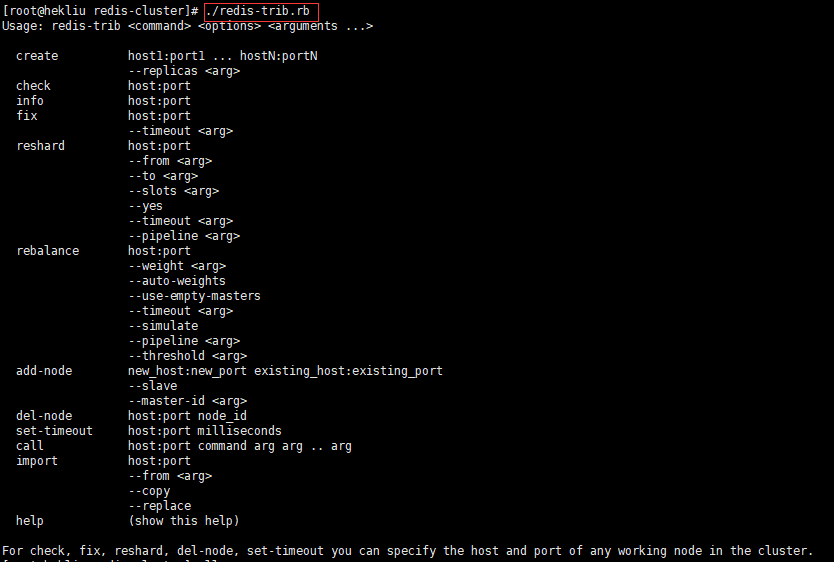
7.需要一个ruby脚本,在redis源码文件夹下的src目录下(/usr/local/tools/redis/).将redis-trib.rb拷贝到redis-cluster文件夹下,使用命令
cp redis-trib.rb /usr/local/redis-cluster/(在/usr/local/tools/redis-3.0.0/路径下执行命令)
8.执行ruby脚本之前先安装ruby环境:
①先执行yum install ruby(此命令相当于安装了一个ruby虚拟机,用来解释ruby脚本)
②安装成功后执行yum install rubygems(此命令是ruby的包管理器)
③安装redis-trib.rb运行依赖的ruby的包,执行命令进行安装gem install redis,提示:
gem install redisERROR: Error installing redis:redis requires Ruby version >= 2.2.2.原因,ruby版本小于了2.2.2。(1)安装RVM:gpg2 --keyserver hkp://keys.gnupg.net --recv-keys D39DC0E3curl -L get.rvm.io | bash -s stablefind / -name rvm -print
/usr/local/rvm
/usr/local/rvm/src/rvm
/usr/local/rvm/src/rvm/bin/rvm
/usr/local/rvm/src/rvm/lib/rvm
/usr/local/rvm/src/rvm/scripts/rvm
/usr/local/rvm/bin/rvm
/usr/local/rvm/lib/rvm
/usr/local/rvm/scripts/rvm
source /usr/local/rvm/scripts/rvm
(2)查看rvm库中已知的ruby版本
rvm list known
# MRI Rubies
[ruby-]1.8.6[-p420]
[ruby-]1.8.7[-head] # security released on head
[ruby-]1.9.1[-p431]
[ruby-]1.9.2[-p330]
[ruby-]1.9.3[-p551]
[ruby-]2.0.0[-p648]
[ruby-]2.1[.10]
[ruby-]2.2[.10]
[ruby-]2.3[.7]
[ruby-]2.4[.4]
[ruby-]2.5[.1]
[ruby-]2.6[.0-preview2]
ruby-head
……
(3)安装一个Ruby版本
rvm install 2.5.1
Searching for binary rubies, this might take some time.
No binary rubies available for: centos/7/x86_64/ruby-2.5.1.
Continuing with compilation. Please read ‘rvm help mount’ to get more information on binary rubies.
Checking requirements for centos.
Installing requirements for centos.
Installing required packages: patch, automake, bison, libffi-devel, libtool, patch, readline-devel, sqlite-devel, zlib-devel, openssl-devel………………….
Requirements installation successful.
Installing Ruby from source to: /usr/local/rvm/rubies/ruby-2.5.1, this may take a while depending on your cpu(s)…
ruby-2.5.1 - #downloading ruby-2.5.1, this may take a while depending on your connection…
% Total % Received % Xferd Average Speed Time Time Time Current
Dload Upload Total Spent Left Speed
100 13.3M 100 13.3M 0 0 888k 0 0 15 015 —:—:— 1199k
ruby-2.5.1 - #extracting ruby-2.5.1 to /usr/local/rvm/src/ruby-2.5.1…..
ruby-2.5.1 - #configuring………………………………………………………….
ruby-2.5.1 - #post-configuration..
ruby-2.5.1 - #compiling…………………………………………………………………………
ruby-2.5.1 - #installing………………………..
ruby-2.5.1 - #making binaries executable..
ruby-2.5.1 - #downloading rubygems-2.7.7
% Total % Received % Xferd Average Speed Time Time Time Current
Dload Upload Total Spent Left Speed
100 894k 100 894k 0 0 125k 0 007 007 —:—:— 142k
……
(4)使用当前安装的Ruby
rvm use 2.5.1
Using /usr/local/rvm/gems/ruby-2.5.1
(5)设置默认版本rvm use 2.5.1 --default
Using /usr/local/rvm/gems/ruby-2.5.1
(6)卸载一个已知版本rvm remove 2.0.0(7)查看Ruby版本ruby --version
ruby 2.5.1p57 (2018-03-29 revision 63029) [x86_64-linux]
(8)安装redisgem install redis
Fetching: redis-4.0.2.gem (100%)
Successfully installed redis-4.0.2
Parsing documentation for redis-4.0.2
Installing ri documentation for redis-4.0.2
Done installing documentation for redis after 1 seconds
1 gem installed
(9)上面的步骤完事了,接下来运行一下redis-trib.rb
9.启动所有的redis实例
①在安装集群的路径下(我的是/usr/local/redis-cluster),编写一个启动脚本,vi start-all.sh,写完之后按ESC键输入:wq保存。
cd redis01./src/redis-server redis.confcd ..cd redis02./src/redis-server redis.confcd ..cd redis03./src/redis-server redis.confcd ..cd redis04./src/redis-server redis.confcd ..cd redis05./src/redis-server redis.confcd ..cd redis06./src/redis-server redis.confcd ..
②给start-all.sh执行的权限,使用命令chmod +x start-all.sh,授权前后对比

③使用脚本启动redis实例,使用命令./start-all.sh

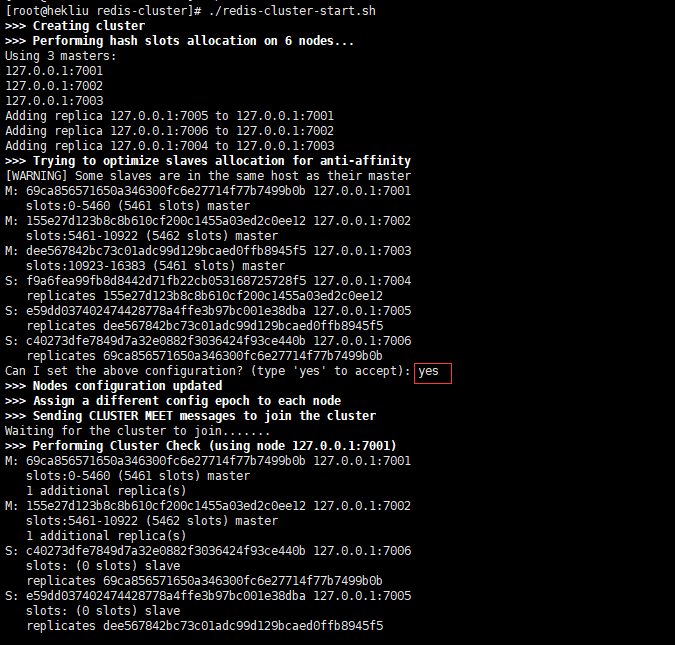
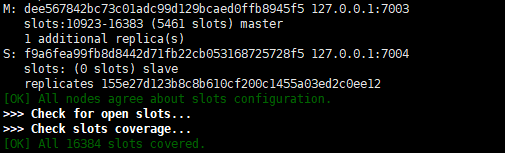
执行命令:./redis-trib.rb create —replicas 1 127.0.0.1:7001 127.0.0.1:7002 127.0.0.1:7003 127.0.0.1:7004 127.0.0.1:7005 127.0.0.1:7006,(这里直接写在脚本里了)结果如下:
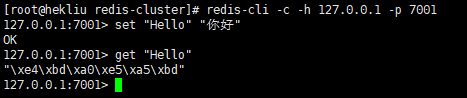
10.连接集群 redis-cli -c -h 你的IP -p 端口 或者 ./redis01/src/redis-cli -c -h 你的IP -p 端口
11.查看集群中的所有主节点信息 redis-cli -c -p 7001 cluster nodes | grep master
redis-cli -c -p 7001 cluster nodes | grep master
到此,Redis就安装完毕了。


Deep Multi-instance Networks with Sparse Label Assignment for Whole Mammogram Classific")


")


还没有评论,来说两句吧...