Android 表单之 TextView(文本框)详解
目录
TextView( 文本框) 简 介
基础属性
带阴影 TextView
TextView( 文本框) 简 介
TextView(文本框)用于显示文本的一个控件,Android 官方 API 文档链接
先熟悉以下几个单位:
dp(dip): device independent pixels(设备独立像素),不同设备有不同的显示效果,和设备硬件有关,一般为了支持 WVGA、HVGA 和 QVGA 推荐使用这个,不依赖像素。
px: pixels(像素) 不同设备显示效果相同,一般 HVGA 代表 320x480 像素,这个用的比较多。
pt: point 是一个标准的长度单位,1pt=1/72英寸,用于印刷业,非常简单易用
sp: scaled pixels(放大像素),主要用于字体显示 best for textsize。
基础属性
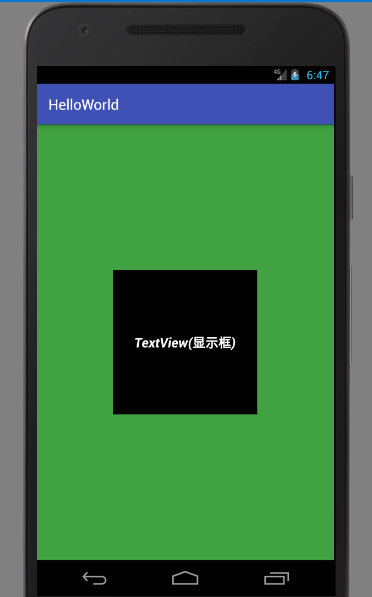 图 1.1
图 1.1
上图 1.1 效果实现代码如下:
<RelativeLayout xmlns:android="http://schemas.android.com/apk/res/android"xmlns:tools="http://schemas.android.com/tools"android:layout_width="match_parent"android:layout_height="match_parent"android:background="#40A240"android:gravity="center"tools:context=".MainActivity"><TextViewandroid:id="@+id/txtOne"android:layout_width="200dp"android:layout_height="200dp"android:background="#000000"android:gravity="center"android:text="TextView(显示框)"android:textColor="#fff"android:textSize="18sp"android:textStyle="bold|italic" /></RelativeLayout>
< TextView 中属性介绍如下:
id:为 TextView 设置一个组件 id,根据 id,可以在 Java 代码中通过 findViewById(id) 的方法获取到该对象,然后进行相关属性的设置
layout_width:组件的宽度,一般写:wrap_content或者match_parent(fill_parent),前者是控件显示的内容多大,控件就多大,而后者会填满该控件所在的父容器;当然也可以设置成特定的大小,比如我这里为了显示效果,设置成了200dp。
layout_height:组件的宽度,内容同上。
gravity:设置控件中内容的对齐方向,TextView 中是文字,ImageView 中是图片等等。
text:设置显示的文本内容,一般是把字符串写到 src/values/string.xml 文件中,然后通过@String/xxx取得对应的字符串内容的,这里为了方便直接就写到 “” 里
textColor:设置字体颜色,同上,通过 src/valuses/colors.xml 资源来引用,别直接这样写!
textStyle:设置字体风格,三个可选值:normal(无效果),bold(加粗),italic(斜体),多个样式时,使用 “|” 隔开
textSize:字体大小,单位一般是用 sp!
background:控件的背景颜色,可以理解为填充整个控件的颜色,也可以是图片
带阴影 TextView
阴影涉及到以下几个属性:
android 设置阴影颜色,需要与 shadowRadius 一起使用
android 设置阴影的模糊程度,设为 0.1 就变成字体颜色了,建议使用 3.0
android 设置阴影在水平方向的偏移,就是水平方向阴影开始的横坐标位置
android 设置阴影在竖直方向的偏移,就是竖直方向阴影开始的纵坐标位置
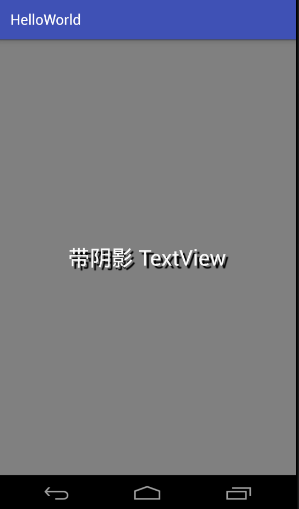 图 1.2
图 1.2
上图 1.2 效果代码如下:
<RelativeLayout xmlns:android="http://schemas.android.com/apk/res/android"xmlns:tools="http://schemas.android.com/tools"android:layout_width="match_parent"android:layout_height="match_parent"android:background="#808080"android:gravity="center"tools:context=".MainActivity"><TextViewandroid:layout_width="wrap_content"android:layout_height="wrap_content"android:layout_centerInParent="true"android:shadowColor="#000000"android:shadowDx="10.0"android:shadowDy="10.0"android:shadowRadius="3.0"android:text="带阴影 TextView"android:textColor="#FAFAFA"android:textSize="30sp" /></RelativeLayout>


还没有评论,来说两句吧...