【Git】之搭建 git 环境
Windows 环境
1、安装 Git
从Git官网:https://git-scm.com/download 上下载 Windows 版的 Git 应用程序,根据自己的操作系统下载安装对应的版本,安装过程直接一路默认安装即可。
2、配置 Git
查看用户名和邮箱:
git config user.name //获取当前登录的用户git config user.email //获取当前登录用户的邮箱
设置或修改用户名和邮箱:
安装完成后配置环境,打开git bash,输入下面面命:
git config --global user.name "Your Name"git config --global user.email "email@example.com"git config --global core.autocrlf false # 解决 LF will be replaced by CRLF 问题
--global 参数表示全局设定,以后所有的Git仓库的操作都使用这个所设定的用户名和邮箱。
添加 ssh 秘钥:
ssh-keygen -t rsa -C "youremail@example.com"
参数说明:
- -t:指定密钥类型,默认是 rsa ,可以省略
- -C:设置注释文字,比如邮箱
- -f:指定密钥文件存储文件名,可以省略
一直回车直到提示成功,这样就会在用户家目录里生成 .ssh 目录:
$ cd ~$ ls .sshid_rsa id_rsa.pub
里面有 id_rsa 和 id_rsa.pub 两个文件,这两个就是 SSH Key 的秘钥对,id_rsa是私钥,不能泄露出去,id_rsa.pub是公钥。
ssh key 的公钥内容就是我们上传到 GitHub 上面的密钥内容。如果添加公钥到 GitHub 成功则可以使用命令测试是否成功:
$ ssh -T git@github.comHi! You've successfully authenticated, but GitHub does not provide shell access.
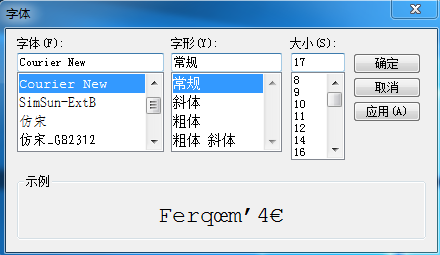
3、设置字体
有时候在配置 GitBash 字体的时候会出现字体缺失的问题,比如没有自己想要的字体,这就需要我们手动修改配置文件来使用我们喜欢的字体。
打开 GitBash 输入命令:
$ cd ~$ vim .minttyrc# 修改里面的字体设置内容Font=Courier NewFontHeight=17
第一个代表字体,第二个代表字体大小根据自己的喜好修改对应的值就可以了,当然你选择的字体必须是要系统已经安装了的,不然修改了也是没法生效的。
当添加了自己定义的字体后,配置窗口也会对应多出这种字体的选择项:
3、NullReferenceException 异常
使用 git push 时:
$ git push origin master
遇到报错:
fatal: NullReferenceException encountered.
出现这种情况是因为 git 的 credential manager 在版本 2.19.1 会出现问题。解决方法为下载安装 Git Credential Manager for Windows
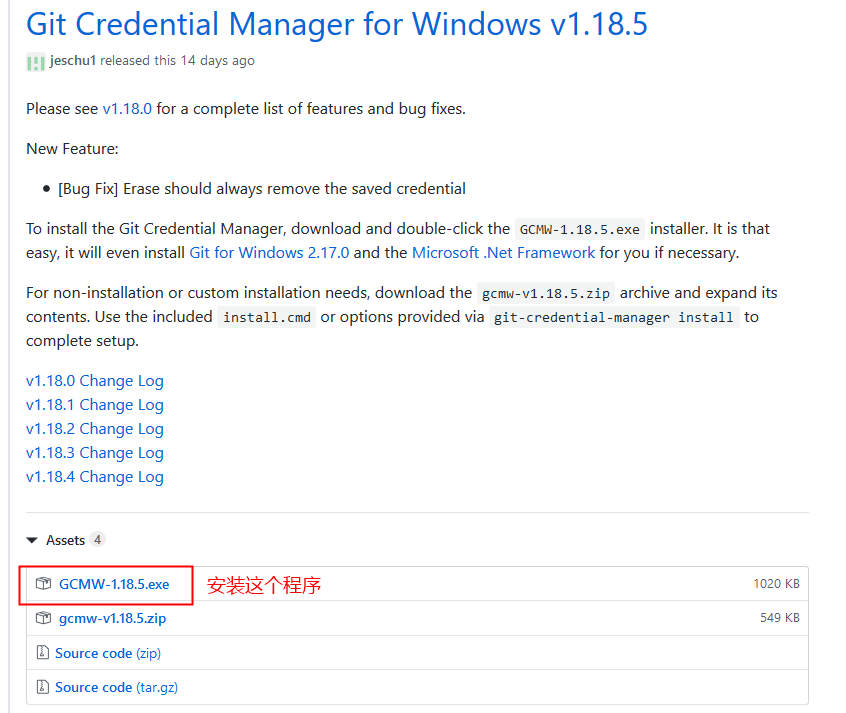
安装完成后再使用 push 命令就不会出现上面的报错了!
Linux 环境
查看是否已经安装过 git
[root@centos] git --versiongit version 1.8.3
卸载旧版 git
[root@centos] yum remove git
安装方式一:yum 安装
[root@centos] yum -y install git
安装方式二:源码安装:
安装依赖包(根据实际情况安装,有些可能已经安装过来):
[root@centos] yum install curl-devel expat-devel gettext-devel openssl-devel zlib-devel[root@centos] yum install gcc-c++ perl-ExtUtils-MakeMaker
下载源码包(下载的版本为 2.25.0,下载路径为:/opt/):
[root@centos] cd /opt/[root@centos] wget https://www.kernel.org/pub/software/scm/git/git-2.25.0.tar.gz
解压:
[root@centos] tar -zxvf git-2.25.0.tar.gz
编译安装(安装在 /usr/local/git 目录下):
[root@centos] mkdir /usr/local/git[root@centos] cd git-2.25.0[root@centos] make prefix=/usr/local/git all[root@centos] make prefix=/usr/local/git install
安装成功后配置 git 环境变量:
[root@centos] vim /etc/profile
在最后一行添加:
export PATH=/usr/local/git/bin:$PATH
生效文件:
[root@centos] source /etc/profile
查看版本:
[root@centos] git --versiongit version 2.25.0
生成 RSA 密钥:
[root@centos] ssh-keygen -t rsa


")


还没有评论,来说两句吧...