springboot dubbo nacos sentinel 快速集成
一 场景
我们以用户服务为例来对 springboot dubbo nacos sentinel 进行整合,我们现在有一个根据用户ID获取用户详情的接口,需要服务化给其他业务使用,dubbo 作为RPC访问框架,nacos做服务注册中心,sentinel 做限流 来保护用户服务。新建了一个工程,工程目录如下:

user-api :用户服务的API 包括接口定义,请求参数,返回参数 服务提供者(user-provider)和服务消费者使用(user-comsumer)
user-provider:用户服务的提供者
user-comsumer:用户服务消费者 消费者本不应该写在这个工程,我为方便就写在一起。
二 nacos 和 Sentinel Dashboard 安装
整合需要用到nacos 和 Sentinel Dashboard 所以先安装
1.nacos安装
nacos安装参考我的另一篇文章:[https://blog.csdn.net/lj1314ailj/article/details/98509699][https_blog.csdn.net_lj1314ailj_article_details_98509699]
2.Sentinel Dashboard 安装
下载地址:[https://github.com/alibaba/Sentinel/releases][https_github.com_alibaba_Sentinel_releases]我下载的地址jar:[https://github.com/alibaba/Sentinel/releases/download/1.6.3/sentinel-dashboard-1.6.3.jar][https_github.com_alibaba_Sentinel_releases_download_1.6.3_sentinel-dashboard-1.6.3.jar]启动:注意:启动 Sentinel 控制台需要 JDK 版本为 1.8 及以上版本。使用如下命令启动控制台:java -Dserver.port=8888 -Dcsp.sentinel.dashboard.server=localhost:8888 -Dproject.name=sentinel-dashboard -jar sentinel-dashboard-1.6.3.jar其中 -Dserver.port=8888 用于指定 Sentinel 控制台端口为 8888访问:[http://localhost:8888][http_localhost_8888]
从 Sentinel 1.6.0 起,Sentinel 控制台引入基本的登录功能,默认用户名和密码都是 sentinel。

三 整合
1.user-api 代码编写
package com.lvzhu.user.api;import com.lvzhu.user.resp.User;/*** @author lvzhu.* Time 2019-08-05 17:59* Desc 文件描述*/public interface UserService {/**** 获取用户信息* @param id* @return*/User getUser(Long id);}
b.返回实体定义
package com.lvzhu.user.resp;import java.io.Serializable;/*** @author lvzhu.* Time 2019-08-05 17:59* Desc 文件描述*/public class User implements Serializable {private static final long serialVersionUID = 1008450983070357113L;/*** 主键ID*/private Long id;/*** 用户名*/private String userName;/*** 年龄*/private Integer age;/** 省略get set**/}
2.user-provider 编码
a.整合springboot dubbo nacos
pom.xml 添加
<!-- springboot dubbo starter--><dependency><groupId>org.apache.dubbo</groupId><artifactId>dubbo-spring-boot-starter</artifactId><version>2.7.1</version></dependency><dependency><groupId>org.apache.dubbo</groupId><artifactId>dubbo</artifactId><version>2.7.3</version></dependency><!-- nacos 注册中心--><dependency><groupId>org.apache.dubbo</groupId><artifactId>dubbo-registry-nacos</artifactId><version>2.7.3</version></dependency><dependency><groupId>com.alibaba.nacos</groupId><artifactId>nacos-client</artifactId><version>1.1.1</version></dependency><dependency><groupId>com.alibaba.spring</groupId><artifactId>spring-context-support</artifactId><version>1.0.2</version></dependency>
参考文章:http://dubbo.apache.org/zh-cn/docs/user/references/registry/nacos.html
b. dubbo整合sentinel
pom.xml 添加
<!--dubbo 版本 Apache Dubbo 2.7.x 及以上版本sentinel-apache-dubbo-adapter对于Dubbo 2.6.x 及以下版本 sentinel-dubbo-adapter--><dependency><groupId>com.alibaba.csp</groupId><artifactId>sentinel-apache-dubbo-adapter</artifactId><version>1.6.3</version></dependency><!--使用sentinel dashboard导入--><dependency><groupId>com.alibaba.csp</groupId><artifactId>sentinel-transport-simple-http</artifactId><version>1.6.3</version></dependency>
需要注意 dubbo 版本 整合时没有注意被坑了。
dubbo 版本 Apache Dubbo 2.7.x 及以上版本 sentinel-apache-dubbo-adapter对于Dubbo 2.6.x 及以下版本 sentinel-dubbo-adapter如果dubbo版本使用2.7.x 使用了sentinel-dubbo-adapter jar服务调用时会出问题错误如下:java.lang.NoSuchMethodError: com.alibaba.dubbo.rpc.RpcContext.setAttachment
sentinel 和更多主流框整合:
https://github.com/alibaba/Sentinel/wiki/%E4%B8%BB%E6%B5%81%E6%A1%86%E6%9E%B6%E7%9A%84%E9%80%82%E9%85%8D
c.application.properties 配置
spring.application.name=springboot-user-provider##nacos 配置中心dubbo.config-center.address=nacos://127.0.0.1:8848dubbo.config-center.app-name=springboot-user-provider##dubbo 服务扫描包dubbo.scan.base-packages=com.lvzhu.user.biz##dubbo.metadata-report.address=zookeeper://127.0.0.1:2181##dubbo.metadata-report.address=nacos://127.0.0.1:8848dubbo.protocol.name=dubbodubbo.protocol.port=20880dubbo.application.name=springboot-user-provider##nacos 注册中心 用zookeeper只需要把地址改为 zookeeper://127.0.0.1:2181dubbo.registry.address=nacos://127.0.0.1:8848##dubbo.registry.simplified=true
nacos 既可以做注册中心也可以做配置中心
d.UserServiceImpl 用户实现类
package com.lvzhu.user.biz;import com.lvzhu.user.api.UserService;import com.lvzhu.user.resp.User;import org.apache.dubbo.config.annotation.Service;/*** @author lvzhu.* Time 2019-08-05 18:16* Desc 文件描述*/@Service(loadbalance = "random",cluster = "failsafe")public class UserServiceImpl implements UserService {/*** 获取用户信息*/@Overridepublic User getUser(Long id) {User user = new User();user.setAge(2+id.intValue());user.setUserName("LVZHU"+id);user.setId(id);System.out.println("Come in getUser()");return user;}}
e.UserProviderApplication 启动类
package com.lvzhu.user;import org.springframework.boot.SpringApplication;import org.springframework.boot.autoconfigure.SpringBootApplication;@SpringBootApplicationpublic class UserProviderApplication {public static void main(String[] args) {SpringApplication.run(UserProviderApplication.class, args);}}
这样用户服务端可以使用了
3.user-comsumer 用服务消费者编写
a. pom.xml 同服务提供者基本相同只是 spring-boot-starter 变成了spring-boot-starter-web
<dependency><groupId>org.springframework.boot</groupId><artifactId>spring-boot-starter-web</artifactId></dependency>
b.application.properties 如下
spring.application.name=springboot-user-comsumerserver.port=8081dubbo.scan.base-packages=com.lvzhu.user.clientdubbo.application.name=springboot-user-comsumer## dubbo.registry.address=zookeeper://127.0.0.1:2181dubbo.registry.address=nacos://127.0.0.1:8848
d.UserClient
package com.lvzhu.user.client;import com.lvzhu.user.api.UserService;import com.lvzhu.user.resp.User;import org.apache.dubbo.config.annotation.Reference;import org.springframework.stereotype.Service;/*** @author lvzhu.* Time 2019-08-05 20:17* Desc 文件描述*/@Servicepublic class UserClient {@Reference(loadbalance = "roundrobin", cluster = "failfast", check = false)private UserService userService;public User getUser(Long id) {return userService.getUser(id);}}
e.UserController
package com.lvzhu.user.controller;import com.lvzhu.user.client.UserClient;import com.lvzhu.user.resp.User;import org.springframework.beans.factory.annotation.Autowired;import org.springframework.web.bind.annotation.GetMapping;import org.springframework.web.bind.annotation.PathVariable;import org.springframework.web.bind.annotation.RestController;/*** @author lvzhu.* Time 2019-08-05 20:17* Desc 文件描述*/@RestControllerpublic class UserController {@Autowiredprivate UserClient userClient;@GetMapping("/user/{id}")public User getUser(@PathVariable(name = "id") Long id) {return userClient.getUser(id);}}
f.UserComsumerApplication启动类
package com.lvzhu.user;import org.springframework.boot.SpringApplication;import org.springframework.boot.autoconfigure.SpringBootApplication;@SpringBootApplicationpublic class UserComsumerApplication {public static void main(String[] args) {SpringApplication.run(UserComsumerApplication.class, args);}}
四 启动
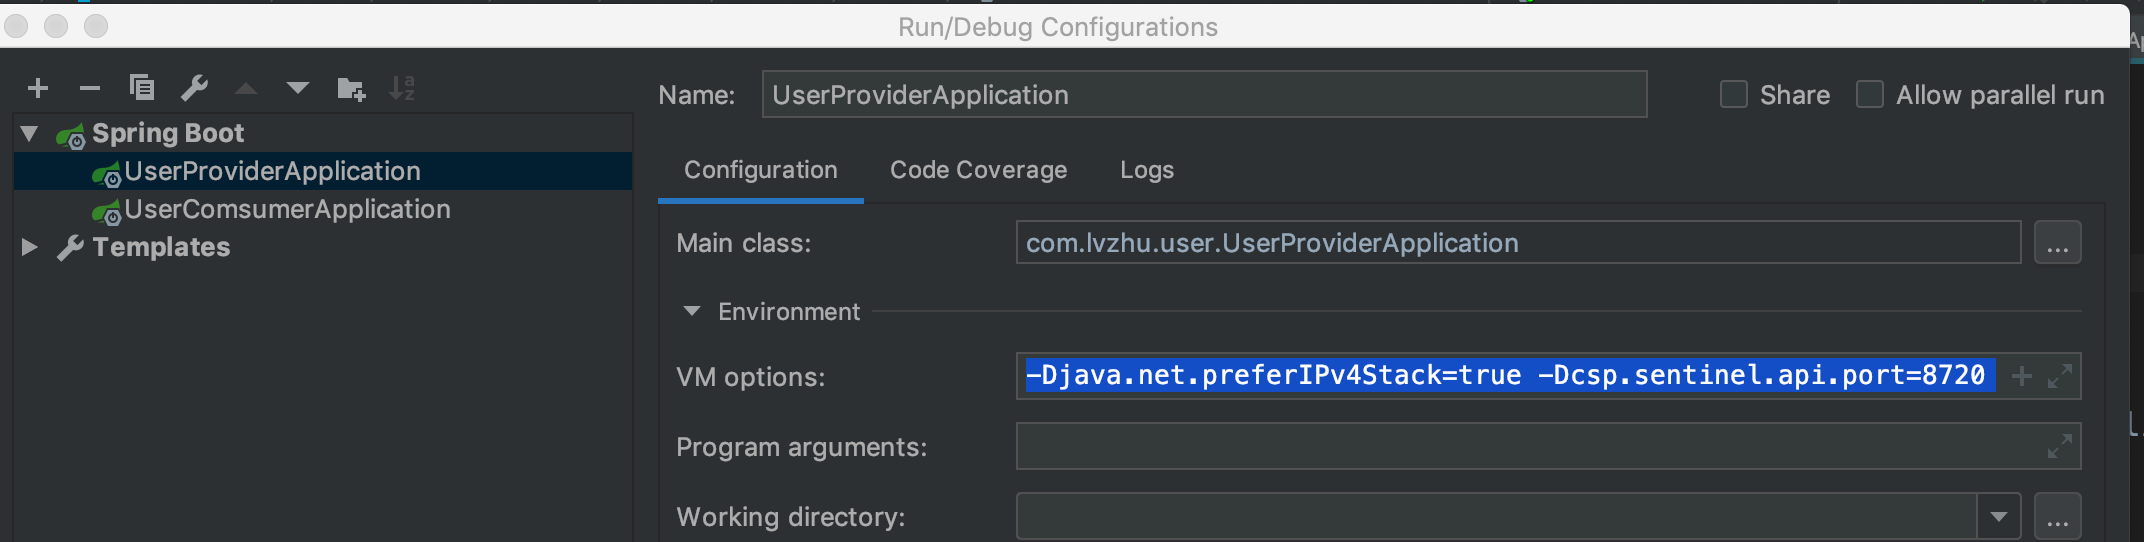
1.启动用户服务提供者
运行 UserProviderApplication运行需要添加参数 :-Djava.net.preferIPv4Stack=true -Dcsp.sentinel.api.port=8720 -Dcsp.sentinel.dashboard.server=localhost:8888 - Dproject.name=springboot-user-provider
如下配置:
2.启动用户服务的消费者
运行UserComsumerApplication运行需要添加参数 :-Djava.net.preferIPv4Stack=true -Dcsp.sentinel.api.port=8721 -Dcsp.sentinel.dashboard.server=localhost:8888 -Dproject.name=springboot-user-comsumer
启动完成后:
nacos控制台 如下:

Sentinel Dashboard 如下:
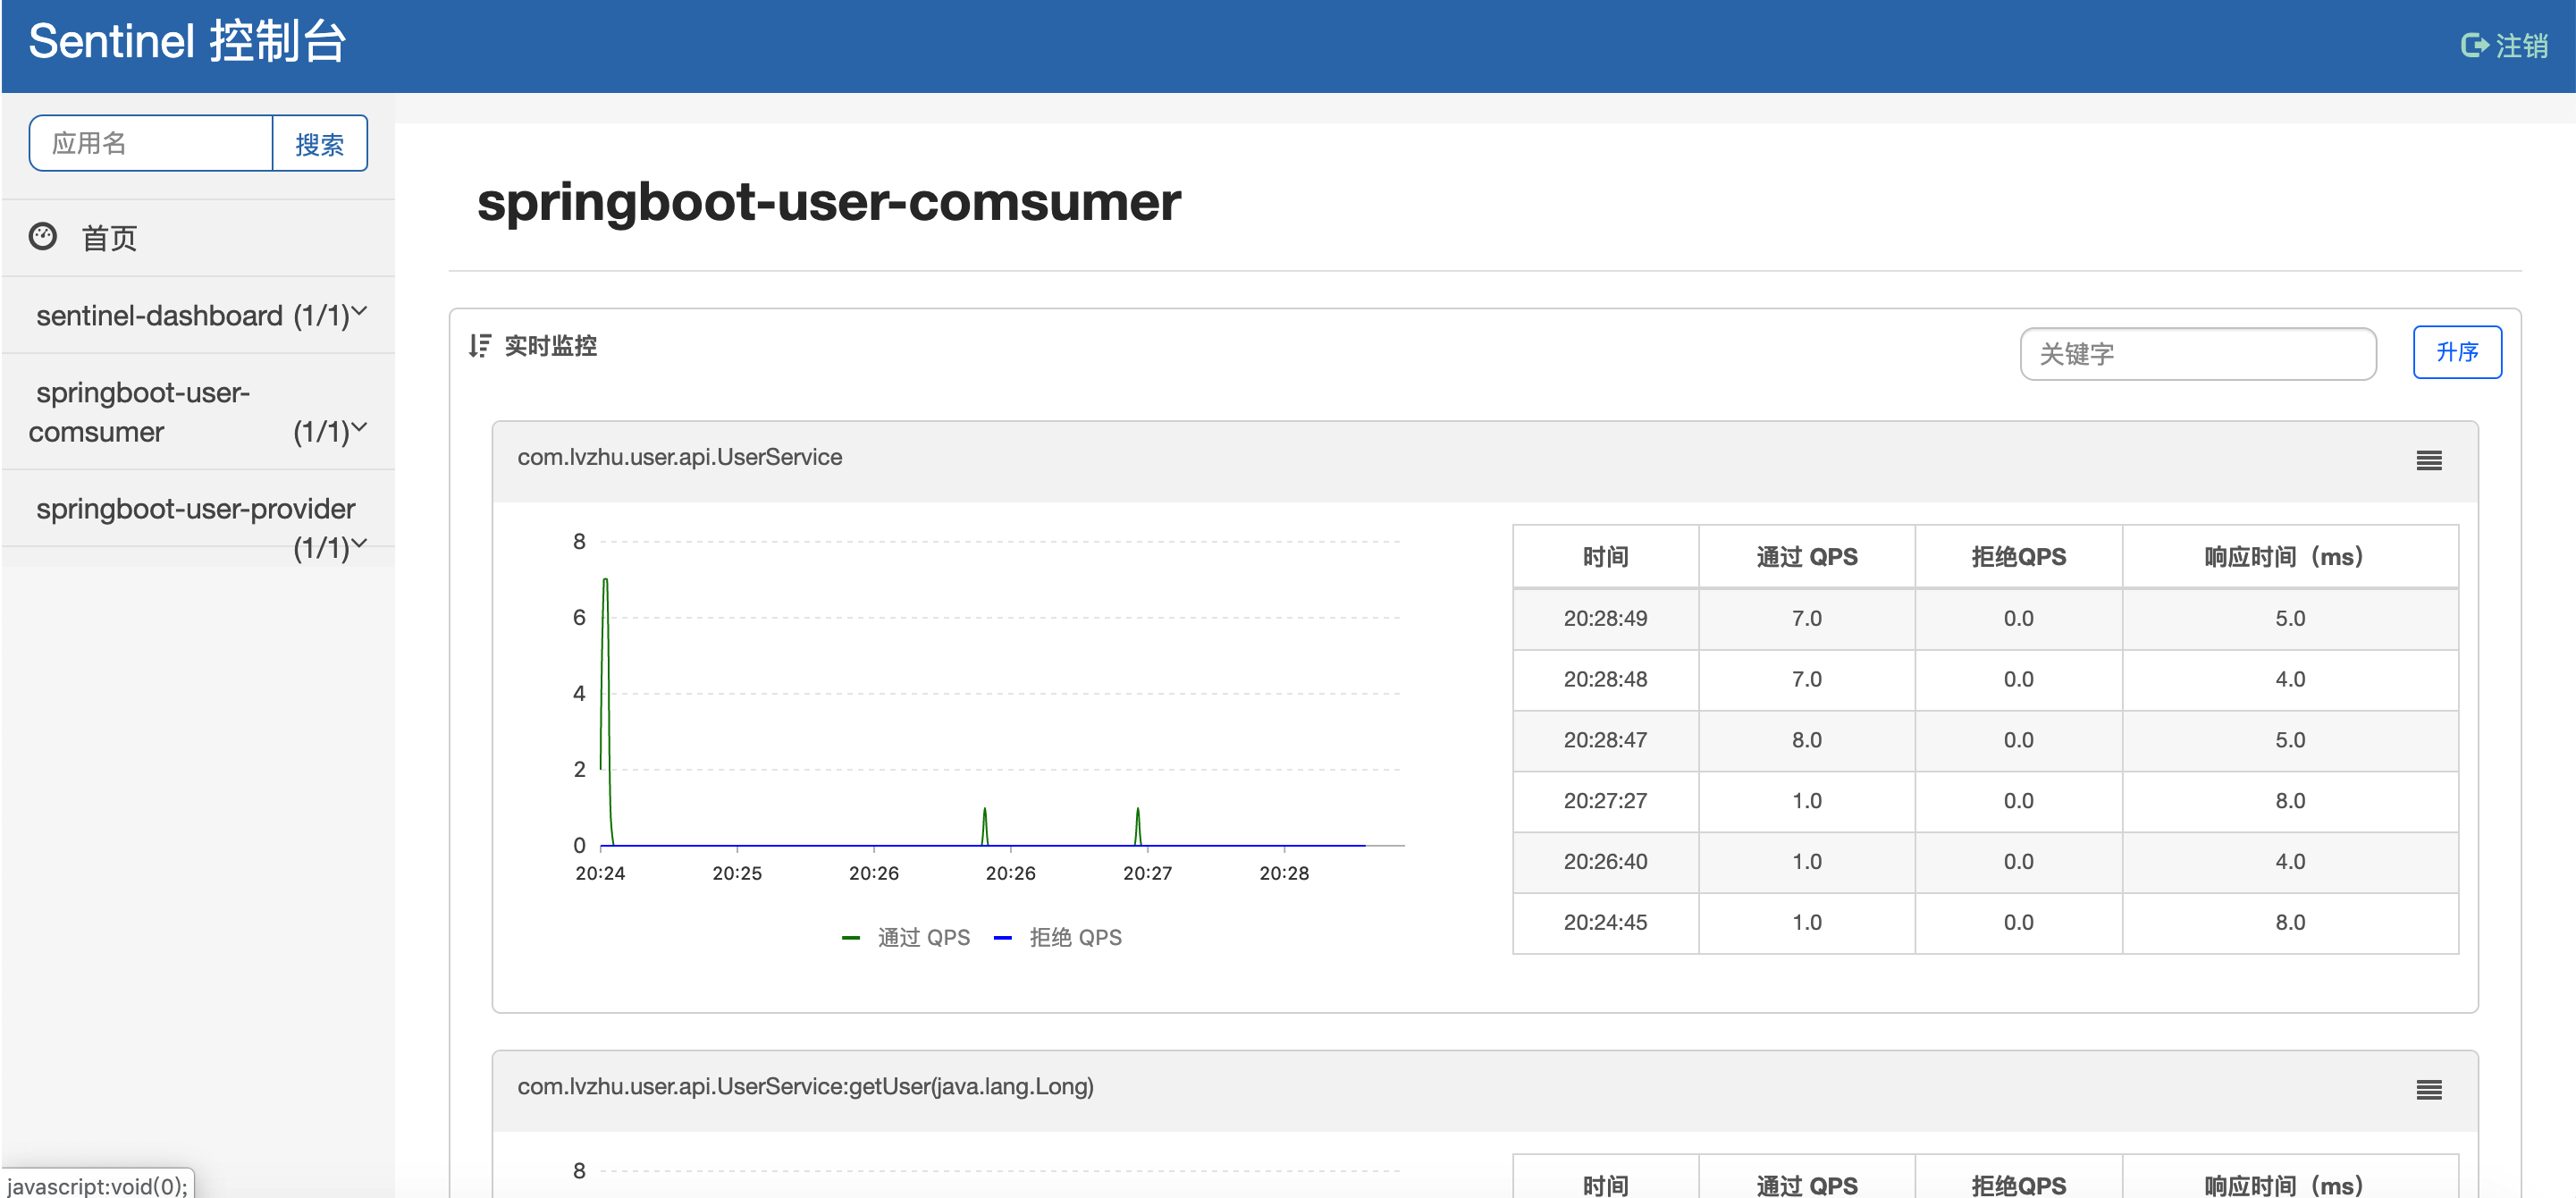
需要注意:要访问一下 http://localhost:8081/user/1 才会有 springboot-user-comsumer 和 springboot-user-provider
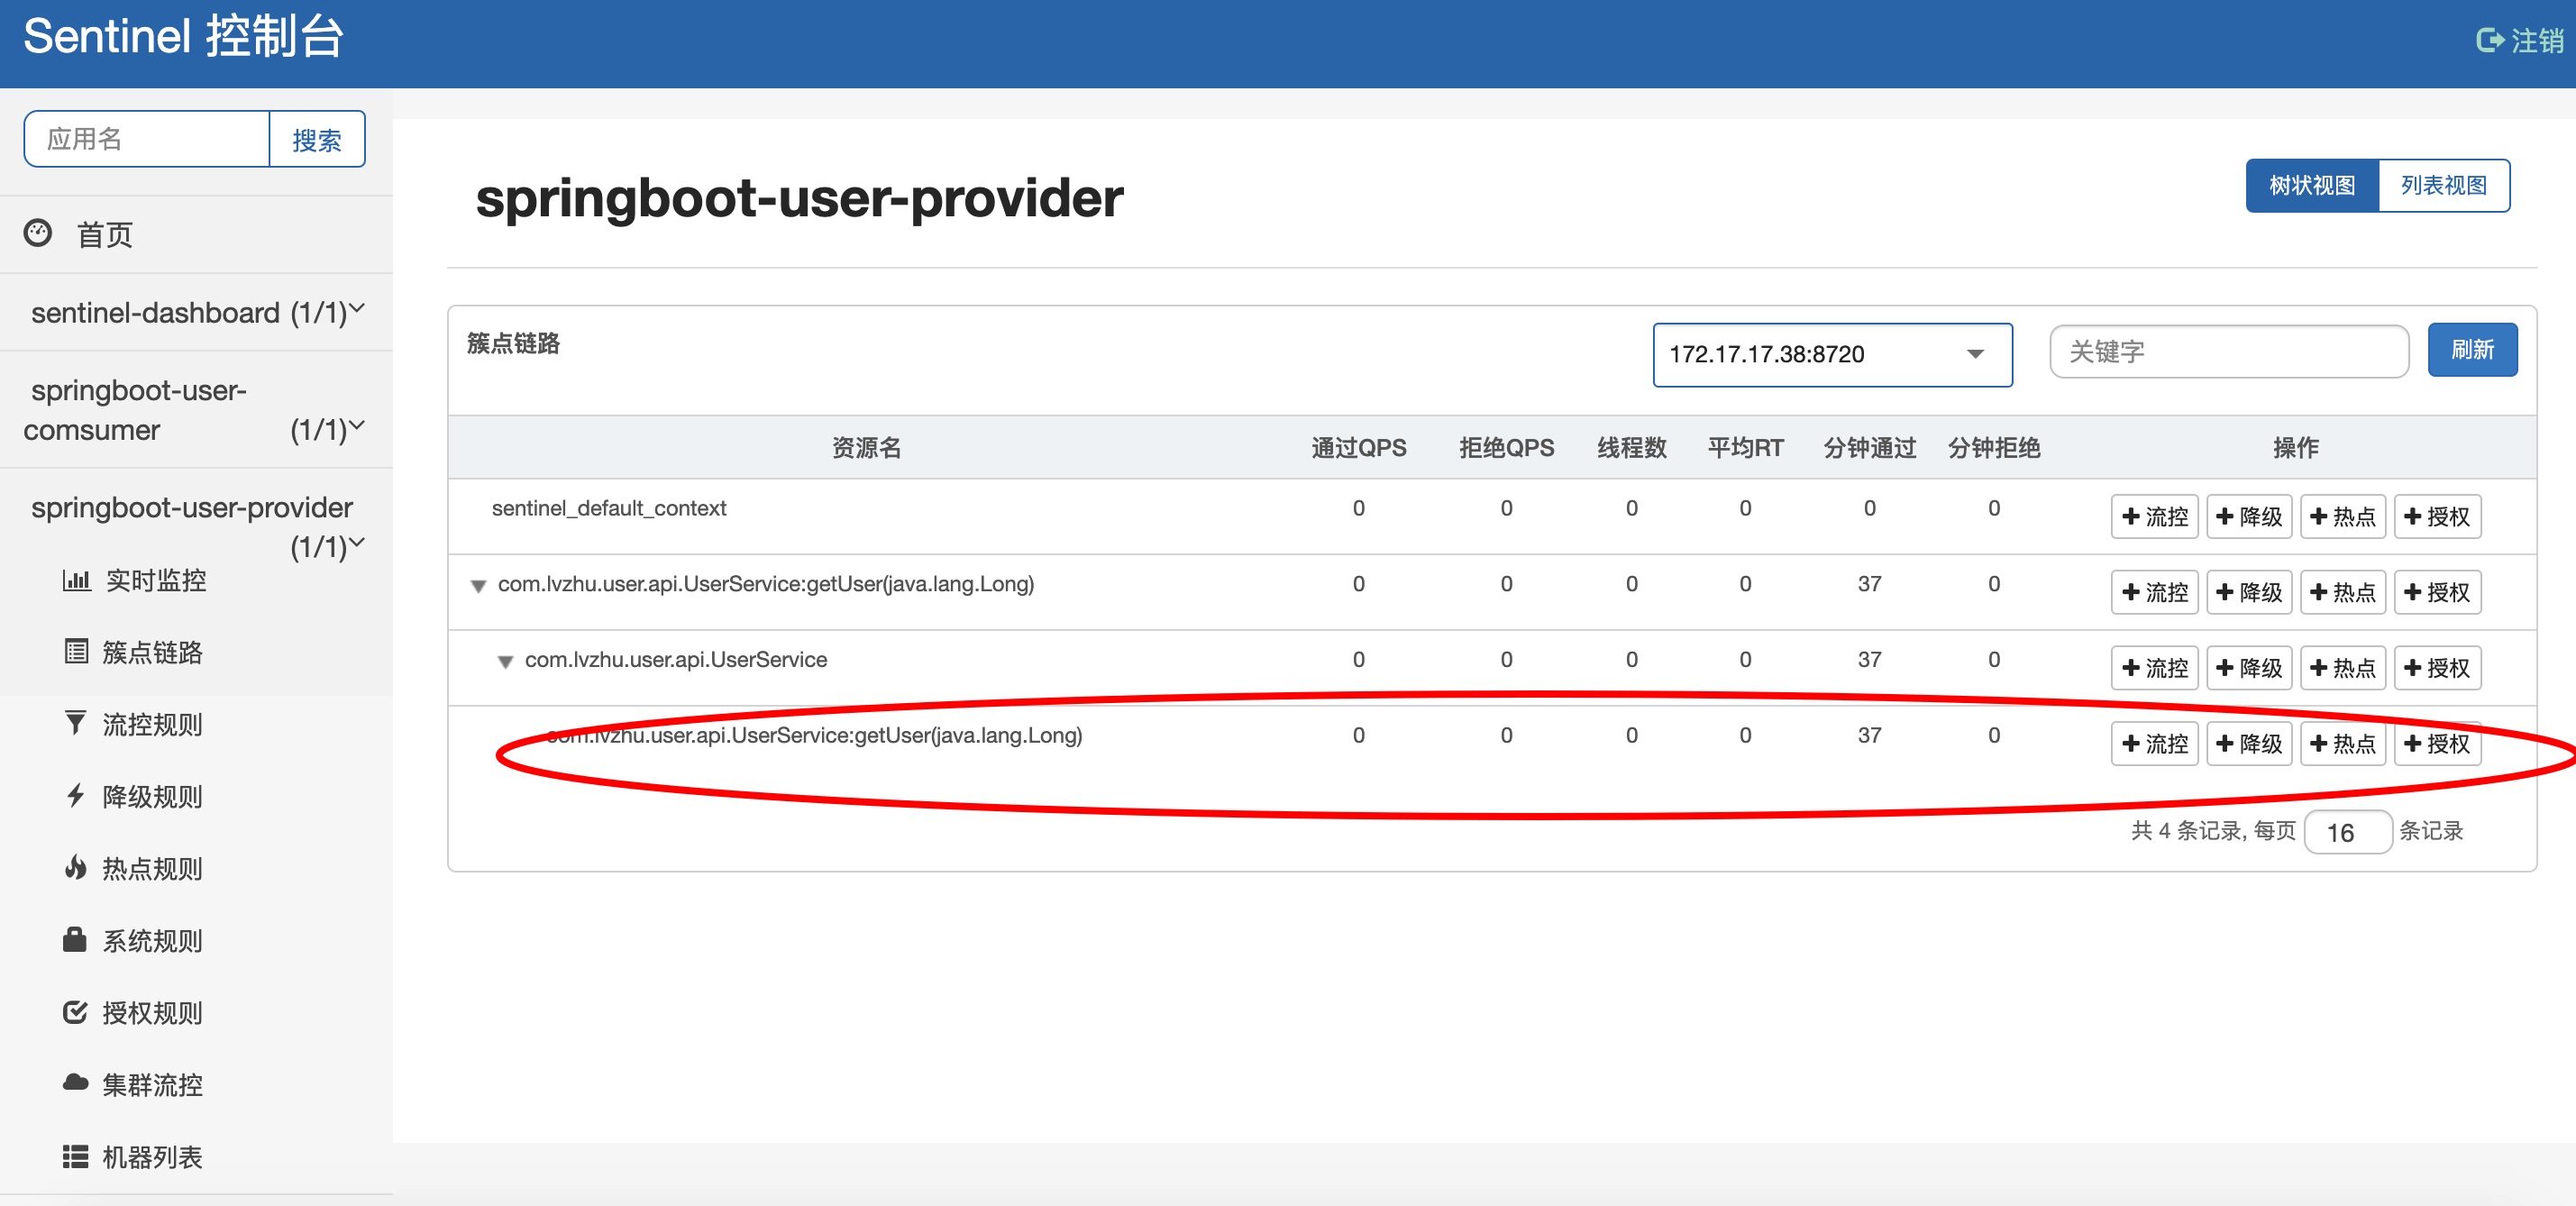
我们对springboot-user-provider进行流控:点击簇点链路 可以对接口和方法进行流控 ,降级。
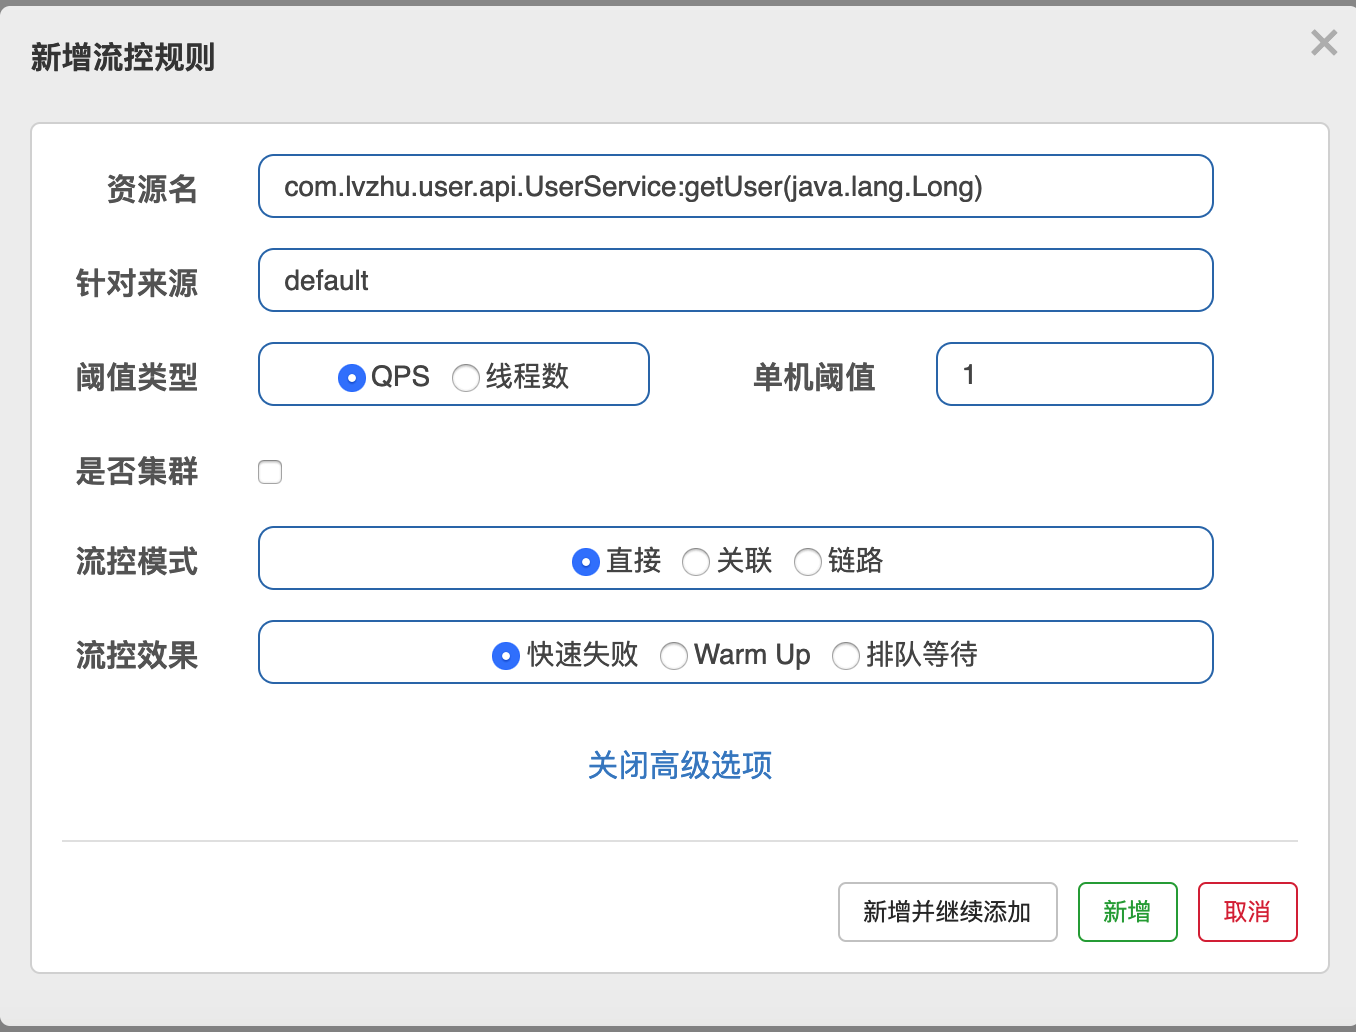
如下新建流控 我把单机的qps设置为了1 超过1就会快速失败
当然可以对 springboot-user-comsumer 进行限流方法同上。
整合的案例:https://github.com/ljmomo/springboot-dubbo-nacos-sentinel
clone 确保 naocos 和 sentinel都启动再运行
五 参考文献:
dubbo:[http://dubbo.apache.org/zh-cn/docs/user/quick-start.html][http_dubbo.apache.org_zh-cn_docs_user_quick-start.html]nacos:[https://nacos.io/zh-cn/docs/quick-start.html][https_nacos.io_zh-cn_docs_quick-start.html]
sentinel:https://github.com/alibaba/Sentinel/wiki/%E4%BB%8B%E7%BB%8D


 多重继承(MI, multiple inheritance,主要研究多重公有继承)")


还没有评论,来说两句吧...