14-线程和线程池
线程和线程池
- 线程
- 1.1 什么是线程&多线程
- 1.2 线程实现的方式
- 1.3 线程的生命周期&状态
- 1.4 线程执行顺序
- 1.5 Callable & Future
- 1.6 总结
- 线程池
- 2.1 线程池是什么
- 2.2 线程池的好处
- 2.3 线程池实现原理
- 2.3.1 源码分析
- 2.3.2 工作线程
- 2.4 线程池的使用
- 2.4.1 线程池的创建
- 2.4.2 向线程池提交任务
- 2.4.2.1 excute()
- 2.4.2.2 submit()
1. 线程
1.1 什么是线程&多线程
**线程**:线程是进程的一个实体,是`CPU`调度和分派的基本单位,它是比进程更小的能独立运行的基本单位。线程自己基本不拥有系统资源,只拥有一点在运行中必不可少的资源(如程序计数器,一组寄存器和栈),但是它可与属同一个进程的其他线程共享进程所拥有的全部资源。**多线程**:多线程指在单个程序中可以同时运行多个不同的线程执行不同的任务。多线程编程的目的,就是“最大限度地利用`CPU`资源”,当某一线程地处理不需要占用`CPU`而只和`IO`等资源打交道时,让需要占用`CPU`的其他线程有其他机会获得`CPU`资源。
1.2 线程实现的方式
- 实现 Runnable 接口
- 继承 Thread 类
- 实现 Callable 接口
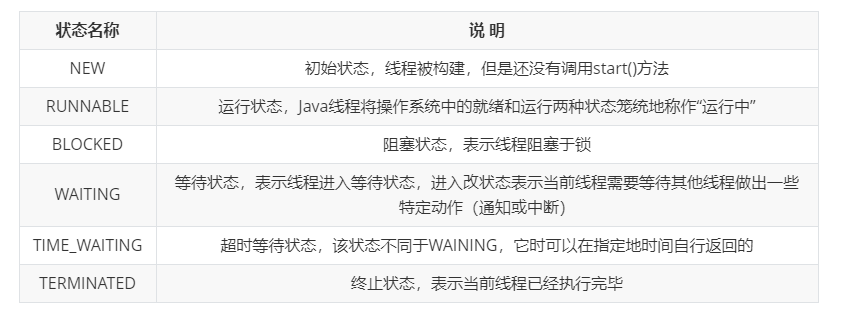
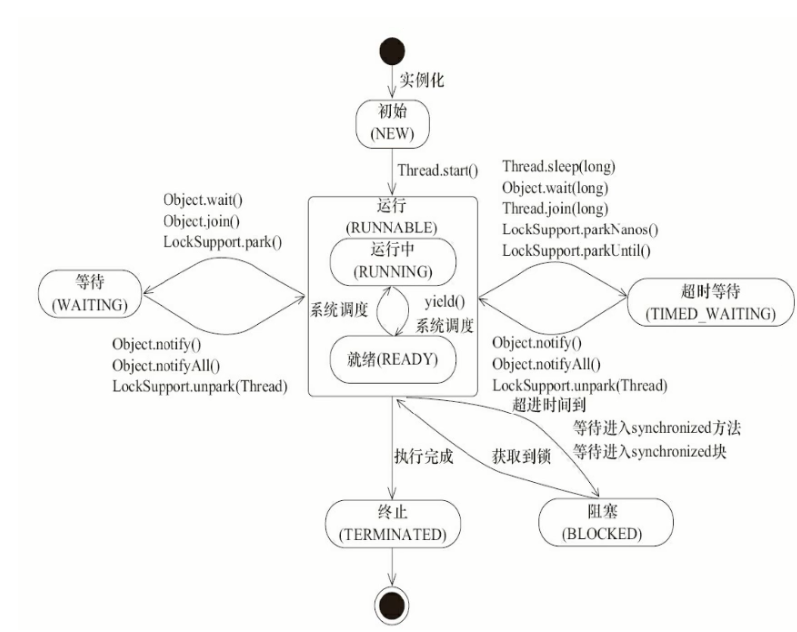
1.3 线程的生命周期&状态
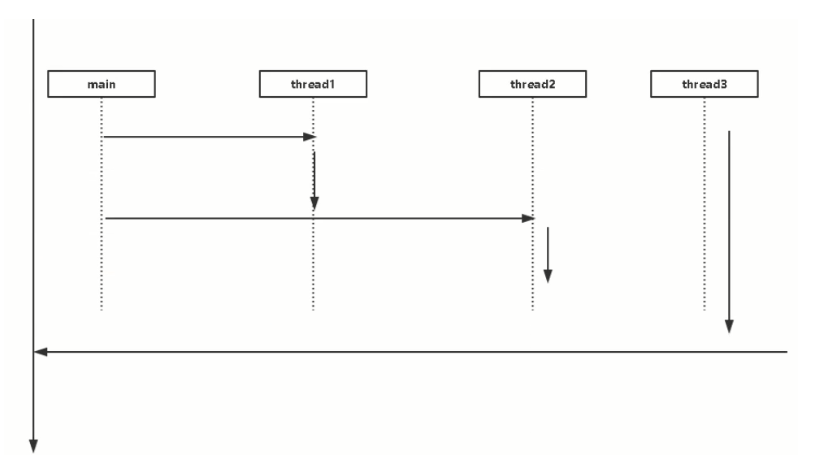
1.4 线程执行顺序
/** * @author wangzhao * @date 2019/9/15 19:48 */public class ThreadSort {public static void main(String[] args) throws InterruptedException {Thread thread1 = new Thread(()->{System.out.println("thread1");});Thread thread2 = new Thread(()->{System.out.println("thread2");});Thread thread3 = new Thread(()->{System.out.println("thread3");});thread1.start();thread1.join();thread2.start();thread2.join();thread3.start();thread3.join();}}`join`线程的运行顺序:thread1thread2thread3`thread1.join()`的含义是运行`thread1.join()`所在的线程等待等待 `thread1` 线程终止后才从thread1.join()返回。即当前线程(`main`)只有等待调用该方法的线程结束,才能继续向下执行,否则一直被阻塞在`join()`处。
public final void join() throws InterruptedException {join(0);}public final synchronized void join(long millis)throws InterruptedException {long base = System.currentTimeMillis();long now = 0;if (millis < 0) {throw new IllegalArgumentException("timeout value is negative");}if (millis == 0) {while (isAlive()) {wait(0);}} else {while (isAlive()) {long delay = millis - now;if (delay <= 0) {break;}wait(delay);now = System.currentTimeMillis() - base;}}}我们需要知道的是,线程调用wait()方法必须获取锁,所以`join()`方法是被`synchronized`修饰的,`synchronizaed`修饰在方法层面相当于`synchronized(this)`,`this`就是`thread1`本身的实例。为什么`join`阻塞的是主线程,而不是`thread1`对象?因为主线程会持有`thread1`这个对象的锁,然后`thread1`对象调用`wait()`方法去阻塞,而这个方法的调用者是在主线程中的。所以造成主线程阻塞。为什么`thread1`线程执行完毕就能够唤醒主线程呢?或者说是在什么时候唤醒的?通过`wait`方法阻塞的线程,需要通过`notify`或者`notifyall`来唤醒。所以在线程执行完毕以后会有一个唤醒的操作,只是我们不需要关心。void JavaThread::exit(bool destroy_vm, ExitType exit_type) {assert(this == JavaThread::current(), "thread consistency check");...// Notify waiters on thread object. This has to be done after exit() is called// on the thread (if the thread is the last thread in a daemon ThreadGroup the// group should have the destroyed bit set before waiters are notified).ensure_join(this);assert(!this->has_pending_exception(), "ensure_join should have cleared");...观察一下 `ensure_join(this)`这行代码上的注释,唤醒处于等待的线程对象,这个是在线程终止之后做的清理工作,这个方法的定义代码片段如下:static void ensure_join(JavaThread* thread) {// We do not need to grap the Threads_lock, since we are operating on ourself.Handle threadObj(thread, thread->threadObj());assert(threadObj.not_null(), "java thread object must exist");ObjectLocker lock(threadObj, thread);// Ignore pending exception (ThreadDeath), since we are exiting anywaythread->clear_pending_exception();// Thread is exiting. So set thread_status field in java.lang.Thread class to TERMINATED.java_lang_Thread::set_thread_status(threadObj(), java_lang_Thread::TERMINATED);// Clear the native thread instance - this makes isAlive return false and allows the join()// to complete once we've done the notify_all below//这里是清除native线程,这个操作会导致isAlive()方法返回falsejava_lang_Thread::set_thread(threadObj(), NULL);lock.notify_all(thread);//注意这里// Ignore pending exception (ThreadDeath), since we are exiting anywaythread->clear_pending_exception();}`ensure_join`方法中,调用 `lock.notify_all(thread)`; 唤醒所有等待`thread`锁的线程,意味着调用了`join`方法被阻塞的主线程会被唤醒;`Thread.join`其实底层是通过`wait/notifyall`来实现线程的通信达到线程阻塞的目的;当线程执行结束以后,会触发两个事情,第一个是设置`native`线程对象为`null`、第二个是通过`notifyall`方法,让等待在`thread1`对象锁上的线程被唤醒。
1.5 Callable & Future
public class CallableTest implements Callable<String> {@Overridepublic String call() throws Exception {return "hello world";}public static void main(String[] args) throws ExecutionException, InterruptedException {FutureTask<String> task = new FutureTask<String>(new CallableTest());new Thread(task).start();System.out.println(task.get());}}hello world为什么调用`get()`方法会被阻塞?public FutureTask(Callable<V> callable) {if (callable == null)throw new NullPointerException();this.callable = callable;this.state = NEW; // ensure visibility of callable}public void run() {if (state != NEW ||!UNSAFE.compareAndSwapObject(this, runnerOffset,null, Thread.currentThread()))return;try {Callable<V> c = callable;if (c != null && state == NEW) {V result;boolean ran;try {result = c.call();ran = true;} catch (Throwable ex) {result = null;ran = false;setException(ex);}if (ran)set(result);}} finally {// runner must be non-null until state is settled to// prevent concurrent calls to run()runner = null;// state must be re-read after nulling runner to prevent// leaked interruptsint s = state;if (s >= INTERRUPTING)handlePossibleCancellationInterrupt(s);}}public V get() throws InterruptedException, ExecutionException {int s = state;if (s <= COMPLETING)s = awaitDone(false, 0L);returnreport(s);}private int awaitDone(boolean timed, long nanos)throws InterruptedException {final long deadline = timed ? System.nanoTime() + nanos : 0L;WaitNode q = null;boolean queued = false;for (;;) {if (Thread.interrupted()) {removeWaiter(q);throw new InterruptedException();}int s = state;if (s > COMPLETING) {if (q != null)q.thread = null;return s;}else if (s == COMPLETING) // cannot time out yetThread.yield();else if (q == null)q = new WaitNode();else if (!queued)queued = UNSAFE.compareAndSwapObject(this, waitersOffset,q.next = waiters, q);else if (timed) {nanos = deadline - System.nanoTime();if (nanos <= 0L) {removeWaiter(q);return state;}LockSupport.parkNanos(this, nanos);}elseLockSupport.park(this);}}通过`state`来判断当前任务是否执行完,如果没有执行完则阻塞。
1.6 总结
**实现Runnable接口相比继承Thread类有如下优势**:1)可以避免由于Java的单继承特性而带来的局限2)增强程序的健壮性,代码能够被多个线程共享,代码与数据是独立的3)线程池只能放入实现`Runnable`或`Callable`类线程,不能直接放入继承`Thread`的类**实现Runnable接口和实现Callable接口的区别**:1)`Runnable`是自从`Java1.1`就有了,而`Callable`是`1.5`之后才加上去的2)实现`Callable`接口的任务线程能返回执行结果,而实现`Runnable`接口的任务线程不能返回结果3)`Callable`接口的`call()`方法允许抛出异常,而`Runnable`接口的`run()`方法的异常只能在内部消化,不能向上抛4)加上线程池允许,`Runnable`使用`ExecutorService`的`execute()`方法,`Callable`使用`submit()`方法注意:`Callable`接口支持返回指向结果,此时需要调用`FutureTask.get()`方法实现,此方法会阻塞主线程直到获取返回结果,当不调用此方法时,主线程不会阻塞。
2. 线程池
2.1 线程池是什么
线程池是拥有若干已经创建好的线程的缓冲池,调用者可以直接通过线程池获取已经创建好的线程执行任务。
2.2 线程池的好处
- 降低资源消耗:重复利用已创建的线程执行新的任务
- 提高响应速度:当任务到达时,任务可以不需要等到线程创建就能立即执行
- 提高线程的可管理性:由线程池统一分配、调优和监控线程
2.3 线程池实现原理
当提交一个新任务到线程池时,线程池的处理流程如下:

`ThreadPoolExecutor`执行 `execute()`方法的示意图:
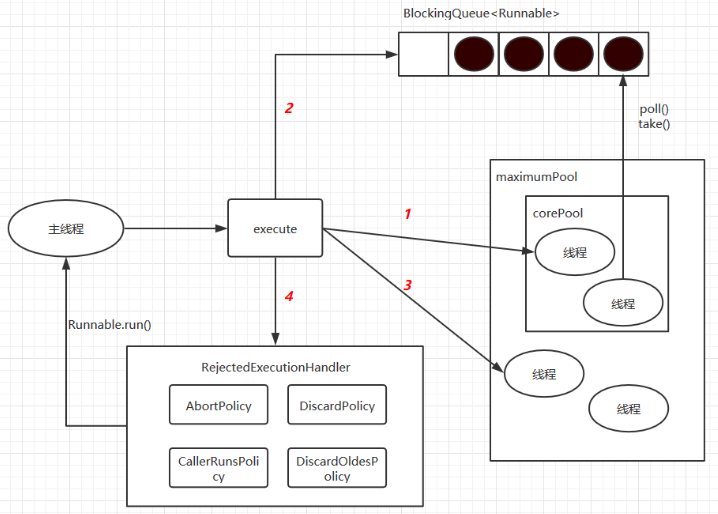
ThreadPoolExecutor执行execute方法分下面4种情况:
1)如果当前运行的线程少于 `corePoolSize` ,则创建新线程来执行任务(注意,执行这一步骤需要获取全局锁)2)如果运行的线程等于或多于`corePoolSize` ,则将任务加入`BlockingQueue`3)如果无法将任务加入`BlockingQueue`(队列已满),则创建新的线程来处理任务(注意,执行这一步骤需要获取全局锁)4)如果新创建线程将使当前运行的线程超出 `maximumPoolsize`,任务将被拒绝,并调用`RejectedExecutionHandler.rejectedExecution()`方法。为什么要将线程池分为maximumPool 和 corePool,一个pool不行吗?是为了在执行`execute()` 方法 ,尽可能地避免获取全局锁。在`ThreadPoolExecuto`r完成预热之后(当前运行地线程数大于等于`corePoolSize` ),几乎所有的 `execute()`方法调用都是执行步骤2 ,而 步骤2不需要获得锁。同时,也可以减少线程被创建的数量。
2.3.1 源码分析

成员变量 `ctl` 是一个 `Integer` 的原子变量,用来记录线程池状态和线程池中线程个数。假设 `Integer` 类型是 `32`位二进制表示,则其中高 `3` 位用来表示线程池状态,后面 `29` 位用来记录线程池线程个数。// 默认是 RUNNING 状态,线程个数为0private final AtomicInteger ctl = new AtomicInteger(ctlOf(RUNNING, 0));// 线程个数掩码位数,并不是所有平台的 int 类型都是32位,即具体平台下Integer的二进制位数-3后的剩余位数所// 表示的数才是线程个数private static final int COUNT_BITS = Integer.SIZE - 3;// 线程最大个数(低29位)00011111111111111111111111111111private static final int CAPACITY = (1 << COUNT_BITS) - 1;// 线程池状态:// (高三位) 11100000000000000000000000000000private static final int RUNNING = -1 << COUNT_BITS;// (高三位) 00000000000000000000000000000000private static final int SHUTDOWN = 0 << COUNT_BITS;// (高三位) 00100000000000000000000000000000private static final int STOP = 1 << COUNT_BITS;// (高三位) 01000000000000000000000000000000private static final int TIDYING = 2 << COUNT_BITS;// (高三位) 01100000000000000000000000000000private static final int TERMINATED = 3 << COUNT_BITS;// 获取高3位(运行状态)private static int runStateOf(int c){return c & ~CAPACITY;}// 获取低29位(线程个数)private static int workerCountOf(int c){return c & CAPACITY;}// 计算 ctl 新值(线程状态与线程个数)private static int ctlOf(int rs,int wc){return rs | wc;}线程池状态含义如下:
RUNNING:接受新任务并且处理阻塞队列里的任务SHUTDOWN:拒绝新任务但是处理阻塞队列里的队伍STOP:拒绝新任务并且抛弃阻塞队列里的任务,同时会中断正在处理的任务TIDYING:所有任务都执行完(包含阻塞队列里面的任务)后当前线程池活动线程数为0,将要调用terminated方法。TERMINSTED:终止状态,terminated方法调用完成以后的状态。public void execute(Runnable command) {
if (command == null)throw new NullPointerException();int c = ctl.get();// 1、如果线程数小于核心线程数,则创建线程并执行当前任务if (workerCountOf(c) < corePoolSize) {if (addWorker(command, true))return;c = ctl.get();}// 2、如果线程数大于等于基本线程数或线程创建失败,将当前任务放到工作队列中if (isRunning(c) && workQueue.offer(command)) {int recheck = ctl.get();if (! isRunning(recheck) && remove(command))reject(command);else if (workerCountOf(recheck) == 0)addWorker(null, false);}// 3、尝试开启新线程,扩容至maxPoolSizeelse if (!addWorker(command, false))// 4、如果失败,则执行响应的策略reject(command);}
2.3.2 工作线程
线程池创建线程时,会将线程封装成工作线程`Worker`,`Worker`在执行完任务后,还会循环获取工作队列的任务来执行。
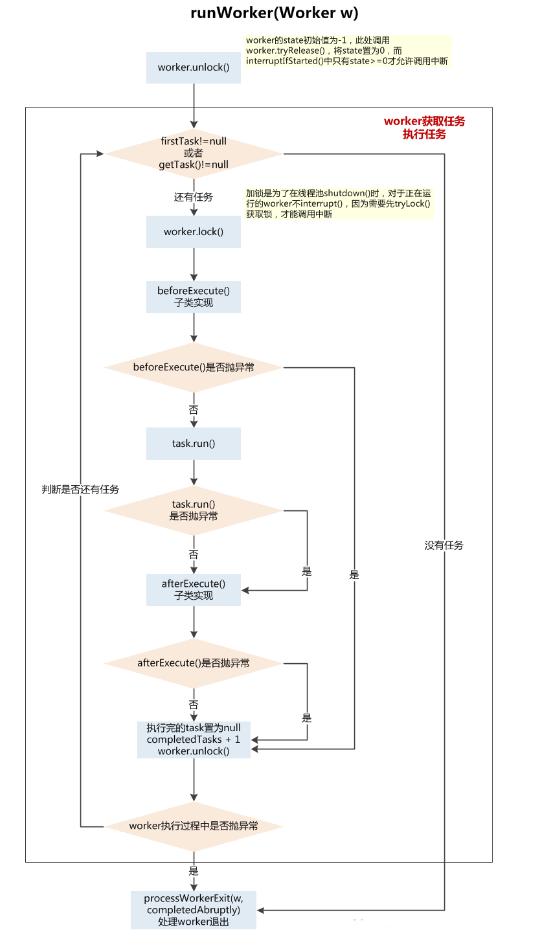
private final class Worker extends AbstractQueuedSynchronizer implements Runnable{private static final long serialVersionUID = 6138294804551838833L;final Thread thread;Runnable firstTask;Worker(Runnable firstTask) {setState(-1); // inhibit interrupts until runWorkerthis.firstTask = firstTask;this.thread = getThreadFactory().newThread(this);}/** Delegates main run loop to outer runWorker */public void run() {runWorker(this);}}final void runWorker(Worker w) {Thread wt = Thread.currentThread();Runnable task = w.firstTask;w.firstTask = null;w.unlock(); // allow interruptsboolean completedAbruptly = true;try {while (task != null || (task = getTask()) != null) {w.lock();if ((runStateAtLeast(ctl.get(), STOP) ||(Thread.interrupted() &&runStateAtLeast(ctl.get(), STOP))) &&!wt.isInterrupted())wt.interrupt();try {beforeExecute(wt, task);Throwable thrown = null;try {task.run();} catch (RuntimeException x) {thrown = x; throw x;} catch (Error x) {thrown = x; throw x;} catch (Throwable x) {thrown = x; throw new Error(x);} finally {afterExecute(task, thrown);}} finally {task = null;w.completedTasks++;w.unlock();}}completedAbruptly = false;} finally {processWorkerExit(w, completedAbruptly);}}`ThreadPoolExecutor`中线程执行任务的示意图:
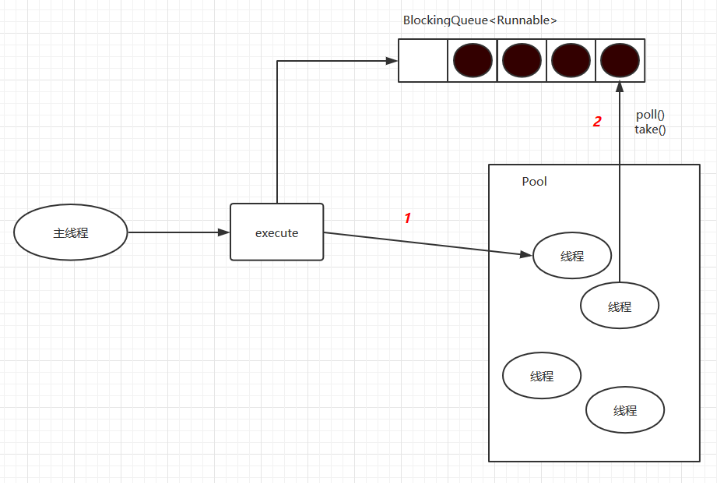
线程池中的线程执行任务分两种情况:
1)在 `execute()` 方法中创建一个线程时,会让这个线程执行当前任务2)这个线程执行完上图中`1`的任务后,会反复从 `BlockingQueue` 获取任务来执行。
2.4 线程池的使用
2.4.1 线程池的创建
new ThreadPoolExecutor(int corePoolSize,int maximumPoolSize,long keepAliveTime,TimeUnit unit,BlockingQueue<Runnable> workQueue,ThreadFactory threadFactory,RejectedExecutionHandler handler)1)`corePoolSize`(线程池的基本大小):当提交一个任务到线程池,线程池会创建一个线程来执行任务,即使其他空闲的基本线程能够执行新任务也会创建线程,需要等到需要执行的任务数大于线程池基本大小时就不再创建。`prestartCoreThread()` , 线程池提前创建并启动所有的基本线程。2)`maximumPoolSize`(线程池最大数量):线程池允许创建的最大线程数。如果队列满了,并且已创建的线程池小于最大线程数,则线程会再创建新的线程执行任务。如果使用了无界的队列这个参数没有效果。3)`workQueue`(任务队列):用于保证等待执行的任务的阻塞队列。有如下几个可以选择的阻塞队列:`ArrayBlockingQueue`:基于数组结构的有界阻塞队列。此队列按FIFO原则对元素进行排序。`LinkedBlockingQueue`:基于链表结构的有界阻塞队列。此队列按FIFO排序元素,吞吐量通常高于ArrayBlockingQueue。 **静态工厂方法 `Executors.newFixedThreadPool()`使用了这个队列**`SynchronousQueue`:一个不存储元素的阻塞队列。每个插入操作必须等到另一个线程调用移除操作,否则插入操作一直处于阻塞状态。吞吐量通常高于`LinkedBlockingQueue`。**静态工厂方法 `Executors.newCachedThreadPool()`使用了这个队列**`PriorityBlockingQueu`e:一个具有优先级的无限阻塞队列。4)`ThreadFactory`:用于设置创建线程的工厂,可以通过线程工厂可以对创建的线程做相关设置。5)`RejectedExecutionHandler`(饱和策略):当队列和线程池都满了,说明线程池处于饱和状态,那么必须采取一种策略处理提交的新任务。这个策略默认情况下是`AbortPolicy`.1. `AbortPolicy`:直接抛出异常2. `CallerRunsPolicy`:使用调用者所在的线程来运行任务3. `DiscardOldestPolicy`:丢弃队列里最老的一个任务,并执行当前任务4. `DiscardPolicy`:不处理,丢弃掉6)`keepAliveTime`(线程活动保持时间):线程池的工作线程空闲后,保持存活的时间。如果任务很多,并且每个任务执行的时间比较短,可以调大时间,提高线程的利用率。7)`TimeUnit`(线程活动保持时间的单位)
2.4.2 向线程池提交任务
可以使用两个方法向线程池提交任务,分别为 `execute()` 和`submit()` 方法:
2.4.2.1 excute()
该方法用于提交不需要返回值的任务。public void execute(Runnable command) {// (1)如果任务为null,抛出NPE异常if (command == null)throw new NullPointerException();// (2)获取当前线程池的状态+线程个数变量的组合值int c = ctl.get();// (3)当前线程池中线程个数是否小于 corePoolSize ,小于则开启新线程运行if (workerCountOf(c) < corePoolSize) {if (addWorker(command, true))return;c = ctl.get();}// (4)如果线程池处于 RUNNING 状态,则添加任务到阻塞队列if (isRunning(c) && workQueue.offer(command)) {// (4.1)二次检查int recheck = ctl.get();// (4.2) 如果当前线程池状态不是 RUNNING 则从队列中删除任务,并执行拒绝策略if (! isRunning(recheck) && remove(command))reject(command);// (4.3)否则如果当前线程为空,则添加一个线程else if (workerCountOf(recheck) == 0)addWorker(null, false);}// (5)如果队列满,则新增线程,新增失败则执行拒绝策略else if (!addWorker(command, false))reject(command);}private boolean addWorker(Runnable firstTask, boolean core) {retry:for (;;) {int c = ctl.get();int rs = runStateOf(c);// 检查队列是否只在必要时为空if (rs >= SHUTDOWN &&! (rs == SHUTDOWN &&firstTask == null &&! workQueue.isEmpty()))return false;// 循环 CAS 增加线程个数for (;;) {int wc = workerCountOf(c);// 如果线程个数超限则返回falseif (wc >= CAPACITY ||wc >= (core ? corePoolSize : maximumPoolSize))return false;// CAS 增加线程个数,同时只有一个线程成功if (compareAndIncrementWorkerCount(c))break retry;// CAS 失败了,则看线程池状态是否变化了,变化则跳到外层循环重新尝试获取线程池// 状态,否则内存循环重新 CASc = ctl.get(); // Re-read ctlif (runStateOf(c) != rs)continue retry;// else CAS failed due to workerCount change; retry inner loop}}// 到这里说明 CAS 成功boolean workerStarted = false;boolean workerAdded = false;Worker w = null;try {// 创建一个workerw = new Worker(firstTask);final Thread t = w.thread;if (t != null) {final ReentrantLock mainLock = this.mainLock;// 加独占锁,为了实现 worker 同步,因为可能多个线程调用了线程池的 execute 方法mainLock.lock();try {// 重新检查线程池状态,以避免在获取锁前调用了 shutdown 接口int rs = runStateOf(ctl.get());if (rs < SHUTDOWN ||(rs == SHUTDOWN && firstTask == null)) {if (t.isAlive()) // precheck that t is startablethrow new IllegalThreadStateException();// 添加任务workers.add(w);int s = workers.size();if (s > largestPoolSize)largestPoolSize = s;workerAdded = true;}} finally {mainLock.unlock();}// 添加成功后则启动任务if (workerAdded) {t.start();workerStarted = true;}}} finally {if (! workerStarted)addWorkerFailed(w);}return workerStarted;}
(1)双重循环的目的是通过CAS操作增加线程数
(2)把并发安全的任务添加到 worker里面,并且启动任务执行
Worker(Runnable firstTask) {setState(-1); // 在调用 runworker 之前禁止中断this.firstTask = firstTask;this.thread = getThreadFactory().newThread(this);}final void runWorker(Worker w) {Thread wt = Thread.currentThread();Runnable task = w.firstTask;w.firstTask = null;w.unlock(); // 将 state 设置为0,允许中断boolean completedAbruptly = true;try {while (task != null || (task = getTask()) != null) {w.lock();if ((runStateAtLeast(ctl.get(), STOP) ||(Thread.interrupted() &&runStateAtLeast(ctl.get(), STOP))) &&!wt.isInterrupted())wt.interrupt();try {// 执行任务前干一些事情beforeExecute(wt, task);Throwable thrown = null;try {// 执行任务task.run();} catch (RuntimeException x) {thrown = x; throw x;} catch (Error x) {thrown = x; throw x;} catch (Throwable x) {thrown = x; throw new Error(x);} finally {// 执行任务完毕后干一些事情afterExecute(task, thrown);}} finally {task = null;// 统计当前 Worker 完成了多少个任务w.completedTasks++;w.unlock();}}completedAbruptly = false;} finally {// 执行清理工作processWorkerExit(w, completedAbruptly);}}
2.4.2.2 submit()
用于提交需要返回值的任务。线程池会返回一个`future` 类型的对象,通过这个`future`对象可以判断任务是否执行成功,并且可以通过`future` 的`get()`方法来获取返回值,`get()` 方法会阻塞当前线程直到任务完成。Future<?> future = threadPool.submit(task);Object s = future.get();可以调用 `shutdown()` 或 `shurdownNow()`方法来关闭线程池。原理:遍历线程池中的工作线程,然后逐个调用线程的`interrupt`方法来中断线程,所以无法响应线程中断的任务可能永远无法终止。
`shotdownNow()`将线程池状态设置成`STOP`,然后尝试停止所有的正在执行或暂停任务的线程,并返回等待执行任务的列表。而`shutdown`只是将线程池的状态设置成SHUTDOWN状态,然后中断所有没有正在执行任务的线程。


”")


还没有评论,来说两句吧...