路由传参和路由卫士
1.动态路由匹配
动态路由也可以叫做路由传参。
组件的显示内容经常会根据用户选择的内容不同来在同一个组件中渲染不同内容。那么在这个时候就需要动态路由。
1. 动态路径参数
- 使用动态路由匹配中的 动态路径参数来进行路由配置。
注意:动态路径参数 以冒号:开头
{name:”tema”,path:”/index/:id/:name”,component:tema},
2. 绑定参数
路由导航绑定参数的两种方式 但是注意 params只能通过路由配置中的name属性来引用路由
index home home js方式进行参数绑定
fun() {
// 对动态数据不太友好// this.$router.push("/home/呵呵哒/heheda")this.$router.push({name: 'home',//params只能通过name来引入路由params: {xiaoming: this.linktexta,xiaohong: this.linktextb}})
}
3. 获取路由传入参数
如果想得到路径参数那么使用$route.params.id
homehomehomehomehomehomehome{
{this.$route.params.xiaoming}}——{
{this.$route.params.xiaohong}}
或者是使用this实例中的this.$route.params.id进行调用
created(){
//路由信心都被挂载到实例中去console.log("路由参数是:"+this.$route.params.id+"---"+this.$route.params.name);
}
params传参案例:
<!DOCTYPE html><html lang="en"><head><meta charset="UTF-8"><meta name="viewport" content="width=device-width, initial-scale=1.0"><meta http-equiv="X-UA-Compatible" content="ie=edge"><title>Document</title></head><body><!-- 动态路由匹配 路由传参 --><!-- params的方式 --><!-- 语法:1.需要配置路由规则 :传递数据的名字 --><!-- 2.开始在导航中进行数据的传递 --><!-- 3.接收传递的数据 this.$route.params.xxxx --><div id="demodiv"><router-link to="/index">index</router-link><!-- 2.在导航中进行数据的发送 --><!-- 声明式导航 --><!-- 2-1传递参数方式1 简单方便 对于传递动态数据不友好 --><!-- <router-link to="/home/呵呵/哈哈">home</router-link> --><!-- 2-2****推荐记忆推荐记忆*****传递方式2 语法稍微麻烦一些 但是对于动态数据非常友好 --><!-- <router-link :to={name:"对应的是路由规则里面的你先去的那个页面的name",params:{路由规则绑定的数据名:你要传递的数据}}></router-link> --><!-- <router-link :to="{name:'home',params:{xiaoming:linktexta,xiaohong:linktextb}}">home</router-link> --><!-- 编程式导航 --><!-- 2-3 --><button @click="fun()">点我去home</button><router-link to="/phone">phone</router-link><router-link to="/user">user</router-link><router-view></router-view></div><!-- 一级路由模板 --><template id="tema"><div><p @click="fun()">{{tematext}}</p></div></template><template id="temb"><div>homehomehomehomehomehomehome{{this.$route.params.xiaoming}}----{{this.$route.params.xiaohong}}</div></template><template id="temc"><div>phonephonephonephonephonephonephone</div></template><template id="temd"><div>useruseruseruseruseruseruser<top-link></top-link><router-view></router-view></div></template><!-- 二级外部模板 --><template id="ertema"><div>我是二级路由11111111</div></template><template id="ertemb"><div>我是二级路由2222222</div></template><template id="ertemc"><div>我是二级路由333333333</div></template><template id="toplinktem"><div><router-link to="/user/ertema">ertema</router-link><router-link to="/user/ertemb">ertemb</router-link><router-link to="/user/ertemc">ertemc</router-link></div></template></body></html><script src="node_modules/vue/dist/vue.min.js"></script><script src="node_modules/vue-router/dist/vue-router.js"></script><script>// 1.为什么要把组件中的内容提取出来单独赋值给一个变量// 下面的是路由规则var tema = {template: "#tema",data() {return {tematext: "你好我是index中的变量数据"}},methods: {fun() {alert("我是index的函数")}},// created(){// alert("我是钩子函数")// }};var temb = {template: "#temb"};var temc = {template: "#temc"};var temd = {template: "#temd",components: {"topLink": {template: "#toplinktem"}}};// 二级路由的组件模板var ertema = {template: "#ertema"};var ertemb = {template: "#ertemb"};var ertemc = {template: "#ertemc"};var routes = [{name: "index",path: "/index",component: tema},// params传参1 配置路由规则{name: "home",path: "/home/:xiaoming/:xiaohong",component: temb},{name: "phone",path: "/phone",component: temc},{name: "user",path: "/user",component: temd,children: [{name: "ertema",path: "ertema",component: ertema},{name: "ertemb",path: "ertemb",component: ertemb},{name: "ertemc",path: "ertemc",component: ertemc}]},{path: "/*",redirect: "/index"}]var router = new VueRouter({routes})new Vue({el: "#demodiv",router,data: {linktexta: "我是第1个1数1据",linktextb: "我是第2个2数2据"},methods: {fun() {// 对动态数据不太友好// this.$router.push("/home/呵呵哒/heheda")this.$router.push({name: 'home',params: {xiaoming: this.linktexta,xiaohong: this.linktextb}})}}})</script>
query传参案例:
<!DOCTYPE html><html lang="en"><head><meta charset="UTF-8"><meta name="viewport" content="width=device-width, initial-scale=1.0"><meta http-equiv="X-UA-Compatible" content="ie=edge"><title>Document</title></head><body><!-- query传参语法:1.不需要配置路由规则2.传参3.接受--><div id="demodiv"><router-link to="/index">首页</router-link><!-- query传参方式 --><!-- 1. --><router-link to="/home?xiaoming=呵呵&xiaohong=哈哈">home</router-link><!-- <router-link to="/home">小组</router-link> --><router-link to="/phone">手机</router-link><router-link to="/user">我的</router-link><router-view></router-view></div><!-- 创建一级路由模板start --><template id="tema"><div><p @click="fun()">{{tematext}}</p></div></template><template id="temb"><div>接收传递过来的参数小组{{this.$route.query.xiaoming}}======{{this.$route.query.xiaohong}}</div></template><template id="temc"><div>手机</div></template><template id="temd"><div>我的<toplink></toplink><router-view></router-view></div></template><!-- 创建一级路由模板end --><!-- 创建二级路由模板start --><template id="ertema"><div>我是二级路由11111111</div></template><template id="ertemb"><div>我是二级路由22222222</div></template><template id="ertemc"><div>我是二级路由33333333</div></template><template id="ertemd"><div>我是二级路由44444444</div></template><!-- 创建二级路由模板end --><template id="toplinktem"><div><router-link to="/user/ertema">ertema</router-link><router-link to="/user/ertemb">ertemb</router-link><router-link to="/user/ertemc">ertemc</router-link><router-link to="/user/ertemd">ertemd</router-link></div></template></body></html><script src="node_modules/vue/dist/vue.js"></script><script src="node_modules/vue-router/dist/vue-router.js"></script><script>// 创建一级路由模板组件startvar tema = {template: "#tema",data(){return{tematext:"我是index中的变量数据"}},methods:{fun(){alert("我是index的函数")}}};var temb = {template: "#temb"};var temc = {template: "#temc"};var temd = {template: "#temd",components: {"topLink":{template:"#toplinktem"}}};// 创建一级路由模板组件end// 创建二级路由模板组件startvar ertema = {template: "#ertema"};var ertemb = {template: "#ertemb"};var ertemc = {template: "#ertemc"};var ertemd = {template: "#ertemd"};// 创建二级路由模板组件endvar routes = [{name: "index",path: "/index",component: tema},{name: "home",path: "/home",component: temb},{name: "phone",path: "/phone",component: temc},{name: "user",path: "/user",component: temd,children:[{name:"ertema",path:"ertema",component:ertema},{name:"ertemb",path:"ertemb",component:ertemb},{name:"ertemc",path:"ertemc",component:ertemc},{name:"ertemd",path:"ertemd",component:ertemd},{path:"/*",redirect: "/index"}]},]const router = new VueRouter({routes})new Vue({el:"#demodiv",data:{},router,data:{linktexta:"数据111111",linktextb:"数据222222"}})</script>
params与query区别
- 用法上的:
params要用name来引入,接收参数都是类似的,分别是this. r o u t e . q u e r y . n a m e 和 t h i s . route.query.name和this. route.query.name和this.route.params.name。 - url展示上的
params类似于post,query更加类似于我们ajax中get传参,说的再简单一点,前者在浏览器地址栏中不显示参数,后者显示,所以params传值相对安全一些。
- 用法上的:
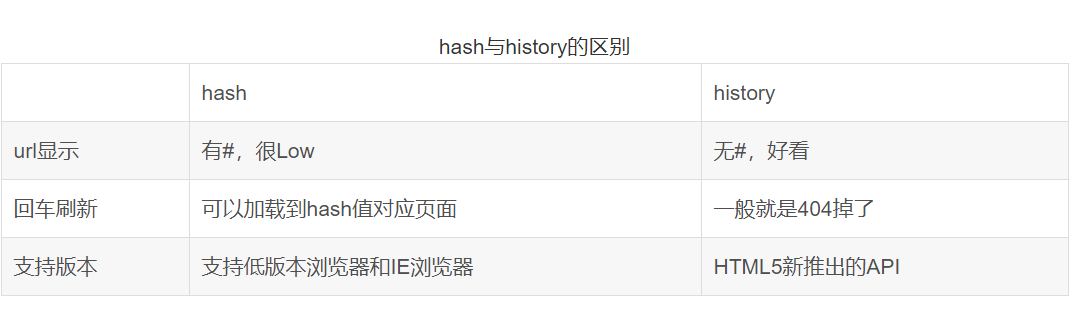
4. hash模式-history模式
hash模式url里面永远带着#号,我们在开发当中默认使用这个模式。
history模式
- history模式没有#号,是个正常的url适合推广宣传。
- 考虑url的规范那么就需要使用history模式,因为当然其功能也有区别,在开发app的时候有分享页面,这个分享出去的页面就是用vue做的,把这个页面分享到第三方的app里,有的app里面url是不允许带有#号的,所以要将#号去除那么就要使用history模式,history模式还有一个问题就是,做刷新操作,会出现404错误,那么就需要和后端人配合让他配置一下apache或是nginx的url重定向,重定向到你的首页路由上。
- history模式与hash模式区别
history模式使用
const router = new VueRouter({
routes,mode:"history"
})
案例:
<!DOCTYPE html><html lang="en"><head><meta charset="UTF-8"><meta name="viewport" content="width=device-width, initial-scale=1.0"><meta http-equiv="X-UA-Compatible" content="ie=edge"><title>Document</title></head><body><div id="demodiv"><router-link to="/index">首页</router-link><router-link to="/home">小组</router-link><router-link to="/phone">手机</router-link><router-link to="/user">我的</router-link><router-view ></router-view></div><!-- 创建一级路由模板start --><template id="tema"><div><p @click="fun()">{{tematext}}</p></div></template><template id="temb"><div>home</div></template><template id="temc"><div>phone</div></template><template id="temd"><div>user<toplink></toplink><router-view></router-view></div></template><!-- 创建一级路由模板end --><!-- 创建二级路由模板start --><template id="ertema"><div>我是二级路由11111111</div></template><template id="ertemb"><div>我是二级路由22222222</div></template><template id="ertemc"><div>我是二级路由33333333</div></template><template id="ertemd"><div>我是二级路由44444444</div></template><!-- 创建二级路由模板end --><template id="toplinktem"><div><router-link to="/user/ertema">ertema</router-link><router-link to="/user/ertemb">ertemb</router-link><router-link to="/user/ertemc">ertemc</router-link><router-link to="/user/ertemd">ertemd</router-link></div></template></body></html><script src="node_modules/vue/dist/vue.js"></script><script src="node_modules/vue-router/dist/vue-router.js"></script><script>//一级路由组件startvar tema={template:"#tema",data(){return{tematext:"我是index中的变量数据",}},methods:{fun(){alert("我是index的函数");}}};var temb={template:"#temb"};var temc={template:"#temc"};var temd={template:"#temd",components:{"toplink":{template:"#toplinktem"}}};//一级路由组件end// 二级路由组件startvar ertema={template:"#ertema"};var ertemb={template:"#ertemb"};var ertemc={template:"#ertemc"};var ertemd={template:"#ertemd"};// 二级路由组件end//添加一级路由规则startvar routes=[{name:"index",path:"/index",component:tema},{name:"home",path:"/home",component:temb},{name:"phone",path:"/phone",component:temc},{name:"user",path:"/user",component:temd,children:[{name:"ertema",path:"ertema",component:ertema},{name:"ertemb",path:"ertemb",component:ertemb},{name:"ertemc",path:"ertemc",component:ertemc},{name:"ertemd",path:"ertemd",component:ertemd}]},{path:"/*",redirect:"/index"}]//添加一级路由规则end// 创建路由实例const router = new VueRouter({routes,mode:"history"})new Vue({el:"#demodiv",data:{},router})</script>
2. 路由守卫/导航守卫
1. 全局前置守卫
- 当一个导航触发时,全局前置守卫(在进入组件之前)按照创建顺序调用。
- vue-router 提供的 router.beforeEach((to,from,next)=>{})可以方便地实现全局前置导航守卫
- to:即将要进入的目标 路由对象
- from: 当前导航正要离开的路由
next: 下一步执行
案例:// 创建路由实例
const router = new VueRouter({routes
})
// **
// **
// **
// 全局前置守卫
// **
// **
router.beforeEach((to, from, next) => {if(to.path=="/home"||to.path=="/phone"){alert("对不起,请登录后再访问");next("/user");}else{next()}
})
2. 全局后置钩子
- 当一个导航触发时,全局后置钩子(在进入组件之后)调用。
- vue-router 提供的 router.afterEach((to, from) => {})实现全局后置守卫
- to:即将要进入的目标 路由对象
from: 当前导航正要离开的路由
案例:// 创建路由实例
const router = new VueRouter({routes
})
// **
// **
// 全局后置守卫
// **
// **
router.afterEach((to,from)=>{console.log(from)
})
案例:路由传参与路由卫士
<!DOCTYPE html><html lang="en"><head><meta charset="UTF-8"><meta name="viewport" content="width=device-width, initial-scale=1.0"><meta http-equiv="X-UA-Compatible" content="ie=edge"><title>Document</title></head><body><!-- 总流程:1.下载需要的库文件2.新建vue基本框架3.根据当前这个功能新建1级路由3-1。新建路由组件与组件模板的引用3-2 新建路由规则3-3 实例化路由对像===》传入路由规则3-4 把路由对象传入 vue实例3-5 在合适的位置传入 router-view 路由出口必须要测试4. 因为根据当前需要完成点击列表内容 跳转到详情页面 (数据如何在两个页面中传递)====》路由传参思考?用params 的方式还是query的方式 一定要在笔记中再次查看两者的语法在这个demo中我们使用params方式4-1 设置路由规则的数据名4-2 开始发送4-3 接收并且测试本次路由传参是否正确的得到了数据5. 开始设置数据(数据是通过ajax发送给后台并且返回)没有后台我们就用模拟数据总流程完 --><div id="demodiv"><topnav :obj="arr"></topnav><router-view></router-view></div><!-- 创建一级路由模板start --><template id="tema"><div>首页</div></template><template id="temb"><div><!-- 5-2便利新闻数据生成新闻列表的内容 --><div v-for="(v,i) in listall"><!-- 4-2通过点击router-link 来进行路由传参的数据发送 --><router-link :to="{name:'details',params:{id:v.id}}"><h1>{{v.title}}</h1></router-link></div></div></template><template id="temc"><div>详情<!-- 4-3在指定的魔板中进行路由传参的数据测试 -->{{this.$route.params.id}}<h1>{{text[0].title}}</h1><p>{{text[0].con}}</p></div></template><template id="temd"><div>登录</div></template><!-- 创建一级路由模板end --><template id="topnavtem"><div><span v-for="(v, i) in obj"><router-link :to="v.linkurl">{{v.title}}</router-link></span></div></template></body></html><script src="node_modules/vue/dist/vue.js"></script><script src="node_modules/vue-router/dist/vue-router.js"></script><script>//创建一级路由组件startconst tema={template:"#tema"};const temb={template:"#temb",data(){return {// 5.1设置详情数据listall:[{id:1,title:"路由传参和路由卫士",con:"本文链接:https://blog.csdn.net/qq_39200185/article/details/100126580"},{id:2,title:"逆向传值与路由",con:"本文链接:https://blog.csdn.net/qq_39200185/article/details/100109285"},{id:3,title:"Vue组件",con:"本文链接:https://blog.csdn.net/qq_39200185/article/details/100046528"},{id:4,title:"交互与实例的生命周期",con:"本文链接:https://blog.csdn.net/qq_39200185/article/details/100025112"}]}}};const temc={template:"#temc",data(){return {// 5.1设置详情数据listall:[{id:1,title:"路由传参和路由卫士",con:"本文链接:https://blog.csdn.net/qq_39200185/article/details/100126580"},{id:2,title:"逆向传值与路由",con:"本文链接:https://blog.csdn.net/qq_39200185/article/details/100109285"},{id:3,title:"Vue组件",con:"本文链接:https://blog.csdn.net/qq_39200185/article/details/100046528"},{id:4,title:"交互与实例的生命周期",con:"本文链接:https://blog.csdn.net/qq_39200185/article/details/100025112"}],text:[]}},// 新闻列表点击之后会给详情页面发送一个id 详情页面根据这个id找出对应的数据展示在页面中created(){// 5-3因为新闻列表页面跳转到当前新闻详情页面的时候 会把id传递过来console.log(this.$route.params.id);// 当前的数据.filter进行过滤this.text= this.listall.filter((v,i)=>{// 判断 路由传参传递过来的数据 如果等于 数据中原油的内容if(v.id==this.$route.params.id){// 取出相关的内容 并且返回给提前准备好的变量 在页面中展示return this.listall[i]}})}};const temd={template:"#temd"};//创建一级路由组件endconst routes=[{name:"index",path:"/index",component:tema},{name:"list",path:"/list",component:temb},// 4-1 设置路由传参的数据名{name:"details",path:"/details/:id",component:temc},{name:"login",path:"/login",component:temd},]const router = new VueRouter({routes})router.beforeEach((to,from,next)=>{if(to.path=="/index"){alert("您没有登录");next("/login")}else{next()}})new Vue({el:"#demodiv",router,data:{arr:[{linkurl:"/index",title:"首页"},{linkurl:"/list",title:"列表"},{linkurl:"/details",title:"详情"},{linkurl:"/login",title:"登录"}]},components:{"topnav":{template:"#topnavtem",// 5-3详见props objprops:{obj:{type:Array,required:true}}}}})</script>


还没有评论,来说两句吧...