springCloud08—分布式配置中心:Spring Cloud Config
8.分布式配置中心:Spring Cloud Config
Spring Cloud Config是Spring Cloud团队创建的一个全新项目,用来为分布式系统中的基础设施和微服务应用提供集中化的外部配置支持,它分为服务端与客户端两个部分。
- 服务端也称为分布式配置中心,它是一个独立的微服务应用,用来连接配置仓库并为客户端提供获取配置信息、加密信息等访问接口;
- 客户端则是微服务架构中的各个微服务应用或基础设施,它们通过指定的配置中心来管理应用资源与业务相关的配置内容,并在启动的时候从配置中心获取和加载配置信息。
SpringCloudConfig实现了对服务端和客户端中环境变量和属性配置的抽象映射,所以它除了适用于Spring构建的应用程序之外,也可以在任何其他语言运行的应用程序中使用。由于Spring Cloud Config实现的配置中心默认采用Git来存储配置信息,所以使用Spring Cloud Config 构建的配置服务器,天然就支持对微服务应用配置信息的版本管理,并且可以通过Git 客户端工具来方便地管理和访问配置内容。当然它也提供了对其他存储方式的支持,比如SVN仓库、本地化文件系统。接下来,我们从一个简单的入门示例开始学习Spring Cloud Config服务端以及客户端的详细构建与使用方法。
8.1 快速入门
1.创建一个基础的SpringBoot web项目,命名为config-server
2.添加maven依赖
<parent><groupId>org.springframework.boot</groupId><artifactId>spring-boot-starter-parent</artifactId><version>2.5.2</version><relativePath/> <!-- lookup parent from repository --></parent><groupId>com.cloud</groupId><artifactId>config-server</artifactId><version>0.0.1-SNAPSHOT</version><name>config-server</name><dependencies><dependency><groupId>org.springframework.boot</groupId><artifactId>spring-boot-starter-web</artifactId></dependency><dependency><groupId>org.springframework.boot</groupId><artifactId>spring-boot-starter-test</artifactId><scope>test</scope></dependency><!-- https://mvnrepository.com/artifact/org.springframework.cloud/spring-cloud-config-server --><dependency><groupId>org.springframework.cloud</groupId><artifactId>spring-cloud-config-server</artifactId><version>3.0.0</version></dependency></dependencies><dependencyManagement><dependencies><!-- https://mvnrepository.com/artifact/org.springframework.cloud/spring-cloud-dependencies --><dependency><groupId>org.springframework.cloud</groupId><artifactId>spring-cloud-dependencies</artifactId><version>2020.0.2</version><type>pom</type><scope>import</scope></dependency></dependencies></dependencyManagement>
3.在主配置类添加注解
import org.springframework.boot.SpringApplication;import org.springframework.boot.autoconfigure.SpringBootApplication;import org.springframework.cloud.config.server.EnableConfigServer;@SpringBootApplication@EnableConfigServerpublic class ConfigServerApplication {public static void main(String[] args) {SpringApplication.run(ConfigServerApplication.class, args);}}
修改application.properties文件
server.port=7001# 应用名称spring.application.name=config-server# 注册服务的时候使用服务的ip地址eureka.instance.prefer-ip-address=falseeureka.client.service-url.defaultZone=http://peer2:1112/eureka/# 配置git仓库信息## 你自己创建的远程仓库spring.cloud.config.server.git.uri=https://gitee.com/ninesuntec/spring-cloud-config/## 配置仓库下的相对搜索位置spring.cloud.config.server.git.search-paths=spring_cloud_in_action/config-repo## 访问git仓库的用户名spring.cloud.config.server.git.username=登录git的邮箱## 访问仓库的密码spring.cloud.config.server.git.password=登录git的密码
下面是我的仓库数据:


注意:我圈起来的部分均是需要自己创建的目录
8.2 配置规则详解
为了验证上面完成的分布式配置中心config-server,根据Git配置信息中指定的仓库位置,在spring_ cloud_ in_ action/config-repo下根据不同环境新建下面4个配置文件:
- didispace.properties
- didispace-dev.properties
- didispace-test.properties
- didispace-prod.properties

并且在这4个配置文件中均设置了一个from属性,分别如下所示
- from=git-default-1.0
- from=git-dev-1.0
- from=git-test-1.0
- from=git-prod-1.0
为了测试版本控制,在该Git仓库的master分支中,我们为from属性加入1.0的后缀,同时创建一个config-label-test分支,并将各配置文件中的值用2.0作为后缀。
git指令如下:
1.创建分支
git branch config-label-test
2.推送到云端
git push origin config-label-test

在config-label-test同样创建4个文件,但是内容的后缀改为2.0
from=git-default-2.0from=git-dev-2.0from=git-test-2.0from=git-prod-2.0

完成这些准备工作之后,我们可以通过浏览器进行访问:
上面的url会映射{application}-{profile} .properties对应的配置文件,其中{ label}对应Git 上不同的分支,默认为master。
我们可以尝试构造不同的url来访问不同的配置内容,比如,要访问 config-label-test 分支,ninesuntec应用的prod环境,就可以访问这个url:
http://localhost:7001/didispace/prod/config-label-test/
并获得如下返回信息:
接下来我们尝试访问主分支上的didispace-dev.properties文件的内容
http://localhost:7001/didispace-dev.properties

我们再次尝试访问config-label-test分支上的内容
http://localhost:7001/config-label-test/didispace-dev.properties

8.3 客户端配置映射
创建一个新的springBoot web 应用命名为config-client,添加以下依赖
<?xml version="1.0" encoding="UTF-8"?><project xmlns="http://maven.apache.org/POM/4.0.0" xmlns:xsi="http://www.w3.org/2001/XMLSchema-instance"xsi:schemaLocation="http://maven.apache.org/POM/4.0.0 https://maven.apache.org/xsd/maven-4.0.0.xsd"><modelVersion>4.0.0</modelVersion><parent><groupId>org.springframework.boot</groupId><artifactId>spring-boot-starter-parent</artifactId><version>2.5.4</version><relativePath/> <!-- lookup parent from repository --></parent><properties><java.version>11</java.version></properties><dependencies><dependency><groupId>org.springframework.boot</groupId><artifactId>spring-boot-starter-web</artifactId></dependency><dependency><groupId>org.springframework.boot</groupId><artifactId>spring-boot-starter-test</artifactId><scope>test</scope></dependency><!-- https://mvnrepository.com/artifact/org.springframework.cloud/spring-cloud-starter-config --><dependency><groupId>org.springframework.cloud</groupId><artifactId>spring-cloud-starter-config</artifactId><version>3.0.4</version></dependency><!-- https://mvnrepository.com/artifact/org.springframework.cloud/spring-cloud-starter-bootstrap --><dependency><groupId>org.springframework.cloud</groupId><artifactId>spring-cloud-starter-bootstrap</artifactId><version>3.0.3</version></dependency></dependencies><dependencyManagement><dependencies><!-- https://mvnrepository.com/artifact/org.springframework.cloud/spring-cloud-dependencies --><dependency><groupId>org.springframework.cloud</groupId><artifactId>spring-cloud-dependencies</artifactId><version>2020.0.2</version><type>pom</type><scope>import</scope></dependency></dependencies></dependencyManagement>
添加bootstrap.properties
spring.application.name=didispace# 注册服务的时候使用服务的ip地址eureka.instance.prefer-ip-address=trueeureka.client.service-url.defaultZone=http://peer2:1112/eureka/#指定的环境spring.cloud.config.profile=dev#指定分支,当使用git的时候,默认是masterspring.cloud.config.label=master#Config server的urispring.cloud.config.uri=http://localhost:7001/# 配置项目启动端口号server.port=7002
注意:spring.application.name要和你git仓库中的配置前缀相对应
这里需要格外注意,上面这些属性必须配置在 bootstrap.properties 中,这样config-server中的配置信息才能被正确加载
修改主配置类
@SpringBootApplication@EnableDiscoveryClientpublic class ConfigClientApplication {public static void main(String[] args) {SpringApplication.run(ConfigClientApplication.class, args);}}
创建一个RESTful接口来返回配置中心的from 属性
通过@value (“${from} “)绑定配置服务中配置的from属性,具体实现如下:
//@RefreshScope是为了可以动态刷新这个Controller的Bean@RefreshScope@RestControllerpublic class TestController {@Value("${from}")private String from;@RequestMapping(value = "from", method = RequestMethod.GET)public String from() {return this.from;}}
重启项目访问http://localhost:7002/from
除@Value之外,我们还可以通过Environment对象来获取配置属性,比如:
//@RefreshScope是为了可以动态刷新这个Controller的Bean@RefreshScope@RestControllerpublic class TestEnviromentController {@Autowiredprivate Environment env;@RequestMapping(value = "from-env", method = RequestMethod.GET)public String from() {return env.getProperty("from", "undefined");}}
8.4 基础架构
接下来我们深入理解一下这个架构是怎么运作起来的,主要包含以下几个要素:
- 远程Git仓库:用来存储配置文件的地方,上例中我们用来存储针对应用名为didispace的多环境配置文件:didispace-{profile }.properties。
- Config Server:这是我们上面构建的分布式配置中心,config-server工程,在该工程中指定了所要连接的Git仓库位置以及账户、密码等连接信息。
- 本地Git仓库:在 Config Server 的文件系统中,每次客户端请求获取配置信息时,Config Server从 Git仓库中获取最新配置到本地,然后在本地Git仓库中读取并返回。当远程仓库无法获取时,直接将本地内容返回。
- Service A、Service B:具体的微服务应用,它们指定了Config Server 的地址,从而实现从外部化获取应用自己要用的配置信息。这些应用在启动的时候,会向ConfigServer请求获取配置信息来进行加载。

客户端应用从配置管理中获取配置信息遵从下面的执行流程:
- 1.应用启动时,根据bootstrap.properties中配置的应用名{application }、环境名{profile}、分支名{ label},向Config Server请求获取配置信息。
- 2.Config Server根据自己维护的Git仓库信息和客户端传递过来的配置定位信息去查找配置信息。
- 3.通过git clone命令将找到的配置信息下载到Config Server的文件系统中。
- 4.Config Server 创建Spring 的 ApplicationContext实例,并从Git 本地仓库中加载配置文件,最后将这些配置内容读取出来返回给客户端应用。
- 5.客户端应用在获得外部配置文件后加载到客户端的Applicationcontext实例,该配置内容的优先级高于客户端Jar包内部的配置内容,所以在Jar包中重复的内容将不再被加载。
Config Server巧妙地通过git clone 将配置信息存于本地,起到了缓存的作用,即使当Git服务端无法访问的时候,依然可以取 Config Server 中的缓存内容进行使用。
8.5 安全保护
由于配置中心存储的内容比较敏感,做一定的安全处理是必需的。为配置中心实现安全保护的方式有很多,比如物理网络限制、OAuth2授权等。不过,由于我们的微服务应用和配置中心都构建于Spring Boot基础上,所以与Spring Security结合使用会更加方便。
我们只需要在config-server配置中心的pom.xml中加入spring-boot-starter-security 依赖,不需要做任何其他改动就能实现对配置中心访问的安全保护。
<!-- https://mvnrepository.com/artifact/org.springframework.boot/spring-boot-starter-security --><dependency><groupId>org.springframework.boot</groupId><artifactId>spring-boot-starter-security</artifactId><version>2.5.4</version></dependency>
当我们重启项目之后,会给出一个默认的随机生成的密码,但是我们在实际开发中 一般会自己去定义一个用户名和密码
# 设置访问配置的用户名和密码spring.security.user.name=rootspring.security.user.password=123456
由于我们设置了用户名和密码,所以在client进行连接时如果没有设置响应的安全信息,那么获取配置就会返回401错误
解决方式如下:在config-client的配置中添加:
# 设置安全访问的用户名和密码spring.cloud.config.username=rootspring.cloud.config.password=123456
8.6 高可用配置
当要将配置中心部署到生产环境中时,与服务注册中心一样,我们也希望它是一个高可用的应用。
Spring Cloud Config实现服务端的高可用非常简单,主要有以下两种方式:
- 传统模式:不需要为这些服务端做任何额外的配置,只需要遵守一个配置规则,将所有的Config Server都指向同一个Git仓库,这样所有的配置内容就通过统一的共享文件系统来维护。而客户端在指定Config Server位置时,只需要配置Config Server上层的负载均衡设备地址即可,就如下图所示的结构。

- 服务模式:除了上面这种传统的实现模式之外,我们也可以将Config Server作为一个普通的微服务应用,纳入 Eureka 的服务治理体系中。这样我们的微服务应用就可以通过配置中心的服务名来获取配置信息,这种方式比起传统的实现模式来说更加有利于维护,因为对于服务端的负载均衡配置和客户端的配置中心指定都通过服务治理机制一并解决了,既实现了高可用,也实现了自维护。
由于这部分的实现需要客户端的配合,具体示例我将会在下面的“客户端详解”一节中的“服务化配置中心”小节中进行展示。
8.7 客户端详解
服务化配置中心
在本节中我们将config-server注册到服务中心,并且通过服务发现来访问config-server并获取git仓库中的配置信息。
1.服务端配置
在config-server的pom文件中添加以下依赖:
<dependency><groupId>org.springframework.cloud</groupId><artifactId>spring-cloud-starter-eureka</artifactId><version>1.4.7.RELEASE</version></dependency>
修改application.properties文件,添加以下配置
# 注册服务的时候使用服务的ip地址eureka.instance.prefer-ip-address=trueeureka.client.service-url.defaultZone=http://localhost:1112/eureka/
这些配置在刚开始入门的时候我们已经添加过所以无需添加
修改主配置类
@SpringBootApplication@EnableConfigServer@EnableDiscoveryClientpublic class ConfigServerApplication {public static void main(String[] args) {SpringApplication.run(ConfigServerApplication.class, args);}}
至此config-server的配置就结束了
2.客户端配置
在config-client的pom文件中新增以下依赖:
<dependency><groupId>org.springframework.cloud</groupId><artifactId>spring-cloud-starter-eureka</artifactId><version>1.4.7.RELEASE</version></dependency>
在bootstrap.properties文件中添加以下配置:
spring.application.name=didispace# 注册服务的时候使用服务的ip地址eureka.instance.prefer-ip-address=trueeureka.client.service-url.defaultZone=http://localhost:1112/eureka/# 开启通过服务来访问config server功能spring.cloud.config.discovery.enabled=true# 通过serviceId来指定config server注册的服务名spring.cloud.config.discovery.service-id=config-server#指定的环境spring.cloud.config.profile=dev#指定分支,当使用git的时候,默认是masterspring.cloud.config.label=master###Config server的uri#spring.cloud.config.uri=http://localhost:7001/# 配置项目启动端口号server.port=7002# 设置安全访问的用户名和密码spring.cloud.config.username=rootspring.cloud.config.password=123456
此处我已经将之前的通过config.uri来访问配置给注释掉了
修改主配置类
@SpringBootApplication@EnableDiscoveryClientpublic class ConfigClientApplication {public static void main(String[] args) {SpringApplication.run(ConfigClientApplication.class, args);}}
再次测试,访问http://localhost:7002/from-env 可以发现还是可以拿到数据
8.8 失败快速响应与重试
Spring Cloud Config 的客户端会预先加载很多其他信息,然后再开始连接Config Server进行属性的注入。
当我们构建的应用较为复杂的时候,可能在连接Config Server之前花费较长的启动时间,而在一些特殊场景下,我们又希望可以快速知道当前应用是否能顺利地从Config Server 获取到配置信息,这对在初期构建调试环境时,可以减少很多等待启动的时间。要实现客户端优先判断Config Server 获取是否正常,并快速响应失败内容,只需在bootstrap.properties 中配置参数spring.cloud.config.failFast= true即可。
在未加该配置之前,如果我们连接config-server失败,那么就会提示以下信息:
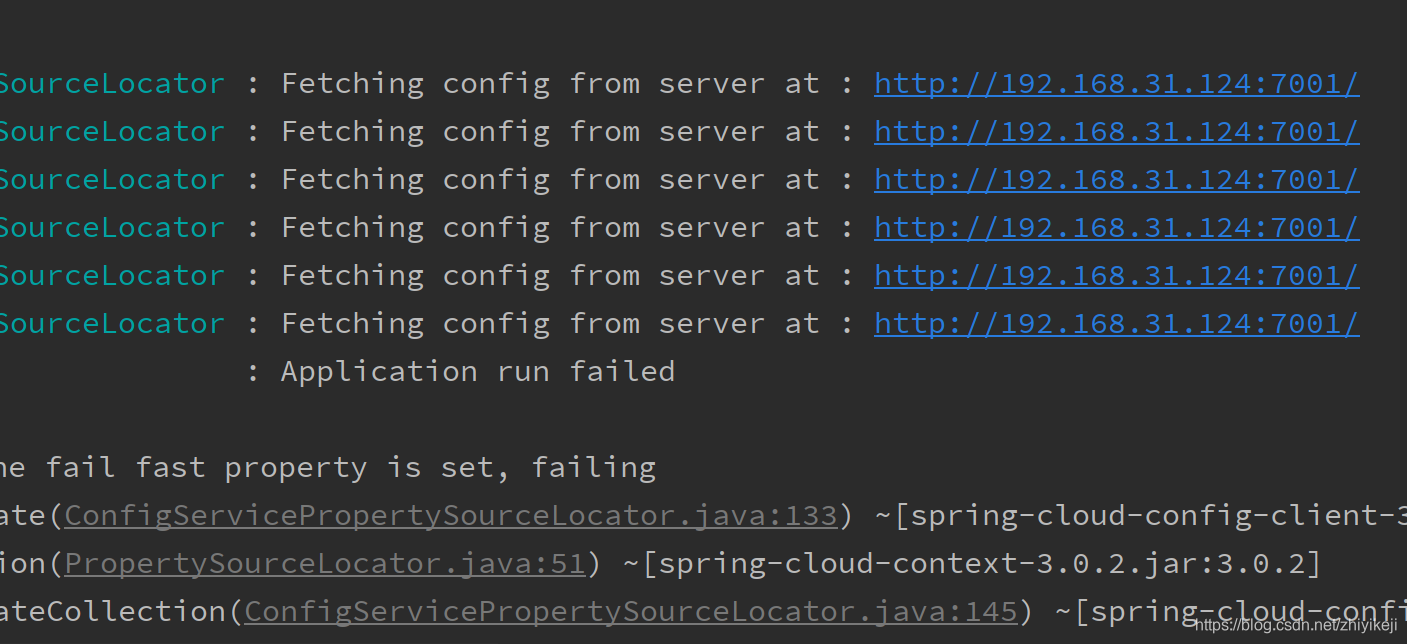
新增该项配置之后,再次启动项目: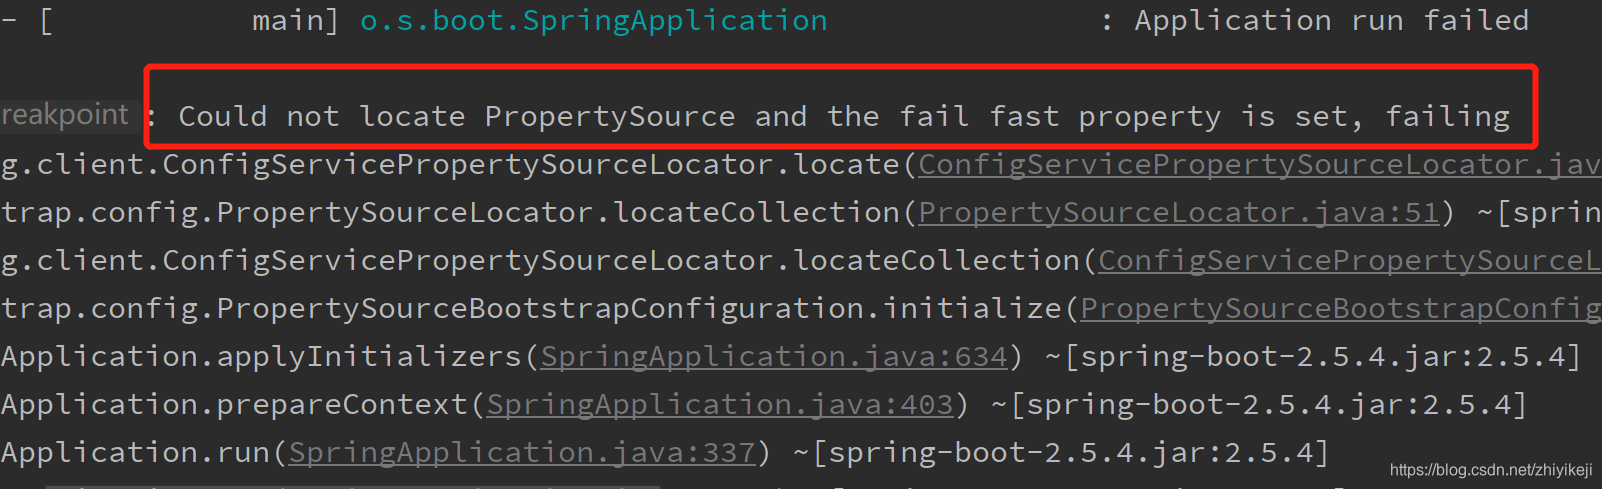
虽然仍然启动失败,但是前置的加载内容少了很多,这样通过该参数有效避免了当Config Server配置有误时,不需要多等待前置的一些加载时间,实现了快速返回失败信息。
上面,我们演示了当Config Server宕机或是客户端配置不正确导致连接不到而启动失败的情况,快速响应的配置可以发挥比较好的效果。但是,若只是因为网络波动等其他间歇性原因导致的问题,直接启动失败似乎代价有些高。所以,Config 客户端还提供了自动重试的功能,在开启重试功能前,先确保已经配置了spring.cloud.config.failFast=true,再进行下面的操作。
在客户端(config-client)pom.xml中增加以下依赖:
<dependency><groupId>org.springframework.retry</groupId><artifactId>spring-retry</artifactId><version>1.3.1</version></dependency><!-- https://mvnrepository.com/artifact/org.springframework.boot/spring-boot-starter-aop --><dependency><groupId>org.springframework.boot</groupId><artifactId>spring-boot-starter-aop</artifactId><version>2.5.4</version></dependency>
不需要再做其他任何配置,启动客户端应用,在控制台中可以看到如下内容。客户端在连接Config Server 失败之后,会继续尝试,直到第6次失败后,才返回错误信息。通过这样的重试机制,可以避免一些间歇性问题引起的失败导致客户端应用无法启动的情况。不需要再做其他任何配置,启动客户端应用,在控制台中可以看到如下内容。客户端在连接Config Server 失败之后,会继续尝试,直到第6次失败后,才返回错误信息。通过这样的重试机制,可以避免一些间歇性问题引起的失败导致客户端应用无法启动的情况。
若对默认的最大重试次数和重试间隔等设置不满意,还可以通过下面的参数进行调整。
#初始重试间隔时间(单位为毫秒),默认为1000毫秒。spring.cloud.config.retry.multiplier=1000# 下一间隔的乘数,默认为1.1,所以当最初间隔是1000毫秒时,下一次失败后的间隔为1100毫秒。spring.cloud.config.retry.initial-interval=1.1# 最大间隔时间,默认为2000毫秒。spring.cloud.config.retry.max-interval=2000# 最大重试次数,默认为6次。spring.cloud.config.retry.max-attempts=6
8.9 动态刷新配置
有时候,我们需要对配置内容做一些实时更新,那么Spring Cloud Config是否可以实现呢?
答案显然是可以的。
下面,我们以快速入门中的示例作为基础,看看如何进行改造来实现配置内容的实时更新。
首先,回顾一下,当前我们已经实现了哪些内容。
- config-repo:定义在Git仓库中的一个目录,其中存储了应用名为didispace的多环境配置文件,配置文件中有一个from参数。
- config-server:配置了Git 仓库的服务端。
- config-client:指定了config-server 为配置中心的客户端,应用名为didispace,用来访问配置服务器以获取配置信息。该应用中提供了一个/from接口,它会获取config-repo/didispace-dev.properties 中的from属性返回。
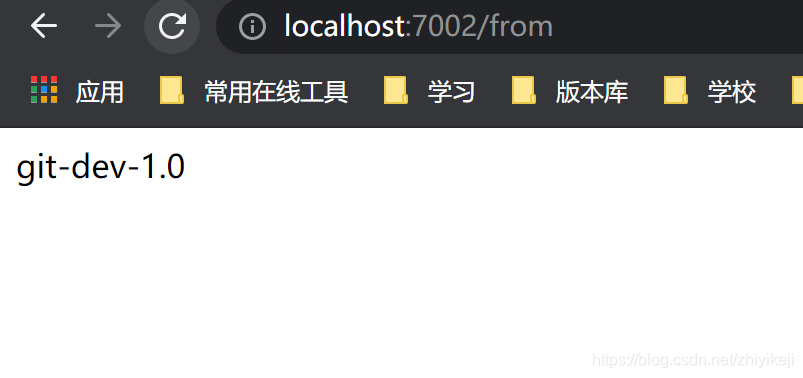
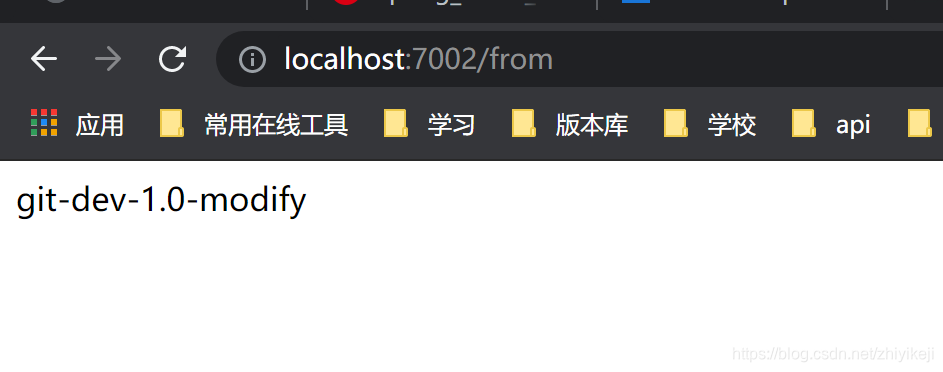
在改造程序之前,我们先将config-server和 config-client都启动起来,并访问客户端提供的接口http://localhost:7002/from来获取配置信息,获得的返回内容为git-dev-1.0。
接着,我们可以尝试使用Git工具修改当前配置的内容,比如,将config-repo/didispace-dev.properties 中的 from 的值从from=git-dev-1.0修改为from=git-dev-1.0-modify,再访问http://localhost:7002/from,可以看到其返回内容还是git-dev-1.0。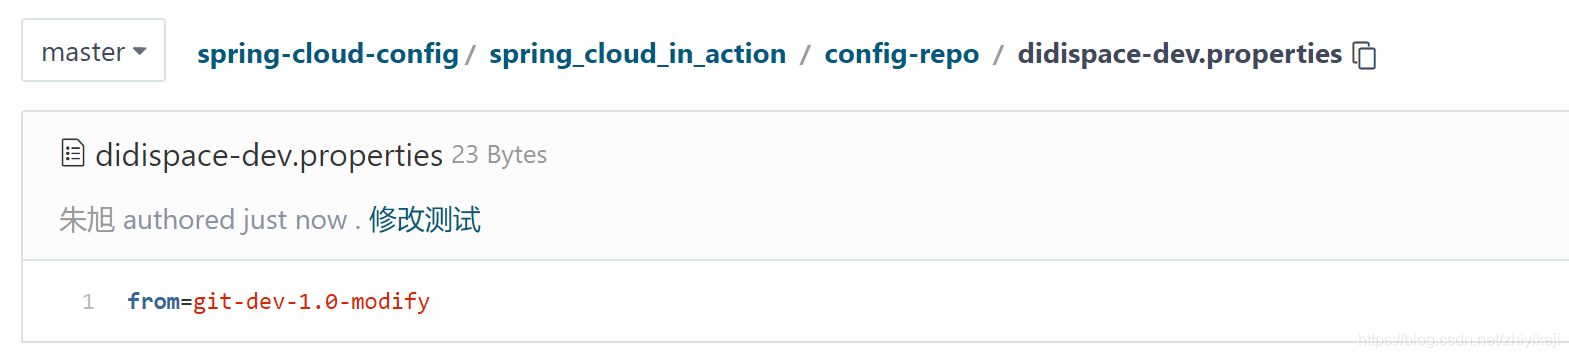
接下来,我们将在config-client端做一些改造以实现配置信息的动态刷新。在config-client的pom.xml中新增spring-boot-starter-actuator监控模块。其中包含了/refresh端点的实现,该端点将用于实现客户端应用配置信息的重新获取与刷新。
<!-- https://mvnrepository.com/artifact/org.springframework.boot/spring-boot-starter-actuator --><dependency><groupId>org.springframework.boot</groupId><artifactId>spring-boot-starter-actuator</artifactId><version>2.5.4</version></dependency>
修改bootstrap.properties文件,添加以下配置:
#actuator配置management.endpoints.enabled-by-default=truemanagement.endpoint.health.show-details=alwaysmanagement.endpoints.web.exposure.include=*management.endpoints.web.base-path=/actuator
- 重新启动config-client,访问一次http://localhost:7002/from,可以看到当前的配置值已经变成我们修改之后的值。
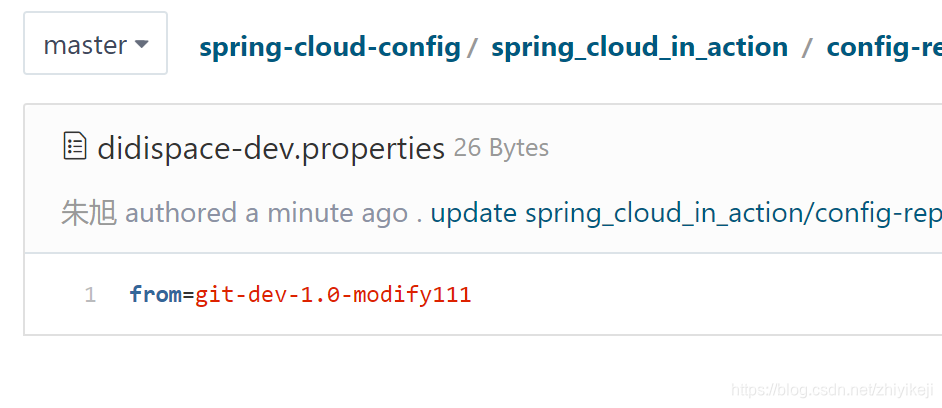
- 我们再次修改Git仓库config-repo/didispace-dev.properties文件中from的值。再访问一次http://localhost:7002/from,可以看到配置值没有改变。
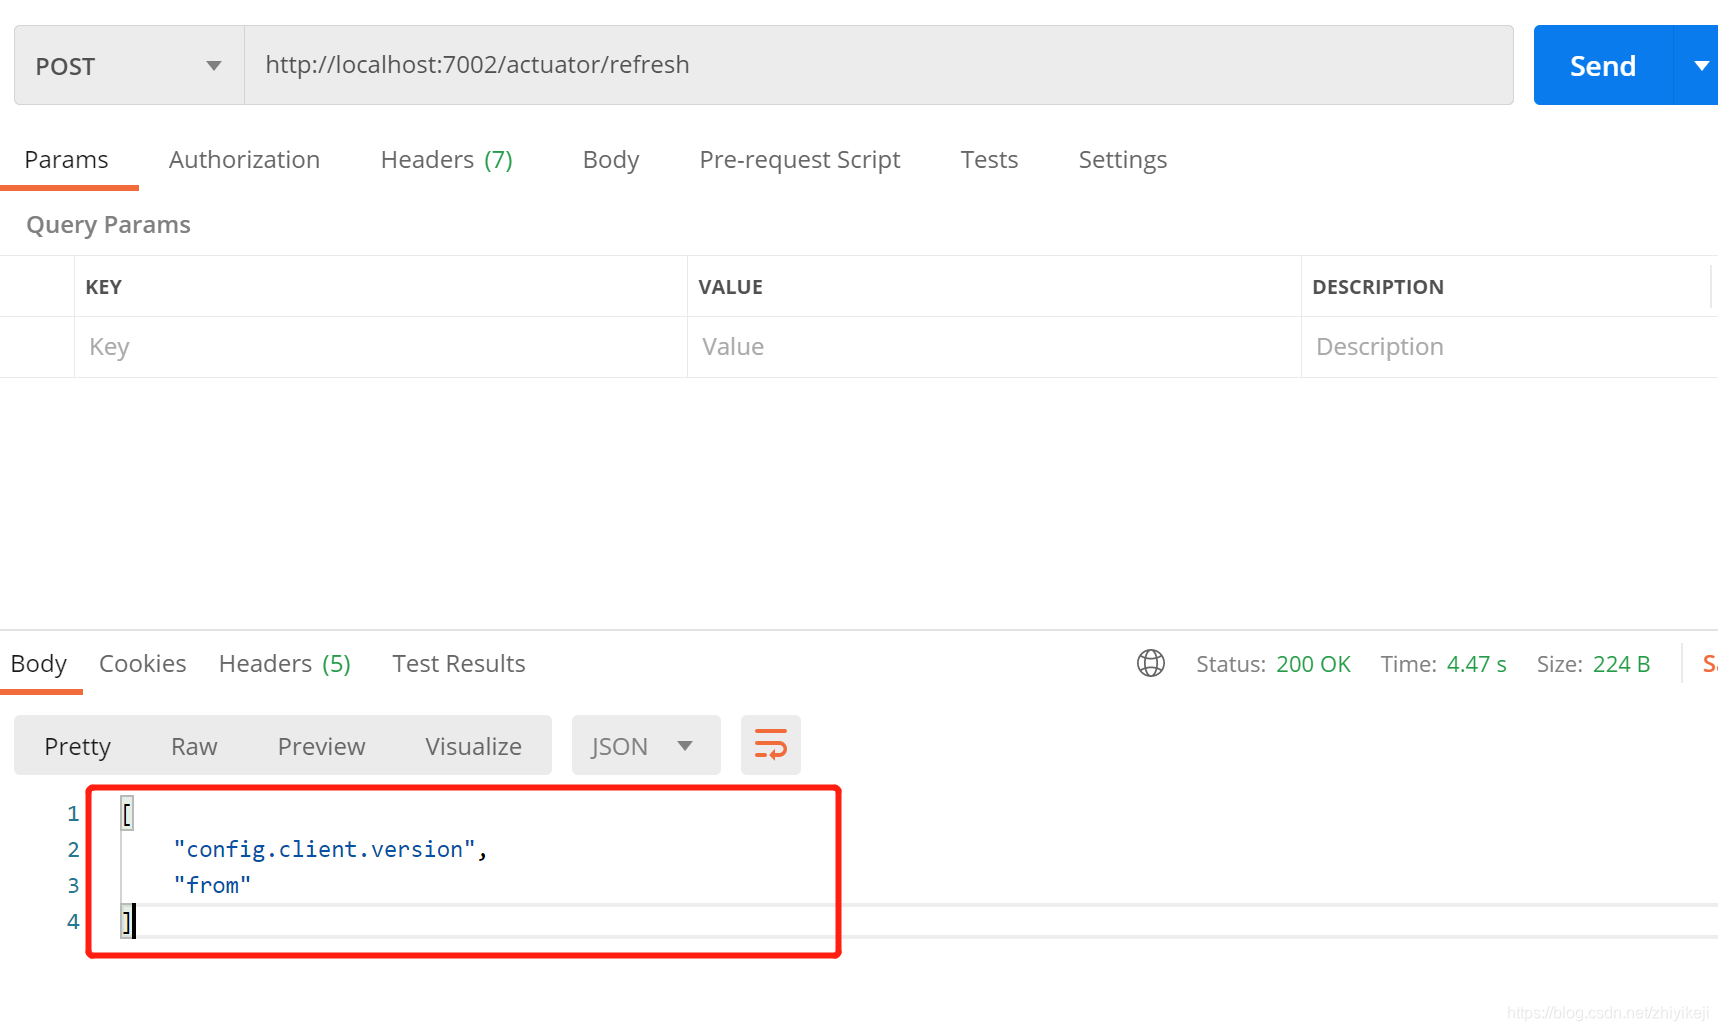
- 通过POST请求发送到http://localhost:7002/actuator/refresh,我们可以看到返回内容如下,代表from参数的配置内容被更新了;
但是,当我们的系统发展壮大之后,维护这样的刷新清单也将成为一个非常大的负担,而且很容易犯错,那么有什么办法可以解决这个复杂度呢?后续我们将介绍如何通过Spring Cloud Bus 来实现以消息总线的方式进行配置变更的通知,并完成集群上的批量配置更新。


还没有评论,来说两句吧...