016-zabbix低级自动发现以及MySQL多实例
Zabbix的网络发现是指zabbix server通过配置好的规则,自动添加host,group,template
Zabbix的主动注册刚好和网络发现是相反的,功能基本一致。zabbix agent主动联系zabbix server,server自动添加host,group,template
以上两种方式都是发现host,添加host,而low-level discovery(低级自动发现)更加底层,用于发现item,trigger,graph等等。

(1)配置3307、3308的实例[root@linux-node2 ~]# mkdir /data/{3307,3308} -p[root@linux-node2 ~]# chown -R mysql.mysql /data[root@linux-node2 ~]# cp /etc/my.cnf /etc/my3307.cnf[root@linux-node2 ~]# vim /etc/my3307.cnf[mysqld]datadir=/data/3307socket=/data/3307/mysql.sock# Disabling symbolic-links is recommended to prevent assorted security riskssymbolic-links=0port=3307# Settings user and group are ignored when systemd is used.# If you need to run mysqld under a different user or group,# customize your systemd unit file for mariadb according to the# instructions in http://fedoraproject.org/wiki/Systemd[mysqld_safe]log-error=/data/3307/mariadb.logpid-file=/data/3307/mariadb.pid## include all files from the config directory#!includedir /etc/my.cnf.d[root@linux-node2 ~]# cp /etc/my3307.cnf /etc/my3308.cnf[root@linux-node2 ~]# vim /etc/my3308.cnf[mysqld]datadir=/data/3308socket=/data/3308/mysql.sock# Disabling symbolic-links is recommended to prevent assorted security riskssymbolic-links=0port=3308# Settings user and group are ignored when systemd is used.# If you need to run mysqld under a different user or group,# customize your systemd unit file for mariadb according to the# instructions in http://fedoraproject.org/wiki/Systemd[mysqld_safe]log-error=/data/3308/mariadb.logpid-file=/data/3308/mariadb.pid## include all files from the config directory#!includedir /etc/my.cnf.d(2)初始化数据库[root@linux-node2 ~]# mysql_install_db --user=mysql --defaults-file=/etc/my3307.cnfInstalling MariaDB/MySQL system tables in '/data/3307' ...171218 12:01:02 [Note] /usr/libexec/mysqld (mysqld 5.5.56-MariaDB) starting as process 4804 ...OKFilling help tables...171218 12:01:02 [Note] /usr/libexec/mysqld (mysqld 5.5.56-MariaDB) starting as process 4813 ...OKTo start mysqld at boot time you have to copysupport-files/mysql.server to the right place for your systemPLEASE REMEMBER TO SET A PASSWORD FOR THE MariaDB root USER !To do so, start the server, then issue the following commands:'/usr/bin/mysqladmin' -u root password 'new-password''/usr/bin/mysqladmin' -u root -h linux-node2 password 'new-password'Alternatively you can run:'/usr/bin/mysql_secure_installation'which will also give you the option of removing the testdatabases and anonymous user created by default. This isstrongly recommended for production servers.See the MariaDB Knowledgebase at http://mariadb.com/kb or theMySQL manual for more instructions.You can start the MariaDB daemon with:cd '/usr' ; /usr/bin/mysqld_safe --datadir='/data/3307'You can test the MariaDB daemon with mysql-test-run.plcd '/usr/mysql-test' ; perl mysql-test-run.plPlease report any problems at http://mariadb.org/jiraThe latest information about MariaDB is available at http://mariadb.org/.You can find additional information about the MySQL part at:http://dev.mysql.comConsider joining MariaDB's strong and vibrant community:https://mariadb.org/get-involved/[root@linux-node2 ~]# mysqld_safe --defaults-file=/etc/my3307.cnf &[1] 4825[root@linux-node2 ~]# 171218 12:01:53 mysqld_safe Logging to '/data/3307/mariadb.log'.171218 12:01:53 mysqld_safe Starting mysqld daemon with databases from /data/3307[root@linux-node2 ~]# mysql_install_db --user=mysql --defaults-file=/etc/my3308.cnfInstalling MariaDB/MySQL system tables in '/data/3308' ...171218 12:03:48 [Note] /usr/libexec/mysqld (mysqld 5.5.56-MariaDB) starting as process 5041 ...OKFilling help tables...171218 12:03:48 [Note] /usr/libexec/mysqld (mysqld 5.5.56-MariaDB) starting as process 5049 ...OKTo start mysqld at boot time you have to copysupport-files/mysql.server to the right place for your systemPLEASE REMEMBER TO SET A PASSWORD FOR THE MariaDB root USER !To do so, start the server, then issue the following commands:'/usr/bin/mysqladmin' -u root password 'new-password''/usr/bin/mysqladmin' -u root -h linux-node2 password 'new-password'Alternatively you can run:'/usr/bin/mysql_secure_installation'which will also give you the option of removing the testdatabases and anonymous user created by default. This isstrongly recommended for production servers.See the MariaDB Knowledgebase at http://mariadb.com/kb or theMySQL manual for more instructions.You can start the MariaDB daemon with:cd '/usr' ; /usr/bin/mysqld_safe --datadir='/data/3308'You can test the MariaDB daemon with mysql-test-run.plcd '/usr/mysql-test' ; perl mysql-test-run.plPlease report any problems at http://mariadb.org/jiraThe latest information about MariaDB is available at http://mariadb.org/.You can find additional information about the MySQL part at:http://dev.mysql.comConsider joining MariaDB's strong and vibrant community:https://mariadb.org/get-involved/[root@linux-node2 ~]# mysqld_safe --defaults-file=/etc/my3308.cnf &[2] 5061[root@linux-node2 ~]# 171218 12:03:56 mysqld_safe Logging to '/data/3308/mariadb.log'.171218 12:03:56 mysqld_safe Starting mysqld daemon with databases from /data/3308[root@linux-node2 ~]# netstat -tulnpActive Internet connections (only servers)Proto Recv-Q Send-Q Local Address Foreign Address State PID/Program nametcp 0 0 0.0.0.0:3307 0.0.0.0:* LISTEN 4972/mysqldtcp 0 0 0.0.0.0:3308 0.0.0.0:* LISTEN 5207/mysqldtcp 0 0 0.0.0.0:80 0.0.0.0:* LISTEN 8237/nginx: mastertcp 0 0 0.0.0.0:22 0.0.0.0:* LISTEN 866/sshdtcp 0 0 127.0.0.1:25 0.0.0.0:* LISTEN 2235/mastertcp 0 0 0.0.0.0:10050 0.0.0.0:* LISTEN 3263/zabbix_agentdtcp 0 0 0.0.0.0:3306 0.0.0.0:* LISTEN 4645/mysqldtcp6 0 0 :::22 :::* LISTEN 866/sshdtcp6 0 0 ::1:25 :::* LISTEN 2235/mastertcp6 0 0 :::10050 :::* LISTEN 3263/zabbix_agentd[root@linux-node2 ~]# netstat -tulnp |grep mysql|awk -F "[ :]+" '{print $5}'330733083306"[ :]+":以1个或多个 :(空格或冒号)作为分隔符例如:printf "1:2::3:::4::::5" | awk -F '[:]+' '{print $4}' 结果为 4(3)编写获取端口号的shell脚本[root@linux-node2 scripts]# vim discovery_mysql.sh#!/bin/bash#mysql low-lever discoveryres=`netstat -lntp|grep mysql |awk -F "[ :]+" '{print $5}'`port=($res)printf '{'printf '"data":['for key in ${!port[@]}doif [[ "${#port[@]}" -gt 1 && "${key}" -ne "$((${#port[@]}-1))" ]];thenprintf '{'printf "\"{#MYSQLPORT}\":\"${port[${key}]}\"},"else [[ "${key}" -eq "((${#port[@]}-1))" ]]printf '{'printf "\"{#MYSQLPORT}\":\"${port[${key}]}\"}"fidoneprintf ']'printf '}'[root@linux-node2 scripts]# sh discovery_mysql.sh |python -m json.tool #采用json格式显示{"data": [{"{#MYSQLPORT}": "3307"},{"{#MYSQLPORT}": "3308"},{"{#MYSQLPORT}": "3306"}]}[root@linux-node2 zabbix_agentd.d]# vim discovery_mysql.conf #编辑自定义keyUserParameter=discovery_mysql,/bin/bash /etc/zabbix/zabbix_agentd.d/scripts/discovery_mysql.sh[root@linux-node1 ~]# zabbix_get -s linux-node2 -k discovery_mysql #测试server端获取数据(Not all processes could be identified, non-owned process infowill not be shown, you would have to be root to see it all.){"data":[]}#这里报错是因为netstat -tulnp的参数-p在执行时需要root的权限,这里使用suid的方式进行授权[root@linux-node2 ~]# chmod u+s `which netstat`[root@linux-node2 ~]# ll `which netstat`-rwsr-xr-x. 1 root root 155000 8月 3 17:17 /usr/bin/netstat[root@linux-node1 ~]# zabbix_get -s linux-node2 -k discovery_mysql{"data":[{"{#MYSQLPORT}":"3307"},{"{#MYSQLPORT}":"3308"},{"{#MYSQLPORT}":"3306"}]}(4)编辑自定义key,获取每个端口的状态数据[root@linux-node2 zabbix_agentd.d]# cat userparameter_mysql.confUserParameter=mysql.status[*],echo "show global status where Variable_name='$2';" | HOME=/var/lib/zabbix mysql -uroot -p123456 -h 127.0.0.1 -P $1 -N | awk '{print $$2}'修改不同端口的mysql密码:[root@linux-node2 zabbix_agentd.d]# mysqladmin -h 127.0.0.1 -uroot password '123456' -P3306[root@linux-node2 zabbix_agentd.d]# mysqladmin -h 127.0.0.1 -uroot password '123456' -P3307[root@linux-node2 zabbix_agentd.d]# mysqladmin -h 127.0.0.1 -uroot password '123456' -P3308测试是否正常[root@linux-node2 zabbix_agentd.d]# mysql -uroot -p123456 -h 127.0.0.1 -P3306 -e "use mysql;show GLOBAL VARIABLES like 'port';"+---------------+-------+| Variable_name | Value |+---------------+-------+| port | 3306 |+---------------+-------+[root@linux-node2 zabbix_agentd.d]# mysql -uroot -p123456 -h 127.0.0.1 -P3307 -e "use mysql;show GLOBAL VARIABLES like 'port';"+---------------+-------+| Variable_name | Value |+---------------+-------+| port | 3307 |+---------------+-------+[root@linux-node2 zabbix_agentd.d]# mysql -uroot -p123456 -h 127.0.0.1 -P3308 -e "use mysql;show GLOBAL VARIABLES like 'port';"+---------------+-------+| Variable_name | Value |+---------------+-------+| port | 3308 |+---------------+-------+zabbix_get测试是否能正常获取数据:[root@linux-node1 ~]# zabbix_get -s linux-node2 -k mysql.status[3306,Bytes_sent]1808
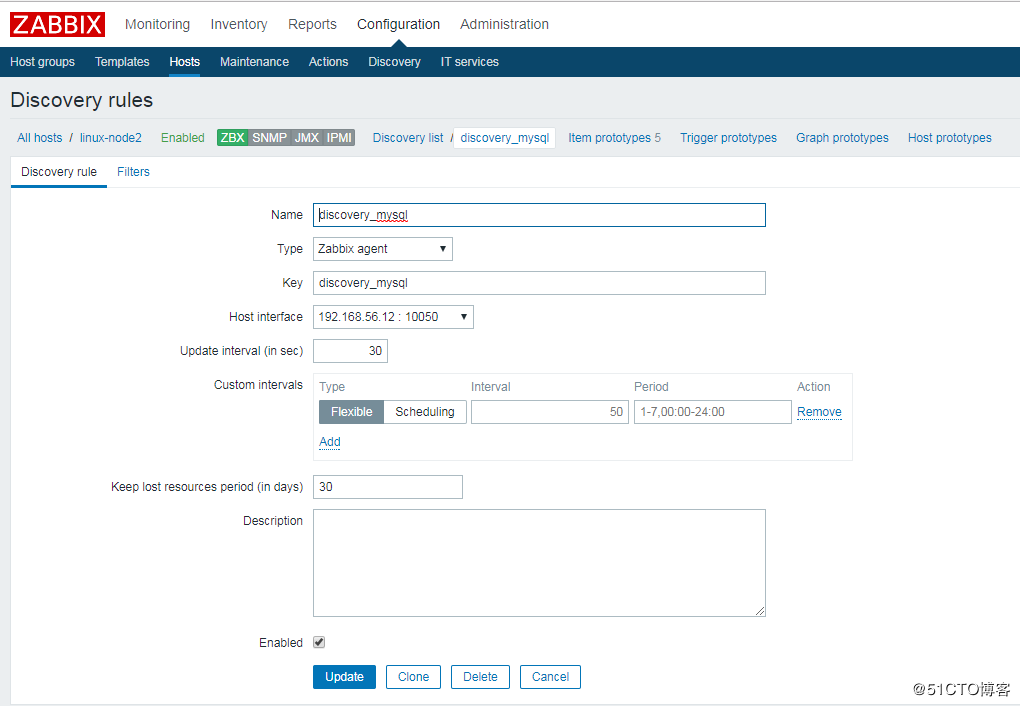
这里直接在linux-node2上进行创建
“Configuration”—>”Host”—>”linux-node2”—>”Discovery”—>”Create discovery rule”—>”Add”
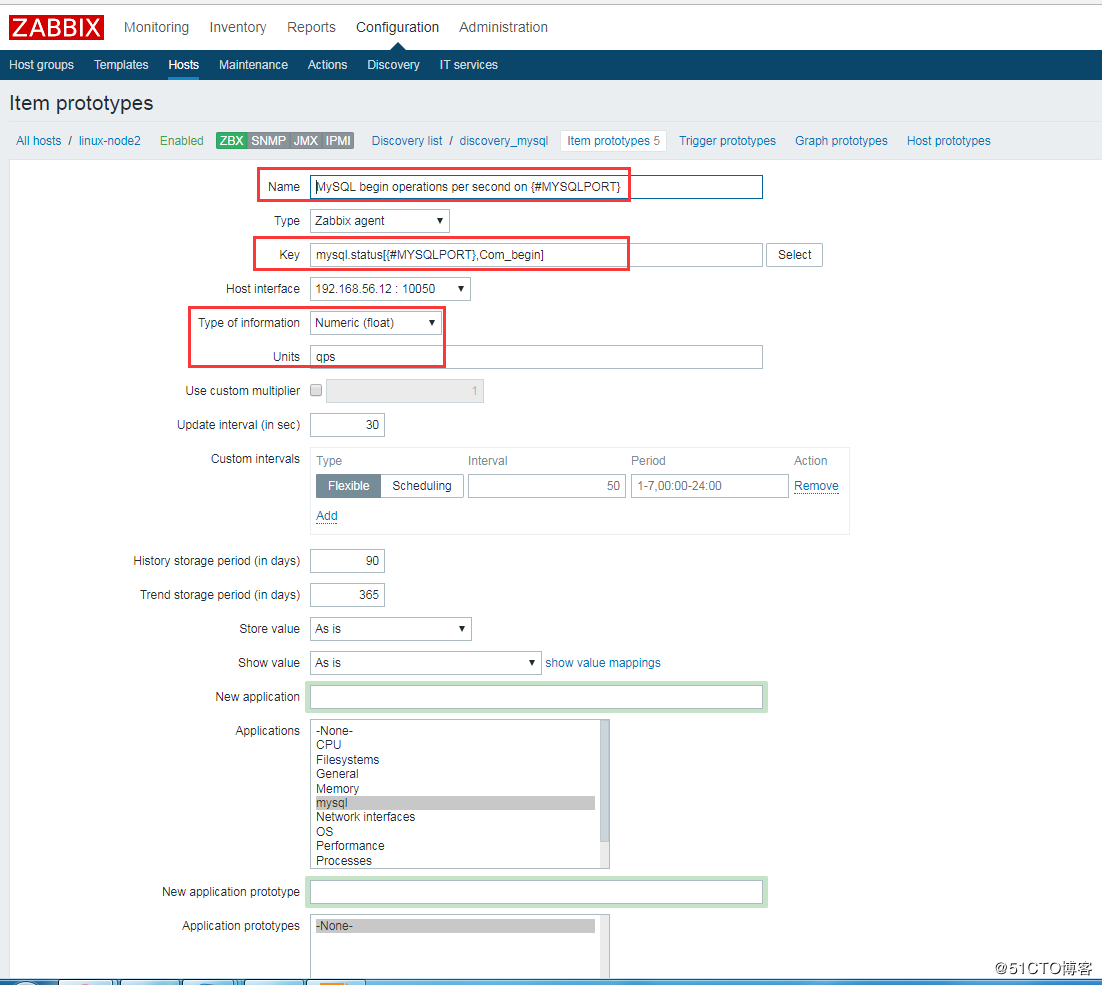
创建 Item prototypes,其实就是一个创建一个 item
Item prototypes (0)>>create Item prototypes,按照官方模板来配置。这里配5个展示

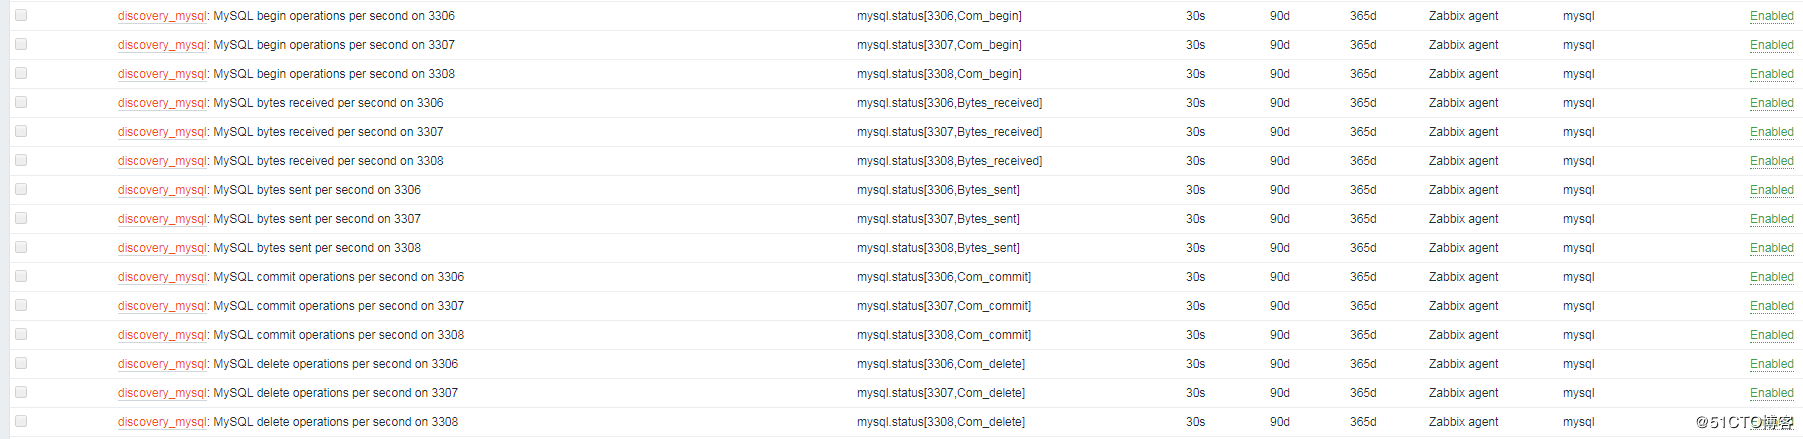
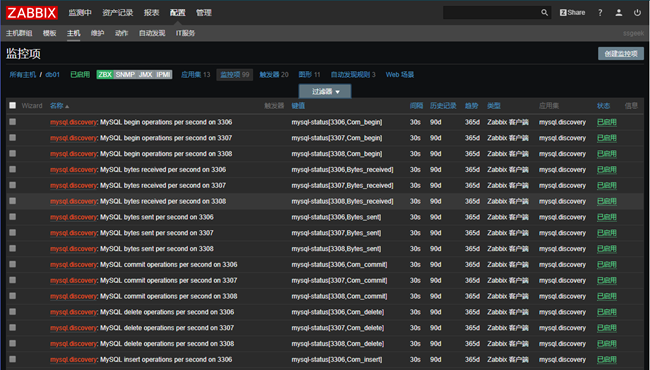
再查看Host中的item项,会多出以下监控项:
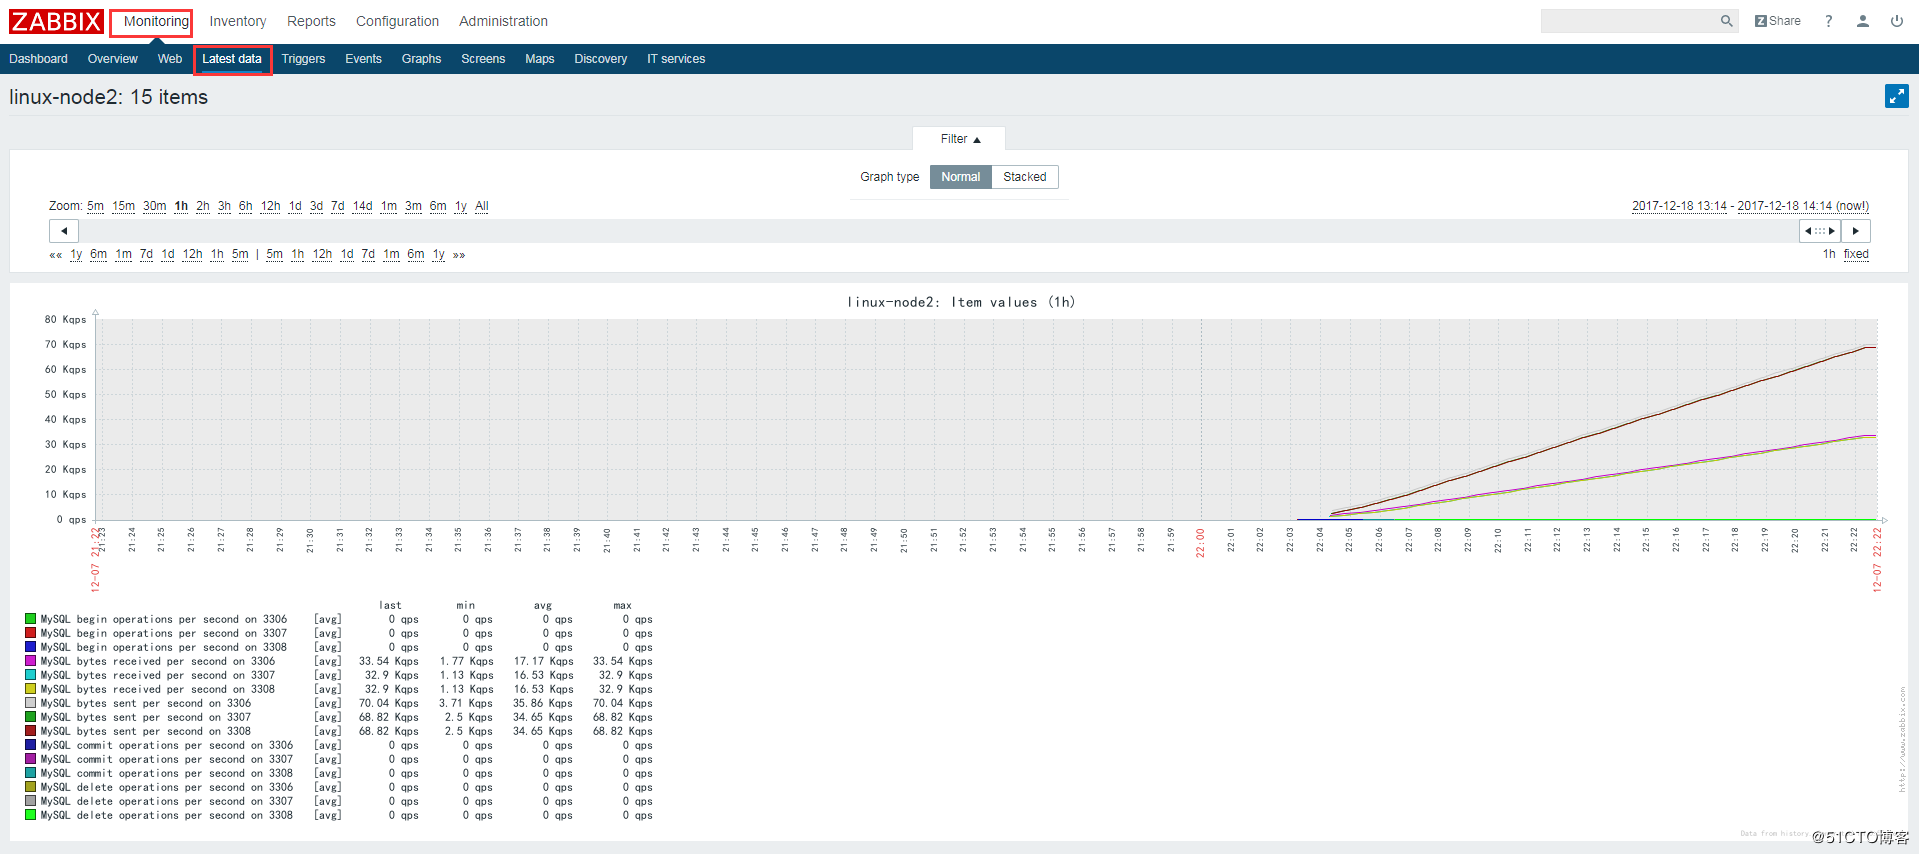
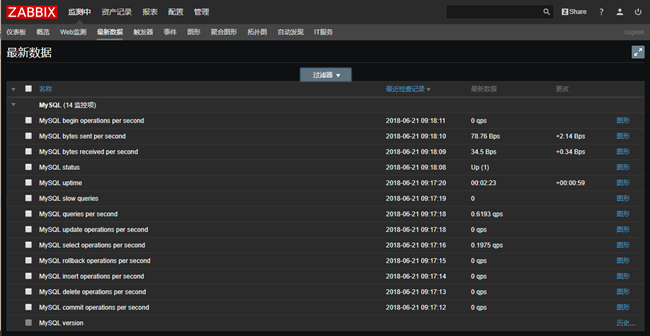
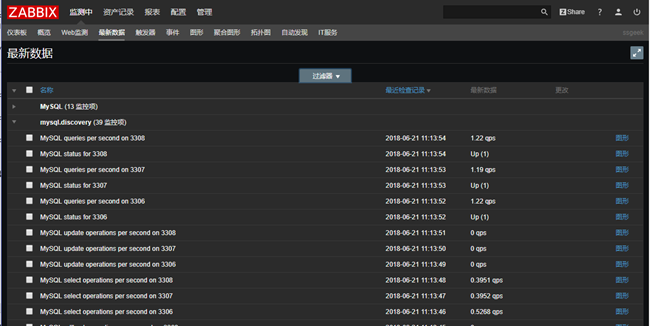
查看监控最新数据图表,即可看到3306、3307、3308的数据库状态信息:
第二个笔记:
1、低级自动发现概述
zabbix的低级自动发现(LLD)适用于监控多实例,监控变化的数据(分区、网卡)。
自动发现(LLD)提供了一种在计算机上为不同实体自动创建监控项,触发器和图形的方法。例如,Zabbix可以在你的机器上自动开始监控文件系统或网络接口,而无需为每个文件系统或网络接口手动创建监控项。此外,可以配置Zabbix根据定期执行发现后的得到实际结果,来移除不需要的监控项。
在zabbix中,支持六种类型的发现项目:
系统文件的发现
网络接口的发现
CPU和CPU内核的发现
SNMP OID的发现
使用ODBC SQL查询的发现
Windows服务的发现
用户可以自己定义发现类型,只要它们遵循特定的JSON协议。
发现过程的一般架构如下。
首先,用户在”配置”→”模板”→”发现”列中创建一个发现规则。发现规则包括(1)发现必要实体(例如,文件系统或网络接口)的项目和(2)应该根据该项目的值创建的监控项,触发器和图形的原型
发现必要实体的项目就像其他地方所看到的常规项目:服务器向该项目的值询问Zabbix agent(或者该项目的任何类型的设置),agent以文本值进行响应。区别在于agent响应的值应该包含特定JSON格式的发现实体的列表。这种格式的自定义检查者发现的细节才是最重要的,因为返回值必须包含宏→值对。例如,项目”net.if.discovery”可能会返回两对键值:”{#IFNAME}“→”lo”和”{#IFNAME}“→”eth0”。
这些宏用于名称,键值和其他原型字段中,然后用接收到的值为每个发现的实体创建实际的监控项,触发器,图形甚至主机。
当服务器接收到发现项目的值时,它会查看宏→值对,每对都根据原型生成实际监控项,触发器和图形。在上面的”net.if.discovery”示例中,服务器将生成环路接口”lo”的一组监控项,触发器和图表,另一组用于界面”eth0”。
2、mysql多实例
2.1 什么是MySQL多实例
MySQL多实例就是在一台机器上开启多个不同的服务端口(如:3306,3307),运行多个MySQL服务进程,通过不同的socket监听不同的服务端口来提供各自的服务
2.2 MySQL多实例的特点
有效利用服务器资源,当单个服务器资源有剩余时,可以充分利用剩余的资源提供更多的服务
节约服务器资源
资源互相抢占问题,当某个服务实例服务并发很高时或者开启慢查询时,会消耗更多的内存、CPU、磁盘IO资源,导致服务器上的其他实例提供服务的质量下降
2.3 部署mysql多实例的两种方式
第一种是使用多个配置文件启动不同的进程来实现多实例,这种方式的优势逻辑简单,配置简单,缺点是管理起来不太方便
第二种是通过官方自带的mysqld_multi使用单独的配置文件来实现多实例,这种方式定制每个实例的配置不太方面,优点是管理起来很方便,集中管理
3、mysql单实例监控
即为主机链接mysql模板,进行监控,查看最新数据
4、开启mysql多实例
4.1 准备配置文件
[root@db01 ~]# cp /etc/my.cnf /etc/my3307.cnf
[root@db01 ~]# vim /etc/my3307.cnf
[mysqld]
datadir=/data/3307/
socket=/data/3307/mysql.sock
port=3307
user=mysql
symbolic-links=0
[mysqld_safe]
log-error=/data/3307/mysqld.log
pid-file=/data/3307/mysqld.pid
[root@db01 ~]# cp /etc/my3307.cnf /etc/my3308.cnf
[root@db01 ~]# sed -i ‘s#3307#3308#g’ /etc/my3308.cnf
4.2 初始化数据库
初始化数据库3307
[root@db01 ~]# mysql_install_db —user=mysql —defaults-file=/etc/my3307.cnf
[root@db01 ~]# mysqld_safe —defaults-file=/etc/my3307.cnf &
初始化数据库3308
[root@db01 ~]# mysql_install_db —user=mysql —defaults-file=/etc/my3308.cnf
[root@db01 ~]# mysqld_safe —defaults-file=/etc/my3308.cnf &
4.3 检查多实例是否正常
[root@db01 ~]# netstat -lntup|grep mysqld
tcp 0 0 0.0.0.0:3306 0.0.0.0:* LISTEN 1648/mysqld
tcp 0 0 0.0.0.0:3307 0.0.0.0:* LISTEN 5434/mysqld
tcp 0 0 0.0.0.0:3308 0.0.0.0:* LISTEN 6021/mysqld
[root@db01 ~]# mkdir /data/3306
[root@db01 ~]# ln -s /var/lib/mysql/mysql.sock /data/3306/
检查
[root@db01 ~]# find /data -name “*.sock”
/data/3307/mysql.sock
/data/3308/mysql.sock
/data/3306/mysql.sock
[root@db01 ~]# chmod 755 /data/*
[root@db01 ~]# ll -d /data/*
drwxr-xr-x 2 root root 23 6月 21 09:58 /data/3306
drwxr-xr-x 5 mysql root 4096 6月 21 09:48 /data/3307
drwxr-xr-x 5 mysql root 4096 6月 21 09:53 /data/3308
[root@db01 ~]# netstat -lntp|awk -F “[ :]+” ‘/mysqld/{print$5}‘
3306
3307
3308
5、编写脚本并测试
编写脚本获取多实例并输出为json格式
[root@db01 ~]# mkdir /etc/zabbix/scripts
[root@db01 ~]# cd /etc/zabbix/scripts
[root@db01 scripts]# vim discover.sh
#!/bin/bash
#mysql low-level discovery
res=`sudo netstat -lntp|awk -F “[ :\t]+” ‘/mysqld/{print$5}‘`
port=($res)
printf ‘{‘
printf ‘“data”:[‘
for key in ${!port[@]}
do
if [[ “{#port[@]}“ -gt 1 && “{#port[@]}“ -gt 1 && “{key}“ -ne “(((({#port[@]}-1))” ]];then
printf ‘{‘
printf “\“{#MYSQLPORT}\“:\“${port[${key}]}\“},”
else [[ “key”−eq”((key”−eq”(({#port[@]}-1))” ]]
printf ‘{‘
printf “\“{#MYSQLPORT}\“:\“${port[${key}]}\“}“
fi
done
printf ‘]‘
printf ‘}\n’
脚本中需要为zabbix用户授权netstat的命令
方法一:
sed -i ‘98a zabbix\tALL=(ALL)\tNOPASSWD: /bin/netstat’ /etc/sudoers
sed -i ‘s@^Defaults requiretty@#Defaults requiretty@g’ /etc/sudoers
方法二:
去掉脚本的sudo,添加suid
usermod -s /bin/bash zabbix
chmod u+s /usr/bin/netstat
测试脚本
[root@db01 scripts]# sh discover.sh
{“data”:[{“{#MYSQLPORT}“:”3306”},{“{#MYSQLPORT}“:”3307”},{“{#MYSQLPORT}“:”3308”}]}
6、自定义key
[root@db01 ~]# cd /etc/zabbix/zabbix_agentd.d/
[root@db01 zabbix_agentd.d]# vim mysql.conf
UserParameter=mysql.discovery,sh /etc/zabbix/scripts/discover.sh
[root@db01 zabbix_agentd.d]# systemctl restart zabbix-agent.service
在server端命令行测试
[root@zabbix ~]# zabbix_get -s 192.168.1.51 -k mysql.discovery
{“data”:[{“{#MYSQLPORT}“:”3306”},{“{#MYSQLPORT}“:”3307”},{“{#MYSQLPORT}“:”3308”}]}
增加自定义key
[root@db01 zabbix_agentd.d]# vim mysql.conf
UserParameter=mysql.discovery,sh /etc/zabbix/scripts/discover.sh
UserParameter=mysql-status[*],echo “show global status where Variable_name=’2′;”|mysql−S/data/2′;”|mysql−S/data/1/mysql.sock -N | awk ‘{print $$2}‘
UserParameter=mysql-ping[*],mysqladmin -S /data/$1/mysql.sock ping | grep -c alive
UserParameter=mysql-version,mysql -V
[root@db01 zabbix_agentd.d]# systemctl restart zabbix-agent.service
在server端命令行进行测试
[root@zabbix ~]# zabbix_get -s 192.168.1.51 -k mysql-ping[3306]
1
[root@zabbix ~]# zabbix_get -s 192.168.1.51 -k mysql-ping[3307]
1
[root@zabbix ~]# zabbix_get -s 192.168.1.51 -k mysql-ping[3308]
1
7、server端web界面操作
创建自动发现规则,添加监控项原型,触发器类型,图形原型,可以参照系统已有的规则进行创建
为了简化操作,直接导入做好的模板并为主机链接模板
成功链接模板后查看最新数据
转载于 //www.cnblogs.com/xuefy/p/11412494.html


表连接查询(内、外连接)-详解")


")


还没有评论,来说两句吧...