SpringIOC
SpringIOC
- 开发第一个Spring程序(IOC)
- springIOC发展史
- IOC控制反转/依赖注入
- 图解三种方式的区别
- 依赖注入的三种方式
- 自动装配(只适用于 ref类型 )
- 使用注解定义bean
- Value与< Value >注入方式的区别
开发第一个Spring程序(IOC)
ApplicationContext conext = new ClassPathXmlApplicationContext("applicationContext.xml") ;//执行从springIOC容器中获取一个 id为student的对象Student student = (Student)conext.getBean("student") ;<?xml version="1.0" encoding="UTF-8"?><beans xmlns="http://www.springframework.org/schema/beans"xmlns:xsi="http://www.w3.org/2001/XMLSchema-instance"xsi:schemaLocation="http://www.springframework.org/schema/beans http://www.springframework.org/schema/beans/spring-beans.xsd"><bean id="student" class="org.cduck.entity.Student"><property name="stuNo" value="1"></property><property name="stuName" value="zs"></property><property name="stuAge" value="21"></property></bean></beans>
可以发现,springioc容器 帮我们new了对象,并且给对象赋了值,我们再需要使用该对象时,只需要去IOC容器中“拿”。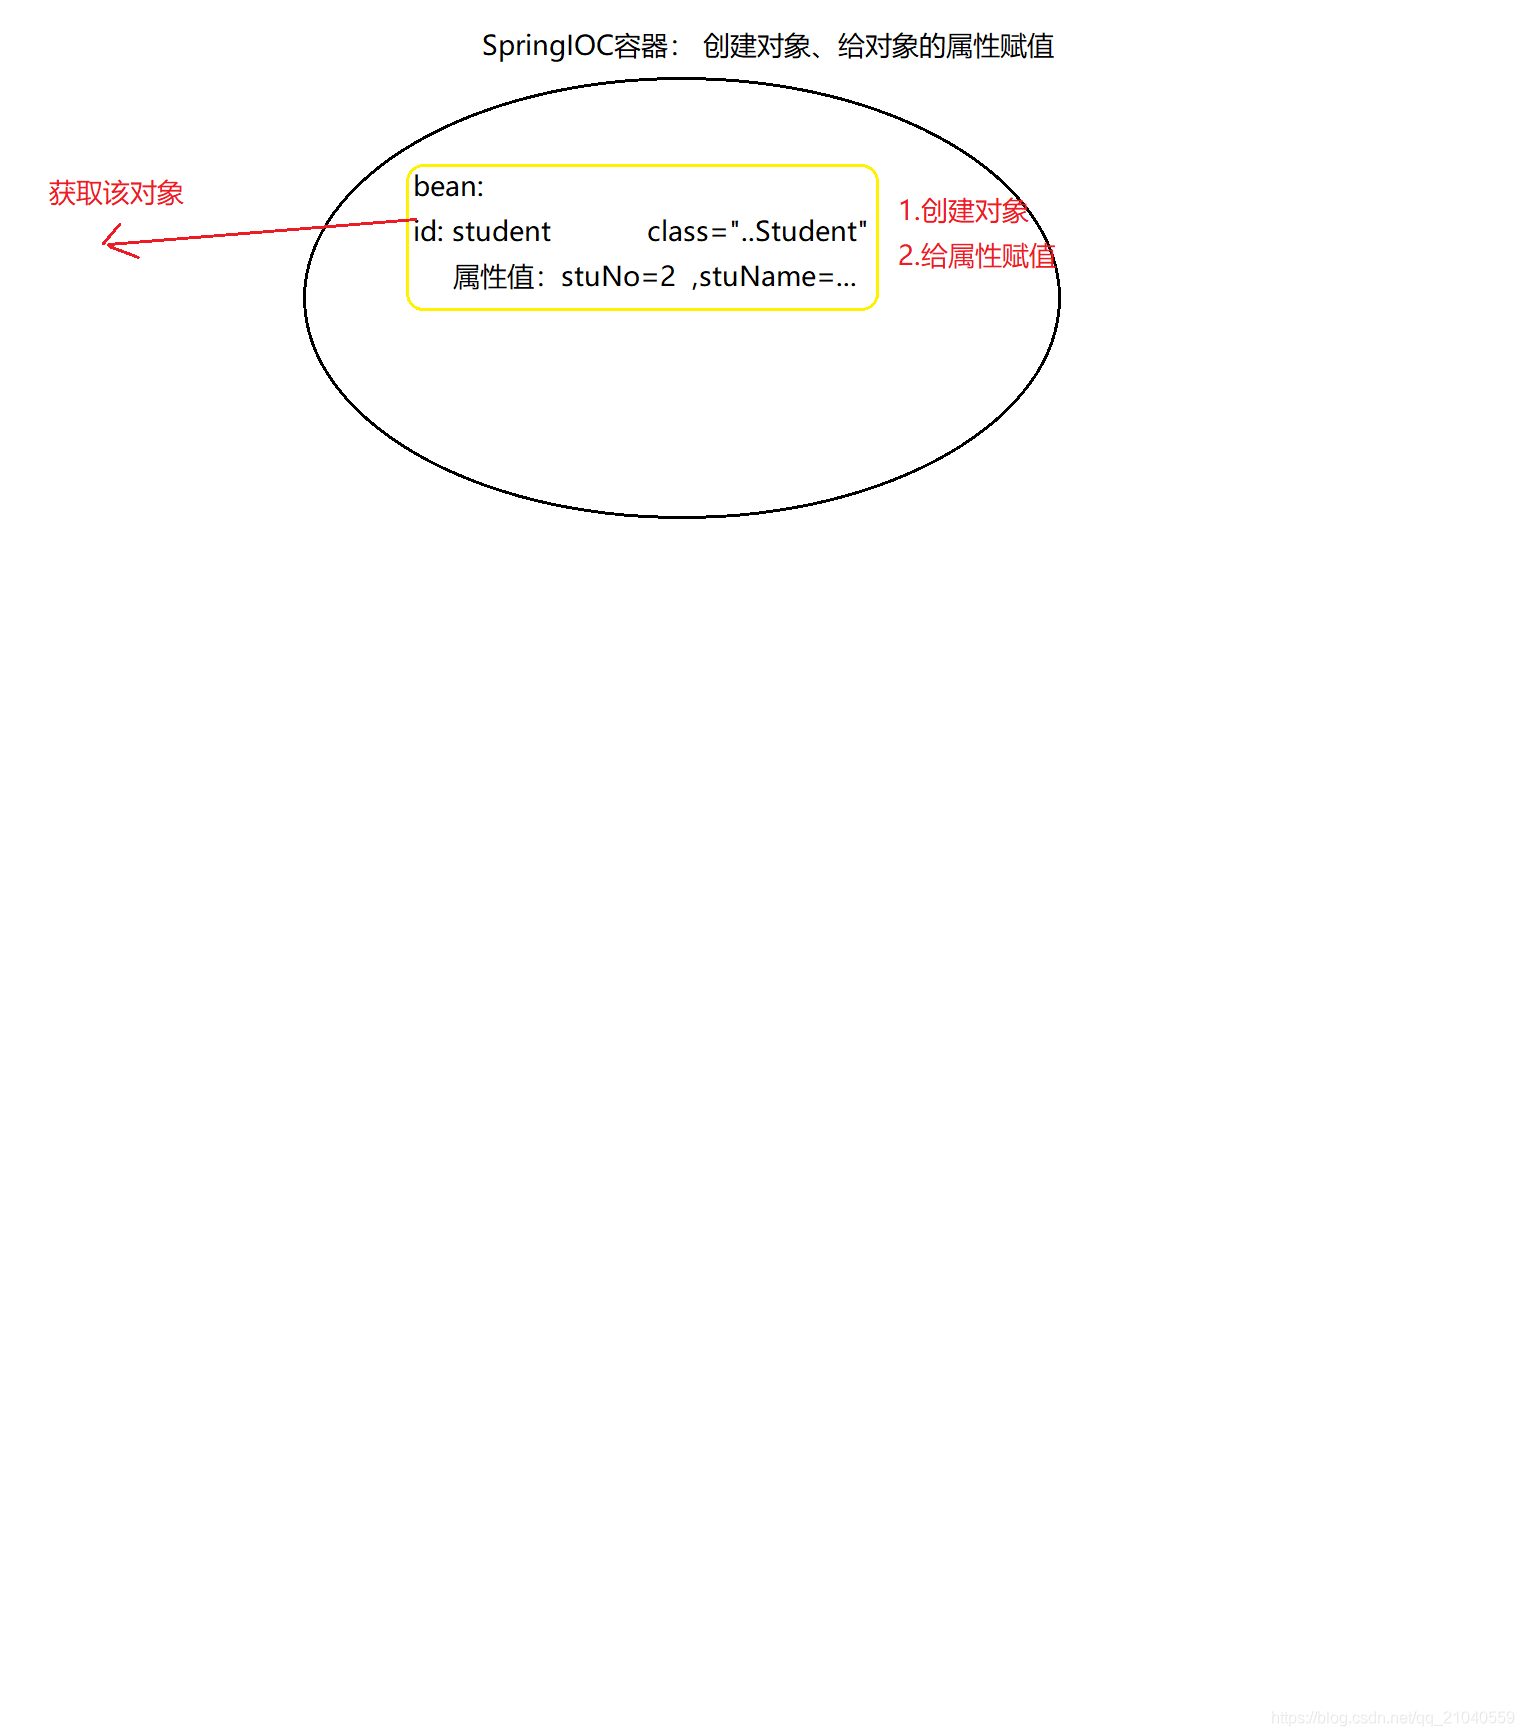
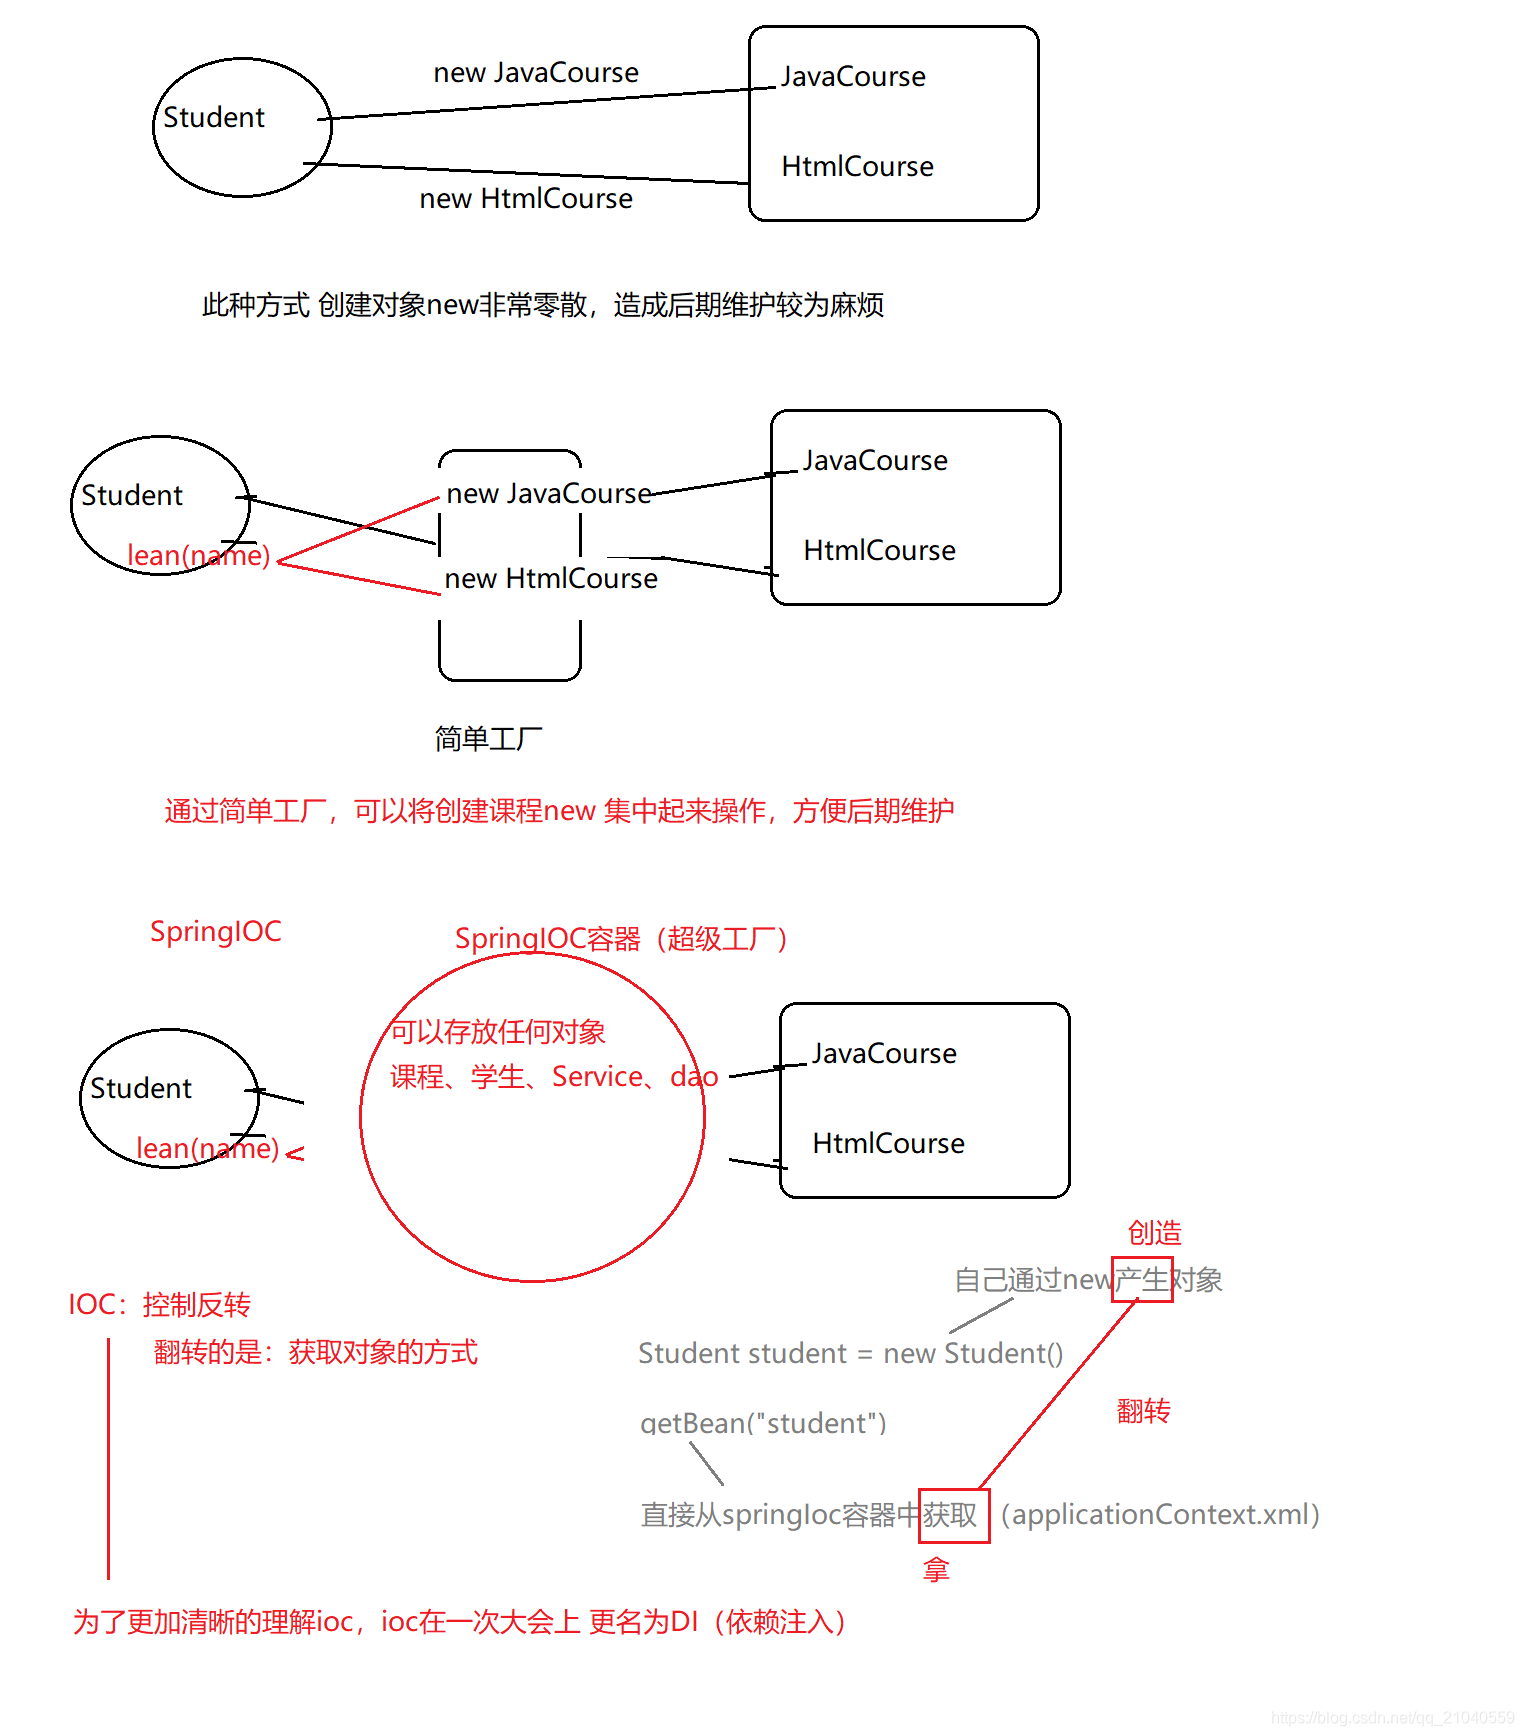
springIOC发展史
1.Student student = new Student();student.setXxx();2.简单工厂3.ioc(超级工厂)
IOC控制反转/依赖注入
IOC(控制反转)也可以称之为DI(依赖注入):
控制反转:将 创建对象、属性值 的方式 进行了翻转,从new、setXxx() 翻转为了 从springIOC容器getBean()
依赖注入:将属性值 注入给了属性,将属性 注入给了bean,将bean注入给了ioc容器;
总结:ioc/di ,无论要什么对象,都可以直接去springioc容器中获取,而不需要自己操作(new\setXxx())
因此之后的ioc分为2步:1 先给springioc中存放对象并赋值 2 拿
图解三种方式的区别
依赖注入的三种方式
1.set注入:通过调用setXxx()赋值。
赋值,默认使用的是 set方法();
依赖注入底层是通过反射实现的。
2.构造器注入:通过构造方法赋值
需要注意:如果 的顺序 与构造方法参数的顺序不一致,则需要通过type或者index或name指定。
3.p命名空间注入
引入p命名空间
xmlns:p=“http://www.springframework.org/schema/p”

注意:
简单类型:
p:属性名=“属性值”
引用类型(除了String外):
p:属性名-ref=“引用的id”
注意多个 p赋值的时候 要有空格。
示例:
注入各种集合数据类型: List Set map
package org.cduck.entity;
import java.util.Arrays;
import java.util.List;
import java.util.Map;
import java.util.Set;
public class AllCollectionType {
private List
private String[] array;
private Set
private Map
public List
return listEList;
}
public void setListEList(List
this.listEList = listEList;
}
public String[] getArray() {
return array;
}
public void setArray(String[] array) {
this.array = array;
}
public Set
return setESet;
}
public void setSetESet(Set
this.setESet = setESet;
}
public Map
return mapEMap;
}
public void setMapEMap(Map
this.mapEMap = mapEMap;
}
public AllCollectionType(List
super();
this.listEList = listEList;
this.array = array;
this.setESet = setESet;
this.mapEMap = mapEMap;
}
public AllCollectionType() {
}
@Override
public String toString() {
String tempString=””;
for (String str : array) {
tempString+=str+”,”;
}
return “listEList=” + listEList + “\n array=” + Arrays.toString(array) + “\n setESet=”
+ setESet + “\n mapEMap=” + mapEMap ;
}
}
<property name="array"><array><value>足球2</value><value>篮球2</value><value>乒乓2</value></array></property><property name="setESet"><set><value>足球3</value><value>篮球3</value><value>乒乓3</value></set></property><property name="mapEMap"><map><entry><key><value>foot</value></key><value>足球4</value></entry><entry><key><value>bas</value></key><value>篮球4</value></entry><entry><key><value>pp</value></key><value>乒乓4</value></entry></map></property></bean>
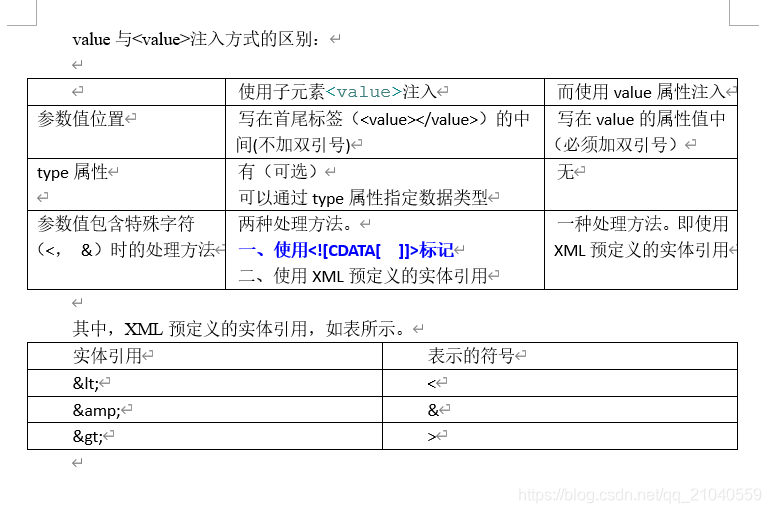
给对象类型赋值null :
<property name="name" ><null/> -->注意 没有<value></property>
赋空值 “” :
<property name="name" ><value></value></property>
在ioc中定义bean的前提:该bean的类 必须提供了 无参构造
自动装配(只适用于 ref类型 )
自动装配:
<bean ... class="org.lanqiao.entity.Course" autowire="byName|byType|constructor|no" >
byName本质是byId
byName: 自动寻找:其他bean的id值=该Course类的属性名
byType: 其他bean的类型(class) 是否与 该Course类的ref属性类型一致 (注意,此种方式 必须满足:当前Ioc容器中 只能有一个Bean满足条件 )
constructor: 其他bean的类型(class) 是否与 该Course类的构造方法参数 的类型一致;此种方式的本质就是byType
可以在头文件中 一次性将该ioc容器的所有bean 统一设置成自动装配:
<beans xmlns="http://www.springframework.org/schema/beans"...default-autowire="byName">
自动装配虽然可以减少代码量,但是会降低程序的可读性,使用时需要谨慎。
使用注解定义bean
<context:component-scan base-package="org.lanqiao.dao"></context:component-scan>
Spring在启动的时候,会根据base-package在 该包中扫描所有类,查找这些类是否有注解@Component(“studentDao”),如果有,则将该类 加入spring Ioc容器。
注意:要在xml引入命名空间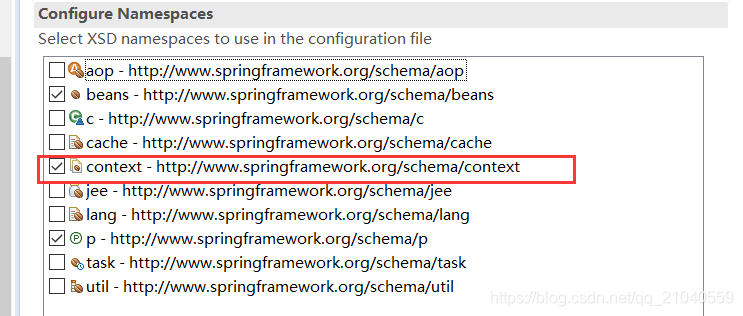

@Component细化:
dao层注解:@Repository
service层注解:@Service
控制器层注解:@Controller
Value与< Value >注入方式的区别


——开发流程")


还没有评论,来说两句吧...