微服务之SpringCloud服务调用
SpringCloud调用服务有两种方式,一种是Ribbon+RestTemplate, 另外一种是Feign。
Ribbon是一个基于HTTP和TCP客户端的负载均衡器,其实feign也使用了ribbon, 只要使用@FeignClient时,ribbon就会自动使用。
Ribbon介绍
Spring Cloud Ribbon是基于Netflix Ribbon实现的一套客户端负载均衡的工具。
Ribbon是Netflix发布的开源项目,主要功能是提供客户端的软件负载均衡算法和服务调用。Ribbon客户端组件提供一新列完善的配置项如连接超时,重试等。简单的说,就是在配置文件中列出Load Balancer(简称LB)后面所有的机器,Ribbon会自动的帮助你基于某种规则(如简单轮询,随机连接等)去连接这些机器。我们很容易使用Ribbon实现自定义的负载均衡算法。
Ribbon提供了与服务器集群通信的软件负载平衡器。负载平衡器提供以下基本功能:
向通信客户端提供单个服务器的公共DNS名称或lP。
根据特定逻辑在服务器列表中循环。
某些负载平衡器还可以提供高级功能,如
通过将cient和服务器划分为多个区域(如数据中心中的机架)来建立它们之间的亲和力,并支持同一区域中的服务器以减少延迟
保持服务器的统计信息,避免服务器出现高延迟或频繁故障。
保持区域统计数据,避免可能处于停机状态的区域
使用高级功能需要使用Ribbon中提供的一个客户端,因为它与负载平衡器集成,并为负载平衡器统计信息提供输入。
LB负载均衡(Load Balance)是什么
简单的说就是将用户的请求平摊的分配到多个服务上,从而达到系统的HA(高可用)。常见的负载均衡有软件Nginx,LVS,硬件F5等。
Ribbon本地负载均衡客户端VS Nginx服务端负载均衡区别
Nginx是服务器负载均衡,客户端所有请求都会交给nginx,然后由nginx实现转发请求。即负载均衡是由服务端实现的。
Ribbon本地负载均衡,在调用微服务接口时候,会在注册中心上获取注册信息服务列表之后缓存到VM本地,从而在本地实现RPC远程服务调用技术。
Ribbon中的关键组件
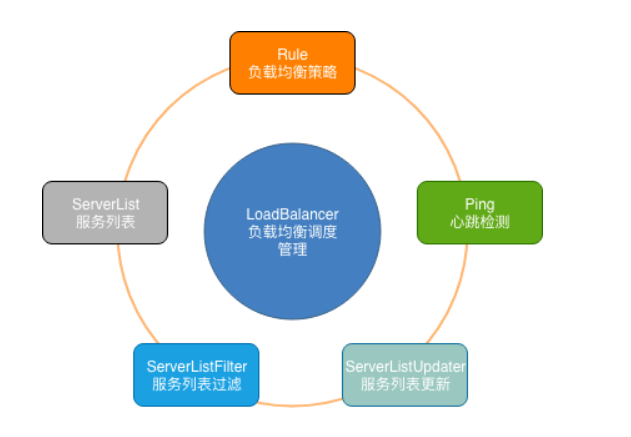
ServerList:可以响应客户端的特定服务的服务器列表。
ServerListFilter:可以动态获得的具有所需特征的候选服务器列表的过滤器。
ServerListUpdater:用于执行动态服务器列表更新。
Rule:负载均衡策略,用于确定从服务器列表返回哪个服务器。
Ping:客户端用于快速检查服务器当时是否处于活动状态。
LoadBalancer:负载均衡器,负责负载均衡调度的管理
Ribbon工作步骤
第—步先选择EurekaServer ,它优先选择在同一个区域内负载较少的server。
第二步再根据用户指定的策略,在从server取到的服务注册列表中选择一个地址。其中Ribbon提供了多种策略:比如轮询、随机和根据响应时间加权。
Ribbon+RestTemplate实现负载均衡
默认情况Ribbon是使用轮询的负载方式的,因此这块我们只需要在消费者服务端进行负载均衡构建即可,实现对服务提供端的轮询调用。由于服务是构建在Eureka服务上的,因此项目的基本服务提供模块以及eureka服务不作详细说明,需要具体了解的可参考前一章微服务之服务注册与发现

这里我们主要对消费者端80端口项目进行构建,首先准备好项目中的所需的Ribbon依赖。其他需要依赖不做详细展示
<dependency><groupId>org.springframework.cloud</groupId><artifactId>spring-cloud-netflix-ribbon</artifactId><version>2.2.1.RELEASE</version></dependency><dependency><groupId>com.netflix.ribbon</groupId><artifactId>ribbon-loadbalancer</artifactId><version>2.3.0</version></dependency>
在spring-cloud-starter-netflix-eureka-client的2.2.1.RELEASE版本中其实已经配备了Ribbon依赖,但是笔者这块的eureka依赖是3.1.3版本的,没有集成Ribbon依赖,因此需要额外导入。
另外我们还需要配置yml中的eureka服务配置,保证80服务能注册到eureka中。
server:port: 80spring:application:name: order-consumer-service#客户端注册进eurekaeureka:client:register-with-eureka: true#将自己注册进eureka服务fetch-registry: true#是否从eureka服务抓取已有的注册信息 默认trueservice-url:#defaultZone: http://localhost:7001/eureka 单机情况defaultZone: http://localhost:7001/eureka,http://localhost:7002/eureka #集群状态下
然后就可以对项目的基本结构进行构建了,在Ribbon+RestTemplate实现负载的时候需要注意的是,默认情况下的RestTemplate是不具备负载均衡的能力的,需要我们手动添加@LoadBanced注解配置实现。
packagecom.yy.myconfig;importorg.springframework.cloud.client.loadbalancer.LoadBalanced;importorg.springframework.context.annotation.Bean;importorg.springframework.context.annotation.Configuration;importorg.springframework.web.client.RestTemplate;/*** @author young* @date 2022/12/16 15:49* @description: 配置类*/@ConfigurationpublicclassApplicationContextConfig {/*** 配置restTemplate*/@Bean//给restTemplate提供负载均衡效果,用于服务建立集群的时候@LoadBalancedpublicRestTemplategetRestTemplate() {returnnewRestTemplate();}}
最后构建controller层的方法测试即可。
packagecom.yy.controller;importcom.yy.myconfig.LoadBalancer;importcom.yy.entity.Payment;importcom.yy.utils.Result;importlombok.extern.slf4j.Slf4j;importorg.springframework.cloud.client.ServiceInstance;importorg.springframework.cloud.client.discovery.DiscoveryClient;importorg.springframework.web.bind.annotation.GetMapping;importorg.springframework.web.bind.annotation.PathVariable;importorg.springframework.web.bind.annotation.RequestMapping;importorg.springframework.web.bind.annotation.RestController;importorg.springframework.web.client.RestTemplate;importjavax.annotation.Resource;importjava.net.URI;importjava.util.List;/*** @author young* @date 2022/12/16 15:46* @description: 模拟客户端接口*/@RestController@Slf4j@RequestMapping("order")publicclassOrderController {/*** 用应用名代替*/publicstaticfinalStringPAYMENT_URL="http://CLOUD-PAYMENT-SERVICE";@ResourceprivateRestTemplaterestTemplate;@GetMapping("/add")publicResult<Payment>create(Paymentpayment){returnrestTemplate.postForObject(PAYMENT_URL+"/payment/add",payment,Result.class);}@GetMapping("/get/{id}")publicResult<Payment>create(@PathVariableIntegerid){returnrestTemplate.getForObject(PAYMENT_URL+"/payment/"+id,Result.class);}

源码探究
那为何加上@LoadBanced注解就能实现负载均衡效果呢?
通过源码我们可以发现这是一个标记注解:
@Target({ElementType.FIELD, ElementType.PARAMETER, ElementType.METHOD})@Retention(RetentionPolicy.RUNTIME)@Documented@Inherited@Qualifierpublic @interface LoadBalanced {}
通过注释可以知道@LoadBalanced注解是用来给RestTemplate做标记,方便我们对RestTemplate添加一个LoadBalancerClient,以实现客户端负载均衡。
根据spring boot的自动配置原理,可以知道同包下的LoadBalancerAutoConfiguration,应该是实现客户端负载均衡器的自动化配置类。代码如下:
//// Source code recreated from a .class file by IntelliJ IDEA// (powered by FernFlower decompiler)//@Configuration(proxyBeanMethods = false)@ConditionalOnClass({RestTemplate.class})@ConditionalOnBean({LoadBalancerClient.class})@EnableConfigurationProperties({LoadBalancerClientsProperties.class})public class LoadBalancerAutoConfiguration {@LoadBalanced@Autowired(required = false)private List<RestTemplate> restTemplates = Collections.emptyList();@Autowired(required = false)private List<LoadBalancerRequestTransformer> transformers = Collections.emptyList();public LoadBalancerAutoConfiguration() {}@Beanpublic SmartInitializingSingleton loadBalancedRestTemplateInitializerDeprecated(final ObjectProvider<List<RestTemplateCustomizer>> restTemplateCustomizers) {return () -> {restTemplateCustomizers.ifAvailable((customizers) -> {Iterator var2 = this.restTemplates.iterator();while(var2.hasNext()) {RestTemplate restTemplate = (RestTemplate)var2.next();Iterator var4 = customizers.iterator();while(var4.hasNext()) {RestTemplateCustomizer customizer = (RestTemplateCustomizer)var4.next();customizer.customize(restTemplate);}}});};}@Bean@ConditionalOnMissingBeanpublic LoadBalancerRequestFactory loadBalancerRequestFactory(LoadBalancerClient loadBalancerClient) {return new LoadBalancerRequestFactory(loadBalancerClient, this.transformers);}@Configuration(proxyBeanMethods = false)@ConditionalOnClass({RetryTemplate.class})@ConditionalOnBean({ReactiveLoadBalancer.Factory.class})@ConditionalOnProperty(value = {"spring.cloud.loadbalancer.retry.enabled"},matchIfMissing = true)public static class RetryInterceptorAutoConfiguration {public RetryInterceptorAutoConfiguration() {}@Bean@ConditionalOnMissingBeanpublic RetryLoadBalancerInterceptor loadBalancerInterceptor(LoadBalancerClient loadBalancerClient, LoadBalancerRequestFactory requestFactory, LoadBalancedRetryFactory loadBalancedRetryFactory, ReactiveLoadBalancer.Factory<ServiceInstance> loadBalancerFactory) {return new RetryLoadBalancerInterceptor(loadBalancerClient, requestFactory, loadBalancedRetryFactory, loadBalancerFactory);}@Bean@ConditionalOnMissingBeanpublic RestTemplateCustomizer restTemplateCustomizer(final RetryLoadBalancerInterceptor loadBalancerInterceptor) {return (restTemplate) -> {List<ClientHttpRequestInterceptor> list = new ArrayList(restTemplate.getInterceptors());list.add(loadBalancerInterceptor);restTemplate.setInterceptors(list);};}}@Configuration(proxyBeanMethods = false)@ConditionalOnClass({RetryTemplate.class})public static class RetryAutoConfiguration {public RetryAutoConfiguration() {}@Bean@ConditionalOnMissingBeanpublic LoadBalancedRetryFactory loadBalancedRetryFactory() {return new LoadBalancedRetryFactory() {};}}private static class RetryMissingOrDisabledCondition extends AnyNestedCondition {RetryMissingOrDisabledCondition() {super(ConfigurationPhase.REGISTER_BEAN);}@ConditionalOnProperty(value = {"spring.cloud.loadbalancer.retry.enabled"},havingValue = "false")static class RetryDisabled {RetryDisabled() {}}@ConditionalOnMissingClass({"org.springframework.retry.support.RetryTemplate"})static class RetryTemplateMissing {RetryTemplateMissing() {}}}@Configuration(proxyBeanMethods = false)@Conditional({RetryMissingOrDisabledCondition.class})static class LoadBalancerInterceptorConfig {LoadBalancerInterceptorConfig() {}@Beanpublic LoadBalancerInterceptor loadBalancerInterceptor(LoadBalancerClient loadBalancerClient, LoadBalancerRequestFactory requestFactory) {return new LoadBalancerInterceptor(loadBalancerClient, requestFactory);}@Bean@ConditionalOnMissingBeanpublic RestTemplateCustomizer restTemplateCustomizer(final LoadBalancerInterceptor loadBalancerInterceptor) {return (restTemplate) -> {List<ClientHttpRequestInterceptor> list = new ArrayList(restTemplate.getInterceptors());list.add(loadBalancerInterceptor);restTemplate.setInterceptors(list);};}}}
代码层面可以看出,这个类作用主要是使用RestTemplateCustomizer对所有标注了@LoadBalanced的RestTemplate Bean添加了一个LoadBalancerInterceptor拦截器,而这个拦截器的作用就是对请求的URI进行转换获取到具体应该请求哪个服务实例。 那再看看添加的拦截器LoadBalancerInterceptor的代码,如下:
public class LoadBalancerInterceptor implements ClientHttpRequestInterceptor {private LoadBalancerClient loadBalancer;private LoadBalancerRequestFactory requestFactory;public LoadBalancerInterceptor(LoadBalancerClient loadBalancer, LoadBalancerRequestFactory requestFactory) {this.loadBalancer = loadBalancer;this.requestFactory = requestFactory;}public LoadBalancerInterceptor(LoadBalancerClient loadBalancer) {this(loadBalancer, new LoadBalancerRequestFactory(loadBalancer));}public ClientHttpResponse intercept(final HttpRequest request, final byte[] body, final ClientHttpRequestExecution execution) throws IOException {URI originalUri = request.getURI();String serviceName = originalUri.getHost();Assert.state(serviceName != null, "Request URI does not contain a valid hostname: " + originalUri);return (ClientHttpResponse)this.loadBalancer.execute(serviceName, this.requestFactory.createRequest(request, body, execution));}}
从代码可以看出 LoadBalancerInterceptor 拦截了请求后,通过LoadBalancerClient执行具体的请求发送。
而LoadBancerClient作为一个接口,其中包含四个方法:
public interface LoadBalancerClient extends ServiceInstanceChooser {<T> T execute(String serviceId, LoadBalancerRequest<T> request) throws IOException;<T> T execute(String serviceId, ServiceInstance serviceInstance, LoadBalancerRequest<T> request) throws IOException;URI reconstructURI(ServiceInstance instance, URI original);}
其中主要的三个方法可以了解一下:
ServiceInstance choose(String serviceId):根据传入的服务id,从负载均衡器中为指定的服务选择一个服务实例。
T execute(String serviceId, LoadBalancerRequest request):根据传入的服务id,指定的负载均衡器中的服务实例执行请求。
T execute(String serviceId, ServiceInstance serviceInstance, LoadBalancerRequest request):根据传入的服务实例,执行请求。
这个接口的唯一实现类是RibbonLoadBalancerClient,他的核心代码在于:
……public ServiceInstance choose(String serviceId) {return this.choose(serviceId, (Object)null);}public ServiceInstance choose(String serviceId, Object hint) {Server server = this.getServer(this.getLoadBalancer(serviceId), hint);return server == null ? null : new RibbonServer(serviceId, server, this.isSecure(server, serviceId), this.serverIntrospector(serviceId).getMetadata(server));}public <T> T execute(String serviceId, LoadBalancerRequest<T> request) throws IOException {return this.execute(serviceId, (LoadBalancerRequest)request, (Object)null);}public <T> T execute(String serviceId, LoadBalancerRequest<T> request, Object hint) throws IOException {ILoadBalancer loadBalancer = this.getLoadBalancer(serviceId);Server server = this.getServer(loadBalancer, hint);if (server == null) {throw new IllegalStateException("No instances available for " + serviceId);} else {RibbonServer ribbonServer = new RibbonServer(serviceId, server, this.isSecure(server, serviceId), this.serverIntrospector(serviceId).getMetadata(server));return this.execute(serviceId, (ServiceInstance)ribbonServer, (LoadBalancerRequest)request);}}protected Server getServer(String serviceId) {return this.getServer(this.getLoadBalancer(serviceId), (Object)null);}protected Server getServer(ILoadBalancer loadBalancer) {return this.getServer(loadBalancer, (Object)null);}protected Server getServer(ILoadBalancer loadBalancer, Object hint) {return loadBalancer == null ? null : loadBalancer.chooseServer(hint != null ? hint : "default");}protected ILoadBalancer getLoadBalancer(String serviceId) {return this.clientFactory.getLoadBalancer(serviceId);}……
从代码上可以看出实际负载均衡的是通过 ILoadBalancer 来实现。
public interface ILoadBalancer {void addServers(List<Server> var1);Server chooseServer(Object var1);void markServerDown(Server var1);/** @deprecated */@DeprecatedList<Server> getServerList(boolean var1);List<Server> getReachableServers();List<Server> getAllServers();}
addServers:向负载均衡器中添加一个服务实例集合。
chooseServer:跟据key,从负载均衡器获取服务实例。
markServerDown:用来标记某个服务实例下线。
getReachableServers:获取可用的服务实例集合。
getAllServers():获取所有服务实例集合,包括下线的服务实例。
这个接口与实现类的关系图如下:
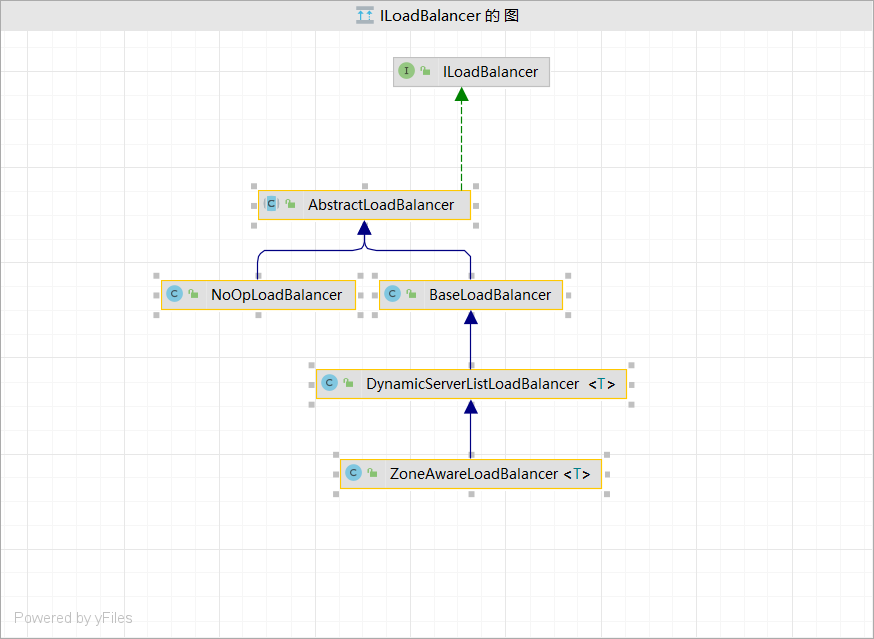
NoOpLoadBalancer:啥都不做
BaseLoadBalancer:
一个负载均衡器的基本实现,其中有一个任意列表,可以将服务器设置为服务器池。可以设置一个ping来确定服务器的活力。
在内部,该类维护一个“all”服务器列表,以及一个“up”服务器列表,并根据调用者的要求使用它们。
- DynamicServerListLoadBalancer:
通过动态的获取服务器的候选列表的负载平衡器。
可以通过筛选标准来传递服务器列表,以过滤不符合所需条件的服务器。
- ZoneAwareLoadBalancer:
用于测量区域条件的关键指标是平均活动请求,它根据每个rest客户机和每个区域聚合。这是区域内未完成的请求总数除以可用目标实例的数量(不包括断路器跳闸实例)。当在坏区上缓慢发生超时时,此度量非常有效。
该负载均衡器将计算并检查所有可用区域的区域状态。如果任何区域的平均活动请求已达到配置的阈值,则该区域将从活动服务器列表中删除。如果超过一个区域达到阈值,则将删除每个服务器上活动请求最多的区域。一旦去掉最坏的区域,将在其余区域中选择一个区域,其概率与其实例数成正比。服务器将使用给定的规则从所选区域返回。对于每个请求,将重复上述步骤。也就是说,每个与区域相关的负载平衡决策都是实时做出的,最新的统计数据可以帮助进行选择。那么在整合Ribbon的时候Spring Cloud默认采用了哪个具体实现呢?我们通过RibbonClientConfiguration配置类,可以知道在整合时默认采用了ZoneAwareLoadBalancer来实现负载均衡器。
@Bean@ConditionalOnMissingBeanpublic ILoadBalancer ribbonLoadBalancer(IClientConfig config, ServerList<Server> serverList, ServerListFilter<Server> serverListFilter, IRule rule, IPing ping, ServerListUpdater serverListUpdater) {return (ILoadBalancer)(this.propertiesFactory.isSet(ILoadBalancer.class, this.name) ? (ILoadBalancer)this.propertiesFactory.get(ILoadBalancer.class, config, this.name) : new ZoneAwareLoadBalancer(config, rule, ping, serverList, serverListFilter, serverListUpdater));}
从这段代码 ,也可以看出,负载均衡器所需的主要配置项是IClientConfig, ServerList, ServerListFilter, IRule, IPing, ServerListUpdater。其中重点的是IRule为LoadBalancer定义“负载均衡策略”的接口
它的实现类关系图如下:
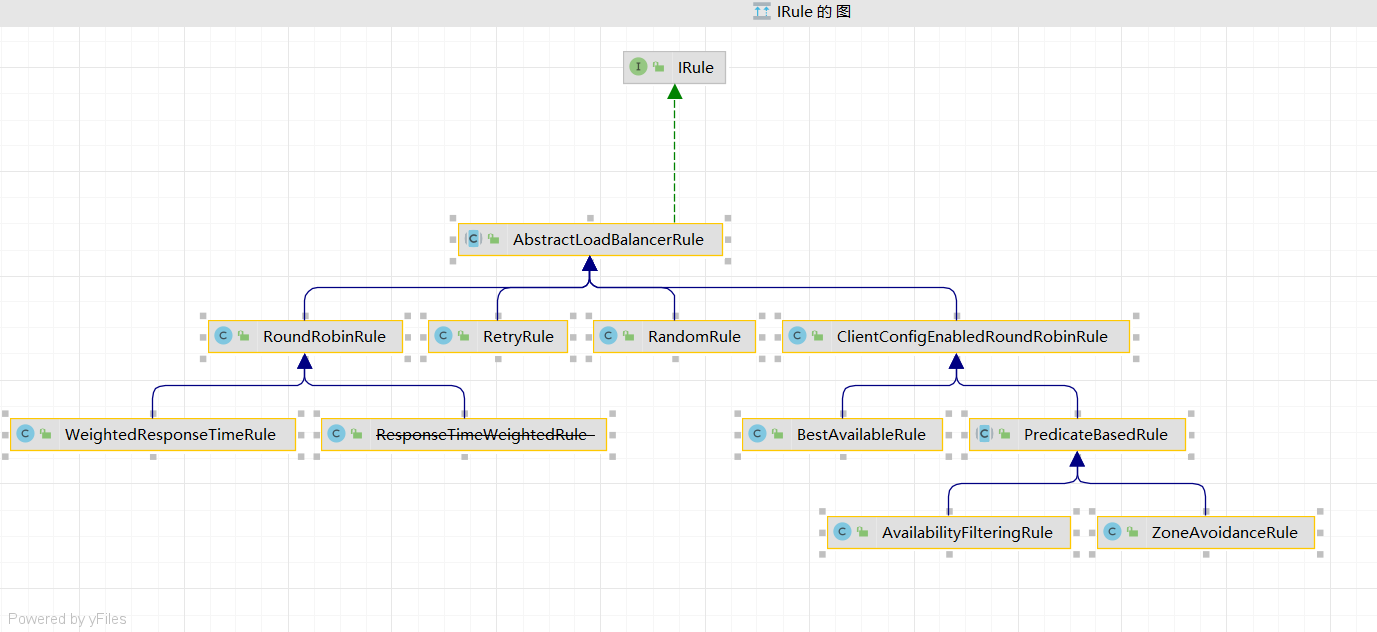
BestAvailableRule:选择具有最低并发请求的服务器。
ClientConfigEnabledRoundRobinRule:轮询。
RandomRule:随机选择一个服务器。
RoundRobinRule:轮询选择服务器。
RetryRule:具备重试机制的轮询。
WeightedResponseTimeRule:根据使用平均响应时间去分配一个weight(权重) ,weight越低,被选择的可能性就越低。
ZoneAvoidanceRule:根据区域和可用性筛选,再轮询选择服务器
然后我们可以看看默认的轮询负载均衡是如何实现的
public class RoundRobinRule extends AbstractLoadBalancerRule {private AtomicInteger nextServerCyclicCounter;private static final boolean AVAILABLE_ONLY_SERVERS = true;private static final boolean ALL_SERVERS = false;private static Logger log = LoggerFactory.getLogger(RoundRobinRule.class);//无参的初始化了一个原子操作类,为保证线程安全public RoundRobinRule() {this.nextServerCyclicCounter = new AtomicInteger(0);}//有参构造类设置了加载的服务器集群LoadBalancerpublic RoundRobinRule(ILoadBalancer lb) {this();this.setLoadBalancer(lb);}//通过实现的choose方法来选择要指定的服务器public Server choose(ILoadBalancer lb, Object key) {if (lb == null) {log.warn("no load balancer");return null;} else {//将上次选择的服务器置空,重新根据规则选择Server server = null;//请求次数统计int count = 0;while(true) {if (server == null && count++ < 10) {//获取可达(健康)的服务器集合List<Server> reachableServers = lb.getReachableServers();List<Server> allServers = lb.getAllServers();//获取up状态的服务器数int upCount = reachableServers.size();//服务集群总数int serverCount = allServers.size();//如果没有up状态的服务器或者没有服务器,直接退出选择if (upCount != 0 && serverCount != 0) {//增加并获得,返回要选择的服务器下标int nextServerIndex = this.incrementAndGetModulo(serverCount);//通过下标选择服务器server = (Server)allServers.get(nextServerIndex);if (server == null) {Thread.yield();} else {if (server.isAlive() && server.isReadyToServe()) {return server;}server = null;}continue;}log.warn("No up servers available from load balancer: " + lb);return null;}if (count >= 10) {log.warn("No available alive servers after 10 tries from load balancer: " + lb);}//返回选择的服务器return server;}}}private int incrementAndGetModulo(int modulo) {int current;int next;do {//这个是我们的atmic原子类。得到默认的值0current = this.nextServerCyclicCounter.get();//这个是服务的个数。这个next的值如果这一样取,其实就是和serverlist的下标对应,并且,每次加1.next = (current + 1) % modulo;}while(!this.nextServerCyclicCounter.compareAndSet(current, next));//因为是多线程,我们要保证安全,所以用了循环的CAS自旋锁return next;}public Server choose(Object key) {return this.choose(this.getLoadBalancer(), key);}public void initWithNiwsConfig(IClientConfig clientConfig) {}}
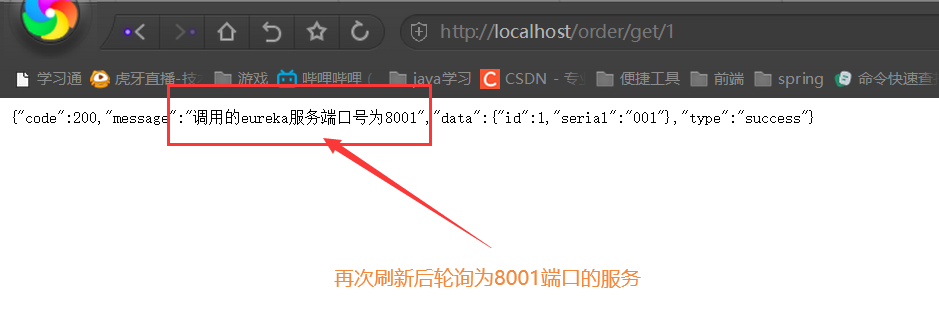
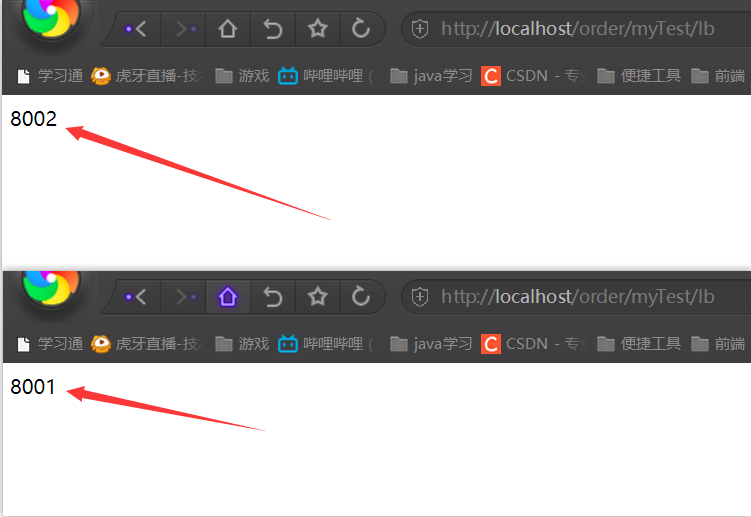
因此轮询算法实际就是实际调用服务器的下标 = rest接口第几次的请求数 % 服务器集群总数量,注意:每次重新启动服务后rest接口从1开始计数,这样我们就得到了实际调用服务器的下标。现在我们有两台服务器分别为:server-1(端口号:8001,下标:0),server-2(端口号:8002,下标:1)当请求数为1时:1%2=1 对应的下标为1,则获得的服务地址为ip:8002当请求数为2时:2%2=0对应的下标为0,则获得的服务地址为ip:8001
这也就是为什么我们请求时,先反馈的是8002的服务,然后是8001.
手写一个简单的轮询算法
首先创建一个类似的LoadBancer接口,里面包含一个从服务集群获取一个服务实例的方法。
public interface LoadBalancer {ServiceInstance instance(List<ServiceInstance> serviceInstances);}
然后通过实现类去实现轮询算法的实现过程。
/*** @author young* @date 2022/12/23 20:37* @description: 自定义一个轮询算法*/@ComponentpublicclassMyRandomRuleimplementsLoadBalancer{privatefinalAtomicIntegeratomicInteger=newAtomicInteger(0);publicfinalintgetAndIncrement(){intcurrent;intnext;do {current=this.atomicInteger.get();next=current>=Integer.MAX_VALUE?0:current+1;//自旋锁设计}while (!this.atomicInteger.compareAndSet(current,next));System.out.println("访问次数为:"+next+"次");returnnext;}//负载均衡算法: rest接口第几次请求数%服务器集群总数量=实际调用服务器位置下标m,每次服务重启动后rest接口@OverridepublicServiceInstanceinstance(List<ServiceInstance>serviceInstances) {intindex=getAndIncrement()%serviceInstances.size();returnserviceInstances.get(index);}}
另外需要注意的是,需要将之前配置的restTamplate上的@LoadBanced注解注释掉,不然我们自己写的就浪费了。
最后通过一个controller方法去测试。
/*** @author young* @date 2022/12/16 15:46* @description: 模拟客户端接口*/@RestController@Slf4j@RequestMapping("order")publicclassOrderController {@ResourceprivateRestTemplaterestTemplate;@ResourceprivateLoadBalancerloadBalancer;@ResourceprivateDiscoveryClientdiscoveryClient;@GetMapping("/myTest/lb")publicStringgetMyLB(){List<ServiceInstance>instances=discoveryClient.getInstances("CLOUD-PAYMENT-SERVICE");if (instances==null||instances.size()<=0){returnnull;}ServiceInstanceinstance=loadBalancer.instance(instances);returnrestTemplate.getForObject(instance.getUri()+"/client/lb",String.class);}}
测试结果:

成功实现模拟的轮询负载效果。
更换负载均衡算法
虽然Ribbon默认的负载均衡算法为轮询算法,但是我们也可以更具自己的业务需求去进行切换。上面也说到了,ribbon其实有7个负载规则。方式很简单:
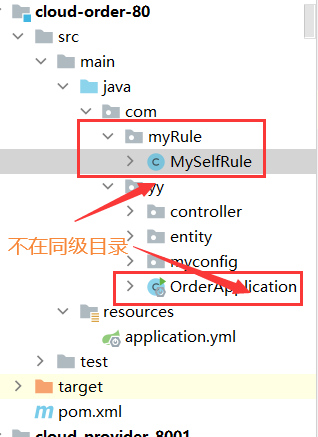
首先在启动类所在父级目录外不同的地方创建一个新的文件夹,以存放我们自定义的负载规则。因为官方文档明确给出了警告:这个自定义配置类不能放在@ComponentScan所扫描的当前包下以及子包下,否则我们自定义的这个配置类就会被所有的Ribbon客户端所共享,达不到特殊化定制的目的了。
然后编写配置类去更换我们的负载规则,并使其注入到spring配置。
/*** @author young* @date 2022/12/23 19:41* @description: 自定义Ribbon负载均衡规则,父包不能在启动类所在包或子包下!*/@ConfigurationpublicclassMySelfRule {@BeanpublicIRulemyRule(){//随机负载均衡模式returnnewRandomRule();}}
最后在启动类上添加@RibbonClient指明指定的微服务更换负载规则配置。
@SpringBootApplication@EnableEurekaClient@RibbonClient(name="CLOUD-PAYMENT-SERVICE",configuration=MySelfRule.class) //指定更换负载均衡模式publicclassOrderApplication {publicstaticvoidmain(String[] args) {SpringApplication.run(OrderApplication.class,args);}}
这里由于我们配置的随机负载规则,因此完成后启动测试调试接口就会随机去调用服务端提供的服务接口了。
Feign介绍
Feign是一个声明式的Web服务客户端。这使得Web服务客户端的写入更加方便 要使用Feign创建一个界面并对其进行注释。它具有可插入注释支持,包括Feign注释和JAX-RS注释。Feign还支持可插拔编码器和解码器。Spring Cloud增加了对Spring MVC注释的支持,并使用Spring Web中默认使用的HttpMessageConverters。Spring Cloud集成Ribbon和Eureka以在使用Feign时提供负载均衡的http客户端。
Spring Cloud Netflix默认为feign(BeanType beanName:ClassName)提供以下bean:
Decoder feignDecoder:ResponseEntityDecoder(其中包含SpringDecoder)
Encoder feignEncoder:SpringEncoder
Logger feignLogger:Slf4jLogger
Contract feignContract:SpringMvcContract
Feign.Builder feignBuilder:HystrixFeign.Builder
Client feignClient:如果Ribbon启用,则为LoadBalancerFeignClient,否则将使用默认的feign客户端。
可以通过将feign.okhttp.enabled或feign.httpclient.enabled设置为true,并将它们放在类路径上来使用OkHttpClient和ApacheHttpClient feign客户端。
Spring Cloud Netflix 默认情况下不提供以下bean,但是仍然从应用程序上下文中查找这些类型的bean以创建假客户机:
Logger.Level
Retryer
ErrorDecoder
Request.Options
Collection
SetterFactory
因此如果需要配置指定的日志记录,需要我们自己配置并注入。Feign日志记录为每个创建的Feign客户端创建一个记录器。默认情况下,记录器的名称是用于创建Feign客户端的接口的全类名称。Feign日志记录仅响应DEBUG级别。
这里以Logger.Level为例
/*** @author young* @date 2022/12/24 18:09* @description: 配置Feign日志*/@Configurationpublic class FeignConfig {@BeanLogger.Level feignLogger(){return Logger.Level.FULL;}}
NONE:默认,不显示任何日志;
BASIC: 仅记录请求方法、URL、响应状态码及执行时间;
HEADERS:除了BASIC中定义的信息之外,还有请求头和响应头信息;
FULL:除了HEADERS中定义的信息之外,还有请求的正文和响应数据。
配置完成后在yml文件中即可指定对应服务接口的调用情况日志打印。
#配置feign日志logging:level:com.yy.service.TestFeignService: debug
Feign实现服务调用
同样的套路,创建新的springboot模板后添加相关的feign依赖,这里我们添加OpenFeign。
<dependency><groupId>org.springframework.cloud</groupId><artifactId>spring-cloud-starter-netflix-eureka-client</artifactId></dependency><dependency><groupId>org.springframework.boot</groupId><artifactId>spring-boot-starter</artifactId></dependency><dependency><groupId>org.springframework.boot</groupId><artifactId>spring-boot-starter-web</artifactId></dependency><dependency><groupId>org.springframework.cloud</groupId><artifactId>spring-cloud-starter-openfeign</artifactId></dependency><dependency><groupId>com.yy</groupId><artifactId>cloud-common</artifactId><version>${myproject.version}</version></dependency><dependency><groupId>org.springframework.boot</groupId><artifactId>spring-boot-starter-actuator</artifactId></dependency>
OpenFeign是Spring Cloud在Feign的基础上支持了SpringMVC的注解,如@RequesMapping等等。OpenFeign的@FeignClient可以解析SpringMVc的@RequestMapping注解下的接口,并通过动态代理的方式产生实现类,实现类中做负载均衡并调用其他服务。
OpenFeign的设计宗旨式简化Java Http客户端的开发。Feign在restTemplate的基础上做了进一步的封装,由其来帮助我们定义和实现依赖服务接口的定义。在OpenFeign的协助下,我们只需创建一个接口并使用注解的方式进行配置(类似于Dao接口上面的Mapper注解)即可完成对服务提供方的接口绑定,大大简化了Spring cloud Ribbon的开发,自动封装服务调用客户端的开发量。
OpenFeign集成了Ribbon,利用ribbon维护了服务列表,并且通过ribbon实现了客户端的负载均衡。与ribbon不同的是,通过OpenFeign只需要定义服务绑定接口且以申明式的方法,优雅而简单的实现了服务调用
然后编写yml配置。
server:port: 80eureka:client:register-with-eureka: trueservice-url:defaultZone: http://localhost:7001/eureka,http://localhost:7002/eureka #集群状态下fetch-registry: truespring:application:name: OpenFeign-service-order-80#配置feign日志logging:level:com.yy.service.TestFeignService: debug
既然是面向接口编程,因此我们使用Feign的时候不用配置restTamplate去调用服务,而是创建另外的消费者服务接口,并且通过@FeignClient指明服务提供端的服务名。
@FeignClient(value="CLOUD-PAYMENT-SERVICE")@ComponentpublicinterfaceTestFeignService {@GetMapping("/payment/{id}")Result<Payment>getOne(@PathVariable("id")Integerid);@GetMapping("/payment/timeout")Stringtimeout();}
这里接口中的方法对应的服务提供端的controller层的服务方法。
/*** 通过主键查询单条数据** @param id 主键* @return 单条数据*/@GetMapping("{id}")publicResult<Payment>selectOne(@PathVariableSerializableid) {returnResult.ok(this.paymentService.getById(id)).message("调用的eureka服务端口号为"+port);}@GetMapping("/timeout")publicStringtimeout(){try{TimeUnit.SECONDS.sleep(3);}catch (InterruptedExceptione){e.printStackTrace();}returnport;}
最后我们就可以编写消费者请求接口去测试调用服务结果了。
@RestController@Slf4j@RequestMapping("/feign")public class OrderFeinController {@Resourceprivate TestFeignService testFeignService;@GetMapping("/getService/{id}")public Result<Payment> getOne(@PathVariable("id")Integer id){return testFeignService.getOne(id);}@GetMapping("/timeout")public String feignTimeout(){return testFeignService.timeout();}}

并且日志增强后的服务执行日志也成功打印出来了
2023-01-06 20:39:18.708 INFO 3860 --- [freshExecutor-0] com.netflix.discovery.DiscoveryClient : Application version is -1: false2023-01-06 20:39:18.708 INFO 3860 --- [freshExecutor-0] com.netflix.discovery.DiscoveryClient : Getting all instance registry info from the eureka server2023-01-06 20:39:18.729 INFO 3860 --- [freshExecutor-0] com.netflix.discovery.DiscoveryClient : The response status is 2002023-01-06 20:39:48.979 DEBUG 3860 --- [p-nio-80-exec-9] com.yy.service.TestFeignService : [TestFeignService#getOne] ---> GET http://CLOUD-PAYMENT-SERVICE/payment/1 HTTP/1.12023-01-06 20:39:48.979 DEBUG 3860 --- [p-nio-80-exec-9] com.yy.service.TestFeignService : [TestFeignService#getOne] ---> END HTTP (0-byte body)2023-01-06 20:39:49.289 DEBUG 3860 --- [p-nio-80-exec-9] com.yy.service.TestFeignService : [TestFeignService#getOne] <--- HTTP/1.1 200 (309ms)2023-01-06 20:39:49.290 DEBUG 3860 --- [p-nio-80-exec-9] com.yy.service.TestFeignService : [TestFeignService#getOne] connection: keep-alive2023-01-06 20:39:49.290 DEBUG 3860 --- [p-nio-80-exec-9] com.yy.service.TestFeignService : [TestFeignService#getOne] content-type: application/json2023-01-06 20:39:49.290 DEBUG 3860 --- [p-nio-80-exec-9] com.yy.service.TestFeignService : [TestFeignService#getOne] date: Fri, 06 Jan 2023 12:39:49 GMT2023-01-06 20:39:49.290 DEBUG 3860 --- [p-nio-80-exec-9] com.yy.service.TestFeignService : [TestFeignService#getOne] keep-alive: timeout=602023-01-06 20:39:49.290 DEBUG 3860 --- [p-nio-80-exec-9] com.yy.service.TestFeignService : [TestFeignService#getOne] transfer-encoding: chunked2023-01-06 20:39:49.290 DEBUG 3860 --- [p-nio-80-exec-9] com.yy.service.TestFeignService : [TestFeignService#getOne]2023-01-06 20:39:49.300 DEBUG 3860 --- [p-nio-80-exec-9] com.yy.service.TestFeignService : [TestFeignService#getOne] {"code":200,"message":"调用的eureka服务端口号为8001","data":{"id":1,"serial":"001"},"type":"success"}2023-01-06 20:39:49.300 DEBUG 3860 --- [p-nio-80-exec-9] com.yy.service.TestFeignService : [TestFeignService#getOne] <--- END HTTP (110-byte body)


-- volatile关键字解析")


还没有评论,来说两句吧...