【源码分析】Spring依赖注入原理
文章目录
- 一、三种依赖注入方式
- 字段注入
- 构造器注入
- Setter注入
- 二、依赖注入原理
- Bean 注册
- Bean 实例化
一、三种依赖注入方式
在Spring中提供了三种实现依赖注入的方式:字段注入、构造器注入、Setter方法注入。
首先我们先创建一个Service层的接口以及对应的实现类,基于以下实现类来实现依赖注入的方式:
public interface UserService {public void UserInfo();}public class UserServiceImpl implements UserService{@Overridepublic void UserInfo() {System.out.println("UserInfo to do ...");}}
字段注入
Spring中通过@Autowired注解,可以完成注入。
public class ClientService {@Autowiredprivate UserService userService;public void UserInfo(){userService.UserInfo();}}
字段注入是三种注入方式最简单、最常用的一种方式,但是也是最需要避免使用的一种方式。那为什么要避免使用呢?接下来进行分析一下。
在ClientService 类中,我们定义了一个私有化的变量userService来注入该接口的实例,但是这个实例只能在ClientService 类中访问到,脱离容器环境无法访问到。
ClientService clientService = new ClientService();clientService.UserInfo();
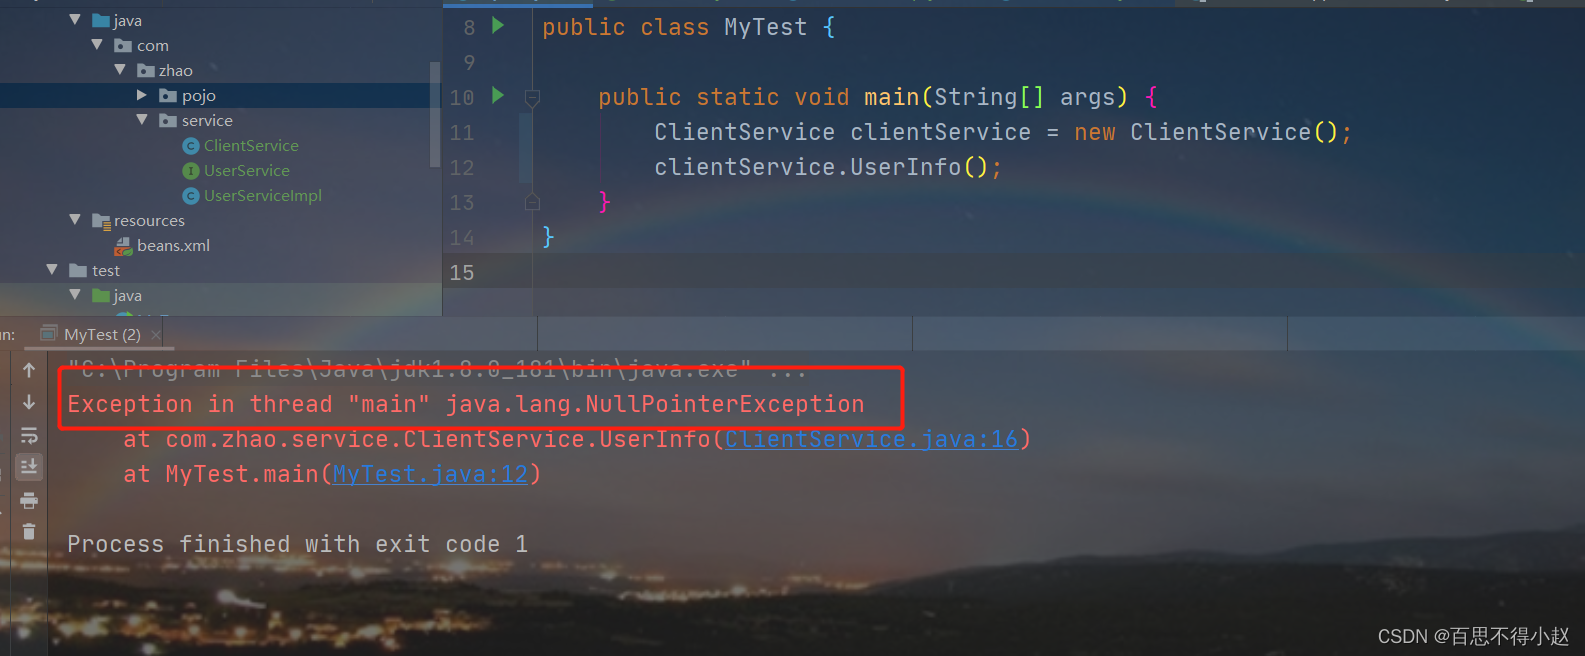
如上图执行结果抛出NullPointerException空指针异常,原因很简单无法在ClientService 类的外部实例化UserService 对象。采用字段注入的话,类与容器的耦合度较高,无法脱离容器使用目标对象。这就得出了避免使用字段注入的第一个原因:对象的外部可见性较差。
避免使用字段注入第二个原因:可能导致潜在的循环依赖。循环依赖指的是两个类之间互相进行注入。代码如下
public class ClassA {@Autowiredprivate ClassB classB;}public class ClassB {@Autowiredprivate ClassA classA;}
如上代码显然,ClassA和ClassB发生循环依赖。在Spring启动的时候不会发生错误,但是在使用具体的某个类时会报错。
构造器注入
构造器注入就是使用类的构造函数来完成对象的注入。
public class ClientService {private UserService userService;@Autowiredpublic ClientService(UserService userService) {this.userService = userService;}public void UserInfo(){userService.UserInfo();}}
通过构造器注入可以解决对象的外部可见性的问题,因为userService是通过ClientService 构造函数进行注入的。基于构造器注入,回顾一下之前循环依赖的问题。代码如下
public class ClassA {private ClassB classB;@Autowiredpublic ClassA(ClassB classB) {this.classB = classB;}}public class ClassB {private ClassA classA;@Autowiredpublic ClassB(ClassA classA) {this.classA = classA;}}
在Spring项目启动的时候,会抛出循环依赖异常,可以提醒开发者避免使用循环依赖。但是构造器注入也是有问题的,当构造函数中存在较多的依赖对象时,大量的构造函数参数回访代码出现冗余。接下来就引入Setter方法注入。
Setter注入
Setter方法注入代码如下
public class ClientService {private UserService userService;@Autowiredpublic void setUserService(UserService userService) {this.userService = userService;}public void UserInfo(){userService.UserInfo();}}
Setter注入相比于构造器注入可读性更强,可以将多个实例对象通过多个Setter方法逐一进行注入。回顾之前的循环依赖问题。代码如下
public class ClassA {private ClassB classB;@Autowiredpublic void setClassB(ClassB classB) {this.classB = classB;}}public class ClassB {private ClassA classA;@Autowiredpublic void setClassA(ClassA classA) {this.classA = classA;}}
在ClassA 和ClassB 作用域都为单例bean的前提下,代码正常执行。
总结:Setter适合可选对象的注入;构造方法适合强制对象的注入;字段注入避免使用。
二、依赖注入原理
前面介绍完依赖注入的三种实现方式,接下来结合Spring源码深入的了解下依赖注入的原理,通过Bean 注册和Bean 实例化两个模块进行阐述。
Bean 注册
在Spring中我们往往通过一个应用的上下文(ApplicationContext)对象来操作各种Bean。
AnnotationConfigApplicationContext context = new AnnotationConfigApplicationContext(Config.class);
xxxApplicationContext接口在Spring中就代表一个Spring IOC 容器,Spring中存在大量的ApplicationContext接口的实现类。如果基于注解的配置方式,就使用AnnotationConfigApplicationContext 来初始化上下文容器对象。接下来进入AnnotationConfigApplicationContext的源码,查看其构造函数如下:
/*** Create a new AnnotationConfigApplicationContext, deriving bean definitions* from the given component classes and automatically refreshing the context.* @param componentClasses one or more component classes — for example,* {@link Configuration @Configuration} classes*/public AnnotationConfigApplicationContext(Class<?>... componentClasses) {this();// 根据注解配置类注册Beanregister(componentClasses);// 刷新容器refresh();}/*** Create a new AnnotationConfigApplicationContext, scanning for components* in the given packages, registering bean definitions for those components,* and automatically refreshing the context.* @param basePackages the packages to scan for component classes*/public AnnotationConfigApplicationContext(String... basePackages) {this();// 根据包路径扫描Beanscan(basePackages);// 刷新容器refresh();}
通过以上两个构造函数可以看出,一个是根据注解配置类注册Bean,另一个通过包路径扫描Bean。点击进入register方法:
//---------------------------------------------------------------------// 注解ConfigRegistry的实现// Implementation of AnnotationConfigRegistry//---------------------------------------------------------------------/*** Register one or more component classes to be processed.* <p>Note that {@link #refresh()} must be called in order for the context* to fully process the new classes.* @param componentClasses one or more component classes — for example,* {@link Configuration @Configuration} classes* @see #scan(String...)* @see #refresh()*/@Overridepublic void register(Class<?>... componentClasses) {Assert.notEmpty(componentClasses, "At least one component class must be specified");this.reader.register(componentClasses);}
通过this.reader.register(componentClasses);可以看出,调用当前对象reader里面的register方法,而reader实际上是AnnotatedBeanDefinitionReader工具类来完成Bean的注册。继续点进register方法:
/*** Register one or more component classes to be processed.* <p>Calls to {@code register} are idempotent; adding the same* component class more than once has no additional effect.* @param componentClasses one or more component classes,* e.g. {@link Configuration @Configuration} classes*/public void register(Class<?>... componentClasses) {for (Class<?> componentClass : componentClasses) {registerBean(componentClass);}}/*** Register a bean from the given bean class, deriving its metadata from* class-declared annotations.* @param beanClass the class of the bean*/public void registerBean(Class<?> beanClass) {doRegisterBean(beanClass, null, null, null, null);}
AnnotatedBeanDefinitionReader会遍历所有的componentClasses组件类,通过registerBean方法中的doRegisterBean方法完成Bean的注册。进入doRegisterBean:
/*** Register a bean from the given bean class, deriving its metadata from* class-declared annotations.* @param beanClass the class of the bean* @param name an explicit name for the bean* @param supplier a callback for creating an instance of the bean* (may be {@code null})* @param qualifiers specific qualifier annotations to consider, if any,* in addition to qualifiers at the bean class level* @param customizers one or more callbacks for customizing the factory's* {@link BeanDefinition}, e.g. setting a lazy-init or primary flag* @since 5.0*/private <T> void doRegisterBean(Class<T> beanClass, @Nullable String name,@Nullable Class<? extends Annotation>[] qualifiers, @Nullable Supplier<T> supplier,@Nullable BeanDefinitionCustomizer[] customizers) {// 将注解配置类信息转换成一种 BeanDefinitionAnnotatedGenericBeanDefinition abd = new AnnotatedGenericBeanDefinition(beanClass);if (this.conditionEvaluator.shouldSkip(abd.getMetadata())) {return;}abd.setInstanceSupplier(supplier);// 获取bean的作用域元数据ScopeMetadata scopeMetadata = this.scopeMetadataResolver.resolveScopeMetadata(abd);// 将bean的作用域写回 BeanDefinitionabd.setScope(scopeMetadata.getScopeName());// 生成 beanNameString beanName = (name != null ? name : this.beanNameGenerator.generateBeanName(abd, this.registry));// 解析AnnotatedGenericBeanDefinition 中的 @lazy 和 @Primary注解AnnotationConfigUtils.processCommonDefinitionAnnotations(abd);// 处理@Qualifier 注解if (qualifiers != null) {for (Class<? extends Annotation> qualifier : qualifiers) {if (Primary.class == qualifier) {// 如果设置了@Primary注解,设置当前bean为首选beanabd.setPrimary(true);}else if (Lazy.class == qualifier) {// 如果设置了@lazy注解,则设置当前bean为延迟加载模式abd.setLazyInit(true);}else {abd.addQualifier(new AutowireCandidateQualifier(qualifier));}}}if (customizers != null) {for (BeanDefinitionCustomizer customizer : customizers) {customizer.customize(abd);}}BeanDefinitionHolder definitionHolder = new BeanDefinitionHolder(abd, beanName);definitionHolder = AnnotationConfigUtils.applyScopedProxyMode(scopeMetadata, definitionHolder, this.registry);// 注册 bean对象BeanDefinitionReaderUtils.registerBeanDefinition(definitionHolder, this.registry);}
总的来看:
① 首先需要构造描述bean实例化信息的BeanDefinition对象,需要将注解配置类信息转化为AnnotatedGenericBeanDefinition 类型,此处的AnnotatedGenericBeanDefinition 就是一种BeanDefinition类型,包含了Bean的构造函数参数,属性值以及添加的注解信息。
② 设置BeanDefinition属性,完成对@Scope、@Lazy、@Primary等注解的处理
③ 最后通过registerBeanDefinition()方法完成Bean的注册。
Bean 实例化
现在Spring IOC容器对Bean的创建过程并没有完成,目前只是将Bean的定义加载到了容器中,但是可能容器本身已经存在这些Bean的定义,所以需要使用refresh()方法刷新容器,回到最开始进入AnnotationConfigApplicationContext的源码,查看其构造函数如下:
/*** Create a new AnnotationConfigApplicationContext, deriving bean definitions* from the given component classes and automatically refreshing the context.* @param componentClasses one or more component classes — for example,* {@link Configuration @Configuration} classes*/public AnnotationConfigApplicationContext(Class<?>... componentClasses) {this();// 根据注解配置类注册Beanregister(componentClasses);// 刷新容器refresh();}
接下来分析refresh方法,点击进入:
@Overridepublic void refresh() throws BeansException, IllegalStateException {synchronized (this.startupShutdownMonitor) {...// 提取配置信息,注册到BeanFactory中ConfigurableListableBeanFactory beanFactory = obtainFreshBeanFactory();...try {......// 初始化所有的单例 beanfinishBeanFactoryInitialization(beanFactory);// Last step: publish corresponding event.finishRefresh();}catch (BeansException ex) {......}finally {......}}}
可以看出obtainFreshBeanFactory完成对Bean的注册返回一个BeanFactory。而finishBeanFactoryInitialization方法真正完成Bean实例化的入口。真正完成实例化的方法为DefaultListableBeanFactory类中的preInstantiateSingletons方法,进入此方法:
@Overridepublic void preInstantiateSingletons() throws BeansException {List<String> beanNames = new ArrayList<>(this.beanDefinitionNames);// 触发所有非懒加载的单例Bean的初始化操作for (String beanName : beanNames) {RootBeanDefinition bd = getMergedLocalBeanDefinition(beanName);if (!bd.isAbstract() && bd.isSingleton() && !bd.isLazyInit()) {if (isFactoryBean(beanName)) {......}else {// 获取BeangetBean(beanName);}}}......}
进入到getBean()方法:
//---------------------------------------------------------------------// Implementation of BeanFactory interface//---------------------------------------------------------------------@Overridepublic Object getBean(String name) throws BeansException {return doGetBean(name, null, null, false);}
Bean的初始化过程就在这个方法中。在当前的抽象类AbstractBeanFactory中有一个抽象方法createBean如下:
protected abstract Object createBean(String beanName, RootBeanDefinition mbd, @Nullable Object[] args)throws BeanCreationException;
在Spring中实现这个抽象方法的唯一BeanFactory是AbstractAutowireCapableBeanFactory,真正完成Bean创建是在doCreateBean:
/*** 此类的中心方法:创建一个bean实例,* Central method of this class: creates a bean instance,* populates the bean instance, applies post-processors, etc.* @see #doCreateBean*/@Overrideprotected Object createBean(String beanName, RootBeanDefinition mbd, @Nullable Object[] args)throws BeanCreationException {......try {// 真正创建BeanObject beanInstance = doCreateBean(beanName, mbdToUse, args);if (logger.isTraceEnabled()) {logger.trace("Finished creating instance of bean '" + beanName + "'");}return beanInstance;}catch (BeanCreationException | ImplicitlyAppearedSingletonException ex) {// A previously detected exception with proper bean creation context already,// or illegal singleton state to be communicated up to DefaultSingletonBeanRegistry.throw ex;}catch (Throwable ex) {throw new BeanCreationException(mbdToUse.getResourceDescription(), beanName, "Unexpected exception during bean creation", ex);}}
最后进入到doCreateBean如下:
protected Object doCreateBean(final String beanName, final RootBeanDefinition mbd, final @Nullable Object[] args)throws BeanCreationException {......// 初始化一个beanif (instanceWrapper == null) {instanceWrapper = createBeanInstance(beanName, mbd, args);}......Object exposedObject = bean;try {// 初始化Bean实例populateBean(beanName, mbd, instanceWrapper);// 执行初始化bean实例回调exposedObject = initializeBean(beanName, exposedObject, mbd);}catch (Throwable ex) {if (ex instanceof BeanCreationException && beanName.equals(((BeanCreationException) ex).getBeanName())) {throw (BeanCreationException) ex;}else {throw new BeanCreationException(mbd.getResourceDescription(), beanName, "Initialization of bean failed", ex);}}......// 将bean注册为一次性。try {registerDisposableBeanIfNecessary(beanName, bean, mbd);}catch (BeanDefinitionValidationException ex) {throw new BeanCreationException(mbd.getResourceDescription(), beanName, "Invalid destruction signature", ex);}return exposedObject;}
总的来看:
① createBeanInstance方法用于根据配置生成具体的Bean,最终通过反射方法实现,执行完后Bean已经被创建,但是不完整,没有属性的注入。
② populateBean方法用于实现属性的自动注入,包含byName、byType、@Autowired、@Value属性的设置,执行完之后Bean就是完整的。
③ initializeBean方法是一种扩展性的机制,用于Bean初始化完成后的一些定制化操作。
至此分析Spring中Bean依赖注入的过程就全部结束,希望对大家有所帮助!!!


还没有评论,来说两句吧...