10.SpringCloud Alibaba Sentinel
10.SpringCloud Alibaba Sentinel
Sentinel基础
官网
Github:https://github.com/alibaba/Sentinel
快速开始:https://sentinelguard.io/zh-cn/docs/quick-start.html
中文文档:https://github.com/alibaba/Sentinel/wiki/%E4%BB%8B%E7%BB%8D
Sentinel是什么
Sentinel概述

Sentinel的主要特性
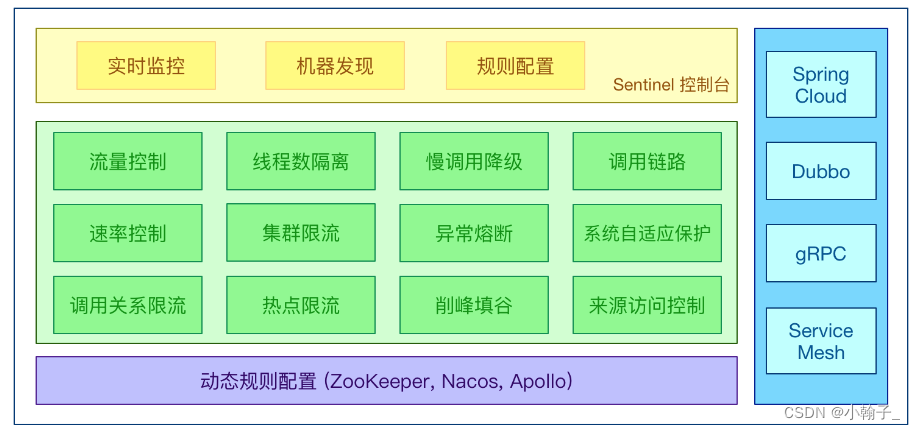
Sentinel可以完成的功能:绿色方框列出的部分
一句话:Sentinel:分布式系统的流量防卫兵,保护你的微服务
Sentinel核心功能
流量控制
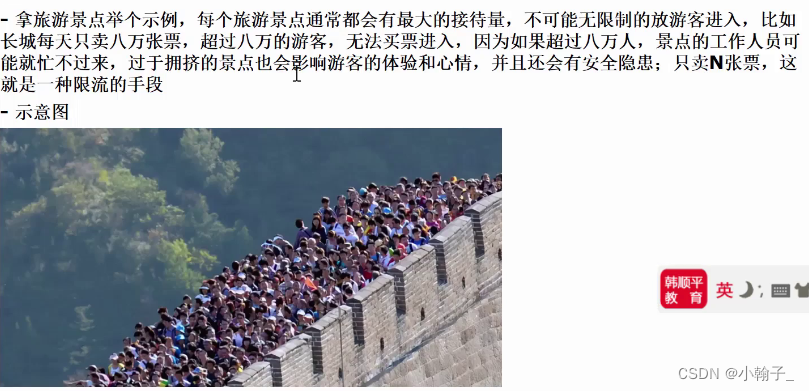
例子
熔断降级

系统负载保护

消息削峰填谷

Sentinel两个组成部分

Sentinel控制台
需求分析/图解

下载
http://github.com/alibaba/Sentinel/releases/tag/v1.8.0
运行
指令:java -jar sentinel-dashboard-1.8.0.jar

注意:Sentinel 控制台 默认端口是8080
访问
浏览器:http://localhost:8080/
账号密码都是:sentinel
![\[外链图片转存失败,源站可能有防盗链机制,建议将图片保存下来直接上传(img-6NyQt4zs-1670145631540)(E:\\Java资料\\韩顺平Java\\资料\\SpringCloud\\笔记\\10.SpringCloud Alibaba Sentinel.assets\\image-20221123180834871.png)\]](https://img-blog.csdnimg.cn/1bf8c8307967486ca8e6735b6f0b2439.png)
登录成功后控制台页面,目前都是空的,因为sentinel还没有进行流量监控
![\[外链图片转存失败,源站可能有防盗链机制,建议将图片保存下来直接上传(img-miOLEeOp-1670145631540)(E:\\Java资料\\韩顺平Java\\资料\\SpringCloud\\笔记\\10.SpringCloud Alibaba Sentinel.assets\\image-20221123180945837.png)\]](https://img-blog.csdnimg.cn/c5fc07083a334ddcb2f4c0fa896ca7d8.png)
注意事项和细节
切换端口号启动
java -jar sentinel-dashboard-1.8.0.jar —server.port=9999
![\[外链图片转存失败,源站可能有防盗链机制,建议将图片保存下来直接上传(img-Ivfqt7yF-1670145631541)(E:\\Java资料\\韩顺平Java\\资料\\SpringCloud\\笔记\\10.SpringCloud Alibaba Sentinel.assets\\image-20221123181223488.png)\]](https://img-blog.csdnimg.cn/68f6d9ae20b34d1486e1ec0ef8533a6e.png)
Sentinel监控微服务
需求分析/图解
![\[外链图片转存失败,源站可能有防盗链机制,建议将图片保存下来直接上传(img-Sri9g603-1670145631541)(E:\\Java资料\\韩顺平Java\\资料\\SpringCloud\\笔记\\10.SpringCloud Alibaba Sentinel.assets\\image-20221123181920088.png)\]](https://img-blog.csdnimg.cn/d9548348ff7445a09457dfed7ea6a944.png)
示意图
![\[外链图片转存失败,源站可能有防盗链机制,建议将图片保存下来直接上传(img-8egJTKUb-1670145631542)(E:\\Java资料\\韩顺平Java\\资料\\SpringCloud\\笔记\\10.SpringCloud Alibaba Sentinel.assets\\image-20221123181906646.png)\]](https://img-blog.csdnimg.cn/29449a1ce72940739a379d073cf3a4fc.png)
![\[外链图片转存失败,源站可能有防盗链机制,建议将图片保存下来直接上传(img-NxC4KBNr-1670145631542)(E:\\Java资料\\韩顺平Java\\资料\\SpringCloud\\笔记\\10.SpringCloud Alibaba Sentinel.assets\\image-20221123182013117.png)\]](https://img-blog.csdnimg.cn/62c18ebf0865436a909056bf68f4b5ff.png)
代码/配置实现
在member-service-nacos-provider-10004 添加pom.xml 依赖
<!-- 引入alibaba-sentinel starter 使用版本仲裁--><dependency><groupId>com.alibaba.cloud</groupId><artifactId>spring-cloud-starter-alibaba-sentinel</artifactId></dependency>
在member-service-nacos-provider-10004 配置application.yml
spring:application:name: member-service-nacos-provider #配置应用的名称datasource:type: com.alibaba.druid.pool.DruidDataSourceurl: jdbc:mysql://localhost:3306/e_commerce_center_db?useSSL=true&useUnicode=true&characterEncoding=UTF-8username: rootpassword: 123456#配置nacoscloud:nacos:discovery:server-addr: localhost:8848 #配置 Nacos Server的地址sentinel:transport:dashboard: localhost:8080 #指定sentinel控制台的地址# 解读transport.port# 1.transport.port 端口配置会在被监控的微服务对应主机上启动 Http Server# 2.该Http Server 会与Sentinel 控制台进行交互# 3.比如sentinel 控制台添加了一个限流规则,会把规则数据push 给这个Http Server 接收# Http Server 再将中国规则注册到Sentinel 中# 4.简单的讲:transport.port 指定被监控的微服务应用于Sentinel 控制台交互的端口# 5.默认端口是 8719,假如被占用了,就会自动的从8719开始依次+1扫描,直到找到一个没有被占用的端口port: 8719 # 指定端口
测试
![\[外链图片转存失败,源站可能有防盗链机制,建议将图片保存下来直接上传(img-udIKg2iJ-1670145631542)(E:\\Java资料\\韩顺平Java\\资料\\SpringCloud\\笔记\\10.SpringCloud Alibaba Sentinel.assets\\image-20221123190638937.png)\]](https://img-blog.csdnimg.cn/16377cdfa8db48a3b443c7c3055b44b9.png)
![\[外链图片转存失败,源站可能有防盗链机制,建议将图片保存下来直接上传(img-CFQW9Euo-1670145631543)(E:\\Java资料\\韩顺平Java\\资料\\SpringCloud\\笔记\\10.SpringCloud Alibaba Sentinel.assets\\image-20221123191424876.png)\]](https://img-blog.csdnimg.cn/d9a7d1ef31824760b7ed23b25ed3d496.png)
![\[外链图片转存失败,源站可能有防盗链机制,建议将图片保存下来直接上传(img-N2LavAmF-1670145631543)(E:\\Java资料\\韩顺平Java\\资料\\SpringCloud\\笔记\\10.SpringCloud Alibaba Sentinel.assets\\image-20221123191439571.png)\]](https://img-blog.csdnimg.cn/032825c28eef4a24af458ea02a32b4c9.png)
注意事项和细节
![\[外链图片转存失败,源站可能有防盗链机制,建议将图片保存下来直接上传(img-LuoYPQDe-1670145631543)(E:\\Java资料\\韩顺平Java\\资料\\SpringCloud\\笔记\\10.SpringCloud Alibaba Sentinel.assets\\image-20221123191454799.png)\]](https://img-blog.csdnimg.cn/2bd0c92f332640ba8f3e4eb8a9f3e801.png)
Sentinel流量控制
规则
![\[外链图片转存失败,源站可能有防盗链机制,建议将图片保存下来直接上传(img-nzq9Lp03-1670145631544)(E:\\Java资料\\韩顺平Java\\资料\\SpringCloud\\笔记\\10.SpringCloud Alibaba Sentinel.assets\\image-20221123195523334.png)\]](https://img-blog.csdnimg.cn/6ce611d000bb4ce1861463c5ae3433c1.png)
![\[外链图片转存失败,源站可能有防盗链机制,建议将图片保存下来直接上传(img-55L31Tx5-1670145631544)(E:\\Java资料\\韩顺平Java\\资料\\SpringCloud\\笔记\\10.SpringCloud Alibaba Sentinel.assets\\image-20221123195738409.png)\]](https://img-blog.csdnimg.cn/9890be4e82ba4e17862bf2b85eb7ca89.png)
![\[外链图片转存失败,源站可能有防盗链机制,建议将图片保存下来直接上传(img-rpPE7ISP-1670145631544)(E:\\Java资料\\韩顺平Java\\资料\\SpringCloud\\笔记\\10.SpringCloud Alibaba Sentinel.assets\\image-20221123200159210.png)\]](https://img-blog.csdnimg.cn/f561a05ef02b4974a975fde2a1ed0c1a.png)
![\[外链图片转存失败,源站可能有防盗链机制,建议将图片保存下来直接上传(img-f0gYB91x-1670145631545)(E:\\Java资料\\韩顺平Java\\资料\\SpringCloud\\笔记\\10.SpringCloud Alibaba Sentinel.assets\\image-20221123200236006.png)\]](https://img-blog.csdnimg.cn/feed50f63599449e8befbe1bf03c07e3.png)
流量控制实例-QPS
需求分析/图解
![\[外链图片转存失败,源站可能有防盗链机制,建议将图片保存下来直接上传(img-Y7X8fMtm-1670145631545)(E:\\Java资料\\韩顺平Java\\资料\\SpringCloud\\笔记\\10.SpringCloud Alibaba Sentinel.assets\\image-20221124092832470.png)\]](https://img-blog.csdnimg.cn/9a3ab6ee20e740abb2baeac7e11645c1.png)
配置实现步骤
1.为/member/get/1 增加流控规则
![\[外链图片转存失败,源站可能有防盗链机制,建议将图片保存下来直接上传(img-aNmEIcYx-1670145631545)(E:\\Java资料\\韩顺平Java\\资料\\SpringCloud\\笔记\\10.SpringCloud Alibaba Sentinel.assets\\image-20221124093425215.png)\]](https://img-blog.csdnimg.cn/dce90fe87dd7495ba417b8756f4bb12f.png)
![\[外链图片转存失败,源站可能有防盗链机制,建议将图片保存下来直接上传(img-h4K8eYJ8-1670145631546)(E:\\Java资料\\韩顺平Java\\资料\\SpringCloud\\笔记\\10.SpringCloud Alibaba Sentinel.assets\\image-20221124093546235.png)\]](https://img-blog.csdnimg.cn/eef68cd6a09f40ed848c5027fe8fb022.png)
2.在流控规则菜单,可以看到新增的流控规则
![\[外链图片转存失败,源站可能有防盗链机制,建议将图片保存下来直接上传(img-f5tDxUlP-1670145631546)(E:\\Java资料\\韩顺平Java\\资料\\SpringCloud\\笔记\\10.SpringCloud Alibaba Sentinel.assets\\image-20221124093753306.png)\]](https://img-blog.csdnimg.cn/20d5f7642ccc4648a906da9bf76a9b72.png)
测试
![\[外链图片转存失败,源站可能有防盗链机制,建议将图片保存下来直接上传(img-1x4tyHbE-1670145631546)(E:\\Java资料\\韩顺平Java\\资料\\SpringCloud\\笔记\\10.SpringCloud Alibaba Sentinel.assets\\image-20221124093831213.png)\]](https://img-blog.csdnimg.cn/0c5ac3bd2dec486080a277572346afad.png)
Sentinel 控制台监控页面
![\[外链图片转存失败,源站可能有防盗链机制,建议将图片保存下来直接上传(img-k7YgaRTt-1670145631547)(E:\\Java资料\\韩顺平Java\\资料\\SpringCloud\\笔记\\10.SpringCloud Alibaba Sentinel.assets\\image-20221124093948088.png)\]](https://img-blog.csdnimg.cn/4958a5a4210a47c7a545e203b23113f7.png)
![\[外链图片转存失败,源站可能有防盗链机制,建议将图片保存下来直接上传(img-vF5mxjFu-1670145631547)(E:\\Java资料\\韩顺平Java\\资料\\SpringCloud\\笔记\\10.SpringCloud Alibaba Sentinel.assets\\image-20221124094001598.png)\]](https://img-blog.csdnimg.cn/702486a273eb4a7ea3d96d9cb7740c49.png)
注意事项和细节
![\[外链图片转存失败,源站可能有防盗链机制,建议将图片保存下来直接上传(img-s39XQA9Q-1670145631547)(E:\\Java资料\\韩顺平Java\\资料\\SpringCloud\\笔记\\10.SpringCloud Alibaba Sentinel.assets\\image-20221124100316279.png)\]](https://img-blog.csdnimg.cn/599eee438e7641ad9a2574ae5a08bef4.png)
![\[外链图片转存失败,源站可能有防盗链机制,建议将图片保存下来直接上传(img-z8Gl8hXk-1670145631548)(E:\\Java资料\\韩顺平Java\\资料\\SpringCloud\\笔记\\10.SpringCloud Alibaba Sentinel.assets\\image-20221124100351474.png)\]](https://img-blog.csdnimg.cn/9fe4443932cb4a409a69e86b8f33b2a5.png)
![\[外链图片转存失败,源站可能有防盗链机制,建议将图片保存下来直接上传(img-27gEUqUQ-1670145631548)(E:\\Java资料\\韩顺平Java\\资料\\SpringCloud\\笔记\\10.SpringCloud Alibaba Sentinel.assets\\image-20221124095012749.png)\]](https://img-blog.csdnimg.cn/fa9cbce357ee432a9bfa2da785de6d9f.png)
![\[外链图片转存失败,源站可能有防盗链机制,建议将图片保存下来直接上传(img-Agg0cJ1I-1670145631548)(E:\\Java资料\\韩顺平Java\\资料\\SpringCloud\\笔记\\10.SpringCloud Alibaba Sentinel.assets\\image-20221124101736917.png)\]](https://img-blog.csdnimg.cn/7cbb6c14cee347069802051a85126053.png)
方案2创建 CustomUrlCleaner.java 对请求路径进行清洗
package com.hspedu.springcloud.controller;import com.alibaba.csp.sentinel.adapter.servlet.callback.UrlCleaner;import org.apache.commons.lang.StringUtils;import org.springframework.stereotype.Component;@Componentpublic class CustomUrlCleaner implements UrlCleaner {@Overridepublic String clean(String originUrl) {// 资源清理 /member/get/1/*** public static boolean isBlank(String str) {* int strLen;* if (str == null || (strLen = str.length()) == 0) {* return true;* }* for (int i = 0; i < strLen; i++) {* if ((Character.isWhitespace(str.charAt(i)) == false)) {* return false;* }* }* return true;* }*/// isBlank就是判断 originUrl!=null && originUrl 有长度 && originUrl!=""if (StringUtils.isBlank(originUrl)){return originUrl;}// 如果originUrl是以/member/get开头,进行处理if (originUrl.startsWith("/member/get")){// 解读// 1.如果请求的接口是/member/get 开头的,比如 /member/get/1 或/member/get/10// 2.给sentinel 返回资源名为/member/get/*// 3.在sentinel 对 /member/get/* 添加流控规则即可return "/member/get/*";}return originUrl;}}
![\[外链图片转存失败,源站可能有防盗链机制,建议将图片保存下来直接上传(img-E8J7iUPA-1670145631549)(E:\\Java资料\\韩顺平Java\\资料\\SpringCloud\\笔记\\10.SpringCloud Alibaba Sentinel.assets\\image-20221124101845699.png)\]](https://img-blog.csdnimg.cn/ff2126e6e99d4fb4a6b3fe7b4a71b675.png)
![\[外链图片转存失败,源站可能有防盗链机制,建议将图片保存下来直接上传(img-gnqrdsHP-1670145631549)(E:\\Java资料\\韩顺平Java\\资料\\SpringCloud\\笔记\\10.SpringCloud Alibaba Sentinel.assets\\image-20221124102233858.png)\]](https://img-blog.csdnimg.cn/043b1c18dfe44546ad9a9fa1fd89ea38.png)
流量控制实例-线程数
需求分析/图解
![\[外链图片转存失败,源站可能有防盗链机制,建议将图片保存下来直接上传(img-a4907tGd-1670145631549)(E:\\Java资料\\韩顺平Java\\资料\\SpringCloud\\笔记\\10.SpringCloud Alibaba Sentinel.assets\\image-20221124102614417.png)\]](https://img-blog.csdnimg.cn/613a63a390d14c58951b45a04de4bada.png)
配置实现步骤
![\[外链图片转存失败,源站可能有防盗链机制,建议将图片保存下来直接上传(img-EBWJEjH8-1670145631550)(E:\\Java资料\\韩顺平Java\\资料\\SpringCloud\\笔记\\10.SpringCloud Alibaba Sentinel.assets\\image-20221124102932061.png)\]](https://img-blog.csdnimg.cn/f152f62e426f4123ad91e911d9832280.png)
![\[外链图片转存失败,源站可能有防盗链机制,建议将图片保存下来直接上传(img-4jYYmK94-1670145631550)(E:\\Java资料\\韩顺平Java\\资料\\SpringCloud\\笔记\\10.SpringCloud Alibaba Sentinel.assets\\image-20221124103044289.png)\]](https://img-blog.csdnimg.cn/d5ea0316842340f287bbc6ebebf555a0.png)
![\[外链图片转存失败,源站可能有防盗链机制,建议将图片保存下来直接上传(img-1zZZgyiC-1670145631550)(E:\\Java资料\\韩顺平Java\\资料\\SpringCloud\\笔记\\10.SpringCloud Alibaba Sentinel.assets\\image-20221124103113651.png)\]](https://img-blog.csdnimg.cn/7a0c43738a394bf8b757dfd3b70beae5.png)
![\[外链图片转存失败,源站可能有防盗链机制,建议将图片保存下来直接上传(img-cABniPlm-1670145631551)(E:\\Java资料\\韩顺平Java\\资料\\SpringCloud\\笔记\\10.SpringCloud Alibaba Sentinel.assets\\image-20221124103207301.png)\]](https://img-blog.csdnimg.cn/8ee5f1d73eff475e81eb43102e9536f1.png)
测试
![\[外链图片转存失败,源站可能有防盗链机制,建议将图片保存下来直接上传(img-uilVqlqD-1670145631551)(E:\\Java资料\\韩顺平Java\\资料\\SpringCloud\\笔记\\10.SpringCloud Alibaba Sentinel.assets\\image-20221124103221642.png)\]](https://img-blog.csdnimg.cn/3d44a71dbf214a4a9f0544aa6a59e6d7.png)
结果页面
![\[外链图片转存失败,源站可能有防盗链机制,建议将图片保存下来直接上传(img-2hBXNgVm-1670145631551)(E:\\Java资料\\韩顺平Java\\资料\\SpringCloud\\笔记\\10.SpringCloud Alibaba Sentinel.assets\\image-20221124103249095.png)\]](https://img-blog.csdnimg.cn/18cf70e99dfd495db54e8e4b4550ef81.png)
![\[外链图片转存失败,源站可能有防盗链机制,建议将图片保存下来直接上传(img-sVnz86tO-1670145631552)(E:\\Java资料\\韩顺平Java\\资料\\SpringCloud\\笔记\\10.SpringCloud Alibaba Sentinel.assets\\image-20221124103443770.png)\]](https://img-blog.csdnimg.cn/0169c17f2e5c4c619215630506dfaf11.png)
![\[外链图片转存失败,源站可能有防盗链机制,建议将图片保存下来直接上传(img-b8gnzGIO-1670145631552)(E:\\Java资料\\韩顺平Java\\资料\\SpringCloud\\笔记\\10.SpringCloud Alibaba Sentinel.assets\\image-20221124103655992.png)\]](https://img-blog.csdnimg.cn/7980035999154a6cb19ee957f8cae6f7.png)
注意事项和细节
![\[外链图片转存失败,源站可能有防盗链机制,建议将图片保存下来直接上传(img-fdnEDxhc-1670145631552)(E:\\Java资料\\韩顺平Java\\资料\\SpringCloud\\笔记\\10.SpringCloud Alibaba Sentinel.assets\\image-20221124103750896.png)\]](https://img-blog.csdnimg.cn/674c0e4ee34249f593e22df1a9555aa9.png)
流量控制实例-关联
关联的含义
当关联的资源达到阈值时,就限流自己
需求分析/图解
![\[外链图片转存失败,源站可能有防盗链机制,建议将图片保存下来直接上传(img-8T8rr4Rv-1670145631553)(E:\\Java资料\\韩顺平Java\\资料\\SpringCloud\\笔记\\10.SpringCloud Alibaba Sentinel.assets\\image-20221124104522591.png)\]](https://img-blog.csdnimg.cn/93ddb19bc0dd474b87c18152487b07d3.png)
配置实现步骤
在MemberController 添加t1 和 t2 接口
![\[外链图片转存失败,源站可能有防盗链机制,建议将图片保存下来直接上传(img-GtwDjhYB-1670145631553)(E:\\Java资料\\韩顺平Java\\资料\\SpringCloud\\笔记\\10.SpringCloud Alibaba Sentinel.assets\\image-20221124105314270.png)\]](https://img-blog.csdnimg.cn/325364c336b941e080d1d1eddc10ff6f.png)
在Sentinel界面配置
![\[外链图片转存失败,源站可能有防盗链机制,建议将图片保存下来直接上传(img-akwXa5lM-1670145631553)(E:\\Java资料\\韩顺平Java\\资料\\SpringCloud\\笔记\\10.SpringCloud Alibaba Sentinel.assets\\image-20221124105455039.png)\]](https://img-blog.csdnimg.cn/f00a243f7f544d6f919edd8353eb7635.png)
![\[外链图片转存失败,源站可能有防盗链机制,建议将图片保存下来直接上传(img-MSmuq16x-1670145631553)(E:\\Java资料\\韩顺平Java\\资料\\SpringCloud\\笔记\\10.SpringCloud Alibaba Sentinel.assets\\image-20221124105821399.png)\]](https://img-blog.csdnimg.cn/219fa3322ad24abfafa7f5cd9c1f30e5.png)
![\[外链图片转存失败,源站可能有防盗链机制,建议将图片保存下来直接上传(img-9cIKSfkE-1670145631554)(E:\\Java资料\\韩顺平Java\\资料\\SpringCloud\\笔记\\10.SpringCloud Alibaba Sentinel.assets\\image-20221124105927434.png)\]](https://img-blog.csdnimg.cn/3ca555c539464e3eb7b49232ced3aef9.png)
测试
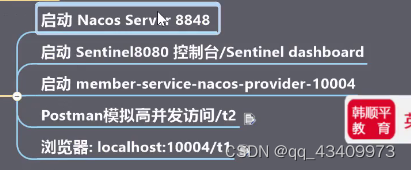
Postman 模拟高并发访问/t2
1.创建新的collection![\[外链图片转存失败,源站可能有防盗链机制,建议将图片保存下来直接上传(img-UmunRZR7-1670145631554)(E:\\Java资料\\韩顺平Java\\资料\\SpringCloud\\笔记\\10.SpringCloud Alibaba Sentinel.assets\\image-20221124110834473.png)\]](https://img-blog.csdnimg.cn/a1132cf18a01471caf04e206002100bc.png)
2.创建新的 request 放到到一个刚创建的collection中
![\[外链图片转存失败,源站可能有防盗链机制,建议将图片保存下来直接上传(img-aijuxSLG-1670145631555)(E:\\Java资料\\韩顺平Java\\资料\\SpringCloud\\笔记\\10.SpringCloud Alibaba Sentinel.assets\\image-20221124111017040.png)\]](https://img-blog.csdnimg.cn/59871be117f54dae8f189f7bd74d5a66.png)
![\[外链图片转存失败,源站可能有防盗链机制,建议将图片保存下来直接上传(img-o4IPYs7C-1670145631555)(E:\\Java资料\\韩顺平Java\\资料\\SpringCloud\\笔记\\10.SpringCloud Alibaba Sentinel.assets\\image-20221124111050607.png)\]](https://img-blog.csdnimg.cn/0fc04a4c4e254eceb1fa3fd6aa449eef.png)
3.设置 run collection 参数,并运行
![\[外链图片转存失败,源站可能有防盗链机制,建议将图片保存下来直接上传(img-kEWCR2Gb-1670145631555)(E:\\Java资料\\韩顺平Java\\资料\\SpringCloud\\笔记\\10.SpringCloud Alibaba Sentinel.assets\\image-20221124111149728.png)\]](https://img-blog.csdnimg.cn/a4859cd0105f4f3ca8a54d89f4c29032.png)
![\[外链图片转存失败,源站可能有防盗链机制,建议将图片保存下来直接上传(img-fTilcApq-1670145631555)(E:\\Java资料\\韩顺平Java\\资料\\SpringCloud\\笔记\\10.SpringCloud Alibaba Sentinel.assets\\image-20221124111213730.png)\]](https://img-blog.csdnimg.cn/a34f6ce16c524f7ab13594eb0407f20b.png)
![\[外链图片转存失败,源站可能有防盗链机制,建议将图片保存下来直接上传(img-EY5BRJ0G-1670145631556)(E:\\Java资料\\韩顺平Java\\资料\\SpringCloud\\笔记\\10.SpringCloud Alibaba Sentinel.assets\\image-20221124111428020.png)\]](https://img-blog.csdnimg.cn/0dd5e64340464e3ead70af357041e3cc.png)
注意事项和细节
![\[外链图片转存失败,源站可能有防盗链机制,建议将图片保存下来直接上传(img-66B4yuaG-1670145631556)(E:\\Java资料\\韩顺平Java\\资料\\SpringCloud\\笔记\\10.SpringCloud Alibaba Sentinel.assets\\image-20221124111619625.png)\]](https://img-blog.csdnimg.cn/09f7b3404e704c7a81560e01fd9ebbda.png)
流量控制实例-Warm up
Warm up 介绍
Warm up 称为冷启动/预热
![\[外链图片转存失败,源站可能有防盗链机制,建议将图片保存下来直接上传(img-UG4DhFCK-1670145631556)(E:\\Java资料\\韩顺平Java\\资料\\SpringCloud\\笔记\\10.SpringCloud Alibaba Sentinel.assets\\image-20221124111720002.png)\]](https://img-blog.csdnimg.cn/db04535b017a42a3b9f584a6539dd5cc.png)
2.一张图
![\[外链图片转存失败,源站可能有防盗链机制,建议将图片保存下来直接上传(img-xY2qpbQO-1670145631557)(E:\\Java资料\\韩顺平Java\\资料\\SpringCloud\\笔记\\10.SpringCloud Alibaba Sentinel.assets\\image-20221124113522772.png)\]](https://img-blog.csdnimg.cn/c284cf212f7f418ab826d5ccc48630ee.png)
![\[外链图片转存失败,源站可能有防盗链机制,建议将图片保存下来直接上传(img-FLxeDrWp-1670145631557)(E:\\Java资料\\韩顺平Java\\资料\\SpringCloud\\笔记\\10.SpringCloud Alibaba Sentinel.assets\\image-20221124113552550.png)\]](https://img-blog.csdnimg.cn/b229f17dc89c44169249cb9983818b40.png)
![\[外链图片转存失败,源站可能有防盗链机制,建议将图片保存下来直接上传(img-E9o3meaZ-1670145631557)(E:\\Java资料\\韩顺平Java\\资料\\SpringCloud\\笔记\\10.SpringCloud Alibaba Sentinel.assets\\image-20221124113823173.png)\]](https://img-blog.csdnimg.cn/0f32d5ab8fff4700b0da1ea3a4b92201.png)
需求分析/图解
![\[外链图片转存失败,源站可能有防盗链机制,建议将图片保存下来直接上传(img-NBSWMHS9-1670145631558)(E:\\Java资料\\韩顺平Java\\资料\\SpringCloud\\笔记\\10.SpringCloud Alibaba Sentinel.assets\\image-20221124115217765.png)\]](https://img-blog.csdnimg.cn/87a39fef8ffa4cfeb91ade84141ef4f1.png)
配置实现步骤
1.为/t2增加流控规则
![\[外链图片转存失败,源站可能有防盗链机制,建议将图片保存下来直接上传(img-SWgi2v6W-1670145631558)(E:\\Java资料\\韩顺平Java\\资料\\SpringCloud\\笔记\\10.SpringCloud Alibaba Sentinel.assets\\image-20221124115612233.png)\]](https://img-blog.csdnimg.cn/7c9db486bf464e16a98fea0ee7352731.png)
![\[外链图片转存失败,源站可能有防盗链机制,建议将图片保存下来直接上传(img-Mnvq0ZKq-1670145631558)(E:\\Java资料\\韩顺平Java\\资料\\SpringCloud\\笔记\\10.SpringCloud Alibaba Sentinel.assets\\image-20221124115629790.png)\]](https://img-blog.csdnimg.cn/257521cdb0634f129077f80f7a42abac.png)
测试
![\[外链图片转存失败,源站可能有防盗链机制,建议将图片保存下来直接上传(img-63JitM0v-1670145631559)(E:\\Java资料\\韩顺平Java\\资料\\SpringCloud\\笔记\\10.SpringCloud Alibaba Sentinel.assets\\image-20221124111700450.png)\]](https://img-blog.csdnimg.cn/7bdd1b64d18146a890e459070ec79209.png)
![\[外链图片转存失败,源站可能有防盗链机制,建议将图片保存下来直接上传(img-7LvptdHU-1670145631559)(E:\\Java资料\\韩顺平Java\\资料\\SpringCloud\\笔记\\10.SpringCloud Alibaba Sentinel.assets\\image-20221124115732689.png)\]](https://img-blog.csdnimg.cn/f842618537a344d4bce99e3bc252dc00.png)
注意事项和细节
![\[外链图片转存失败,源站可能有防盗链机制,建议将图片保存下来直接上传(img-OmfXGZsD-1670145631560)(E:\\Java资料\\韩顺平Java\\资料\\SpringCloud\\笔记\\10.SpringCloud Alibaba Sentinel.assets\\image-20221124115808003.png)\]](https://img-blog.csdnimg.cn/1a1d00f62bd14ff0a0bb4b232cf3a509.png)
流量控制实例-排队
排队介绍
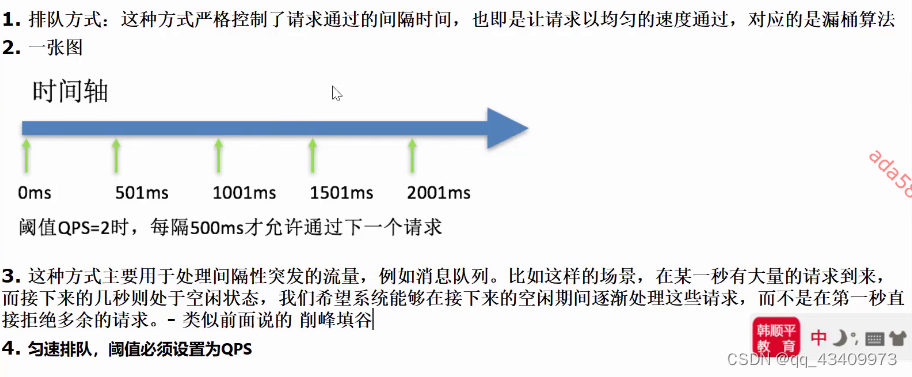
需求分析/图解
![\[外链图片转存失败,源站可能有防盗链机制,建议将图片保存下来直接上传(img-BkxVDOrO-1670145631560)(E:\\Java资料\\韩顺平Java\\资料\\SpringCloud\\笔记\\10.SpringCloud Alibaba Sentinel.assets\\image-20221124140425523.png)\]](https://img-blog.csdnimg.cn/2e4f2b96f4a84054aa181747bc6be3d0.png)
修改业务类
修改 MemberController.java 的 t2()方法
![\[外链图片转存失败,源站可能有防盗链机制,建议将图片保存下来直接上传(img-ytTtGB2J-1670145631561)(E:\\Java资料\\韩顺平Java\\资料\\SpringCloud\\笔记\\10.SpringCloud Alibaba Sentinel.assets\\image-20221124141134282.png)\]](https://img-blog.csdnimg.cn/27056674c7ff493cabef6fd52b5e2425.png)
配置实现步骤
![\[外链图片转存失败,源站可能有防盗链机制,建议将图片保存下来直接上传(img-Up0dmpxI-1670145631561)(E:\\Java资料\\韩顺平Java\\资料\\SpringCloud\\笔记\\10.SpringCloud Alibaba Sentinel.assets\\image-20221124141344001.png)\]](https://img-blog.csdnimg.cn/2daa3cb382c040f896b0aa576bd6d845.png)
测试
![\[外链图片转存失败,源站可能有防盗链机制,建议将图片保存下来直接上传(img-8HODQDtA-1670145631561)(E:\\Java资料\\韩顺平Java\\资料\\SpringCloud\\笔记\\10.SpringCloud Alibaba Sentinel.assets\\image-20221124141447619.png)\]](https://img-blog.csdnimg.cn/5af3849e3f4943448e9d1a6ae5aa89ae.png)
![\[外链图片转存失败,源站可能有防盗链机制,建议将图片保存下来直接上传(img-R33MQ4zp-1670145631562)(E:\\Java资料\\韩顺平Java\\资料\\SpringCloud\\笔记\\10.SpringCloud Alibaba Sentinel.assets\\image-20221124141513091.png)\]](https://img-blog.csdnimg.cn/0b20cbfde1f14bc5a8a1aa2c6c6fdf35.png)
![\[外链图片转存失败,源站可能有防盗链机制,建议将图片保存下来直接上传(img-07qXJk9O-1670145631562)(E:\\Java资料\\韩顺平Java\\资料\\SpringCloud\\笔记\\10.SpringCloud Alibaba Sentinel.assets\\image-20221124141552331.png)\]](https://img-blog.csdnimg.cn/339782fa0bb4439a96c7f9f17d0c6f3e.png)
![\[外链图片转存失败,源站可能有防盗链机制,建议将图片保存下来直接上传(img-ZsqPkFKV-1670145631562)(E:\\Java资料\\韩顺平Java\\资料\\SpringCloud\\笔记\\10.SpringCloud Alibaba Sentinel.assets\\image-20221124141720936.png)\]](https://img-blog.csdnimg.cn/6860599227d14ccbba1a00748cd3590a.png)
Sentinel熔断降级
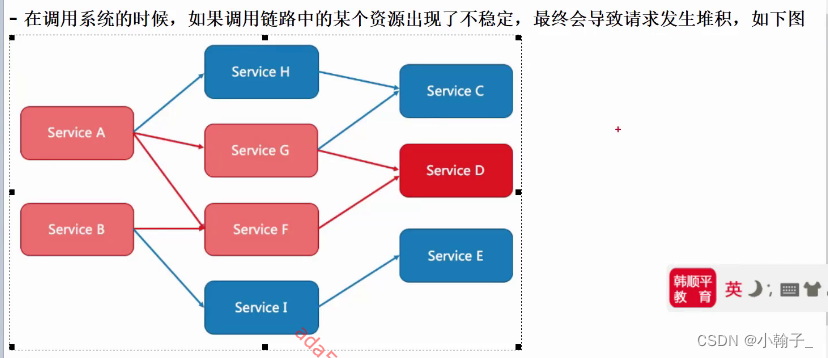
线程堆积引出熔断降级
![\[外链图片转存失败,源站可能有防盗链机制,建议将图片保存下来直接上传(img-b6Sfp6aM-1670145631563)(E:\\Java资料\\韩顺平Java\\资料\\SpringCloud\\笔记\\10.SpringCloud Alibaba Sentinel.assets\\image-20221124142014708.png)\]](https://img-blog.csdnimg.cn/f66ab4cdf3b64ea385c626633ed01dd0.png)
基本介绍
![\[外链图片转存失败,源站可能有防盗链机制,建议将图片保存下来直接上传(img-pTSxO2nC-1670145631563)(E:\\Java资料\\韩顺平Java\\资料\\SpringCloud\\笔记\\10.SpringCloud Alibaba Sentinel.assets\\image-20221124142500390.png)\]](https://img-blog.csdnimg.cn/cd4a850aac4b4625b7f604415d083b95.png)
![\[外链图片转存失败,源站可能有防盗链机制,建议将图片保存下来直接上传(img-jRw8BVSJ-1670145631563)(E:\\Java资料\\韩顺平Java\\资料\\SpringCloud\\笔记\\10.SpringCloud Alibaba Sentinel.assets\\image-20221124143107503.png)\]](https://img-blog.csdnimg.cn/e52578fedc2d45e09a6caf92975ca626.png)
![\[外链图片转存失败,源站可能有防盗链机制,建议将图片保存下来直接上传(img-VUBjYYyq-1670145631564)(E:\\Java资料\\韩顺平Java\\资料\\SpringCloud\\笔记\\10.SpringCloud Alibaba Sentinel.assets\\image-20221124143154841.png)\]](https://img-blog.csdnimg.cn/f7660b9904434e168f0687bfe2d9bf28.png)
![\[外链图片转存失败,源站可能有防盗链机制,建议将图片保存下来直接上传(img-7GCx0tlu-1670145631564)(E:\\Java资料\\韩顺平Java\\资料\\SpringCloud\\笔记\\10.SpringCloud Alibaba Sentinel.assets\\image-20221124143627328.png)\]](https://img-blog.csdnimg.cn/3fcaf7f6de404f759eca12b123d3b6b2.png)
熔断策略
慢调用比例
![\[外链图片转存失败,源站可能有防盗链机制,建议将图片保存下来直接上传(img-4fCs8Ezp-1670145631564)(E:\\Java资料\\韩顺平Java\\资料\\SpringCloud\\笔记\\10.SpringCloud Alibaba Sentinel.assets\\image-20221124143808780.png)\]](https://img-blog.csdnimg.cn/02e55dc572a745f0a8710b0e8dccd12c.png)
![\[外链图片转存失败,源站可能有防盗链机制,建议将图片保存下来直接上传(img-nU7ehnMB-1670145631565)(E:\\Java资料\\韩顺平Java\\资料\\SpringCloud\\笔记\\10.SpringCloud Alibaba Sentinel.assets\\image-20221124144349309.png)\]](https://img-blog.csdnimg.cn/889ef552ad3649acbeb83a0ea7cfb339.png)
![\[外链图片转存失败,源站可能有防盗链机制,建议将图片保存下来直接上传(img-YXBCV6Zq-1670145631565)(E:\\Java资料\\韩顺平Java\\资料\\SpringCloud\\笔记\\10.SpringCloud Alibaba Sentinel.assets\\image-20221124144807437.png)\]](https://img-blog.csdnimg.cn/bcc7be1703484d8e82ac58f63c32d13e.png)
异常比例
![\[外链图片转存失败,源站可能有防盗链机制,建议将图片保存下来直接上传(img-hCnILauB-1670145631565)(E:\\Java资料\\韩顺平Java\\资料\\SpringCloud\\笔记\\10.SpringCloud Alibaba Sentinel.assets\\image-20221124144556836.png)\]](https://img-blog.csdnimg.cn/492c4b8a8f25424eb206d484c1946fc0.png)
![\[外链图片转存失败,源站可能有防盗链机制,建议将图片保存下来直接上传(img-xrVTB1Co-1670145631566)(E:\\Java资料\\韩顺平Java\\资料\\SpringCloud\\笔记\\10.SpringCloud Alibaba Sentinel.assets\\image-20221124144750954.png)\]](https://img-blog.csdnimg.cn/acc504a2ca7444659f249f9badc1ac70.png)
![\[外链图片转存失败,源站可能有防盗链机制,建议将图片保存下来直接上传(img-ABAmE1hw-1670145631566)(E:\\Java资料\\韩顺平Java\\资料\\SpringCloud\\笔记\\10.SpringCloud Alibaba Sentinel.assets\\image-20221124144730555.png)\]](https://img-blog.csdnimg.cn/0a51e5cc300b4646a6f0f4138329f11c.png)
异常数
![\[外链图片转存失败,源站可能有防盗链机制,建议将图片保存下来直接上传(img-bECgNjnV-1670145631566)(E:\\Java资料\\韩顺平Java\\资料\\SpringCloud\\笔记\\10.SpringCloud Alibaba Sentinel.assets\\image-20221124144946948.png)\]](https://img-blog.csdnimg.cn/d91c6571db894a8485c139047c2492d5.png)
熔断降级实例-慢调用比例
需求分析/图解
![\[外链图片转存失败,源站可能有防盗链机制,建议将图片保存下来直接上传(img-fZ625PWk-1670145631567)(E:\\Java资料\\韩顺平Java\\资料\\SpringCloud\\笔记\\10.SpringCloud Alibaba Sentinel.assets\\image-20221124145152158.png)\]](https://img-blog.csdnimg.cn/94c215c966064a6189f4882ee1fc8e49.png)
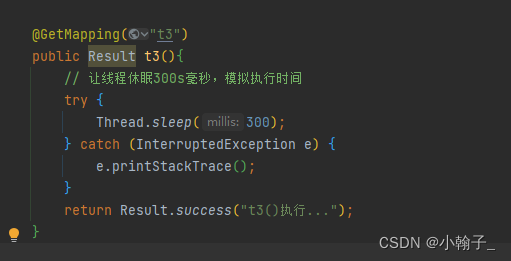
修改业务类
在MemberController.java 类添加 t3()方法
配置实现步骤
1.为/t3 增加降级规则
![\[外链图片转存失败,源站可能有防盗链机制,建议将图片保存下来直接上传(img-YWHoEwVI-1670145631567)(E:\\Java资料\\韩顺平Java\\资料\\SpringCloud\\笔记\\10.SpringCloud Alibaba Sentinel.assets\\image-20221124150030222.png)\]](https://img-blog.csdnimg.cn/41bfab8494c24c69a40ec6e9483731c3.png)
![\[外链图片转存失败,源站可能有防盗链机制,建议将图片保存下来直接上传(img-Qv8Q9n5W-1670145631568)(E:\\Java资料\\韩顺平Java\\资料\\SpringCloud\\笔记\\10.SpringCloud Alibaba Sentinel.assets\\image-20221124150918764.png)\]](https://img-blog.csdnimg.cn/cc98cde5c6bc4f938f2ab3a38de7c14a.png)
测试
![\[外链图片转存失败,源站可能有防盗链机制,建议将图片保存下来直接上传(img-i6x1Pon6-1670145631568)(E:\\Java资料\\韩顺平Java\\资料\\SpringCloud\\笔记\\10.SpringCloud Alibaba Sentinel.assets\\image-20221124150302816.png)\]](https://img-blog.csdnimg.cn/978a6b8817c04c19b57d5d324620c4cf.png)
使用postman测试
注意事项和细节
![\[外链图片转存失败,源站可能有防盗链机制,建议将图片保存下来直接上传(img-CRGw64jU-1670145631568)(E:\\Java资料\\韩顺平Java\\资料\\SpringCloud\\笔记\\10.SpringCloud Alibaba Sentinel.assets\\image-20221124150819485.png)\]](https://img-blog.csdnimg.cn/b048c10adb334a859d3719f20999e26e.png)
熔断降级实例-异常比例
需求分析/图解
![\[外链图片转存失败,源站可能有防盗链机制,建议将图片保存下来直接上传(img-hnxqRIx3-1670145631569)(E:\\Java资料\\韩顺平Java\\资料\\SpringCloud\\笔记\\10.SpringCloud Alibaba Sentinel.assets\\image-20221124151042317.png)\]](https://img-blog.csdnimg.cn/b437a1628dee47099306401401affa6d.png)
修改业务类
在MemberController.java添加
![\[外链图片转存失败,源站可能有防盗链机制,建议将图片保存下来直接上传(img-atYswBx9-1670145631569)(E:\\Java资料\\韩顺平Java\\资料\\SpringCloud\\笔记\\10.SpringCloud Alibaba Sentinel.assets\\image-20221124151835040.png)\]](https://img-blog.csdnimg.cn/1cd7b4d01e5e428495368d94aee6e094.png)
private static int num = 0; // 执行的计数器@GetMapping("t4")public Result t4(){// 设计异常比例达到50% > 20%if (++num %2 ==0){// 制造一个异常System.out.println(3/0);}log.info("熔断降级测试[异常比例] 执行t4 线程id={}",Thread.currentThread().getId());return Result.success("t4()执行...");}
配置实现步骤
1、为/t4 增加降级规则
![\[外链图片转存失败,源站可能有防盗链机制,建议将图片保存下来直接上传(img-6mufaA51-1670145631569)(E:\\Java资料\\韩顺平Java\\资料\\SpringCloud\\笔记\\10.SpringCloud Alibaba Sentinel.assets\\image-20221124152127379.png)\]](https://img-blog.csdnimg.cn/545623319b5545189d0f3ef178fc51cc.png)
![\[外链图片转存失败,源站可能有防盗链机制,建议将图片保存下来直接上传(img-nlLJ4eav-1670145631570)(E:\\Java资料\\韩顺平Java\\资料\\SpringCloud\\笔记\\10.SpringCloud Alibaba Sentinel.assets\\image-20221124151954283.png)\]](https://img-blog.csdnimg.cn/271690b2c5114f9a8b308e11e6bfc7e5.png)
测试
![\[外链图片转存失败,源站可能有防盗链机制,建议将图片保存下来直接上传(img-054I2ukx-1670145631570)(E:\\Java资料\\韩顺平Java\\资料\\SpringCloud\\笔记\\10.SpringCloud Alibaba Sentinel.assets\\image-20221124152057859.png)\]](https://img-blog.csdnimg.cn/7757535476924572bb6aa247949ba6c8.png)
浏览器:http://localhost:10004/t4
注意事项和细节
![\[外链图片转存失败,源站可能有防盗链机制,建议将图片保存下来直接上传(img-eCLfJ42w-1670145631570)(E:\\Java资料\\韩顺平Java\\资料\\SpringCloud\\笔记\\10.SpringCloud Alibaba Sentinel.assets\\image-20221124152443003.png)\]](https://img-blog.csdnimg.cn/a9cff4e18ed54752a0edb703aa74de1a.png)
熔断降级实例-异常数
需求分析/图解
![\[外链图片转存失败,源站可能有防盗链机制,建议将图片保存下来直接上传(img-maQRYITY-1670145631573)(E:\\Java资料\\韩顺平Java\\资料\\SpringCloud\\笔记\\10.SpringCloud Alibaba Sentinel.assets\\image-20221124152603687.png)\]](https://img-blog.csdnimg.cn/99b0bf489399425bb4878ba2743d0e2e.png)
修改业务类
在MemberController.java添加 t5()方法
![\[外链图片转存失败,源站可能有防盗链机制,建议将图片保存下来直接上传(img-OJ7OTaV7-1670145631573)(E:\\Java资料\\韩顺平Java\\资料\\SpringCloud\\笔记\\10.SpringCloud Alibaba Sentinel.assets\\image-20221124155805825.png)\]](https://img-blog.csdnimg.cn/a63d07fbdcac41bf814818d30c6d4544.png)
private static int num = 0; // 执行的计数器// 设计一个测试案例-满足异常数的阈值,触发限流机制@GetMapping("t5")public Result t5() {// 出现6次异常,这里需要设置大于6,需要留出几次做测试和加入簇点链路if (++num <= 10) {System.out.println(3 / 0);}log.info("熔断降级测试[异常数] 执行t5 线程id={}", Thread.currentThread().getId());return Result.success("t5()执行...");}
配置实现步骤
![\[外链图片转存失败,源站可能有防盗链机制,建议将图片保存下来直接上传(img-ulo6ADxK-1670145631574)(E:\\Java资料\\韩顺平Java\\资料\\SpringCloud\\笔记\\10.SpringCloud Alibaba Sentinel.assets\\image-20221124155930613.png)\]](https://img-blog.csdnimg.cn/be323e13c2f24144a82969826f28126f.png)
测试
![\[外链图片转存失败,源站可能有防盗链机制,建议将图片保存下来直接上传(img-Ou41CkcL-1670145631574)(E:\\Java资料\\韩顺平Java\\资料\\SpringCloud\\笔记\\10.SpringCloud Alibaba Sentinel.assets\\image-20221124160006593.png)\]](https://img-blog.csdnimg.cn/162cceb02340420ea5ff96c583c29ffb.png)
注意事项和细节
![\[外链图片转存失败,源站可能有防盗链机制,建议将图片保存下来直接上传(img-nhUQYKlR-1670145631575)(E:\\Java资料\\韩顺平Java\\资料\\SpringCloud\\笔记\\10.SpringCloud Alibaba Sentinel.assets\\image-20221124160427249.png)\]](https://img-blog.csdnimg.cn/074cd85d72214770a7414f0c8a075668.png)
Sentinel热点规则
一个问题引出热点key限流
![\[外链图片转存失败,源站可能有防盗链机制,建议将图片保存下来直接上传(img-bhSxlRe4-1670145631575)(E:\\Java资料\\韩顺平Java\\资料\\SpringCloud\\笔记\\10.SpringCloud Alibaba Sentinel.assets\\image-20221124165920451.png)\]](https://img-blog.csdnimg.cn/bcbb270a40164189ac4e5f958d1c1de1.png)
基本介绍
![\[外链图片转存失败,源站可能有防盗链机制,建议将图片保存下来直接上传(img-u1TPdCCx-1670145631576)(E:\\Java资料\\韩顺平Java\\资料\\SpringCloud\\笔记\\10.SpringCloud Alibaba Sentinel.assets\\image-20221124170250081.png)\]](https://img-blog.csdnimg.cn/5349caf1129e447e926318698821a8b9.png)
![\[外链图片转存失败,源站可能有防盗链机制,建议将图片保存下来直接上传(img-07Fjd8J0-1670145631576)(E:\\Java资料\\韩顺平Java\\资料\\SpringCloud\\笔记\\10.SpringCloud Alibaba Sentinel.assets\\image-20221124170437518.png)\]](https://img-blog.csdnimg.cn/bb00b842fee047beb8e82b766bf01be0.png)
热点Key限流-实例
需求分析/图解
![\[外链图片转存失败,源站可能有防盗链机制,建议将图片保存下来直接上传(img-9JccshVO-1670145631576)(E:\\Java资料\\韩顺平Java\\资料\\SpringCloud\\笔记\\10.SpringCloud Alibaba Sentinel.assets\\image-20221124170912862.png)\]](https://img-blog.csdnimg.cn/05989b64b559444aae52ef95ee13f1cf.png)
修改业务类
在MemberController 添加方法
// 完成对 热点key限流的测试/*** 1. @SentinelResource:指定sentinel限流资源* 2. value = "news" 表示sentinel限流资源 名称,由程序员指定* 3.blockHandler="newBlockHandler" :当出现限流时,由newBlockHandler方法进行处理*/@GetMapping("news")@SentinelResource(value = "news",blockHandler = "newBlockHandler")public Result queryNews(@RequestParam(value = "id",required = false) String id,@RequestParam(value = "type",required = false) String type){// 在实际开发汇总,新闻应该到DB或者缓存获取,这里就模拟一下log.info("到DB 查询新闻");return Result.success("返回新闻 id="+id+" " + "新闻 from DB");}// 热点key限制/限流异常处理方法public Result newBlockHandler(String id, String type, BlockException blockException){return Result.success("查询id="+id+" 新闻 触发热点key限流保护 sorry...");}
配置实现步骤
![\[外链图片转存失败,源站可能有防盗链机制,建议将图片保存下来直接上传(img-wTuHHiq6-1670145631577)(E:\\Java资料\\韩顺平Java\\资料\\SpringCloud\\笔记\\10.SpringCloud Alibaba Sentinel.assets\\image-20221124174719145.png)\]](https://img-blog.csdnimg.cn/145f91326d08472ead42a53ea48d7045.png)
![\[外链图片转存失败,源站可能有防盗链机制,建议将图片保存下来直接上传(img-R1fFfWaK-1670145631577)(E:\\Java资料\\韩顺平Java\\资料\\SpringCloud\\笔记\\10.SpringCloud Alibaba Sentinel.assets\\image-20221124174807270.png)\]](https://img-blog.csdnimg.cn/94ed15817e75461d9ae3f540b3b93917.png)
![\[外链图片转存失败,源站可能有防盗链机制,建议将图片保存下来直接上传(img-GuPRGm3s-1670145631578)(E:\\Java资料\\韩顺平Java\\资料\\SpringCloud\\笔记\\10.SpringCloud Alibaba Sentinel.assets\\image-20221124175419225.png)\]](https://img-blog.csdnimg.cn/bb17becc60e9428199166821d2e316d4.png)
测试
![\[外链图片转存失败,源站可能有防盗链机制,建议将图片保存下来直接上传(img-dUbTttCF-1670145631578)(E:\\Java资料\\韩顺平Java\\资料\\SpringCloud\\笔记\\10.SpringCloud Alibaba Sentinel.assets\\image-20221124173633559.png)\]](https://img-blog.csdnimg.cn/e264c0135bea4e038df4f16499444b9d.png)
注意事项和细节
![\[外链图片转存失败,源站可能有防盗链机制,建议将图片保存下来直接上传(img-YtH4fFez-1670145631578)(E:\\Java资料\\韩顺平Java\\资料\\SpringCloud\\笔记\\10.SpringCloud Alibaba Sentinel.assets\\image-20221124180218014.png)\]](https://img-blog.csdnimg.cn/e20fe27f5f0144aeaf79438acb3005bc.png)
系统规则
一个问题引出系统规则
![\[外链图片转存失败,源站可能有防盗链机制,建议将图片保存下来直接上传(img-SjR6mAMP-1670145631579)(E:\\Java资料\\韩顺平Java\\资料\\SpringCloud\\笔记\\10.SpringCloud Alibaba Sentinel.assets\\image-20221124180913680.png)\]](https://img-blog.csdnimg.cn/bb386f728f2e4e3c971b2afbd5934acb.png)
一句话:系统规则作用,在系统稳定的前提下,保持系统的吞吐量
基本介绍
![\[外链图片转存失败,源站可能有防盗链机制,建议将图片保存下来直接上传(img-MYN1UZzj-1670145631579)(E:\\Java资料\\韩顺平Java\\资料\\SpringCloud\\笔记\\10.SpringCloud Alibaba Sentinel.assets\\image-20221124181425170.png)\]](https://img-blog.csdnimg.cn/3ef2bdea0ed444bc95c0e60e7cac76f9.png)
![\[外链图片转存失败,源站可能有防盗链机制,建议将图片保存下来直接上传(img-iy2muQzB-1670145631580)(E:\\Java资料\\韩顺平Java\\资料\\SpringCloud\\笔记\\10.SpringCloud Alibaba Sentinel.assets\\image-20221124181606391.png)\]](https://img-blog.csdnimg.cn/fbf73163b55f4b2ba66e306c3977a356.png)
实例
需求分析/图解
![\[外链图片转存失败,源站可能有防盗链机制,建议将图片保存下来直接上传(img-R6fgSxRE-1670145631580)(E:\\Java资料\\韩顺平Java\\资料\\SpringCloud\\笔记\\10.SpringCloud Alibaba Sentinel.assets\\image-20221124182041194.png)\]](https://img-blog.csdnimg.cn/bb8033ded0a249939305981d5a297860.png)
配置实现步骤
![\[外链图片转存失败,源站可能有防盗链机制,建议将图片保存下来直接上传(img-CqmYOump-1670145631580)(E:\\Java资料\\韩顺平Java\\资料\\SpringCloud\\笔记\\10.SpringCloud Alibaba Sentinel.assets\\image-20221124182128919.png)\]](https://img-blog.csdnimg.cn/f4e5bf9a028a4d88b0b39bb2a6a91829.png)
![\[外链图片转存失败,源站可能有防盗链机制,建议将图片保存下来直接上传(img-UByrSdlP-1670145631581)(E:\\Java资料\\韩顺平Java\\资料\\SpringCloud\\笔记\\10.SpringCloud Alibaba Sentinel.assets\\image-20221124182156416.png)\]](https://img-blog.csdnimg.cn/716e879755024ee6ae6d0c801313b2ce.png)
测试
http://localhost:10004/t1
@SentinelResource
自定义全局限流处理类
需求分析/图解
![\[外链图片转存失败,源站可能有防盗链机制,建议将图片保存下来直接上传(img-rwBLskkx-1670145631581)(E:\\Java资料\\韩顺平Java\\资料\\SpringCloud\\笔记\\10.SpringCloud Alibaba Sentinel.assets\\image-20221124183118733.png)\]](https://img-blog.csdnimg.cn/fea6be59ba0e49d0aa68f33ff21185f0.png)
![\[外链图片转存失败,源站可能有防盗链机制,建议将图片保存下来直接上传(img-MI2868va-1670145631581)(E:\\Java资料\\韩顺平Java\\资料\\SpringCloud\\笔记\\10.SpringCloud Alibaba Sentinel.assets\\image-20221124183156532.png)\]](https://img-blog.csdnimg.cn/9c64fe8953724af5bff40ad8eb3f9dd2.png)
代码实现
创建全局限流处理类 CustomGlobalBlockHandler.java
package com.hspedu.springcloud.handler;import com.alibaba.csp.sentinel.slots.block.BlockException;import com.hspedu.springcloud.entity.Result;/*** 1.CustomGlobalBlockHandler 全局限流处理类* 2.在CustomGlobalBlockHandler类中,可以编写限流处理方法,但是要求方法是static*/public class CustomGlobalBlockHandler {public static Result handlerMethod1(BlockException blockException){return Result.error("400","客户自定义异常/限流处理方法handlerMethod1");}public static Result handlerMethod2(BlockException blockException){return Result.error("400","客户自定义异常/限流处理方法handlerMethod2");}}
在MemberController.java 使用全局限流处理类
/***value = "t6" 表示 sentinel限流资源的名字* blockHandlerClass = CustomGlobalBlockHandler.class 全局限流处理类* blockHandler = "handlerMethod1" 指定使用全局限流处理类的哪个方法,处理信息*/// 这里我们使用全局限流处理类,显示限流信息@GetMapping("t6")@SentinelResource(value = "t6",blockHandlerClass = CustomGlobalBlockHandler.class,blockHandler = "handlerMethod1")public Result t6(){log.info("执行t6() 线程id={}",Thread.currentThread().getId());return Result.success("200","t6() 执行OK~~");}
配置实现步骤
![\[外链图片转存失败,源站可能有防盗链机制,建议将图片保存下来直接上传(img-uqcLLf31-1670145631582)(E:\\Java资料\\韩顺平Java\\资料\\SpringCloud\\笔记\\10.SpringCloud Alibaba Sentinel.assets\\image-20221124184021203.png)\]](https://img-blog.csdnimg.cn/e5e160ad16ad4212b6bea2bfe063473d.png)
![\[外链图片转存失败,源站可能有防盗链机制,建议将图片保存下来直接上传(img-GMPGyqSR-1670145631582)(E:\\Java资料\\韩顺平Java\\资料\\SpringCloud\\笔记\\10.SpringCloud Alibaba Sentinel.assets\\image-20221124184028413.png)\]](https://img-blog.csdnimg.cn/e67b454cf5d64c13bec1647b3d3553b7.png)
测试
http://localhost:10004/t6
fallback
看一段代码-引出fallback
// 这里我们使用全局限流处理类,显示限流信息@GetMapping("t6")@SentinelResource(value = "t6",blockHandlerClass = CustomGlobalBlockHandler.class,blockHandler = "handlerMethod1")public Result t6(){// 假定:当访问t6资源次数是5的倍数时,就出现java异常if (++num%5==0){throw new RuntimeException("num的值异常 num=" +num);}log.info("执行t6() 线程id={}",Thread.currentThread().getId());return Result.success("200","t6() 执行OK~~");}
基本介绍
![\[外链图片转存失败,源站可能有防盗链机制,建议将图片保存下来直接上传(img-FDBEksSW-1670145631582)(E:\\Java资料\\韩顺平Java\\资料\\SpringCloud\\笔记\\10.SpringCloud Alibaba Sentinel.assets\\image-20221124190914414.png)\]](https://img-blog.csdnimg.cn/74f9c2db7fe04212a11c2e3551ca669b.png)
需求分析/图解
![\[外链图片转存失败,源站可能有防盗链机制,建议将图片保存下来直接上传(img-TEUuRvRw-1670145631583)(E:\\Java资料\\韩顺平Java\\资料\\SpringCloud\\笔记\\10.SpringCloud Alibaba Sentinel.assets\\image-20221124190953493.png)\]](https://img-blog.csdnimg.cn/6aaf2996c32e487c96ab03adfd5a0271.png)
代码实现
创建 GustomGlobalFallbackHandler 全局fallback处理类
package com.hspedu.springcloud.handler;import com.hspedu.springcloud.entity.Result;/*** GustomGlobalFallbackHandler 全局fallback处理类* 在GustomGlobalFallbackHandler 类中,可以编写处理java异常/业务异常方法 static*/public class GustomGlobalFallbackHandler {public static Result fallbackHandlerMethod1(Throwable throwable){return Result.error("402","java异常 信息="+throwable.getMessage());}public static Result fallbackHandlerMethod2(Throwable throwable){return Result.error("403","java异常 信息="+throwable.getMessage());}}
在MemberController 类修改
/***value = "t6" 表示 sentinel限流资源的名字* blockHandlerClass = CustomGlobalBlockHandler.class 全局限流处理类* blockHandler = "handlerMethod1" 指定使用全局限流处理类的哪个方法,处理信息* allbackClass = GustomGlobalFallbackHandler.class 全局fallback处理* fallback = "fallbackHandlerMethod1" 指定使用全局fallback处理类的哪个方法来处理*/// 这里我们使用全局限流处理类,显示限流信息@GetMapping("t6")@SentinelResource(value = "t6",fallbackClass = GustomGlobalFallbackHandler.class,fallback = "fallbackHandlerMethod1",blockHandlerClass = CustomGlobalBlockHandler.class,blockHandler = "handlerMethod1")public Result t6(){// 假定:当访问t6资源次数是5的倍数时,就出现java异常if (++num%5==0){throw new RuntimeException("num的值异常 num=" +num);}log.info("执行t6() 线程id={}",Thread.currentThread().getId());return Result.success("200","t6() 执行OK~~");}
测试
![\[外链图片转存失败,源站可能有防盗链机制,建议将图片保存下来直接上传(img-xtY0pw3u-1670145631583)(E:\\Java资料\\韩顺平Java\\资料\\SpringCloud\\笔记\\10.SpringCloud Alibaba Sentinel.assets\\image-20221124200753804.png)\]](https://img-blog.csdnimg.cn/dbdadd8a662e4e399b540dfe4175ff94.png)
![\[外链图片转存失败,源站可能有防盗链机制,建议将图片保存下来直接上传(img-iu7NL4R9-1670145631584)(E:\\Java资料\\韩顺平Java\\资料\\SpringCloud\\笔记\\10.SpringCloud Alibaba Sentinel.assets\\image-20221124200806731.png)\]](https://img-blog.csdnimg.cn/5a2e6d85698f41e0888d48dfd07fd2e3.png)
![\[外链图片转存失败,源站可能有防盗链机制,建议将图片保存下来直接上传(img-C0Hs3Miv-1670145631584)(E:\\Java资料\\韩顺平Java\\资料\\SpringCloud\\笔记\\10.SpringCloud Alibaba Sentinel.assets\\image-20221124200847237.png)\]](https://img-blog.csdnimg.cn/f6bcf98bf3e34d698bdb7e93bfe6efda.png)
![\[外链图片转存失败,源站可能有防盗链机制,建议将图片保存下来直接上传(img-6ZVE7FHZ-1670145631584)(E:\\Java资料\\韩顺平Java\\资料\\SpringCloud\\笔记\\10.SpringCloud Alibaba Sentinel.assets\\image-20221124200906729.png)\]](https://img-blog.csdnimg.cn/f3ebff84f8b6424aa11fe6aac26241cc.png)
![\[外链图片转存失败,源站可能有防盗链机制,建议将图片保存下来直接上传(img-Ypu3dSDF-1670145631585)(E:\\Java资料\\韩顺平Java\\资料\\SpringCloud\\笔记\\10.SpringCloud Alibaba Sentinel.assets\\image-20221124200916103.png)\]](https://img-blog.csdnimg.cn/a1dee187d097450c81911cf873a728b7.png)
exceptionsTolgnore
基本介绍
![\[外链图片转存失败,源站可能有防盗链机制,建议将图片保存下来直接上传(img-e9h2YvSD-1670145631585)(E:\\Java资料\\韩顺平Java\\资料\\SpringCloud\\笔记\\10.SpringCloud Alibaba Sentinel.assets\\image-20221124201139153.png)\]](https://img-blog.csdnimg.cn/bb68af43db9f4205910a759687a53c58.png)
应用实例
![\[外链图片转存失败,源站可能有防盗链机制,建议将图片保存下来直接上传(img-Nz2sHoaW-1670145631586)(E:\\Java资料\\韩顺平Java\\资料\\SpringCloud\\笔记\\10.SpringCloud Alibaba Sentinel.assets\\image-20221124201240794.png)\]](https://img-blog.csdnimg.cn/9a66d9e66685469186da010104385b2e.png)
exceptionsToIgnore = {RuntimeException.class} :如果t6抛出RuntimeException,就使用系统默认方式处理
/***value = "t6" 表示 sentinel限流资源的名字* blockHandlerClass = CustomGlobalBlockHandler.class 全局限流处理类* blockHandler = "handlerMethod1" 指定使用全局限流处理类的哪个方法,处理信息* allbackClass = GustomGlobalFallbackHandler.class 全局fallback处理* fallback = "fallbackHandlerMethod1" 指定使用全局fallback处理类的哪个方法来处理* exceptionsToIgnore = {RuntimeException.class} :如果t6抛出RuntimeException,就使用系统默认方式处理*/// 这里我们使用全局限流处理类,显示限流信息@GetMapping("t6")@SentinelResource(value = "t6",fallbackClass = GustomGlobalFallbackHandler.class,fallback = "fallbackHandlerMethod1",blockHandlerClass = CustomGlobalBlockHandler.class,blockHandler = "handlerMethod1",exceptionsToIgnore = {RuntimeException.class})public Result t6(){// 假定:当访问t6资源次数是5的倍数时,就出现java异常if (++num%5==0){throw new RuntimeException("num的值异常 num=" +num);}log.info("执行t6() 线程id={}",Thread.currentThread().getId());return Result.success("200","t6() 执行OK~~");}
接入 Sentinel的方式
代码方式(硬编码,侵入性强,不推荐)
注解方式(低侵入性,前面用过,推荐)
@SentinelResource注解
注意:注解方式埋点不支持 private 方法,处理指定异常的方法也不支持 private
OpenFeign+sentinel对远程调用熔断降级
当前微服务基础环境
当前微服务环境架构图
![\[外链图片转存失败,源站可能有防盗链机制,建议将图片保存下来直接上传(img-phLyDjs9-1670145631586)(E:\\Java资料\\韩顺平Java\\资料\\SpringCloud\\笔记\\10.SpringCloud Alibaba Sentinel.assets\\image-20221125091039650.png)\]](https://img-blog.csdnimg.cn/65dc3e82e14c4bc98c0e42c78f8ef4d1.png)
测试
![\[外链图片转存失败,源站可能有防盗链机制,建议将图片保存下来直接上传(img-QZOsxGYd-1670145631586)(E:\\Java资料\\韩顺平Java\\资料\\SpringCloud\\笔记\\10.SpringCloud Alibaba Sentinel.assets\\image-20221125091519512.png)\]](https://img-blog.csdnimg.cn/63e7dd1326b74715b515c181eb429c53.png)
浏览器:http://localhost:81/member/nacos/consumer/get/2 目前是Ribbon+RestTemplate
服务消费者整合Openfeign
需求分析/图解
![\[外链图片转存失败,源站可能有防盗链机制,建议将图片保存下来直接上传(img-kU43uiNU-1670145631587)(E:\\Java资料\\韩顺平Java\\资料\\SpringCloud\\笔记\\10.SpringCloud Alibaba Sentinel.assets\\image-20221125092242185.png)\]](https://img-blog.csdnimg.cn/8ca875aed592498b8aa1a7271e8a0f01.png)
代码+配置实现步骤
在 member-service-nacos-consumer-80 引入依赖
<!-- 引入openfeign starter 即场景启动器starter--><dependency><groupId>org.springframework.cloud</groupId><artifactId>spring-cloud-starter-openfeign</artifactId></dependency>
添加OpenFeign调用接口 MemberOpenFeignService
@FeignClient(value = "member-service-nacos-provider")public interface MemberOpenFeignService {@GetMapping("member/get/{id}")public Result getMemberById(@PathVariable("id") Long id);}
在 MemberNacosConsumerController 添加OpenFeign 远程调用接口
// 装配 MemberOpenFeignService@Resourceprivate MemberOpenFeignService memberOpenFeignService;// 编写方法通过OpenFeign实现远程调用@GetMapping("member/openfeign/consumer/get/{id}")public Result getMemberOpenFeignById(@PathVariable("id") Long id){// 这里使用OpenFeign接口方式调用return memberOpenFeignService.getMemberById(id);}
在 MemberNacosConsumerApplication80 启用openfeign
@SpringBootApplication@EnableDiscoveryClient // 引入的是启动nacos发现注解@EnableFeignClients // 启用openFeignpublic class MemberNacosConsumerApplication80 {public static void main(String[] args) {SpringApplication.run(MemberNacosConsumerApplication80.class,args);}}
测试
![\[外链图片转存失败,源站可能有防盗链机制,建议将图片保存下来直接上传(img-pHweJMjq-1670145631587)(E:\\Java资料\\韩顺平Java\\资料\\SpringCloud\\笔记\\10.SpringCloud Alibaba Sentinel.assets\\image-20221125093617552.png)\]](https://img-blog.csdnimg.cn/39842de254fb432a93389d86b217cd0e.png)
浏览器:http://localhost:81/member/openfeign/consumer/get/2
服务消费者整合Sentinel
需求分析/图解
![\[外链图片转存失败,源站可能有防盗链机制,建议将图片保存下来直接上传(img-En4KyzQC-1670145631587)(E:\\Java资料\\韩顺平Java\\资料\\SpringCloud\\笔记\\10.SpringCloud Alibaba Sentinel.assets\\image-20221125094226810.png)\]](https://img-blog.csdnimg.cn/bd71905b0436497eb3f71104250d0048.png)
代码+配置实现步骤
在 member-service-nacos-consumer-80 引入依赖
<!-- 引入alibaba-sentinel starter 使用版本仲裁--><dependency><groupId>com.alibaba.cloud</groupId><artifactId>spring-cloud-starter-alibaba-sentinel</artifactId></dependency>
添加 member-service-nacos-consumer-80 的application.yml 依赖
server:port: 81spring:application:name: member-service-nacos-consumer-80#配置nacoscloud:nacos:discovery:server-addr: localhost:8848 #nacos server的地址sentinel:transport:dashboard: localhost:8080 # 指定sentinel控制台地址port: 8719#配置暴露所有的监控点management:endpoints:web:exposure:include: '*'
测试
![\[外链图片转存失败,源站可能有防盗链机制,建议将图片保存下来直接上传(img-QIIu1JJh-1670145631588)(E:\\Java资料\\韩顺平Java\\资料\\SpringCloud\\笔记\\10.SpringCloud Alibaba Sentinel.assets\\image-20221125095230681.png)\]](https://img-blog.csdnimg.cn/599bf11d82924642853ef474fc543fae.png)
浏览器:http://localhost:81/member/openfeign/consumer/get/2
OpenFeign+sentinel对对远程调用熔断降级
需求分析/图解
![\[外链图片转存失败,源站可能有防盗链机制,建议将图片保存下来直接上传(img-XQKYZVpu-1670145631588)(E:\\Java资料\\韩顺平Java\\资料\\SpringCloud\\笔记\\10.SpringCloud Alibaba Sentinel.assets\\image-20221125100600843.png)\]](https://img-blog.csdnimg.cn/73cd58cedf2442aca88a2302616c5bfa.png)
代码+配置实现步骤
在 member-service-nacos-consumer-80 添加实现openfeign接口类,进行熔断降级
package com.hspedu.springcloud.service;import com.hspedu.springcloud.entity.Result;import org.springframework.stereotype.Component;@Componentpublic class MembarFeignFallbackService implements MemberOpenFeignService{@Overridepublic Result getMemberById(Long id) {return Result.error("500","被调用服务异常,熔断降级,快速返回结果,防止请求线程堆积");}}
在 MemberOpenFeignService 接口注解加上属性
// fallback 加上熔断降级返回的类@FeignClient(value = "member-service-nacos-provider",fallback = MembarFeignFallbackService.class)public interface MemberOpenFeignService {
添加application.yml 依赖
# openfeign和sentinel整合,必须配置feign:sentinel:enabled: true
测试
![\[外链图片转存失败,源站可能有防盗链机制,建议将图片保存下来直接上传(img-ZDnVtUrZ-1670145631589)(E:\\Java资料\\韩顺平Java\\资料\\SpringCloud\\笔记\\10.SpringCloud Alibaba Sentinel.assets\\image-20221125101813832.png)\]](https://img-blog.csdnimg.cn/373745a4acdd4b95bf7c750bdc03d352.png)
浏览器 http://localhost:81/member/openfeign/consumer/get/2
注意事项和细节
![\[外链图片转存失败,源站可能有防盗链机制,建议将图片保存下来直接上传(img-oP3Su199-1670145631589)(E:\\Java资料\\韩顺平Java\\资料\\SpringCloud\\笔记\\10.SpringCloud Alibaba Sentinel.assets\\image-20221125105859857.png)\]](https://img-blog.csdnimg.cn/67aa3448b3654dbcbb5a1fa450b725f3.png)
![\[外链图片转存失败,源站可能有防盗链机制,建议将图片保存下来直接上传(img-nNOq4wEN-1670145631590)(E:\\Java资料\\韩顺平Java\\资料\\SpringCloud\\笔记\\10.SpringCloud Alibaba Sentinel.assets\\image-20221125110104084.png)\]](https://img-blog.csdnimg.cn/4793e934eabd45a4b0987ffb5634fd2d.png)
![\[外链图片转存失败,源站可能有防盗链机制,建议将图片保存下来直接上传(img-KiO2UrXl-1670145631590)(E:\\Java资料\\韩顺平Java\\资料\\SpringCloud\\笔记\\10.SpringCloud Alibaba Sentinel.assets\\image-20221125110229626.png)\]](https://img-blog.csdnimg.cn/78fe0ed4cb7246ed874392153bfd761a.png)
规则持久化
规则没有持久化的问题
![\[外链图片转存失败,源站可能有防盗链机制,建议将图片保存下来直接上传(img-Zfr0HuPo-1670145631590)(E:\\Java资料\\韩顺平Java\\资料\\SpringCloud\\笔记\\10.SpringCloud Alibaba Sentinel.assets\\image-20221125110559287.png)\]](https://img-blog.csdnimg.cn/01c4b91e0ab6427d8a0423b6fd191f04.png)
规则持久化方案
阿里云Ahas[最方便/付费]
在Nacos Server 配置规则,完成持久化-官方推荐
datasource 支持 nacos,redis,apollo,zk,file
Nacos Server 配置中心-规则持久化实例
工作原理示意图
![\[外链图片转存失败,源站可能有防盗链机制,建议将图片保存下来直接上传(img-CaWt2n5y-1670145631590)(E:\\Java资料\\韩顺平Java\\资料\\SpringCloud\\笔记\\10.SpringCloud Alibaba Sentinel.assets\\image-20221125111714436.png)\]](https://img-blog.csdnimg.cn/fd92ce2aec294f20bd800dcd4db8b3f5.png)
需求分析/图解
![\[外链图片转存失败,源站可能有防盗链机制,建议将图片保存下来直接上传(img-0F2Syvfb-1670145631591)(E:\\Java资料\\韩顺平Java\\资料\\SpringCloud\\笔记\\10.SpringCloud Alibaba Sentinel.assets\\image-20221125111822186.png)\]](https://img-blog.csdnimg.cn/c1d1670f18a04cb4bc2f551df35d6213.png)
代码+配置实现步骤
![\[外链图片转存失败,源站可能有防盗链机制,建议将图片保存下来直接上传(img-iDMwNe9m-1670145631591)(E:\\Java资料\\韩顺平Java\\资料\\SpringCloud\\笔记\\10.SpringCloud Alibaba Sentinel.assets\\image-20221125112414988.png)\]](https://img-blog.csdnimg.cn/eadd8974e74e4d6aaba6f6d944b0abdd.png)
![\[外链图片转存失败,源站可能有防盗链机制,建议将图片保存下来直接上传(img-ne9UA7KY-1670145631592)(E:\\Java资料\\韩顺平Java\\资料\\SpringCloud\\笔记\\10.SpringCloud Alibaba Sentinel.assets\\image-20221125113758229.png)\]](https://img-blog.csdnimg.cn/ae4410b5e5324f3c928cf2e84f9e7517.png)
[{"resource": "/member/openfeign/consumer/get/1","limitApp": "default","grade": 1,"count": 1,"strategy": 0,"controlBehavior": 0,"clusterMode": false}]
![\[外链图片转存失败,源站可能有防盗链机制,建议将图片保存下来直接上传(img-e1eOcexb-1670145631592)(E:\\Java资料\\韩顺平Java\\资料\\SpringCloud\\笔记\\10.SpringCloud Alibaba Sentinel.assets\\image-20221125112615954.png)\]](https://img-blog.csdnimg.cn/a94484e8adb64f10a742b18e8a436a43.png)
![\[外链图片转存失败,源站可能有防盗链机制,建议将图片保存下来直接上传(img-8xYmNwNQ-1670145631593)(E:\\Java资料\\韩顺平Java\\资料\\SpringCloud\\笔记\\10.SpringCloud Alibaba Sentinel.assets\\image-20221125112636088.png)\]](https://img-blog.csdnimg.cn/e5de604e03084559823df9f89c65281d.png)
修改 member-service-nacos-consumer-80
<!-- 引入sentinel 和 nacos持久化整合依赖 使用版本仲裁--><dependency><groupId>com.alibaba.csp</groupId><artifactId>sentinel-datasource-nacos</artifactId></dependency>
修改 member-service-nacos-consumer-80 的yam文件
![\[外链图片转存失败,源站可能有防盗链机制,建议将图片保存下来直接上传(img-hXh9FUIb-1670145631593)(E:\\Java资料\\韩顺平Java\\资料\\SpringCloud\\笔记\\10.SpringCloud Alibaba Sentinel.assets\\image-20221125113026933.png)\]](https://img-blog.csdnimg.cn/f29c214964b248059956f1490447328d.png)
spring:application:name: member-service-nacos-consumer-80#配置nacoscloud:nacos:discovery:server-addr: localhost:8848 #nacos server的地址sentinel:transport:dashboard: localhost:8080 # 指定sentinel控制台地址port: 8719datasource:ds1:# 流控规则配置是从nacos server配置中心获取nacos:server-addr: localhost:8848 # 指定nacos server配置中心地址dataId: member-service-nacos-consumer-80 # 指定nacos server配置中心dataIdgroupId: DEFAULT_GROUP # 指定nacos server配置中心 哪个Groupdata-type: json # 指定nacos server配置中心 流控规则的数据类型rule-type: flow # 规则类型:流控规则 可以是【flow -流控规则】【degrade -降级规则】【param-flow -热点规则】【system -系统规则】
测试
![\[外链图片转存失败,源站可能有防盗链机制,建议将图片保存下来直接上传(img-sxduiVeZ-1670145631593)(E:\\Java资料\\韩顺平Java\\资料\\SpringCloud\\笔记\\10.SpringCloud Alibaba Sentinel.assets\\image-20221125115219711.png)\]](https://img-blog.csdnimg.cn/2e950e8fde764fe2bf96b0d7e782126e.png)
浏览器:http://localhost:81/member/openfeign/consumer/get/1
![\[外链图片转存失败,源站可能有防盗链机制,建议将图片保存下来直接上传(img-gUMkJDuf-1670145631594)(E:\\Java资料\\韩顺平Java\\资料\\SpringCloud\\笔记\\10.SpringCloud Alibaba Sentinel.assets\\image-20221125115236065.png)\]](https://img-blog.csdnimg.cn/b99e6986423f47108a3eb3f2552b9ef8.png)
注意事项和细节
![\[外链图片转存失败,源站可能有防盗链机制,建议将图片保存下来直接上传(img-DSlxMRgd-1670145631594)(E:\\Java资料\\韩顺平Java\\资料\\SpringCloud\\笔记\\10.SpringCloud Alibaba Sentinel.assets\\image-20221125115343753-16693484694561.png)\]](https://img-blog.csdnimg.cn/1f521005f4fd4c9c83ed3229c17dd2ef.png)
其他类型规则
![\[外链图片转存失败,源站可能有防盗链机制,建议将图片保存下来直接上传(img-psyX5akr-1670145631595)(E:\\Java资料\\韩顺平Java\\资料\\SpringCloud\\笔记\\10.SpringCloud Alibaba Sentinel.assets\\image-20221125115506122.png)\]](https://img-blog.csdnimg.cn/b2f85212a0514340bfb889db8e7a570a.png)
![\[外链图片转存失败,源站可能有防盗链机制,建议将图片保存下来直接上传(img-JWhzcr0O-1670145631595)(E:\\Java资料\\韩顺平Java\\资料\\SpringCloud\\笔记\\10.SpringCloud Alibaba Sentinel.assets\\image-20221125115535723.png)\]](https://img-blog.csdnimg.cn/f12bded6a71c4e78a4f93e79e4453f7d.png)
rult-type 配置
可以是【flow -流控规则】【degrade -降级规则】【param-flow -热点规则】【system -系统规则】
3.其他规则-配置文档
https://sentinelguard.io/zh-cn/docs/basic-api-resource-rule.html


还没有评论,来说两句吧...