Spring---DI依赖注入
上一篇介绍了关于IOC的内容:IOC称为控制反转,简单来说就是讲对象的创建的权利以及对象的生命周期的管理过程交给Spring容器来管理,从此在开发的过程中不需要关注对象的创建以及生命周期,而是在需要的时候有spring容器来提供,这个由Spring容器管理对象创建和生命周期的机制称之为控制反转
那么什么是DI,有人说IOC就是DI 我持不同意见,我认为DI是IOC的重要实现方式:
**在创建对象的过程中spring容器可依据配置对象的属性进行设置,这个过程称为依赖注入,指在对象在创建的过程中不是自己主动去找,换句话说就是指对象不是从容器中查找它所依赖的类,而是在容器实例化对象的时候就主动将它依赖的类注入给它。**
简单的用一个例子来说明:
新建两个类:Address类 和 Student类
Address类
//Address类package com.kuang.pojo;public class Address {private String address;public String getAddress(){return address;}public void setAddress(String address){this.address=address;}@Overridepublic String toString() {return "Address{" +"address='" + address + '\'' +'}';}}
Student类
//Student类package com.kuang.pojo;import java.util.*;public class Student {private String name;private Address address;private String[] books;private List<String> hobbys;private Map<String,String> card;private Set<String> games;private String wife;private Properties info;public String getName() {return name;}public void setName(String name) {this.name = name;}public Address getAddress() {return address;}public void setAddress(Address address) {this.address = address;}public String[] getBooks() {return books;}public void setBooks(String[] books) {this.books = books;}public List<String> getHobbys() {return hobbys;}public void setHobbys(List<String> hobbys) {this.hobbys = hobbys;}public Map<String, String> getCard() {return card;}public void setCard(Map<String, String> card) {this.card = card;}public Set<String> getGames() {return games;}public void setGames(Set<String> games) {this.games = games;}public String getWife() {return wife;}public void setWife(String wife) {this.wife = wife;}public Properties getInfo() {return info;}public void setInfo(Properties info) {this.info = info;}@Overridepublic String toString() {return "Student{" +"name='" + name + '\'' +", address=" + address +", books=" + Arrays.toString(books) +", hobbys=" + hobbys +", card=" + card +", games=" + games +", wife='" + wife + '\'' +", info=" + info +'}';}}
从这两个类中我们可以很明显的看到Student类是依赖Address类的,因为在Student中引用了Address类型的变量,那么这个时候就需要我们通过某种方法给他们绑定起来。
1.Set注入方法:
我们的student中的属性都是具备私有化的,但是他们的set和get方法通常都是暴露在外,此时spring可以通过set()方法将属性的值注入到对象中
重点: 这个时候加入了beans.xml配置文件
<?xml version="1.0" encoding="UTF-8"?><beans xmlns="http://www.springframework.org/schema/beans"xmlns:xsi="http://www.w3.org/2001/XMLSchema-instance"xsi:schemaLocation="http://www.springframework.org/schema/beans http://www.springframework.org/schema/beans/spring-beans.xsd"><bean id="address" class="com.kuang.pojo.Address"><property name="address" value="北京"></property></bean><bean id="student" class="com.kuang.pojo.Student"><!-- 第一种普通值注入--><property name="name" value="太假"></property><!--第二种引用类型注入--><property name="address" ref="address"></property><!-- 数组注入--><property name="books"><array><value>红楼梦</value><value>三国</value><value>水浒传</value><value>西游记</value></array></property><!-- List集合注入--><property name="hobbys"><list><value>听歌</value><value>跳舞</value></list></property><!-- Map--><property name="card"><map><entry key="a" value="1"></entry><entry key="b" value="2"></entry><entry key="c" value="3"></entry></map></property><!-- Set--><property name="games"><set><value>lol</value></set></property><!-- null--><property name="wife"><null></null></property><!-- properties--><property name="info"><props><prop key="driver">123</prop><prop key="url">男</prop></props></property></bean></beans>
看上面的beans.xml配置文件,可能会有点蒙蔽,我们把上面的配置文件分为两部分:
1.1第一部分:属于spring内置的属性(例如:string[]数组 int list map等都属于内置属性)可以直接注入:
<!-- 数组注入--><property name="books"><array><value>红楼梦</value><value>三国</value><value>水浒传</value><value>西游记</value></array></property><!-- List集合注入--><property name="hobbys"><list><value>听歌</value><value>跳舞</value></list></property><!-- Map--><property name="card"><map><entry key="a" value="1"></entry><entry key="b" value="2"></entry><entry key="c" value="3"></entry></map></property><!-- Set--><property name="games"><set><value>lol</value></set></property><!-- null--><property name="wife"><null></null></property><!-- properties--><property name="info"><props><prop key="driver">123</prop><prop key="url">男</prop></props></property>
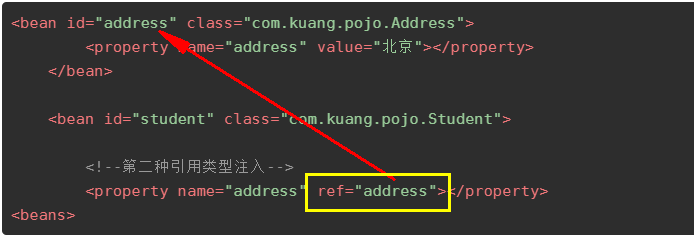
1.2第二部分:非spring内置的属性的注入方式:(例如Address类,属于是我们自己创建的)
测试类:
import com.kuang.pojo.Student;import org.springframework.context.ApplicationContext;import org.springframework.context.support.ClassPathXmlApplicationContext;public class MyTest {public static void main(String[] args) {ApplicationContext context=new ClassPathXmlApplicationContext("beans.xml");Student student=(Student) context.getBean("student");System.out.println(student.toString());}}
结果:


")


还没有评论,来说两句吧...