三.SpringCloud极简入门-服务注册与发现-Eureka
老鸟飞过,只做学习使用,欢迎交流
三. 服务注册与发现-Eureka
1. Eureka介绍
1.1. 什么是Eureka
微服务的其中一个特点是服务之间需要进行网络通信,服务器之间发起调用时调用服务得知道被调用服务的通信地址,试问当微服务数量成百上千之多,程序员该如何管理众多的服务通信地址,对于随时新增加的微服务和下线的微服务,又应该如何去动态添加和删除这些微服务的通信地址呢?所以手工管理服务的通信地址是一件遥不可及的事情,我们需要借助一个强大的工具帮我们实现这一功能 - Eureka,同类型的组件还有 zookeeper,consul等
1.2. Eureka的工作原理
服务注册
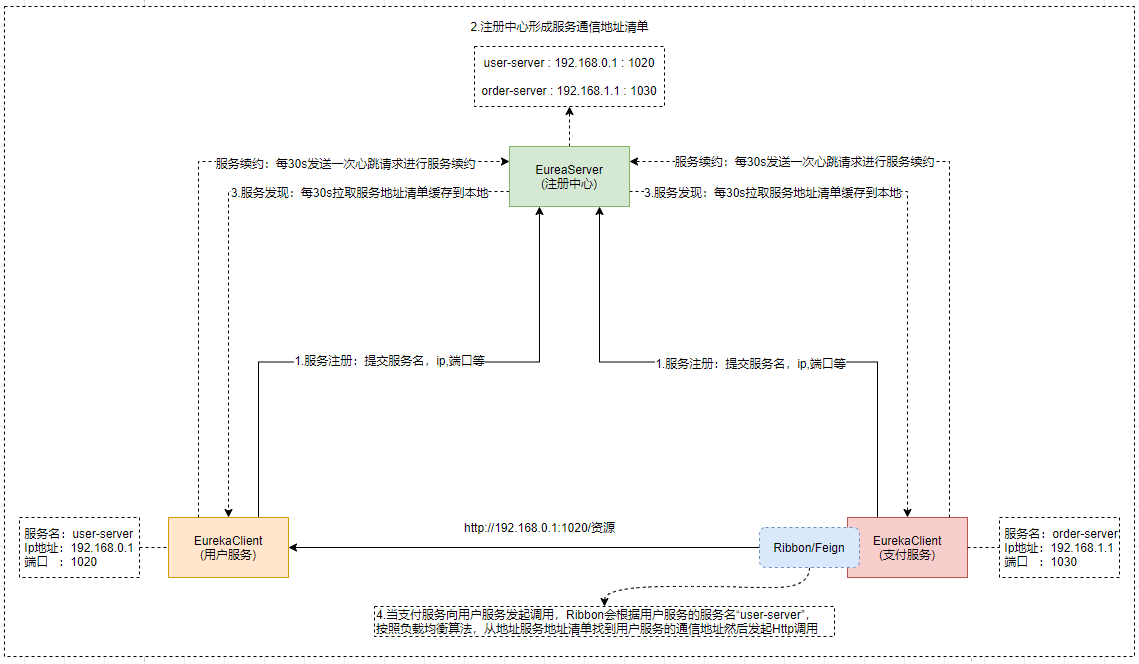
Eureka是一个服务注册与发现组件,简单说就是用来统一管理微服务的通信地址的组件,它包含了EurekaServer 服务端(也叫注册中心)和EurekaClient客户端两部分组成,EurekaServer是独立的服务,而EurekaClient需要集成到每个微服务中。
微服务(EurekaClient)在启动的时候会向EurekaServer提交自己的服务信息(通信地址如:服务名,ip,端口等),在 EurekaServer会形成一个微服务的通信地址列表存储起来。 — 这叫服务注册
服务发现
微服务(EurekaClient)会定期(RegistryFetchIntervalSeconds:默认30s)的从EurekaServer拉取一份微服务通信地址列表缓存到本地。当一个微服务在向另一个微服务发起调用的时候会根据目标服务的服务名找到其通信地址,然后基于HTTP协议向目标服务发起请求。—这叫服务发现
服务续约
另外,微服务(EurekaClient)采用定时(LeaseRenewalIntervalInSeconds:默认30s)发送“心跳”请求向EurekaServer发请求进行服务续约,其实就是定时向 EurekaServer发请求报告自己的健康状况,告诉EurekaServer自己还活着,不要把自己从服务地址清单中剔除掉,那么当微服务(EurekaClient)宕机未向EurekaServer续约,或者续约请求超时,注册中心机会从服务地址清单中剔除该续约失败的服务。
服务下线
微服务(EurekaClient)关闭服务前向注册中心发送下线请求,注册中心(EurekaServer)接受到下线请求负责将该服务实例从注册列表剔除
下面我们用一张图来介绍Eureka的工作流程
2. EurekaServer实战
文章采用“用户”,“订单”,“支付”等业务来演示整个SpringCloud的各个组件
2.1.多模块项目结构
1.搭建项目结构
欲善其事,比利其器,为了方便演示SpringCloud的各个组件,我这里采用多模块的方式搭建项目,所有的jar包交给父工程来管理,搭建好的项目结构如下:
springcloud-parent //父项目pom.xml //父项目的pomspringcloud-eureka-server-1010 //注册中心EurekaServerspringcloud-user-server-1020 //用户服务EurekaClient ,提供者springcloud-order-server-1030 //订单服务EurekaClient ,消费者
啥?不懂SpringBoot?找篇文章学一学!!! , 啥?多模块项目不会搭建?找篇文章学一学!!!
2.父项目管理依赖
SpringCloud的Jar包管理参照文档:https://cloud.spring.io/spring-cloud-static/Greenwich.SR5/multi/multi\_\_quick\_start.html\#\_client\_side\_usage
springcloud-parent父工程负责管理SpringBoot和SpringCloud的jar包 ,pom.xml如下
<?xml version="1.0" encoding="UTF-8"?><project xmlns="http://maven.apache.org/POM/4.0.0" xmlns:xsi="http://www.w3.org/2001/XMLSchema-instance" xsi:schemaLocation="http://maven.apache.org/POM/4.0.0 http://maven.apache.org/xsd/maven-4.0.0.xsd"><modelVersion>4.0.0</modelVersion><groupId>cn.itsource.springboot</groupId><artifactId>springcloud-parent</artifactId><version>1.0-SNAPSHOT</version><modules><module>springcloud-eureka-server-1010</module><module>springcloud-user-server-1020</module><module>springcloud-order-server-1030</module></modules><packaging>pom</packaging><!--公共的一些配置--><properties><project.build.sourceEncoding>UTF-8</project.build.sourceEncoding><project.reporting.outputEncoding>UTF-8</project.reporting.outputEncoding><java.version>1.8</java.version><spring-cloud.version>Finchley.SR1</spring-cloud.version></properties><!--1.管理 SpringBoot的jar包--><parent><groupId> org.springframework.boot</groupId><artifactId>spring-boot-starter-parent</artifactId><version>2.0.5.RELEASE</version></parent><!--2.管理 SpringCloud的jar包 --><dependencyManagement><dependencies><dependency><groupId>org.springframework.cloud</groupId><artifactId>spring-cloud-dependencies</artifactId><version>${spring-cloud.version}</version><type>pom</type><scope>import</scope></dependency></dependencies></dependencyManagement><!--3.这里是所有子项目都可以用的jar包--><dependencies><dependency><groupId>junit</groupId><artifactId>junit</artifactId><version>4.12</version><scope>test</scope></dependency></dependencies></project>
2.2. 搭建Eureka Server
参照文档:https://cloud.spring.io/spring-cloud-static/Greenwich.SR5/multi/multi\_spring-cloud-eureka-server.html\#netflix-eureka-server-starter
在springcloud-parent父工程下面搭建好子工程springcloud-eureka-server-1010,然后我们来集成EurekaServer。
1.导入依赖
<?xml version="1.0" encoding="UTF-8"?><project xmlns="http://maven.apache.org/POM/4.0.0" xmlns:xsi="http://www.w3.org/2001/XMLSchema-instance" xsi:schemaLocation="http://maven.apache.org/POM/4.0.0 http://maven.apache.org/xsd/maven-4.0.0.xsd"><!--集成自己的父工程--><parent><artifactId>springcloud-parent</artifactId><groupId>cn.itsource.springboot</groupId><version>1.0-SNAPSHOT</version></parent><modelVersion>4.0.0</modelVersion><artifactId>springcloud-eureka-server-1010</artifactId><name>springcloud-eureka-server-1010</name><dependencies><!--spring-cloud-starter-netflix-eureka-server --><dependency><groupId>org.springframework.cloud</groupId><artifactId>spring-cloud-starter-netflix-eureka-server</artifactId></dependency><dependency><groupId>org.springframework.boot</groupId><artifactId>spring-boot-starter-web</artifactId></dependency></dependencies></project>
提示:spring-cloud-starter-netflix-eureka-server作为EurekaServer端的基础依赖,但同时这个包也把EurekaClient端的以来也导入进来了,spring-boot-starter-web作为web服务的基础依赖是不可缺少的。
2.主配置类
/** * 注册中心启动类 * @EnableEurekaServer : 开启EurekaServer服务端 */@SpringBootApplication@EnableEurekaServerpublic class EurekaServerApplication1010{public static void main( String[] args ){SpringApplication.run(EurekaServerApplication1010.class);}}
提示:在主配置类上通过 @EnableEurekaServer 注解开启了EurekaServer端的功能。
3.application.yml配置文件
server:port: 1010 #端口eureka:instance:hostname: localhost #主机client: #客户端配置registerWithEureka: false #EurekaServer自己不要注册到EurekaServer自己 ,只有EurekaClient才注册fetchRegistry: false #EurekaServer不要拉取服务的通信地址列表 ,只有EurekaClient才拉取地址列表serviceUrl: #注册中心的注册地址defaultZone: http://localhost:1010/eureka/ #http://${eureka.instance.hostname}:${server.port}/eureka/server:enable-self-preservation: false #关闭自我保护警告
提示:这里配置了EurekaServer的端口为 1010 ,主机名 localhost ,需要特别说明的是我们再引入EurekaServer的基础依赖spring-cloud-starter-netflix-eureka-server时,这个依赖即引入了EurekaServer所需要的包,也引入了EurekaClient的包,换句话说,现在的springcloud-eureka-server-1010工程既是一个 EurekaServer,也是一个EurekaClient。
我们这里暂时把EurekaClient的功能屏蔽掉 ,即关闭它的服务注册和发现功能,让他做好EurekaServer该做的事情即可。
- serviceUrl是服务注册地址,EurekaClient需要注册到EurekaServer就得跟上该地址。
- registerWithEureka=false :禁止自己向自己注册
- fetchRegistry=false : 禁止拉取服务注册列表
4.启动测试
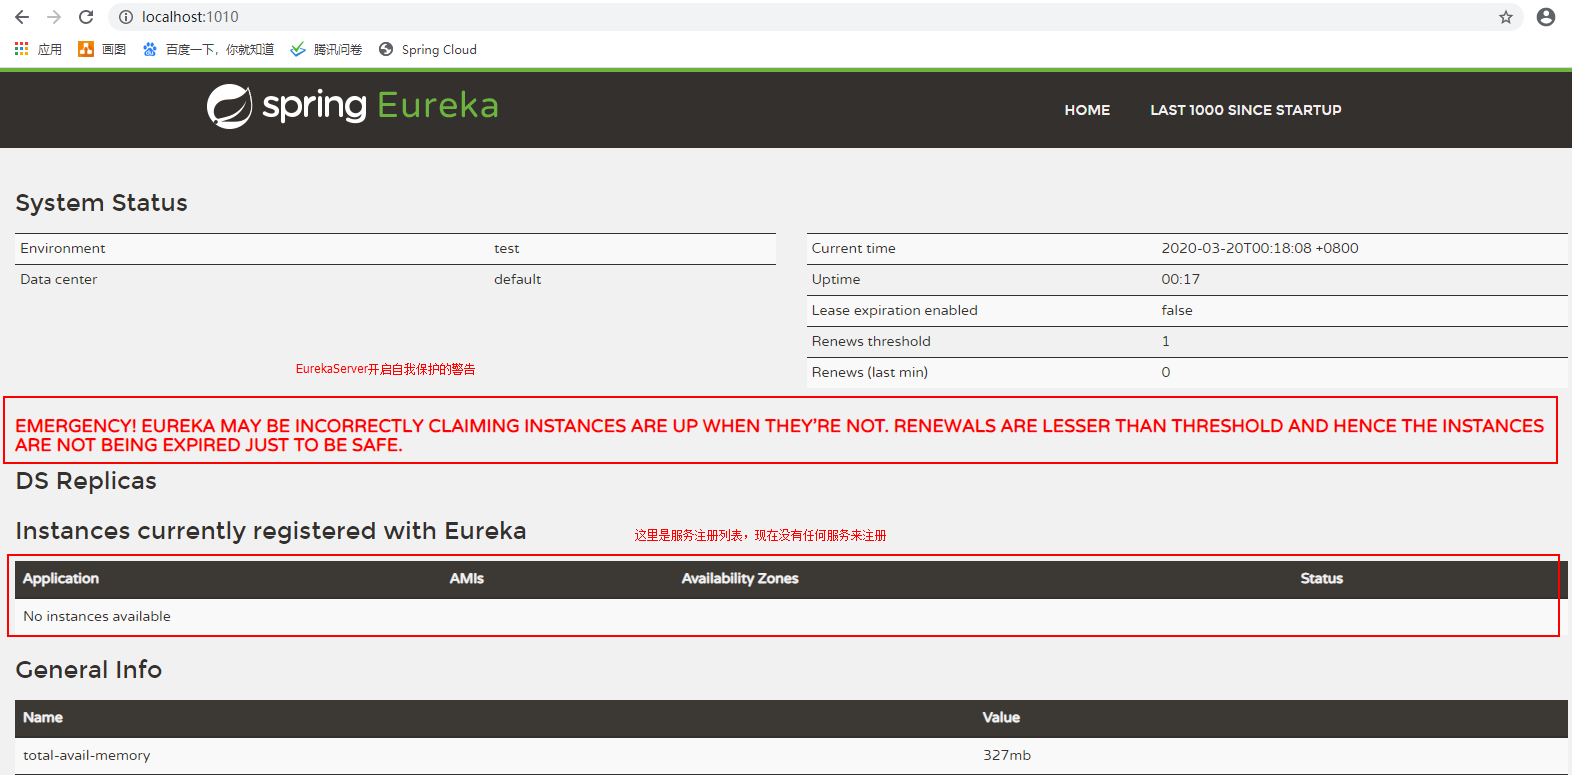
启动springcloud-eureka-server-1010工程,浏览器访问 http://localhost:1010 ,出现如下界面代码EurekaServer集成成功:
2.3.Eureka自我保护
默认情况下,当EurekaServer接收到服务续约的心跳失败比例在15分钟之内低于85%,EurekaServer会把这些服务保护起来,即不会把该服务从服务注册地址清单中剔除掉,但是在此种情况下有可能会出现服务下线,那么消费者就会拿到一个无效的服务,请求会失败,那我们需要对消费者服务做一些重试,或在熔断策略。
当EurekaServer开启自我保护时,监控主界面会出现红色警告信息,我们可以使用eureka.server.enable-self-preservation=false来关闭EurekaServer的保护机制,这样可以确保注册中心中不可用的实例被及时的剔除,但是不推荐
关闭Eureka自我保护后的配置如下:
server:port: 1010 #端口eureka:instance:hostname: localhost #主机client: #客户端配置registerWithEureka: false #EurekaServer自己不要注册到EurekaServer自己fetchRegistry: false #不要拉取服务的通信地址列表serviceUrl: #注册中心的注册地址defaultZone: http://localhost:1010/eureka/ #http://${eureka.instance.hostname}:${server.port}/eureka/server:enable-self-preservation: false #关闭自我保护
3.EurekaClient实战-用户服务
参照官方文档 : https://cloud.spring.io/spring-cloud-static/Greenwich.SR5/multi/multi\_\_service\_discovery\_eureka\_clients.html\#netflix-eureka-client-starter
根据上一章节我们的Eureka的理解,Eureka分为服务端和客户端,服务端已经搭建成功,我们来搭建客户端。再来看一下我们之前的那张图:
其实我们的用户服务 springcloud-user-server-1020 ,订单服务springcloud-order-server-1030 两个工程都是EurekaClient客户端,都需要去集成EurekaClient,我们先从springcloud-user-server-1020 下手 。
3.1.导入依赖
修改springcloud-user-server-1020,导入EurekaClient基础依赖:spring-cloud-starter-netflix-eureka-client,导入web的基础依赖:spring-boot-starter-web,具体的pom.xml如下:
<?xml version="1.0" encoding="UTF-8"?><project xmlns="http://maven.apache.org/POM/4.0.0" xmlns:xsi="http://www.w3.org/2001/XMLSchema-instance" xsi:schemaLocation="http://maven.apache.org/POM/4.0.0 http://maven.apache.org/xsd/maven-4.0.0.xsd"><parent><artifactId>springcloud-parent</artifactId><groupId>cn.itsource.springboot</groupId><version>1.0-SNAPSHOT</version></parent><modelVersion>4.0.0</modelVersion><artifactId>springcloud-user-server-1020</artifactId><name>springcloud-user-server-1020</name><dependencies><dependency><groupId>org.springframework.cloud</groupId><artifactId>spring-cloud-starter-netflix-eureka-client</artifactId></dependency><dependency><groupId>org.springframework.boot</groupId><artifactId>spring-boot-starter-web</artifactId></dependency></dependencies></project>
提示:不要忘记导入web的基础依赖 spring-boot-starter-web
3.2.主配置类
我们可以在主配置通过注解@EnableEurekaClient标记服务作为Eureka客户端
/** * 用户的启动类 * @EnableEurekaClient: 标记该应用是 Eureka客户端 */@SpringBootApplication@EnableEurekaClientpublic class UserServerApplication1020{public static void main( String[] args ){SpringApplication.run(UserServerApplication1020.class);}}
提示:主配置类通过打@EnableEurekaClient注解开启EurekaClient客户端功能,当然如果不打这个标签也能实现功能,因为导入spring-cloud-starter-netflix-eureka-client 依赖后,默认就开启了EurekaClient
3.3.application.yml配置
在配置文件中,我们需要通过eureka.client.serviceUrl配置EurekaServer的地址,EurekaClient根据该地址把自己注册给服务端。
#注册到EurekaServereureka:client:serviceUrl:defaultZone: http://localhost:1010/eureka/spring:application:name: user-serverserver:port: 1020
提示:serviceUrl是EurekaServer注册中的地址,主机和端口都应该指向springcloud-eureka-server-1010工程,这里额外指定了服务的名字,和端口,这些信息都会被注册到EurekaServer
3.4.测试EurekaClient
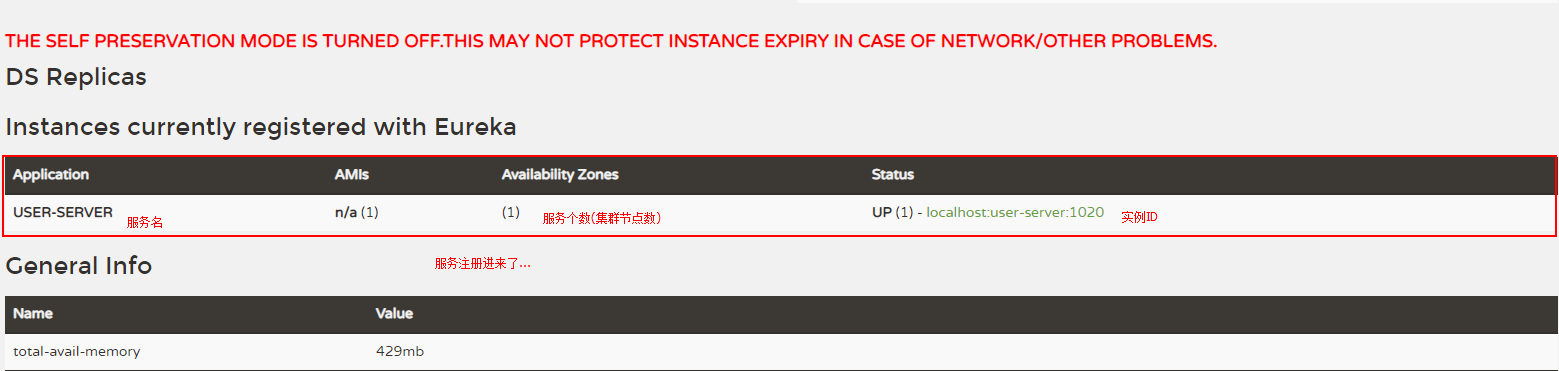
启动springcloud-eureka-server-1010 , 启动springcloud-user-server-1020 , 浏览器再次访问http://localhost:1010,那你应该可以看到我们的user-server服务已经被注册到EurekaServer。如下:
3.5.使用IP进行注册
默认情况下EurekaClient使用hostname进行注册到EurekaServer,我们希望使用ip进行注册,可以通过配置eureka.instance.prefer-ip-address=true来指定,同时为了方便区分和管理服务实例,我们指定服务的实例ID,通过eureka.instance.instance-id为user-serer:1020来指定,具体配置如下:
#注册到EurekaServereureka:client:serviceUrl:defaultZone: http://localhost:1010/eureka/instance:prefer-ip-address: true #使用ip地址进行注册instance-id: user-server:1020 #实例IDspring:application:name: user-serverserver:port: 1020
重启springcloud-user-server-1020 工程,访问注册中心,可以看到实例ID已经发生改变,如下:

4.Eureka Client实战-订单服务
订单服务和用户服务的做法一样,只是yml配置文件中有些稍微的不同。
4.1.导入依赖
同用户服务一样,省略…
...省略部分不重要的内容...<dependencies><dependency><groupId>org.springframework.cloud</groupId><artifactId>spring-cloud-starter-netflix-eureka-client</artifactId></dependency><dependency><groupId>org.springframework.boot</groupId><artifactId>spring-boot-starter-web</artifactId></dependency></dependencies>
4.2.主配置类
同用户服务一样,省略…
/** * 订单的启动类 * @EnableEurekaClient: 标记该应用是 Eureka客户端 */@SpringBootApplication@EnableEurekaClientpublic class OrderServerApplication1030{public static void main( String[] args ){SpringApplication.run(OrderServerApplication1030.class);}}
4.3.application.yml配置
订单服务除了服务名,端口和用户服务不一样,其他的都一样,如下:
eureka:client:serviceUrl:defaultZone: http://localhost:1010/eureka/instance:prefer-ip-address: true #使用ip地址进行注册instance-id: order-server:1030 #实例IDspring:application:name: order-serverserver:port: 1030
4.4.测试
启动订单服务,访问Eureka Server的监控界面:http://localhost:1010,可以看到订单服务也注册进去了。
4.5.做个小结
到这里Eureka服务注册与发现案例已经完成,服务端和客户端的搭建都相对简单,一般都是导个包,打个标签,配置文件都搞定了,作为一个合格的程序员,我们不能光停留在用的层面,它的一些重要工作方式与思想也是需要我们去掌握。


![sublime text3 提示[WinError 2] 系统找不到指定的文件](https://image.dandelioncloud.cn/images/20221021/7c2d64239b9e47b8999ee78cb4480121.png "sublime text3 提示[WinError 2] 系统找不到指定的文件")


——Oracle 11g 第二章知识点小结——过滤 排序...")


还没有评论,来说两句吧...