EventBus使用详解
前言
EventBus是一种用于Android的发布/订阅事件总线。它有很多优点:简化应用组件间的通信;解耦事件的发送者和接收者;避免复杂和容易出错的依赖和生命周期的问题;很快,专门为高性能优化过等等。
基础知识
EventBus使用了发布者/订阅者模式。
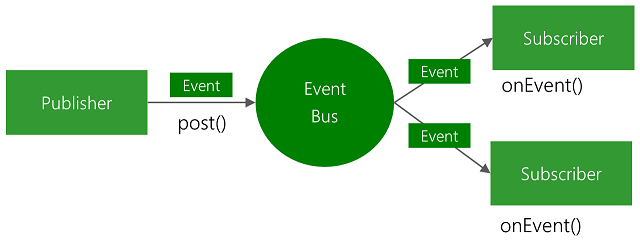
发布者通过EventBus发布事件,订阅者通过EventBus订阅事件。当发布者发布事件时,订阅该事件的订阅者的事件处理方法将被调用。
使用详解
本文将按照如下顺序来介绍EventBus的使用:
- 准备工作
- 基本使用
- 线程模式
- 粘性事件
- 事件优先级
- 订阅者索引
文中所有的代码都放在了GitHub上:
https://github.com/chongyucaiyan/EventBusDemo
准备工作
首先,在模块的 build.gradle 构建脚本中添加EventBus依赖:
dependencies {...implementation 'org.greenrobot:eventbus:3.1.1'}1234
接着,添加EventBus混淆规则。ProGuard工具混淆了方法名,并可能移除那些未被调用的方法。订阅者的事件处理方法没有被直接调用,如果开启了ProGuard工具的压缩功能,那么你必须告诉ProGuard工具保留这些订阅者方法。在模块的 proguard-rules.pro 混淆规则文件中添加如下规则:
# EventBus-keepattributes *Annotation*-keepclassmembers class ** {@org.greenrobot.eventbus.Subscribe <methods>;}-keep enum org.greenrobot.eventbus.ThreadMode { *; }123456
基本使用
EventBus的使用非常简单,主要分为3个步骤:
- 定义事件。
- 订阅事件。
- 发布事件。
第一步,定义事件。事件可以是任意普通的Java对象,没有任何特殊的要求。例如:
public class MessageEvent {private String message;public MessageEvent(String message) {this.message = message;}public String getMessage() {return message;}public void setMessage(String message) {this.message = message;}}123456789101112131415
第二步,订阅事件。订阅者需要定义事件处理方法(也称为订阅者方法)。当发布对应类型的事件时,该方法将被调用。EventBus 3使用 @Subscribe 注解来定义订阅者方法。方法名可以是任意合法的方法名,参数类型为订阅事件的类型。例如:
@Subscribe(threadMode = ThreadMode.MAIN)public void onMessageEvent(MessageEvent event) {...}1234
订阅者还需要在总线上注册,并在不需要时在总线上注销。只有订阅者注册了,它们才会收到事件。在Android中,可以根据Activity或者Fragment的生命周期来注册和注销。例如:
@Overrideprotected void onCreate(Bundle savedInstanceState) {super.onCreate(savedInstanceState);setContentView(R.layout.activity_main);initContentView();// 注册订阅者EventBus.getDefault().register(this);}@Overrideprotected void onDestroy() {super.onDestroy();// 注销订阅者EventBus.getDefault().unregister(this);}123456789101112131415
第三步,发布事件。在需要的地方发布事件,所有订阅了该类型事件并已注册的订阅者将收到该事件。例如:
// 发布事件EventBus.getDefault().post(new MessageEvent("Hello EventBus!"));12
下面是一个例子。订阅事件的代码如下所示:
public class MainActivity extends AppCompatActivity implements View.OnClickListener {private static final String TAG = "MainActivity";private TextView mTvMessage;@Overrideprotected void onCreate(Bundle savedInstanceState) {super.onCreate(savedInstanceState);setContentView(R.layout.activity_main);initContentView();// 注册订阅者EventBus.getDefault().register(this);}private void initContentView() {Button btnStart = findViewById(R.id.btn_main_start_activity);mTvMessage = findViewById(R.id.tv_main_message);btnStart.setOnClickListener(this);}@Overridepublic void onClick(View v) {if (v.getId() == R.id.btn_main_start_activity) {SecondActivity.start(this);}}@Subscribe(threadMode = ThreadMode.MAIN)public void onMessageEvent(MessageEvent event) {Log.i(TAG, "message is " + event.getMessage());// 更新界面mTvMessage.setText(event.getMessage());}@Overrideprotected void onDestroy() {super.onDestroy();// 注销订阅者EventBus.getDefault().unregister(this);}}1234567891011121314151617181920212223242526272829303132333435363738394041
MainActivity订阅了MessageEvent事件。当接收到MessageEvent事件时,订阅者方法将打印日志消息,并更新界面上的TextView。
发布事件的代码如下所示:
public class SecondActivity extends AppCompatActivity implements View.OnClickListener {public static void start(Context context) {Intent intent = new Intent(context, SecondActivity.class);context.startActivity(intent);}@Overrideprotected void onCreate(Bundle savedInstanceState) {super.onCreate(savedInstanceState);setContentView(R.layout.activity_second);initContentView();}private void initContentView() {findViewById(R.id.btn_second_post_event).setOnClickListener(this);}@Overridepublic void onClick(View v) {if (v.getId() == R.id.btn_second_post_event) {// 发布事件EventBus.getDefault().post(new MessageEvent("Hello EventBus!"));}}}1234567891011121314151617181920212223242526
当点击发布事件的按钮时,SecondActivity将发布一个MessageEvent事件。
运行应用。点击MainActivity界面上的启动活动按钮来启动SecondActivity,然后点击SecondActivity界面上的发布事件按钮来发布事件。最后,回退到MainActivity,可以看到界面上的TextView的内容已经更新为”Hello EventBus!”,并且应用打印出如下信息:
12-27 20:59:18.919 24705-24705/com.github.cyc.eventbus.basicusedemo I/MainActivity: message is Hello EventBus!1
线程模式
EventBus支持订阅者方法在不同于发布事件所在线程的线程中被调用。你可以使用线程模式来指定调用订阅者方法的线程。EventBus总共支持5种线程模式:
- ThreadMode.POSTING 订阅者方法将在发布事件所在的线程中被调用。这是 默认的线程模式。事件的传递是同步的,一旦发布事件,所有该模式的订阅者方法都将被调用。这种线程模式意味着最少的性能开销,因为它避免了线程的切换。因此,对于不要求是主线程并且耗时很短的简单任务推荐使用该模式。使用该模式的订阅者方法应该快速返回,以避免阻塞发布事件的线程,这可能是主线程。
- ThreadMode.MAIN 订阅者方法将在主线程(UI线程)中被调用。因此,可以在该模式的订阅者方法中直接更新UI界面。如果发布事件的线程是主线程,那么该模式的订阅者方法将被直接调用。使用该模式的订阅者方法必须快速返回,以避免阻塞主线程。
- ThreadMode.MAIN_ORDERED 订阅者方法将在主线程(UI线程)中被调用。因此,可以在该模式的订阅者方法中直接更新UI界面。事件将先进入队列然后才发送给订阅者,所以发布事件的调用将立即返回。这使得事件的处理保持严格的串行顺序。使用该模式的订阅者方法必须快速返回,以避免阻塞主线程。
- ThreadMode.BACKGROUND 订阅者方法将在后台线程中被调用。如果发布事件的线程不是主线程,那么订阅者方法将直接在该线程中被调用。如果发布事件的线程是主线程,那么将使用一个单独的后台线程,该线程将按顺序发送所有的事件。使用该模式的订阅者方法应该快速返回,以避免阻塞后台线程。
- ThreadMode.ASYNC 订阅者方法将在一个单独的线程中被调用。因此,发布事件的调用将立即返回。如果订阅者方法的执行需要一些时间,例如网络访问,那么就应该使用该模式。避免触发大量的长时间运行的订阅者方法,以限制并发线程的数量。EventBus使用了一个线程池来有效地重用已经完成调用订阅者方法的线程。
下面是一个例子。订阅事件的代码如下所示:
public class MainActivity extends AppCompatActivity implements View.OnClickListener {private static final String TAG = "MainActivity";@Overrideprotected void onCreate(Bundle savedInstanceState) {super.onCreate(savedInstanceState);setContentView(R.layout.activity_main);initContentView();// 注册订阅者EventBus.getDefault().register(this);}private void initContentView() {findViewById(R.id.btn_main_start_activity).setOnClickListener(this);}@Overridepublic void onClick(View v) {if (v.getId() == R.id.btn_main_start_activity) {SecondActivity.start(this);}}@Subscribe(threadMode = ThreadMode.POSTING)public void onMessageEventPosting(MessageEvent event) {Log.i(TAG, "onMessageEventPosting(), current thread is " + Thread.currentThread().getName());}@Subscribe(threadMode = ThreadMode.MAIN)public void onMessageEventMain(MessageEvent event) {Log.i(TAG, "onMessageEventMain(), current thread is " + Thread.currentThread().getName());}@Subscribe(threadMode = ThreadMode.MAIN_ORDERED)public void onMessageEventMainOrdered(MessageEvent event) {Log.i(TAG, "onMessageEventMainOrdered(), current thread is " + Thread.currentThread().getName());}@Subscribe(threadMode = ThreadMode.BACKGROUND)public void onMessageEventBackground(MessageEvent event) {Log.i(TAG, "onMessageEventBackground(), current thread is " + Thread.currentThread().getName());}@Subscribe(threadMode = ThreadMode.ASYNC)public void onMessageEventAsync(MessageEvent event) {Log.i(TAG, "onMessageEventAsync(), current thread is " + Thread.currentThread().getName());}@Overrideprotected void onDestroy() {super.onDestroy();// 注销订阅者EventBus.getDefault().unregister(this);}}12345678910111213141516171819202122232425262728293031323334353637383940414243444546474849505152535455
MainActivity订阅了MessageEvent事件,定义了5个不同线程模式的订阅者方法。当接收到MessageEvent事件时,订阅者方法将打印当前所在的线程名。
发布事件的代码如下所示:
public class SecondActivity extends AppCompatActivity implements View.OnClickListener {public static void start(Context context) {Intent intent = new Intent(context, SecondActivity.class);context.startActivity(intent);}@Overrideprotected void onCreate(Bundle savedInstanceState) {super.onCreate(savedInstanceState);setContentView(R.layout.activity_second);initContentView();}private void initContentView() {findViewById(R.id.btn_second_post_event).setOnClickListener(this);}@Overridepublic void onClick(View v) {if (v.getId() == R.id.btn_second_post_event) {// 发布事件new Thread("posting") {@Overridepublic void run() {EventBus.getDefault().post(new MessageEvent("Hello EventBus!"));}}.start();}}}1234567891011121314151617181920212223242526272829303132
当点击发布事件的按钮时,SecondActivity将在一个名为”posting”的线程中发布一个MessageEvent事件。
运行应用。点击MainActivity界面上的启动活动按钮来启动SecondActivity,然后点击SecondActivity界面上的发布事件按钮来发布事件。应用打印出如下信息:
12-27 22:12:05.745 6003-6117/com.github.cyc.eventbus.threadmodedemo I/MainActivity: onMessageEventBackground(), current thread is posting12-27 22:12:05.746 6003-6117/com.github.cyc.eventbus.threadmodedemo I/MainActivity: onMessageEventPosting(), current thread is posting12-27 22:12:05.752 6003-6003/com.github.cyc.eventbus.threadmodedemo I/MainActivity: onMessageEventMain(), current thread is main12-27 22:12:05.752 6003-6003/com.github.cyc.eventbus.threadmodedemo I/MainActivity: onMessageEventMainOrdered(), current thread is main12-27 22:12:05.754 6003-6118/com.github.cyc.eventbus.threadmodedemo I/MainActivity: onMessageEventAsync(), current thread is pool-1-thread-112345
粘性事件
如果先发布了事件,然后有订阅者订阅了该事件,那么除非再次发布该事件,否则订阅者将永远接收不到该事件。此时,可以使用粘性事件。发布一个粘性事件之后,EventBus将在内存中缓存该粘性事件。当有订阅者订阅了该粘性事件,订阅者将接收到该事件。
订阅和发布一个粘性事件的示例代码如下所示:
// 订阅粘性事件@Subscribe(sticky = true)public void onMessageEvent(MessageEvent event) {...}// 发布粘性事件EventBus.getDefault().postSticky(new MessageEvent("Hello EventBus!"));12345678
发布一个粘性事件之后,EventBus将一直缓存该粘性事件。如果想要移除粘性事件,那么可以使用如下方法:
// 移除指定的粘性事件removeStickyEvent(Object event);// 移除指定类型的粘性事件removeStickyEvent(Class<T> eventType);// 移除所有的粘性事件removeAllStickyEvents();12345678
下面是一个例子。发布粘性事件的代码如下所示:
public class MainActivity extends AppCompatActivity implements View.OnClickListener {@Overrideprotected void onCreate(Bundle savedInstanceState) {super.onCreate(savedInstanceState);setContentView(R.layout.activity_main);initContentView();}private void initContentView() {findViewById(R.id.btn_main_post_event).setOnClickListener(this);findViewById(R.id.btn_main_start_activity).setOnClickListener(this);}@Overridepublic void onClick(View v) {switch (v.getId()) {case R.id.btn_main_post_event:// 发布粘性事件EventBus.getDefault().postSticky(new MessageEvent("Hello EventBus!"));break;case R.id.btn_main_start_activity:SecondActivity.start(this);break;default:break;}}}12345678910111213141516171819202122232425262728293031
当点击发布粘性事件的按钮时,MainActivity将发布一个MessageEvent粘性事件。
订阅粘性事件的代码如下所示:
public class SecondActivity extends AppCompatActivity {private static final String TAG = "SecondActivity";private TextView mTvMessage;public static void start(Context context) {Intent intent = new Intent(context, SecondActivity.class);context.startActivity(intent);}@Overrideprotected void onCreate(Bundle savedInstanceState) {super.onCreate(savedInstanceState);setContentView(R.layout.activity_second);initContentView();// 注册订阅者EventBus.getDefault().register(this);}private void initContentView() {mTvMessage = findViewById(R.id.tv_second_message);}@Subscribe(threadMode = ThreadMode.MAIN, sticky = true)public void onMessageEvent(MessageEvent event) {Log.i(TAG, "message is " + event.getMessage());// 更新界面mTvMessage.setText(event.getMessage());// 移除粘性事件EventBus.getDefault().removeStickyEvent(event);}@Overrideprotected void onDestroy() {super.onDestroy();// 注销订阅者EventBus.getDefault().unregister(this);}}123456789101112131415161718192021222324252627282930313233343536373839
SecondActivity订阅了MessageEvent粘性事件。当接收到MessageEvent粘性事件时,订阅者方法将打印日志消息,并更新界面上的TextView,最后移除该粘性事件。
运行应用。先点击MainActivity界面上的发布粘性事件按钮来发布粘性事件,然后点击启动活动按钮来启动SecondActivity。可以看到SecondActivity界面上的TextView的内容更新为”Hello EventBus!”,并且应用打印出如下信息:
12-27 22:52:16.975 7684-7684/com.github.cyc.eventbus.stickyeventdemo I/SecondActivity: message is Hello EventBus!1
事件优先级
EventBus支持在定义订阅者方法时指定事件传递的优先级。默认情况下,订阅者方法的事件传递优先级为0。数值越大,优先级越高。在相同的线程模式下,更高优先级的订阅者方法将优先接收到事件。注意:优先级只有在相同的线程模式下才有效。
指定事件传递优先级的示例代码如下所示:
@Subscribe(priority = 1)public void onMessageEvent(MessageEvent event) {...}1234
你可以在高优先级的订阅者方法接收到事件之后取消事件的传递。此时,低优先级的订阅者方法将不会接收到该事件。注意: 订阅者方法只有在线程模式为ThreadMode.POSTING时,才可以取消一个事件的传递。
取消事件传递的示例代码如下所示:
@Subscribe(threadMode = ThreadMode.POSTING, priority = 1)public void onMessageEvent(MessageEvent event) {...// 取消事件传递EventBus.getDefault().cancelEventDelivery(event);}123456
下面是一个例子。订阅事件的代码如下所示:
public class MainActivity extends AppCompatActivity implements View.OnClickListener {private static final String TAG = "MainActivity";@Overrideprotected void onCreate(Bundle savedInstanceState) {super.onCreate(savedInstanceState);setContentView(R.layout.activity_main);initContentView();// 注册订阅者EventBus.getDefault().register(this);}private void initContentView() {findViewById(R.id.btn_main_start_activity).setOnClickListener(this);}@Overridepublic void onClick(View v) {if (v.getId() == R.id.btn_main_start_activity) {SecondActivity.start(this);}}@Subscribe(threadMode = ThreadMode.POSTING, priority = 1)public void onMessageEvent1(MessageEvent event) {Log.i(TAG, "onMessageEvent1(), message is " + event.getMessage());}@Subscribe(threadMode = ThreadMode.POSTING, priority = 2)public void onMessageEvent2(MessageEvent event) {Log.i(TAG, "onMessageEvent2(), message is " + event.getMessage());// 取消事件EventBus.getDefault().cancelEventDelivery(event);}@Subscribe(threadMode = ThreadMode.POSTING, priority = 3)public void onMessageEvent3(MessageEvent event) {Log.i(TAG, "onMessageEvent3(), message is " + event.getMessage());}@Subscribe(threadMode = ThreadMode.POSTING, priority = 4)public void onMessageEvent4(MessageEvent event) {Log.i(TAG, "onMessageEvent4(), message is " + event.getMessage());}@Subscribe(threadMode = ThreadMode.POSTING, priority = 5)public void onMessageEvent5(MessageEvent event) {Log.i(TAG, "onMessageEvent5(), message is " + event.getMessage());}@Overrideprotected void onDestroy() {super.onDestroy();// 注销订阅者EventBus.getDefault().unregister(this);}}123456789101112131415161718192021222324252627282930313233343536373839404142434445464748495051525354555657
MainActivity订阅了MessageEvent事件,定义了5个不同优先级的订阅者方法。当接收到MessageEvent事件时,订阅者方法将打印日志消息。优先级为2的订阅者方法在接收到事件之后取消了事件的传递。
发布事件的代码如下所示:
public class SecondActivity extends AppCompatActivity implements View.OnClickListener {public static void start(Context context) {Intent intent = new Intent(context, SecondActivity.class);context.startActivity(intent);}@Override protected void onCreate(Bundle savedInstanceState) {super.onCreate(savedInstanceState); setContentView(R.layout.activity_second);initContentView();}private void initContentView() {findViewById(R.id.btn_second_post_event).setOnClickListener(this);}@Overridepublic void onClick(View v) {if (v.getId() == R.id.btn_second_post_event) {// 发布事件EventBus.getDefault().post(new MessageEvent("Hello EventBus!"));}}}1234567891011121314151617181920212223242526
当点击发布事件的按钮时,SecondActivity将发布一个MessageEvent事件。
运行应用。点击MainActivity界面上的启动活动按钮来启动SecondActivity,然后点击SecondActivity界面上的发布事件按钮来发布事件。应用打印出如下信息:
12-28 01:03:27.751 22428-22428/com.github.cyc.eventbus.eventprioritydemo I/MainActivity: onMessageEvent5(), message is Hello EventBus!12-28 01:03:27.751 22428-22428/com.github.cyc.eventbus.eventprioritydemo I/MainActivity: onMessageEvent4(), message is Hello EventBus!12-28 01:03:27.751 22428-22428/com.github.cyc.eventbus.eventprioritydemo I/MainActivity: onMessageEvent3(), message is Hello EventBus!12-28 01:03:27.752 22428-22428/com.github.cyc.eventbus.eventprioritydemo I/MainActivity: onMessageEvent2(), message is Hello EventBus!1234
订阅者索引
默认情况下,EventBus在查找订阅者方法时采用的是反射。订阅者索引是EventBus 3的一个新特性。它可以加速订阅者的注册,是一个可选的优化。订阅者索引的原理是:使用EventBus的注解处理器在应用构建期间创建订阅者索引类,该类包含了订阅者和订阅者方法的相关信息。EventBus官方推荐在Android中使用订阅者索引以获得最佳的性能。
要开启订阅者索引的生成,你需要在构建脚本中使用annotationProcessor属性将EventBus的注解处理器添加到应用的构建中,还要设置一个eventBusIndex参数来指定要生成的订阅者索引的完全限定类名。
我们在前面的基本使用的那个例子上进行修改。首先,修改模块下的build.gradle构建脚本:
android {defaultConfig {...javaCompileOptions {annotationProcessorOptions {arguments = [eventBusIndex: 'com.github.cyc.eventbus.subscriberindexdemo.MyEventBusIndex']}}}...}dependencies {...compile 'org.greenrobot:eventbus:3.1.1'annotationProcessor 'org.greenrobot:eventbus-annotation-processor:3.1.1'}1234567891011121314151617
然后,build一下工程。EventBus注解处理器将为你生成一个订阅者索引类。如下所示:
package com.github.cyc.eventbus.subscriberindexdemo;import org.greenrobot.eventbus.meta.SimpleSubscriberInfo;import org.greenrobot.eventbus.meta.SubscriberMethodInfo;import org.greenrobot.eventbus.meta.SubscriberInfo;import org.greenrobot.eventbus.meta.SubscriberInfoIndex;import org.greenrobot.eventbus.ThreadMode;import java.util.HashMap;import java.util.Map;/** This class is generated by EventBus, do not edit. */public class MyEventBusIndex implements SubscriberInfoIndex {private static final Map<Class<?>, SubscriberInfo> SUBSCRIBER_INDEX;static {SUBSCRIBER_INDEX = new HashMap<Class<?>, SubscriberInfo>();putIndex(new SimpleSubscriberInfo(MainActivity.class, true, new SubscriberMethodInfo[] {new SubscriberMethodInfo("onMessageEvent", MessageEvent.class, ThreadMode.MAIN),}));}private static void putIndex(SubscriberInfo info) {SUBSCRIBER_INDEX.put(info.getSubscriberClass(), info);}@Overridepublic SubscriberInfo getSubscriberInfo(Class<?> subscriberClass) {SubscriberInfo info = SUBSCRIBER_INDEX.get(subscriberClass);if (info != null) {return info;} else {return null;}}}123456789101112131415161718192021222324252627282930313233343536373839
最后,在应用自定义的Application类的onCreate()方法中将订阅者索引类添加到EventBus中,并将该EventBus设置成默认的EventBus。示例代码如下所示:
public class MyApplication extends Application {@Overridepublic void onCreate() {super.onCreate();// 配置EventBusEventBus.builder().addIndex(new MyEventBusIndex()).installDefaultEventBus();}}123456789
运行应用。点击MainActivity界面上的启动活动按钮来启动SecondActivity,然后点击SecondActivity界面上的发布事件按钮来发布事件。最后,回退到MainActivity,可以看到界面上的TextView的内容已经更新为”Hello EventBus!”,并且应用打印出如下信息:
12-28 02:06:57.365 11335-11335/com.github.cyc.eventbus.subscriberindexdemo I/MainActivity: message is Hello EventBus!1
源码分析
EventBus的源码分析可以阅读下面这篇文章:
EventBus源码分析
总结
EventBus是一种用于Android的发布/订阅事件总线。使用EventBus可以简化应用组件间的通信,可以解耦事件的发送者和接收者。
参考
- EventBus 3.1.1
- http://greenrobot.org/eventbus/
- https://github.com/greenrobot/EventBus


")


还没有评论,来说两句吧...