MQTT初入门
1.MQTT 入门介绍
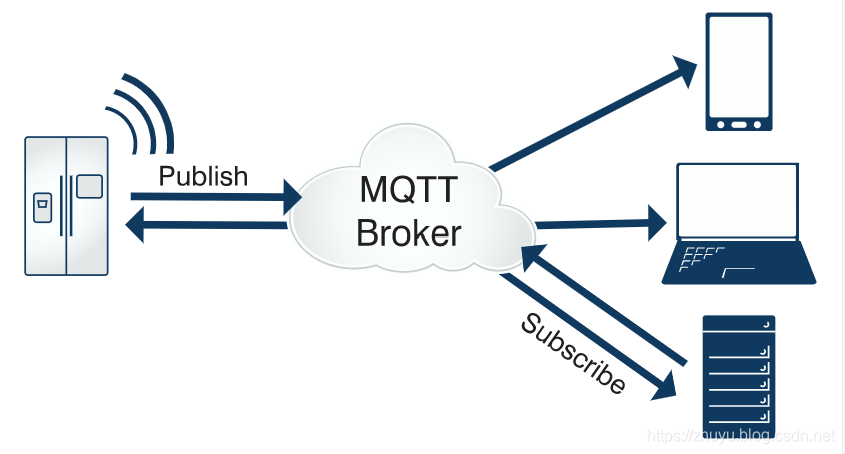
MQTT(Message Queuing Telemetry Transport,消息队列遥测传输协议),是一种基于发布/订阅(publish/subscribe)模式的”轻量级”通讯协议,该协议构建于TCP/IP协议上,由IBM在1999年发布。MQTT最大优点在于,可以以极少的代码和有限的带宽,为连接远程设备提供实时可靠的消息服务。作为一种低开销、低带宽占用的即时通讯协议,使其在物联网、小型设备、移动应用等方面有较广泛的应用。
MQTT只是一个网络协议,需要一个消息中间件,目前比较有名的有Mosquitto,Apollo,RabbitMQ,Emqx等,本篇使用Mosquitto,使用的是docker eclipse-mosquitto 镜像
2.安装MQTT
用Centos7 + docker部署 MQTT服务,使用下载和关注次数较多的 eclipse-mosquitto 镜像,https://hub.docker.com/\_/eclipse-mosquitto

1.创建目录和文件mkdir -p /mosquitto/configmkdir -p /mosquitto/datamkdir -p /mosquitto/logtouch /mosquitto/config/mosquitto.conftouch /mosquitto/log/mosquitto.log2.初始化配置文件vi /mosquitto/config/mosquitto.conf,内容如下persistence truepersistence_location /mosquitto/datalog_dest file /mosquitto/log/mosquitto.log3.目录授权chmod -R 755 /mosquitto4.运行docker镜像启动mqttdocker run -it --name=mosquitto -p 1883:1883 -p 9001:9001 -v /mosquitto/config/mosquitto.conf:/mosquitto/config/mosquitto.conf -v /mosquitto/data -v /mosquitto/log eclipse-mosquitto5.添加配置vi /mosquitto/config/mosquitto.conf# 关闭匿名模式allow_anonymous false# 指定密码文件password_file /mosquitto/config/pwfile.conf6.进入启动的容器shell命令行:docker exec -it mosquitto sh7.在容器shell命令行中,利用mosquitto命令设置密码,才能访问MQTTtouch /mosquitto/config/pwfile.confchmod -R 755 /mosquitto/config/pwfile.conf# 使用mosquitto_passwd命令创建用户,第一个lxy是用户名,第二个lxy是密码mosquitto_passwd -b /mosquitto/config/pwfile.conf test test_1238.重启mqtt容器:docker restart mosquitto9.利用MQTT.fx进行连接,下载地址:http://mqttfx.bceapp.com/安装MQTT.fx后,设置好连接地址,端口(默认1883),订阅一个主题,再向此主题Publish10.mosquitto.conf完整内容如下:persistence truepersistence_location /mosquitto/datalog_dest file /mosquitto/log/mosquitto.logallow_anonymous falsepassword_file /mosquitto/config/pwfile.conf#如果要让 js 通过websocket连接,则需要设置protocol为websockets#protocol websockets
3.使用MQTT.fx连接
对照上面的第9点,下载mqtt.fx 的windows64位版本,然后安装,打开软件,点击Extras-Edit Connection…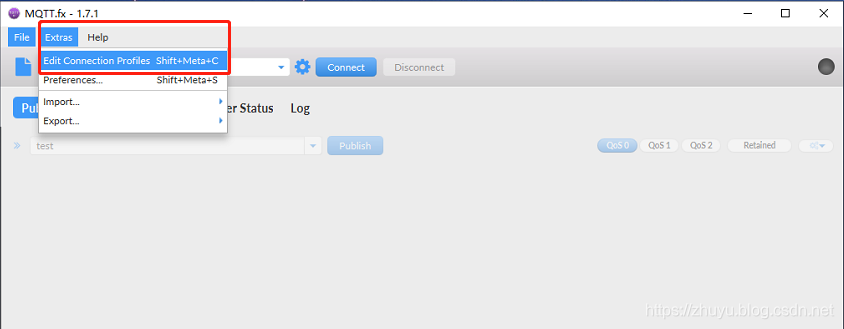
输入MQTT服务地址,端口,点击Generate生成一个ClientID,在User Credentials中输入用户名和密码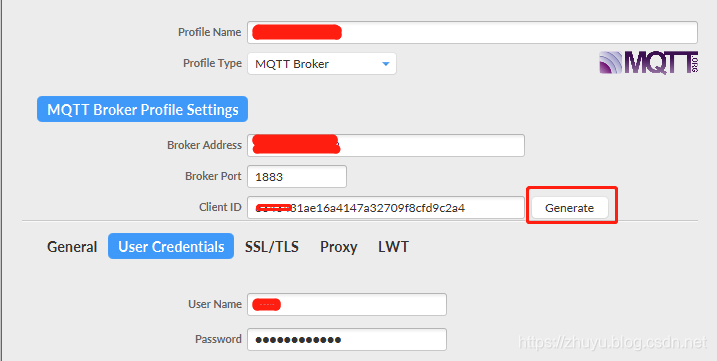
在Subscribe(订阅)中输入一个Topic名称为 test,在Publish(发布)中选中test,输入内容点击publish,能在Subscribe的右下角看到发布的内容
pis:订阅一个主题,向此主题发布内容,那么订阅者就能收到信息
4.JavaScript使用WebSocket连接 MQTT
想要使用websocket连接mqtt,需要mqtt服务支持websocket协议,
需要在配置文件中添加:protocol websockets
然后重启docker服务:docker restart mosquitto
<!DOCTYPE html><html><head><meta charset="utf-8" /><title>websocket连接mqtt</title><script src="https://cdnjs.cloudflare.com/ajax/libs/paho-mqtt/1.0.1/mqttws31.min.js" type="text/javascript"></script><script>var hostname = '192.168.68.134', //'192.168.1.2',port = 1883,clientId = 'client-test',timeout = 10,keepAlive = 100,cleanSession = false,ssl = false,userName = 'test',password = 'test_123',topic = '/test';client = new Paho.MQTT.Client(hostname, port, clientId);//建立客户端实例var options = {invocationContext: {host: hostname,port: port,path: client.path,clientId: clientId},timeout: timeout,keepAliveInterval: keepAlive,cleanSession: cleanSession,useSSL: ssl,userName : 'test',password : 'test_123',onSuccess: onConnect,onFailure: function (e) {console.log(e);s = "{time:" + new Date().Format("yyyy-MM-dd hh:mm:ss") + ", onFailure()}";console.log(s);}};client.connect(options);//连接服务器并注册连接成功处理事件function onConnect() {console.log("onConnected");s = "{time:" + new Date().Format("yyyy-MM-dd hh:mm:ss") + ", onConnected()}";console.log(s);client.subscribe(topic);}client.onConnectionLost = onConnectionLost;//注册连接断开处理事件client.onMessageArrived = onMessageArrived;//注册消息接收处理事件function onConnectionLost(responseObject) {console.log(responseObject);s = "{time:" + new Date().Format("yyyy-MM-dd hh:mm:ss") + ", onConnectionLost()}";console.log(s);if (responseObject.errorCode !== 0) {console.log("onConnectionLost:" + responseObject.errorMessage);console.log("连接已断开");}}function onMessageArrived(message) {s = "{time:" + new Date().Format("yyyy-MM-dd hh:mm:ss") + ", onMessageArrived()}";console.log(s);console.log("收到消息:" + message.payloadString);}function send() {var s = document.getElementById("msg").value;if (s) {s = "{time:" + new Date().Format("yyyy-MM-dd hh:mm:ss") + ", content:" + (s) + ", from: web console}";message = new Paho.MQTT.Message(s);message.destinationName = topic;client.send(message);document.getElementById("msg").value = "";}}var count = 0;function start() {window.tester = window.setInterval(function () {if (client.isConnected) {var s = "{time:" + new Date().Format("yyyy-MM-dd hh:mm:ss") + ", content:" + (count++) +", from: web console}";message = new Paho.MQTT.Message(s);message.destinationName = topic;client.send(message);}}, 1000);}function stop() {window.clearInterval(window.tester);}Date.prototype.Format = function (fmt) { //author: meizzvar o = {"M+": this.getMonth() + 1, //月份"d+": this.getDate(), //日"h+": this.getHours(), //小时"m+": this.getMinutes(), //分"s+": this.getSeconds(), //秒"q+": Math.floor((this.getMonth() + 3) / 3), //季度"S": this.getMilliseconds() //毫秒};if (/(y+)/.test(fmt)) fmt = fmt.replace(RegExp.$1, (this.getFullYear() + "").substr(4 - RegExp.$1.length));for (var k in o)if (new RegExp("(" + k + ")").test(fmt)) fmt = fmt.replace(RegExp.$1, (RegExp.$1.length == 1) ? (o[k]) : (("00" + o[k]).substr(("" + o[k]).length)));return fmt;}</script></head><body><input type="text" id="msg" /><input type="button" value="Send" onclick="send()" /><input type="button" value="Start" onclick="start()" /><input type="button" value="Stop" onclick="stop()" /></body></html>
效果如下,首先会提示连接成功,然后输入 hello world ,点击 send ,控制台会监测输出发送的信息
不过此版本的MQTT有点问题,要只能tcp连接,要么只能websocket连接,而且测试发现 移动智能设备无法连接上,因此又找了一个开源 MQTT 服务器 EMQ X,请看下一节


——第1篇 概论——第1章 计算机系统概论")
Dubbo源码分析之整体架构设计")


还没有评论,来说两句吧...