Vue组件通信(父子组件传值,非父子组件传值)
主要是整理给自己用的一些面试常用题,这里记录一下vue组件间通信几种方式。
父组件传值到子组件(父传子)
先定义一个子组件,这里我在component文件夹里定义一个child.vue
子组件
<template><div class="about"><h1>这里是子组件的变量接受的变量{{msg}}</h1></div></template><script>export default {props: {msg: Number}}</script>
父组件
<template><div class="home"><div>我是父组件的变量{{num}}</div><button @click="add">父组件变量+1</button><Child :msg="num" @getData="getData"></Child></template><script>import Child from '@/components/child.vue'export default {data() {return {num: 18}},components: {Child},methods: {add() {this.num++}}}</script>
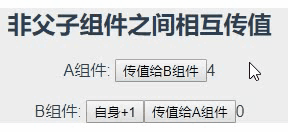
实现效果
父组件传子组件还是比较容易理解的,实现方式就是通过props属性,子组件通过props属性接收从父组件传过来的数据,而父组件传值给子组件的时候使用 v-bind 将子组件中props预留的变量名绑定到父组件data里面的数据就好了,记得你在子组件定义的数据类型
子组件传值到父组件(子传父)
子组件代码
<template><div class="about"><div><input type="text" v-model="inputMsg"></div><button @click="setData">把输入的文字传递给父组件</button></div></template><script>export default {data() {return {inputMsg: ''}},methods: {setData() {this.$emit("setData", this.inputMsg);}}}</script>
父组件代码
<template><div class="home"><div class="red">父组件默认:{{msg}}</div><Child @setData="getData"></Child></template><script>import Child from '@/components/child.vue'export default {data() {return {msg: '父组件默认数据'}},components: {Child},methods: {getData(data) {this.msg = data;}}}</script>

子组件传递数据到父组件,子组件通过this.$emit自定义事件向父组件传递信息,父组件监听子组件的事件来接收
非父子组件传值
方法一:
新建一个bus.js文件, 在这个文件里实例化一下vue;然后在组件A和组件B中分别引入这个bus.js文件,将事件监听和事件触发都挂到bus.js这个实例上,这样就可以实现全局的监听与触发了。
bus.js文件
//bus.jsimport Vue from 'vue'export default new Vue()
组件A
<template><div>A组件:<button @click="AValueChange">传值给B组件</button><span>{{AValue}}</span></div></template><script>// 引入公共的bug,来做为中间传达的工具import Bus from './bus.js'export default {data () {return {AValue: 4}},mounted () {var that = this// 用$on事件来接收参数// Bus.$on("事件名称",事件处理函数)写在mounted钩子函数里面,事件处理函数里面就写当这个触发事件的回调函数里面,应该干的事。Bus.$on('val', (data) => {that.AValue = data})},methods: {// 触发事件AValueChange() {Bus.$emit('val', this.AValue)}}}</script>
组件B
<template><div>B组件:<button @click="getData">自身+1</button><button @click="BValueChange">传值给A组件</button><span>{{BNum}}</span></div></template><script>import Bus from './bus.js'export default {data () {return {BNum: 0}},mounted () {var that = this// 用$on事件来接收参数Bus.$on('val', (data) => {that.BNum = data})},methods: {getData() {this.BNum++},BValueChange() {Bus.$emit('val', this.BNum)}}}</script>
方法二:
在main.js,也就是入口文件中,在vue的原型上添加一个bus对象,原理跟方法一类似,只不过更加简单
//在main.js中Vue.prototype.bus = new Vue()// 传递组件里的触发事件this.bus.$emit('updata', this.AValue)// 接收组件里面的监听事件this.bus.$on('updata', (data) => {console.log(data) //data就是触发updata事件带过来的数据})
这里就不上详细代码了,因为在方法一里面改下即可。
A组件里面的触发事件
methods: {// 传递组件里的触发事件AValueChange() {this.bus.$emit('updata', this.AValue)},}
B组件里面的mounted函数里面的监听事件
mounted() {var that = this// 接收组件里面的监听事件this.bus.$on('updata', (data) => {console.log(data) //data就是触发updata事件带过来的数据that.BNum = data})}
实现效果: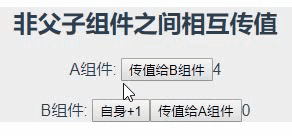
这里就是改了下,原理还是类似
其实这些可以直接Vuex状态管理工具来实现,看实际应用场景。
本来是这些都在一个demo里面的,便于理解写的时候把这些拆分出来了。复制代码的时候可能会出现些问题,如果各位发现问题了,可以指出,我加以更正,感谢。
个人水平有限,有问题欢迎大家留言指导,仅供学习和参考。
学海无涯!努力二字,共勉!


")
实现")

算法")
之python实现")


还没有评论,来说两句吧...