从零搭建springcloud
开发工具:IDEA
JDK1.8
sprngcloud微服务的架构基础 :生产者(client),消费者(client),注册中心/配置中心(server)
首先我们创建server,打开idea,选择左侧spring initializr,点击next

springcloud是以eureka作为注册中心 ,这里要勾选Eureka Server

一直next创建

pom.xml如下,注意要修改springboot与springcloud版本,否则springboot版本太高版本不匹配会爆红报错,建议按照以下配置来。
<?xml version="1.0" encoding="UTF-8"?><project xmlns="http://maven.apache.org/POM/4.0.0" xmlns:xsi="http://www.w3.org/2001/XMLSchema-instance"xsi:schemaLocation="http://maven.apache.org/POM/4.0.0 https://maven.apache.org/xsd/maven-4.0.0.xsd"><modelVersion>4.0.0</modelVersion><parent><groupId>org.springframework.boot</groupId><artifactId>spring-boot-starter-parent</artifactId><version>1.5.9.RELEASE</version><relativePath/> <!-- lookup parent from repository --></parent><groupId>com.example</groupId><artifactId>server</artifactId><version>0.0.1-SNAPSHOT</version><name>server</name><description>Demo project for Spring Boot</description><properties><java.version>1.8</java.version><project.build.sourceEncoding>UTF-8</project.build.sourceEncoding><project.reporting.outputEncoding>UTF-8</project.reporting.outputEncoding></properties><!-- 导入eureka依赖 --><dependencies><dependency><groupId>org.springframework.cloud</groupId><artifactId>spring-cloud-starter-eureka-server</artifactId></dependency></dependencies><!-- dependency management --><dependencyManagement><dependencies><dependency><groupId>org.springframework.cloud</groupId><artifactId>spring-cloud-dependencies</artifactId><version>Dalston.SR1</version><type>pom</type><scope>import</scope></dependency></dependencies></dependencyManagement><build><plugins><plugin><groupId>org.springframework.boot</groupId><artifactId>spring-boot-maven-plugin</artifactId></plugin></plugins></build></project>
在application.properties配置文件里配置eureka
server.port=8081eureka.instance.hostname=localhost#在默认设置下, 该服务注册中心也会将自己作为客户端来尝试注册它自己,所以我们需要禁用它的客户端注册行为eureka.client.registerWithEureka=falseeureka.client.fetchRegistry=falseeureka.client.serviceUrl.defaultZone=http://${eureka.instance.hostname}:${server.port}/eureka/
在启动类上添加
@EnableEurekaServer

启动项目,访问http://localhost:8081

二.创建生产者provider1
新建springboot项目与注册中心server创建一样,pom.xml如下
<?xml version="1.0" encoding="UTF-8"?><project xmlns="http://maven.apache.org/POM/4.0.0" xmlns:xsi="http://www.w3.org/2001/XMLSchema-instance"xsi:schemaLocation="http://maven.apache.org/POM/4.0.0 https://maven.apache.org/xsd/maven-4.0.0.xsd"><modelVersion>4.0.0</modelVersion><parent><groupId>org.springframework.boot</groupId><artifactId>spring-boot-starter-parent</artifactId><version>1.5.9.RELEASE</version><relativePath/> <!-- lookup parent from repository --></parent><groupId>com.example</groupId><artifactId>provider1</artifactId><version>0.0.1-SNAPSHOT</version><name>provider1</name><description>Demo project for Spring Boot</description><properties><java.version>1.8</java.version><project.build.sourceEncoding>UTF-8</project.build.sourceEncoding><project.reporting.outputEncoding>UTF-8</project.reporting.outputEncoding></properties><!-- 导入eureka依赖 --><dependencies><dependency><groupId>org.springframework.cloud</groupId><artifactId>spring-cloud-starter-eureka-server</artifactId></dependency></dependencies><!-- dependency management --><dependencyManagement><dependencies><dependency><groupId>org.springframework.cloud</groupId><artifactId>spring-cloud-dependencies</artifactId><version>Dalston.SR1</version><type>pom</type><scope>import</scope></dependency></dependencies></dependencyManagement><build><plugins><plugin><groupId>org.springframework.boot</groupId><artifactId>spring-boot-maven-plugin</artifactId></plugin></plugins></build></project>
application.properties,注意端口不能跟server服务端口一样,eureka地址端口要与server服务一样。
server.port=8082eureka.client.serviceUrl.defaultZone=http://localhost:8081/eureka/#服务名称spring.application.name=provider1
启动类上添加
@EnableEurekaClient
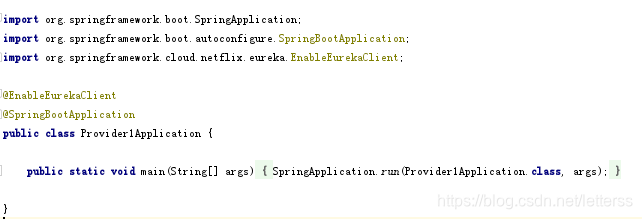
创建controller写一个提供方法
import org.springframework.web.bind.annotation.GetMapping;import org.springframework.web.bind.annotation.RequestParam;import org.springframework.web.bind.annotation.ResponseBody;import org.springframework.web.bind.annotation.RestController;import java.util.HashMap;import java.util.Map;@RestControllerpublic class controller {/*** 假如这个客户端要提供一个getCloud的方法* @return*/@GetMapping(value = "/getCloud")@ResponseBodypublic Map<String,Object> getCloud(@RequestParam String name){Map<String,Object> data = new HashMap<>();data.put("userName",name);data.put("from","provider-A");return data;}}
启动项目,可见在注册中心已经注册上了

然后我们访问provider1服务

三.创建消费者(customer)
新建springboot项目与注册中心server创建一样,pom.xml如下
<?xml version="1.0" encoding="UTF-8"?><project xmlns="http://maven.apache.org/POM/4.0.0" xmlns:xsi="http://www.w3.org/2001/XMLSchema-instance"xsi:schemaLocation="http://maven.apache.org/POM/4.0.0 https://maven.apache.org/xsd/maven-4.0.0.xsd"><modelVersion>4.0.0</modelVersion><parent><groupId>org.springframework.boot</groupId><artifactId>spring-boot-starter-parent</artifactId><version>1.5.9.RELEASE</version><relativePath/> <!-- lookup parent from repository --></parent><groupId>com.example</groupId><artifactId>customer</artifactId><version>0.0.1-SNAPSHOT</version><name>customer</name><description>Demo project for Spring Boot</description><properties><java.version>1.8</java.version><project.build.sourceEncoding>UTF-8</project.build.sourceEncoding><project.reporting.outputEncoding>UTF-8</project.reporting.outputEncoding></properties><!-- 导入eureka依赖 --><dependencies><dependency><groupId>org.springframework.cloud</groupId><artifactId>spring-cloud-starter-eureka-server</artifactId></dependency></dependencies><!-- dependency management --><dependencyManagement><dependencies><dependency><groupId>org.springframework.cloud</groupId><artifactId>spring-cloud-dependencies</artifactId><version>Dalston.SR1</version><type>pom</type><scope>import</scope></dependency></dependencies></dependencyManagement><build><plugins><plugin><groupId>org.springframework.boot</groupId><artifactId>spring-boot-maven-plugin</artifactId></plugin></plugins></build></project>
application.properties
server.port=8083eureka.client.serviceUrl.defaultZone=http://localhost:8081/eureka/spring.application.name=customer1
启动类上添加
@EnableEurekaClient
创建消费方法
import org.springframework.beans.factory.annotation.Autowired;import org.springframework.cloud.client.loadbalancer.LoadBalanced;import org.springframework.context.annotation.Bean;import org.springframework.web.bind.annotation.GetMapping;import org.springframework.web.bind.annotation.RequestParam;import org.springframework.web.bind.annotation.ResponseBody;import org.springframework.web.bind.annotation.RestController;import org.springframework.web.client.RestTemplate;import java.util.HashMap;import java.util.Map;@RestControllerpublic class customerController {@AutowiredRestTemplate restTemplate;/*** 实例化RestTemplate* @return*/@LoadBalanced@Beanpublic RestTemplate rest() {return new RestTemplate();}/*** Rest服务端使用RestTemplate发起http请求,然后得到数据返回给前端* @param name* @return*/@GetMapping(value = "/gotoCloud")@ResponseBodypublic Map<String,Object> gotoCloud(@RequestParam String name){Map<String,Object> data = new HashMap<>();/*** 因为他向注册中心注册了服务,服务名称provider1,我们访问provider1即可*/data = restTemplate.getForObject("http://provider1/getCloud?name="+name,Map.class);return data;}}
启动消费者,可以看到消费者也注册上了

访问http://localhost:8083/gotoCloud?name=wangsheng,可以看到调用了提供者的服务。

那么怎么实现负载均衡呢?
我们把provider1复制一份,修改 application.properties,将端口改为8084,spring.application.name不变
server.port=8084eureka.client.serviceUrl.defaultZone=http://localhost:8081/eureka/#服务名称spring.application.name=provider1
将提供者里面的方法稍微修改一下

然后启动

可以看到provider1有2个实例。
我们再次访问http://localhost:8083/gotoCloud?name=wangsheng
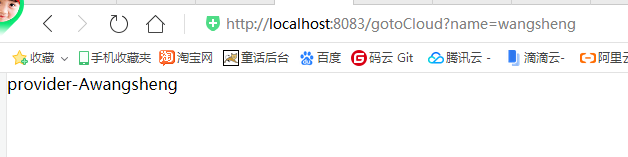
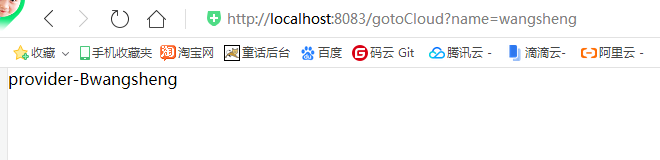
一开始是from A,你刷新一下 变成 from B了,说明这个时候两台提供者在交替工作,从而达到了一个负载均衡的作用。


![sublime text3 提示[WinError 2] 系统找不到指定的文件](https://image.dandelioncloud.cn/images/20221021/7c2d64239b9e47b8999ee78cb4480121.png "sublime text3 提示[WinError 2] 系统找不到指定的文件")


——Oracle 11g 第二章知识点小结——过滤 排序...")


还没有评论,来说两句吧...