SpringMVC--视图和视图解析器
1.Spring MVC如何解析视图

2.视图
(1) 视图的作用是渲染模型数据,将模型里的数据以某种形式呈现给客户。(2) 为了实现视图模型和具体实现技术的解耦,Spring 在 org.springframework.web.servlet 包中定义了一个高度抽象的 View 接口(3) 视图对象由视图解析器负责实例化。由于视图是无状态的,所以他们不会有线程安全的问题
常用的视图实现类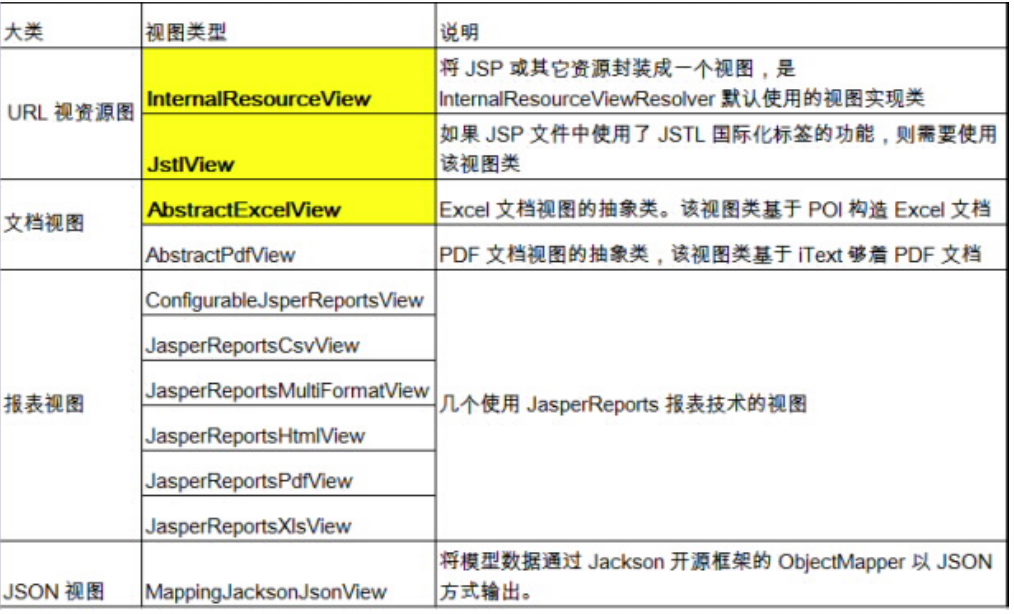
3.视图解析器
(1) SpringMVC 为逻辑视图名的解析提供了不同的策略,可以在 Spring WEB 上下文中配置一种或多种解析策略,并指定他们之间的先后顺序。(2) 每一种映射策略对应一个具体 的视图解析器实现类。(3) 视图解析器的作用比较单一:将逻辑视图解析为一个具体的视图对象。(4) 所有的视图解析器都必须实现 ViewResolver 接口(5) 每个视图解析器都实现了 Ordered 接口并开放出一个 order 属性,可以通过 order 属性指定解析器的优先顺序,order 越小优先级越高(6) JSP 是最常见的视图技术,可以使用InternalResourceViewResolver 作为视图解析器
常用的视图解析器实现类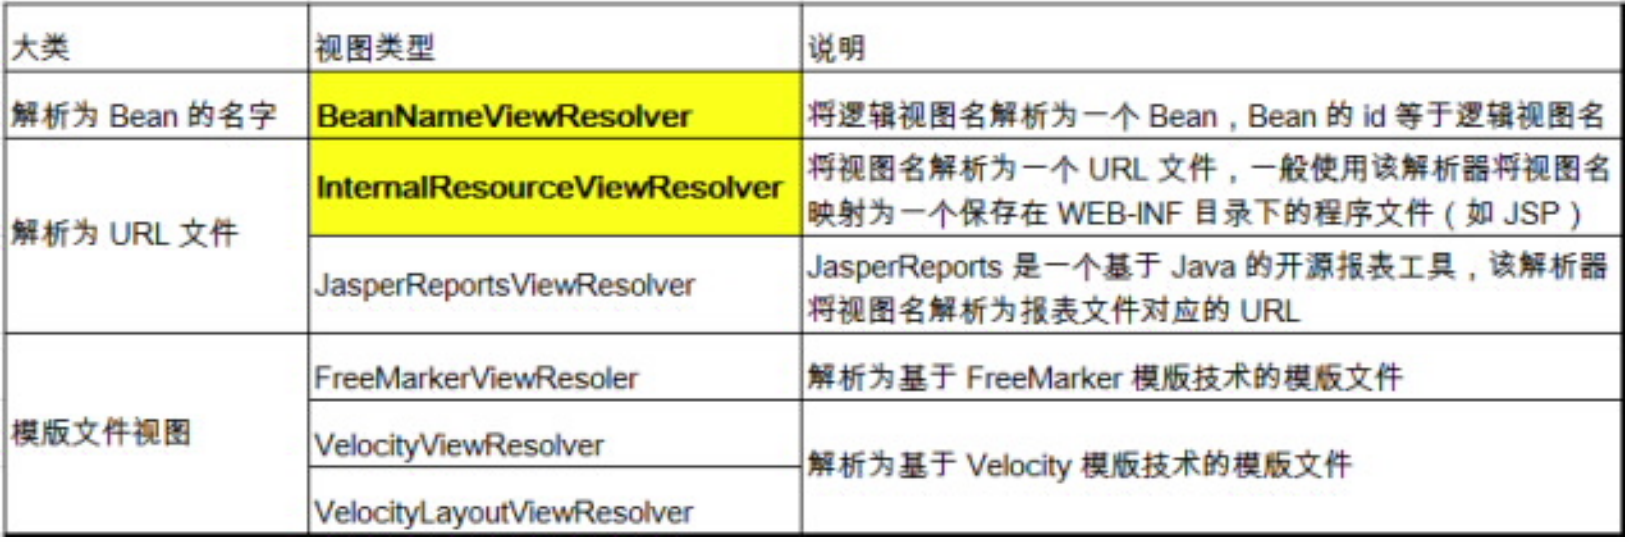
4.JstlView(若项目中使用了 JSTL,则 SpringMVC 会自动把视图由 InternalResourceView 转为 JstlView )
4.1 fmt 标签
若使用 JSTL 的 fmt 标签则需要在 SpringMVC 的配置文件中配置国际化资源文件
(1) i18n.properties
i18n.username=Usernamei18n.password=Password
(2) springmvc.xml
<bean id="messageSource" class="org.springframework.context.support.ResourceBundleMessageSource"><property name="basename" value="i18n"/></bean>
(3) jsp中导入fmt标签
<%@taglib prefix="fmt" uri="http://java.sun.com/jsp/jstl/fmt" %>
(4) 使用fmt标签
<fmt:message key="i18n.username"/><fmt:message key="i18n.password"/>
4.2 mspringmvc.xml:view-controller 标签
若希望直接响应通过 SpringMVC 渲染的页面,可以使用 mvc:view-controller 标签实现
配置springmvc.xml文件
<?xml version="1.0" encoding="UTF-8"?><beans xmlns="http://www.springframework.org/schema/beans"xmlns:tx="http://www.springframework.org/schema/tx"xmlns:aop="http://www.springframework.org/schema/aop"xmlns:xsi="http://www.w3.org/2001/XMLSchema-instance"xmlns:context="http://www.springframework.org/schema/context"xmlns:p="http://www.springframework.org/schema/p"xmlns:mvc="http://www.springframework.org/schema/mvc"xsi:schemaLocation="http://www.springframework.org/schema/beanshttp://www.springframework.org/schema/beans/spring-beans.xsdhttp://www.springframework.org/schema/contexthttp://www.springframework.org/schema/context/spring-context.xsdhttp://www.springframework.org/schema/aophttp://www.springframework.org/schema/aop/spring-aop.xsdhttp://www.springframework.org/schema/txhttp://www.springframework.org/schema/tx/spring-tx.xsdhttp://www.springframework.org/schema/mvchttp://www.springframework.org/schema/mvc/spring-mvc.xsd">......<!-- 配置直接转发的页面 --><mvc:view-controller path="/success" view-name="success"/><!-- 在实际开发中通常都需配置 mvc:annotation-driven 标签 --><mvc:annotation-driven></mvc:annotation-driven></beans>
5. 自定义视图
(1) 创建一个视图类(实现 view 接口)
@Componentpublic class HelloView implements View {@Overridepublic String getContentType() {return "text/html";}@Overridepublic void render(Map<String, ?> map, HttpServletRequest httpServletRequest, HttpServletResponse httpServletResponse) throws Exception {httpServletResponse.getWriter().print("hello-->view");}}
(2) 配置视图 BeanNameViewResolver解析器(在springmvc.xml中)
<bean class="org.springframework.web.servlet.view.BeanNameViewResolver"><property name="order" value="99"/></bean>
(3) 编写测试方法
@RequestMapping("/testView")public String testView(){return "helloView";}
6. 转发与重定向( forward:转发——redirect:重定向)
(1) redirect:success.jsp:会完成一个到 success.jsp 的重定向的操作
@RequestMapping("/test")public String test(){return "redirect:success.jsp";}
# (2) forward:success.jsp:会完成一个到 success.jsp 的转发操作
@RequestMapping("/test2")public String test2(){return " forward:success.jsp";}


---- 二分查找学习期")


还没有评论,来说两句吧...