【Vuex】核心概念解读
目标
知道什么是Vuex
掌握Vuex的基本使用
掌握Vuex的核心概念及其用法
1. Vuex是什么
Vuex 是一个专为 Vue.js 应用程序开发的状态管理模式。它采用集中式存储管理应用的所有组件的状态,并以相应的规则保证状态以一种可预测的方式发生变化。Vuex 也集成到 Vue 的官方调试工具 devtools extension,提供了诸如零配置的 time-travel 调试、状态快照导入导出等高级调试功能。了解更多——传送官网:https://vuex.vuejs.org/zh/
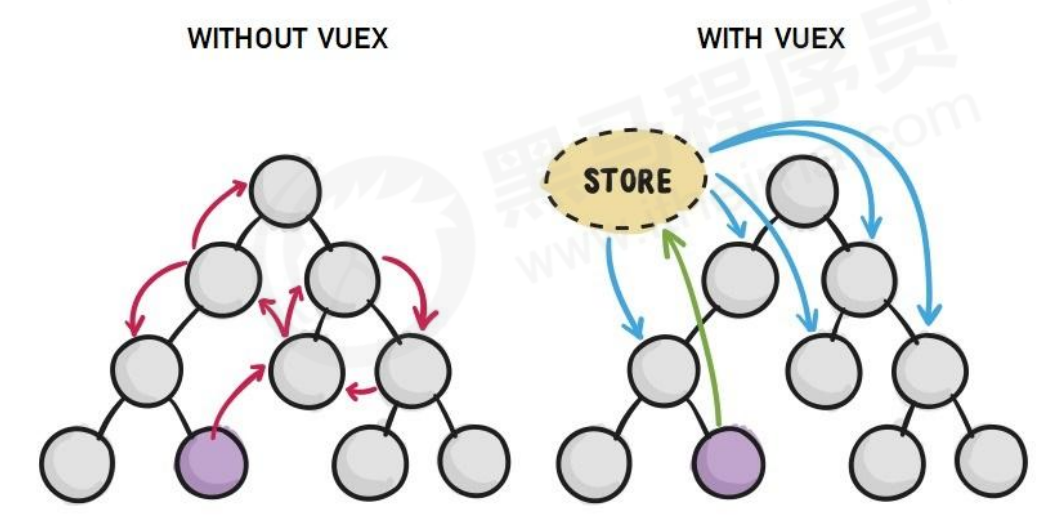
1.1 组件之间共享数据的方式
父向子传值:v-bind 属性绑定
子向父传值:v-on 事件绑定
兄弟组件之间共享数据: EventBus
$on接收数据的那个组件$emit发送数据的那个组件
1.2 使用Vuex传值方式
Vuex 是实现组件全局状态(数据)管理的一种机制,可以方便的实现组件之间数据的共享。
1.3 使用 Vuex 统一管理状态的好处
①: 能够在 vuex 中集中管理共享的数据,易于开发和后期维护
②: 能够高效地实现组件之间的数据共享,提高开发效率
③: 存储在 vuex 中的数据都是响应式的,能够实时保持数据与页面的同步
1.4 什么样的数据适合存储到 Vuex 中
一般情况下,只有组件之间共享的数据,才有必要存储到 vuex 中;对于组件中的私有数据,依旧存储在组件
自身的 data 中即可。
2. Vuex 的基本使用
2.1 安装 vuex 依赖包
可通过可视化UI 面板安装依赖 Vuex。也可以npm 命令安装npm install vuex --save
2.2 导入 vuex 包
import Vuex from 'vuex'Vue.use(Vuex)
2.3 创建 store 对象
const store = new Vuex.Store({// state 中存放的就是全局共享的数据state: { count: 0 }})
2.4 将 store 对象挂载到 vue 实例中
new Vue({el: '#app',render: h => h(app),router,// 将创建的共享数据对象,挂载到 Vue 实例中// 所有的组件,就可以直接从 store 中获取全局的数据了store})
3. 核心概念概述
Vuex 中的主要核心概念包含:State 、Mutation 、Action 、Getter
3.1 State
State 提供唯一的公共数据源,所有共享的数据都要统一放到 Store 的 State 中进行存储。
示例:
// 创建store数据源,提供唯一公共数据const store = new Vuex.Store({state: { count: 0 }})
组件访问state中数据的第一种方式:
this.$store.state.全局数据名称
组件访问state中数据的第二种方式:
// 1. 从 vuex 中按需导入 mapState 函数import { mapState } from 'vuex'// 2. 将全局数据,映射为当前组件的计算属性computed: {...mapState(['count'])}
注意:此处通过刚才导入的 mapState 函数,将当前组件需要的全局数据,映射为当前组件的 computed 计算属性
3.2 Mutation
Mutation 用于变更 Store中 的数据
①: 只能通过 mutation 变更 Store 数据,不可以直接操作 Store 中的数据。
②: 通过这种方式虽然操作起来稍微繁琐一些,但是可以集中监控所有数据的变化。
③:mutations中的的函数一定要有state参数
示例:
// 定义 Mutationconst store = new Vuex.Store({state: {count: 0},mutations: {add(state) {// 变更状态state.count++}}})// 触发mutationmethods: {handle1() {// 触发 mutations 的第一种方式(也可直接将mutation函数写在事件函数处)this.$store.commit('add')}}
▶:可以在触发 mutations 时传递参数
示例:
// 定义Mutationconst store = new Vuex.Store({state: {count: 0},mutations: {addN(state, step) {// 变更状态state.count += step}}})// 触发mutationmethods: {handle2() {// 在调用 commit 函数,// 触发 mutations 时携带参数this.$store.commit('addN', 3)}}
▶:触发 mutations 的第二种方式
示例:
// 1. 从 vuex 中按需导入 mapMutations 函数import { mapMutations } from 'vuex'// 2. 将指定的 mutations 函数,映射为当前组件的 methods 函数methods: {...mapMutations(['add', 'addN'])}
注意:此处通过刚才导入的 mapMutations 函数,将需要的 mutations 函数,映射为当前组件的 methods 方法
3.3 Action
Action 用于处理异步任务
如果通过异步操作变更数据,必须通过 Action,而不能使用 Mutation,但是在 Action 中还是要通过触发 Mutation 的方式间接变更数据。
示例:
// 定义 Actionconst store = new Vuex.Store({// ...省略其他代码mutations: {add(state) {state.count++}},actions: {addAsync(context) {setTimeout(() => {context.commit('add')}, 1000)}}})// 触发 Actionmethods: {handle() {// 触发 actions 的第一种方式this.$store.dispatch('addAsync')}}
▶:触发 actions 异步任务时携带参数
示例:
// 定义 Actionconst store = new Vuex.Store({// ...省略其他代码mutations: {addN(state, step) {state.count += step}},actions: {addNAsync(context, step) {setTimeout(() => {context.commit('addN', step)}, 1000)}}})// 触发 Actionmethods: {handle() {// 在调用 dispatch 函数,// 触发 actions 时携带参数this.$store.dispatch('addNAsync', 5)}}
▶:触发 actions 的第二种方式
示例:
// 1. 从 vuex 中按需导入 mapActions 函数import { mapActions } from 'vuex'// 2. 将指定的 actions 函数,映射为当前组件的 methods 函数methods: {...mapActions(['addASync', 'addNASync'])}
注意:此处通过刚才导入的 mapActions 函数,将需要的 actions 函数,映射为当前组件的 methods 方法
3.4 Getter
Getter 用于对 Store 中的数据进行加工处理形成新的数据
①: Getter 可以对 Store 中已有的数据加工处理之后形成新的数据,类似 Vue 的计算属性。
②: Store 中数据发生变化,Getter 的数据也会跟着变化。
示例:
// 定义 Getterconst store = new Vuex.Store({state: {count: 0},getters: {showNum: state => {return '当前最新的数量是【'+ state.count +'】'}}})
▶:使用 getters 的第一种方式
this.$store.getters.名称
▶:使用 getters 的第二种方式
import { mapGetters } from 'vuex'computed: {...mapGetters(['showNum'])}
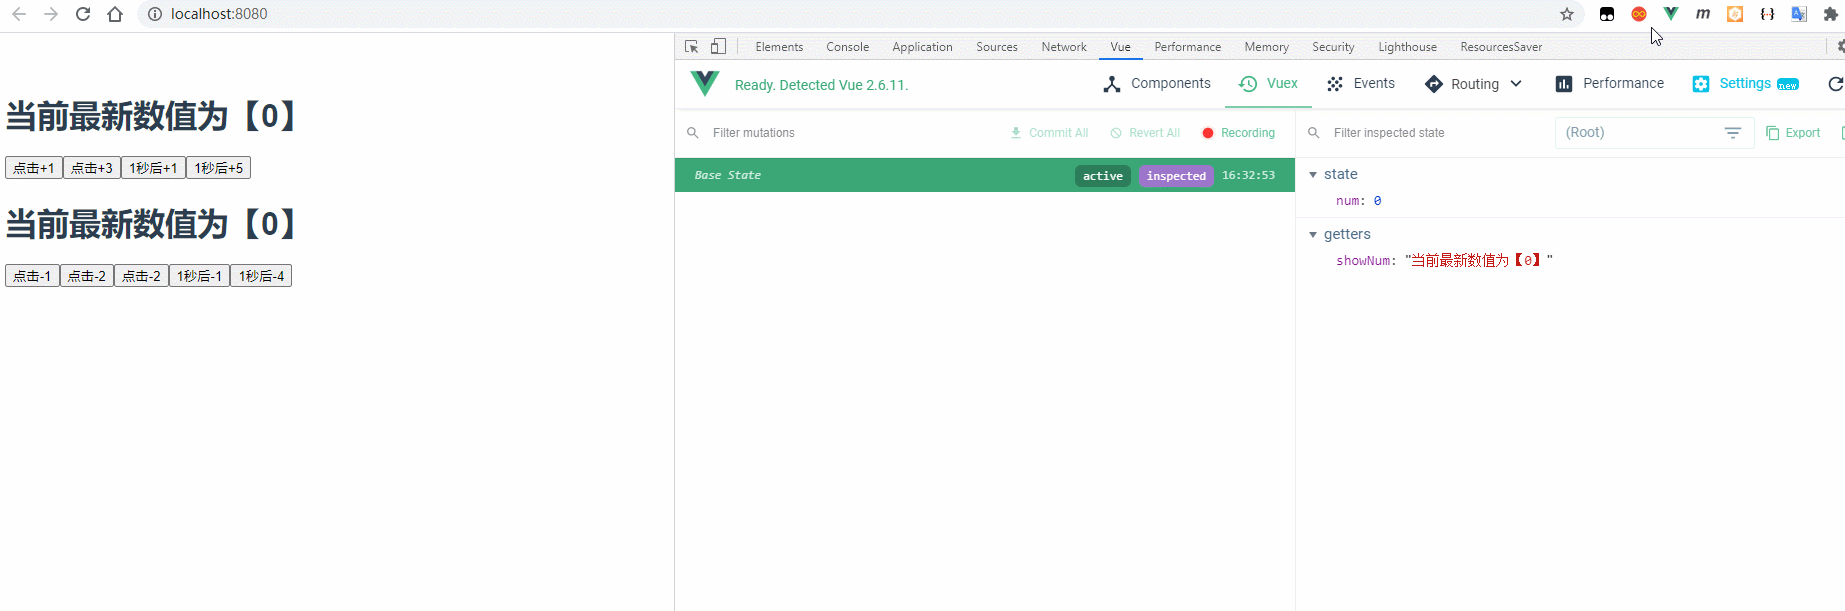
4. 综合本文代码的案例
对本文中 Vuex 的核心概念,进行了详尽的展示(通过调试工具,直观的展现数据的响应式变化)
4.1 效果预览
4.2 实现步骤
- 首先创建
含vuex 的 vue项目 - 然后修改App根组件,新增加法、减法两个新组建,实现页面基本布局
在
store.js文件中需要管理的数据import Vue from ‘vue’
import Vuex from ‘vuex’Vue.use(Vuex)
export default new Vuex.Store({
state: {num: 0},mutations: {//# 只有mutations中的函数才有权限修改state中的数据add1(state) {state.num++},sub1(state) {state.num--},addN(state, step) {state.num += step},subN(state, step) {state.num -= step}},actions: {//# 主要用于处理异步操作AddAsync(context) {setTimeout(() => {//# 在action中,不能直接修改state中的数据//# 必须通过 context.commit() 触发某个mutation 才行context.commit('add1')}, 1000)},SubAsync(context) {setTimeout(() => {//# 在action中,不能直接修改state中的数据//# 必须通过 context.commit() 触发某个mutation 才行context.commit('sub1')}, 1000)},//# 主要用于处理异步操作AddNAsync(context, step) {setTimeout(() => {context.commit('addN', step)}, 1000)},SubNAsync(context, step) {setTimeout(() => {context.commit('subN', step)}, 1000)}},getters: {showNum(state) {return '当前最新数值为【' + state.num + '】'}},modules: { }
})
两个组件使用 state 中的数据
组件1:
<template><div><!-- 第一种获取store数据的方法 --><h1>{ { this.$store.getters.showNum}}</h1><!-- 也可以直接在事件后写mutation函数(需要去除this,此处this指向button) --><button @click="$store.commit('add1')">点击+1</button><button @click="handle1">点击+3</button><button @click="handle2">1秒后+1</button><button @click="handle3">1秒后+5</button></div></template><script>export default {methods: {handle1() {this.$store.commit('addN', 3);},handle2() {this.$store.dispatch('AddAsync');},handle3() {this.$store.dispatch('AddNAsync', 5);}}};</script>
组件2:
<template><div><!-- 此处为使用store数据的第二种方式 --><h1>{ { showNum}}</h1><button @click="sub1">点击-1</button><button @click="handle">点击-2</button><button @click="subN(2)">点击-2</button><button @click="SubAsync">1秒后-1</button><button @click="SubNAsync(4)">1秒后-4</button></div></template><script>import { mapState, mapGetters } from 'vuex';import { mapMutations } from 'vuex';import { mapActions } from 'vuex';export default {data() {return { };},computed: {...mapState(['num']),...mapGetters(['showNum'])},methods: {...mapMutations(['sub1', 'subN']),...mapActions(['SubAsync', 'SubNAsync']),//# 也可以把metations函数写在组件本身的函数中handle() {this.subN(2);}}};</script>
over


还没有评论,来说两句吧...