how to install SMAC in WSL?
In WSL,we build the python environment by anaconda and for debuging the code in the GUI, we install VS code.
Note:Select Ubuntu 18.04 in Microsoft Store instead of 20.04. At present, the 20.04 version is not stable, and swig, in it, is forced to be version 4.0 when installing SMAC when input the command ‘sudo apt get install build essential swig’ ,resulting in the segmentation fault (core dumped) .
目录
1 Install WSL
2 Install anaconda
3 SMAC
3.1 install SMAC
3.2 test SMAC
4 Install VS code
1 Install WSL
You need to go to control panel \ all control panel items \ programs and functions to select enable or disable windows functions

Locate the windows subsystem for Linux and tick it, then make sure to choose restart now
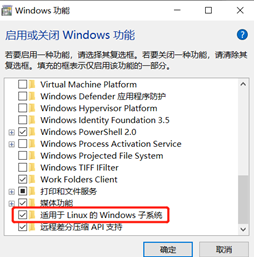
Select Ubuntu 18.04 in Microsoft Store. At present, the 20.04 version is not stable, and swig, in it, is forced to be version 4.0 when installing SMAC when input the command ‘sudo apt get install build essential swig’ ,resulting in the segmentation fault (core dumped) .

Set user and password. Note: password is invisible

2 Install anaconda
Download Anaconda Linux version to D: \ Anaconda \ Anaconda 2-4.2.0-linux-x86_ 64.sh
You can access resources under windows in WSL, and windows resources are mounted under / MNT.
Therefore, enter disk D through / MNT / d.
cd /mnt/dbash Anaconda3-2020.02-Linux-x86_64.sh
If right, the situation will be:
Welcome to Anaconda2 4.2.0(by Continuum Analytics, Inc.)
In order to continue the installation process, please review the license agreement.
Please, press ENTER to continue>>>
Then go on all the way, and you will be prompted with the installation path, which will be used later:
Anaconda3 will now be installed in to this location:/home/aaa/anaconda3
Continue the installation until:
Do you wish the installer to initialize Anaconda3
by running conda init? [yes|no]
choose ‘no’
Enter command to create environment variable:
export PATH="$PATH:/home/xxx/anaconda3/bin"
Input ‘python’, and the installation is successful as follows:

3 SMAC
3.1 install SMAC
cd to the folder under your own name, the general software is installed here
cd ~cd /home/xxxsudo apt-get install software-properties-commonsudo apt-get updatesudo apt-get install build-essential swig
It shows that version 3.0.12 is correct, and version 3. X is OK

conda install gxx_linux-64 gcc_linux-64 swigcurl https://raw.githubusercontent.com/automl/smac3/master/requirements.txt | xargs -n 1 -L 1 pip installpip install smac
if occurs the error: ‘curl: (7) Failed to connect to raw.githubusercontent.com port 443: Connection refused’
maybe need to ping the address:
[Enter IPAddress.com Home page, entering raw.githubusercontent.com Find the real IP address] e.g. 199.232.68.133
if not install vim,please install vim first.
sudo vi /etc/hosts
Enter the interface, add 199.232.68.133 raw.githubusercontent.com . Press : wq to save and exit
199.232.68.133 raw.githubusercontent.com
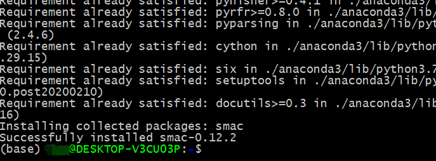
After saving and exiting, type the following commands again: on the command line to complete the installation of smac on the command side
curl https://raw.githubusercontent.com/automl/smac3/master/requirements.txt | xargs -n 1 -L 1 pip installpip install smac
it will occur’Successfully installed smac -0.12.2’:
3.2 test SMAC
Note: if want to run in tensorflow environment, activate tensorflow first
pip install scikit-optimizepip install retrygit clone https://github.com/automl/SMAC3cd SMAC3cd examples/braninpython ../../scripts/smac --scenario scenario.txt

Now, the installation is completed by the command. If you want to debug the code on GUI, it is recommended to install VS code
4 Install VS code
Input the command: ‘code.’ The VS code will be started. If it is not installed, it will be automatically installed and then started
code .
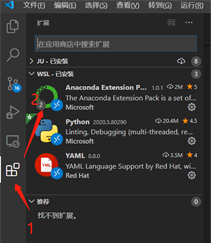
After the installation is opened automatically, install the plug-in and python running environment first. Here, Anaconda extension pack is recommended. After the plug-in installation is completed, prompt “reload”. Click OK
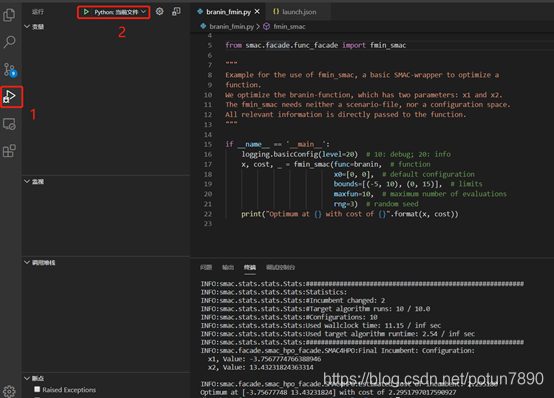
Then open brain.py File, run, reflect need to load launch.json , OK, click run again

You can also run it in the debug window to debug the code
I have been pounding drums for many days according to the following links. If operations above are not clear, please refer to:
1 https://github.com/automl/SMAC3/issues
2 https://github.com/automl/auto-sklearn/issues
3 https://automl.github.io/SMAC3/master/installation.html
4 WSL安装anaconda https://www.jianshu.com/p/ad49c4405fe7
5 raw.githubusercontent https://www.cnblogs.com/jeshy/p/12353188.html


--------代理模式")
")


还没有评论,来说两句吧...