jvm之类加载技术
一:jvm之类加载技术
1、ClassLoader作用
Java程序在运行的时候,JVM通过类加载机制(ClassLoader)把class文件加载到内存中,只有class文件被载入内存,才能被其他class引用,使程序正确运行起来。
二、ClassLoader的分类
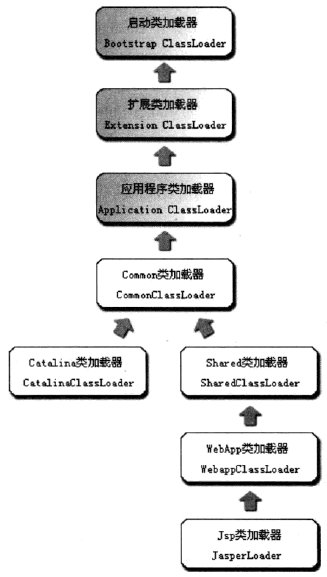
Java中的ClassLoader有三种:Bootstrap ClassLoader 、Extension ClassLoader、App ClassLoader。
1. Bootstrap ClassLoader
由C++写的,由JVM启动.
启动类加载器,负责加载java基础类,对应的文件是%JRE_HOME/lib/ 目录下的rt.jar、resources.jar、charsets.jar和class等
2.Extension ClassLoader
Java类,继承自URLClassLoader 扩展类加载器,
对应的文件是 %JRE_HOME/lib/ext 目录下的jar和class等
3.App ClassLoader
Java类,继承自URLClassLoader 系统类加载器,
对应的文件是应用程序classpath目录下的所有jar和class等
三、ClassLoader的加载机制
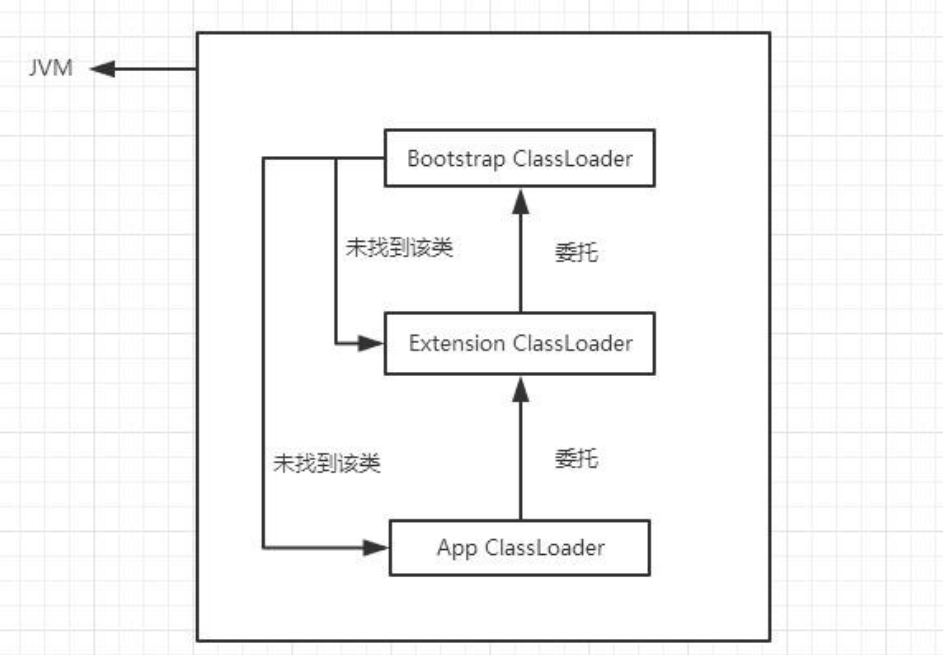
Java的加载机制是双亲委派机制来加载类
为什么要使用这种方式?这个是为了保证 如果加载的类是一个系统类,那么会优先由Bootstrap ClassLoader 、Extension ClassLoader先去加载,而不是使用我们自定义的ClassLoader去加载,保证系统的安全!
这三种类加载器存在父子关系,App ClassLoader的父类加载器是Extension ClassLoader,Extension ClassLoader的父类加载器是Bootstrap ClassLoader,要注意的一点是,这里的父子并不是继承关系.
ClassLoaderParentMain实体类:package com.example.springbootparam.demo;/*** @author lizhangyu* @date 2021/6/19 16:08*/public class ClassLoaderParentMain {public static void main(String[] args) {ClassLoader classLoader = ClassLoaderParentMain.class.getClassLoader();ClassLoader parentClassLoader = classLoader.getParent();ClassLoader pparentClassLoader = parentClassLoader.getParent();System.out.println(classLoader);System.out.println(parentClassLoader);System.out.println(pparentClassLoader);}}
运行结果为:
sun.misc.Launcher$AppClassLoader@18b4aac2sun.misc.Launcher$ExtClassLoader@2a84aee7nullProcess finished with exit code 0
当这三者中的某个ClassLoader要加载一个类时,会先委托它的父类加载器尝试加载,一直往上,如果最顶级的父类加载器没有找到该类,那么委托者则亲自到特定的地方加载
protected Class<?> loadClass(String name, boolean resolve) throws ClassNotFoundException {synchronized (getClassLoadingLock(name)) { // 首先,检测是否已经加载Class<?> c = findLoadedClass(name);if (c == null) {long t0 = System.nanoTime();try {if (parent != null) { //父加载器不为空则调用父加载器的loadClassc = parent.loadClass(name, false);} else { //父加载器为空则调用Bootstrap Classloaderc = findBootstrapClassOrNull(name);}} catch (ClassNotFoundException e) { // ClassNotFoundException thrown if class not found // from the non-null parent class loader}if (c == null) { // If still not found, then invoke findClass in order // to find the class.long t1 = System.nanoTime(); //父加载器没有找到,则调用findclassc = findClass(name); // this is the defining class loader; record the stats sun.misc.PerfCounter.getParentDelegationTime().addTime(t1 - t0); sun.misc.PerfCounter.getFindClassTime().addElapsedTimeFrom(t1); sun.misc.PerfCounter.getFindClasses().increment();}}if (resolve) { //调用resolveClass()resolveClass(c);}return c;}}
先加载Extension ClassLoader ,如果没有加载到,那么使用Bootstrap ClassLoader去加载,如果都没有,那么使用App ClassLoader去加载。如果没找到,那么就抛出异常ClassNotFoundException.
方法原理很简单,一步一步解释一下:
1、第5行,首先查找.class是否被加载过
2、 第6行~第12行,如果.class文件没有被加载过,那么会去找加载器的父加载器。如果父加载器不是null(不是Bootstrap ClassLoader),那么就执行父加载器的loadClass方法,把类加载请求一直向上抛,直到父加载器为null(是Bootstrap ClassLoader)为止
3、第13行~第17行,父加载器开始尝试加载.class文件,加载成功就返回一个java.lang.Class,加载不成功就抛出一个ClassNotFoundException,给子加载器去加载
4、第19行~第21行,如果要解析这个.class文件的话,就解析一下,解析的作用类加载的文章里面也写了,主要就是将符号引用替换为直接引用的过程
我们看一下findClass这个方法:
protected Class<?> findClass(String name) throws ClassNotFoundException {throw new ClassNotFoundException(name);}
是的,没有具体实现,只抛了一个异常,而且是protected的,这充分证明了:这个方法就是给开发者重写用的。
这里画张图来表示下:
只有被同一个类加载器实例加载并且文件名相同的class文件才被认为是同一个class
四、自定义ClassLoader
自定义类加载器
从上面对于java.lang.ClassLoader的loadClass(String name, boolean resolve)方法的解析来看,可以得出以下2个结论:
1、如果不想打破双亲委派模型,那么只需要重写findClass方法即可
2、如果想打破双亲委派模型,那么就重写整个loadClass方法
当然,我们自定义的ClassLoader不想打破双亲委派模型,所以自定义的ClassLoader继承自java.lang.ClassLoader并且只重写findClass方法。
第一步,自定义一个实体类Person.java,我把它编译后的Person.class放在D盘根目录下:
Person实体类:package com.example.springbootparam.demo;/*** @author lizhangyu* @date 2021/6/19 16:56*/public class Person {private String name;public Person() {}public Person(String name) {this.name = name;}public String getName() {return name;}public void setName(String name) {this.name = name;}public String toString() {return "I am a person, my name is " + name;}}
第二步,自定义一个类加载器,里面主要是一些IO和NIO的内容,另外注意一下 defineClass方法可以把二进制流字节组成的文件转换为一个java.lang.Class——只要二进制字节流的内容符合Class文件规 范。我们自定义的MyClassLoader继承自java.lang.ClassLoader,就像上面说的,只实现findClass方法:
MyClassLoader实体类:package com.example.springbootparam.demo;import java.io.ByteArrayOutputStream;import java.io.File;import java.io.FileInputStream;import java.nio.ByteBuffer;import java.nio.channels.Channels;import java.nio.channels.FileChannel;import java.nio.channels.WritableByteChannel;/*** @author lizhangyu* @date 2021/6/19 16:46*/public class MyClassLoader extends ClassLoader {public MyClassLoader() {}public MyClassLoader(ClassLoader parent) {super(parent);}@Overrideprotected Class<?> findClass(String name) throws ClassNotFoundException {File file = getClassFile(name);try {byte[] bytes = getClassBytes(file);Class<?> c = this.defineClass(name, bytes, 0, bytes.length);return c;} catch (Exception e) {e.printStackTrace();}return super.findClass(name);}private File getClassFile(String name) {File file = new File("E:/Person.class");return file;}private byte[] getClassBytes(File file) throws Exception {// 这里要读入.class的字节,因此要使用字节流FileInputStream fis = new FileInputStream(file);FileChannel fc = fis.getChannel();ByteArrayOutputStream baos = new ByteArrayOutputStream();WritableByteChannel wbc = Channels.newChannel(baos);ByteBuffer by = ByteBuffer.allocate(1024);while (true) {int i = fc.read(by);if (i == 0 || i == -1)break;by.flip();wbc.write(by);by.clear();}fis.close();return baos.toByteArray();}}
第三步,Class.forName有一个三个参数的重载方法,可以指定类加载器,平时我们使用的Class.forName(“XX.XX.XXX”)都是使用的系统类加载器Application ClassLoader。写一个测试类:
TestMyClassLoader实体类:package com.example.springbootparam.demo;/*** @author lizhangyu* @date 2021/6/19 17:01*/public class TestMyClassLoader {public static void main(String[] args) throws Exception{MyClassLoader mcl = new MyClassLoader();Class<?> c1 = Class.forName("com.example.springbootparam.demo.Person", true, mcl);Object obj = c1.newInstance();System.out.println(obj);System.out.println(obj.getClass().getClassLoader());}}
运行结果:
I am a person, my name is nullcom.example.springbootparam.demo.MyClassLoader@a09ee92Process finished with exit code 0
最容易出问题的点是第二行的打印出来的是”sun.misc.Launcher$AppClassLoader”。造成这个问题的关键在于idea是自动编译的,Person.java这个类在ctrl+S保存之后或者在Person.java文件不编辑若干秒后,idea会帮我们用户自动编译Person.java,并生成到CLASSPATH也就是bin目录下。在CLASSPATH下有Person.class,那么自然是由Application ClassLoader来加载这个.class文件了。解决这个问题有两个办法:
1、删除CLASSPATH下的Person.class,CLASSPATH下没有Person.class,Application ClassLoader就把这个.class文件交给下一级用户自定义ClassLoader去加载了。
2、TestMyClassLoader类的第5行这么写”MyClassLoader mcl = new MyClassLoader(ClassLoader.getSystemClassLoader().getParent());”, 即把自定义ClassLoader的父加载器设置为Extension ClassLoader,这样父加载器加载不到Person.class,就交由子加载器MyClassLoader来加载了。
ClassLoader.getResourceAsStream(String name)方法作用
ClassLoader中的getResourceAsStream(String name)其实是一个挺常见的方法,所以要写一下。这个方法是用来读入指定的资源的输入流,并将该输入流返回给用户用的,资源可以是图像、声音、.properties文件等,资源名称是以”/“分隔的标识资源名称的路径名称。
不仅ClassLoader中有getResourceAsStream(String name)方法,Class下也有getResourceAsStream(String name)方法,它们两个方法的区别在于:
1、Class的getResourceAsStream(String name)方法,参数不以”/“开头则默认从此类对应的.class文件所在的packge下取资源,以”/“开头则从CLASSPATH下获取
2、ClassLoader的getResourceAsStream(String name)方法,默认就是从CLASSPATH下获取资源,参数不可以以”/“开头
其实,Class的getResourceAsStream(String name)方法,只是将传入的name进行解析一下而已,最终调用的还是ClassLoader的getResourceAsStream(String name),看一下Class的getResourceAsStrea(String name)的源代码:
/*** Returns an input stream for reading the specified resource.** <p> The search order is described in the documentation for {@link* #getResource(String)}. </p>** @param name* The resource name** @return An input stream for reading the resource, or <tt>null</tt>* if the resource could not be found** @since 1.1*/public InputStream getResourceAsStream(String name) {URL url = getResource(name);try {return url != null ? url.openStream() : null;} catch (IOException e) {return null;}}/*** Finds the resource with the given name. A resource is some data* (images, audio, text, etc) that can be accessed by class code in a way* that is independent of the location of the code.** <p> The name of a resource is a '<tt>/</tt>'-separated path name that* identifies the resource.** <p> This method will first search the parent class loader for the* resource; if the parent is <tt>null</tt> the path of the class loader* built-in to the virtual machine is searched. That failing, this method* will invoke {@link #findResource(String)} to find the resource. </p>** @apiNote When overriding this method it is recommended that an* implementation ensures that any delegation is consistent with the {@link* #getResources(java.lang.String) getResources(String)} method.** @param name* The resource name** @return A <tt>URL</tt> object for reading the resource, or* <tt>null</tt> if the resource could not be found or the invoker* doesn't have adequate privileges to get the resource.** @since 1.1*/public URL getResource(String name) {URL url;if (parent != null) {url = parent.getResource(name);} else {url = getBootstrapResource(name);}if (url == null) {url = findResource(name);}return url;}
.class和getClass()的区别
最后讲解一个内容,.class方法和getClass()的区别,这两个比较像,我自己没对这两个东西总结前,也常弄混。它们二者都可以获取一个唯一的java.lang.Class对象,但是区别在于:
1、.class用于类名,getClass()是一个final native的方法,因此用于类实例
2、.class在编译期间就确定了一个类的java.lang.Class对象,但是getClass()方法在运行期间确定一个类实例的java.lang.Class对象。


盒子模型,边框,内外边距,盒子模型布局,ps基本操作,列表样式,圆角边框,盒子阴影")


还没有评论,来说两句吧...