若依集成 WebSocket
若依集成 WebSocket
- 引入依赖
- 创建 WebSocket 配置类,开启 WebSocket 支持
- 添加 WebSocketServer 类,创建 webSocket 端点
- 创建 controller,用于模拟服务端消息发送
- 添加 websocket.html
- 参考链接
由于若依模块划分的很清楚,建议将 WebSocket 配置代码放到 framework 模块中,
将 WebSocket 控制器的代码放到用到的模块中。
引入依赖
在 xxx-framework 下的 pom.xml 中引入 websocket 的依赖:
<!--websocket--><dependency><groupId>org.springframework.boot</groupId><artifactId>spring-boot-starter-websocket</artifactId></dependency>
创建 WebSocket 配置类,开启 WebSocket 支持
在 xxx-framework 下的 com.xxx.framework.config 包下添加该类:
package com.lrjas.framework.config;import org.springframework.context.annotation.Bean;import org.springframework.context.annotation.Configuration;import org.springframework.web.socket.server.standard.ServerEndpointExporter;/** * 开启WebSocket支持 */@Configurationpublic class WebSocketConfig {@Beanpublic ServerEndpointExporter serverEndpointExporter() {return new ServerEndpointExporter();}}
添加 WebSocketServer 类,创建 webSocket 端点
package com.lrjas.framework.ws;import org.slf4j.Logger;import org.slf4j.LoggerFactory;import org.springframework.stereotype.Component;import javax.websocket.*;import javax.websocket.server.PathParam;import javax.websocket.server.ServerEndpoint;import java.io.IOException;import java.util.concurrent.CopyOnWriteArraySet;// @ServerEndpoint 声明并创建了webSocket端点, 并且指明了请求路径// id 为客户端请求时携带的参数, 用于服务端区分客户端使用@ServerEndpoint("/WebSocketServer/{sid}")@Componentpublic class WebSocketServer {// 日志对象private static final Logger log = LoggerFactory.getLogger(WebSocketServer.class);// 静态变量,用来记录当前在线连接数。应该把它设计成线程安全的。private static int onlineCount = 0;// concurrent包的线程安全Set,用来存放每个客户端对应的MyWebSocket对象。private static CopyOnWriteArraySet<WebSocketServer> webSocketSet = new CopyOnWriteArraySet<>();// private static ConcurrentHashMap<String,WebSocketServer> websocketList = new ConcurrentHashMap<>();// 与某个客户端的连接会话,需要通过它来给客户端发送数据private Session session;// 接收sidprivate String sid = "";/* * 客户端创建连接时触发 * */@OnOpenpublic void onOpen(Session session, @PathParam("sid") String sid) {this.session = session;webSocketSet.add(this); // 加入set中addOnlineCount(); // 在线数加1log.info("有新窗口开始监听:" + sid + ", 当前在线人数为" + getOnlineCount());this.sid = sid;try {sendMessage("连接成功");} catch (IOException e) {log.error("websocket IO异常");}}/** * 客户端连接关闭时触发 **/@OnClosepublic void onClose() {webSocketSet.remove(this); // 从set中删除subOnlineCount(); // 在线数减1log.info("有一连接关闭!当前在线人数为" + getOnlineCount());}/** * 接收到客户端消息时触发 */@OnMessagepublic void onMessage(String message, Session session) {log.info("收到来自窗口" + sid + "的信息:" + message);// 群发消息for (WebSocketServer item : webSocketSet) {try {item.sendMessage(message);} catch (IOException e) {e.printStackTrace();}}}/** * 连接发生异常时候触发 */@OnErrorpublic void onError(Session session, Throwable error) {log.error("发生错误");error.printStackTrace();}/** * 实现服务器主动推送(向浏览器发消息) */public void sendMessage(String message) throws IOException {log.info("服务器消息推送:"+message);this.session.getBasicRemote().sendText(message);}/** * 发送消息到所有客户端 * 指定sid则向指定客户端发消息 * 不指定sid则向所有客户端发送消息 * */public static void sendInfo(String message, @PathParam("sid") String sid) throws IOException {log.info("推送消息到窗口" + sid + ",推送内容:" + message);for (WebSocketServer item : webSocketSet) {try {// 这里可以设定只推送给这个sid的,为null则全部推送if (sid == null) {item.sendMessage(message);} else if (item.sid.equals(sid)) {item.sendMessage(message);}} catch (IOException e) {continue;}}}public static synchronized int getOnlineCount() {return onlineCount;}public static synchronized void addOnlineCount() {WebSocketServer.onlineCount++;}public static synchronized void subOnlineCount() {WebSocketServer.onlineCount--;}public static CopyOnWriteArraySet<WebSocketServer> getWebSocketSet() {return webSocketSet;}}
创建 controller,用于模拟服务端消息发送
package com.lrjas.web.wms.controller;import com.lrjas.common.core.controller.BaseController;import com.lrjas.framework.ws.WebSocketServer;import org.apache.shiro.authz.annotation.RequiresPermissions;import org.springframework.stereotype.Controller;import org.springframework.web.bind.annotation.GetMapping;import org.springframework.web.bind.annotation.PathVariable;import org.springframework.web.bind.annotation.RequestMapping;import org.springframework.web.bind.annotation.ResponseBody;import java.io.IOException;import java.util.HashMap;import java.util.Map;@Controller@RequestMapping("/wms/websocket")public class WebSocketController extends BaseController{private String prefix = "wms/websocket";@RequiresPermissions("wms:websocket:view")@GetMapping()public String socket() {return prefix + "/websocket"; // 页面的访问路径}@RequiresPermissions("wms:websocket:edit")//推送数据接口@ResponseBody@RequestMapping("/push/{cid}")public Map<String, Object> pushToWeb(@PathVariable String cid, String message) {if (message == null) {message = "我是消息!!!";}Map<String, Object> result = new HashMap<>();try {WebSocketServer.sendInfo(message, cid);result.put("code", 200);result.put("msg", "success");} catch (IOException e) {e.printStackTrace();}return result;}}
添加 websocket.html
HTML5 提供了对 websocket 的支持,并且提供了相关 api, 可以直接使用:
1.WebSocket 创建
// url就是服务端的websocket端点路径, protocol 是可选的,指定了可接受的子协议var Socket = new WebSocket(url, [protocol] );
2.WebSocket 事件
| 事件 | 事件处理程序 | 描述 |
|---|---|---|
| open | Socket.onopen | 连接建立时触发 |
| message | Socket.onmessage | 客户端接收服务端数据时触发 |
| error | Socket.onerror | 通信发生错误时触发 |
| close | Socket.onclose | 连接关闭时触发 |
3.WebSocket 方法
| 方法 | 描述 |
|---|---|
| Socket.send() | 使用连接发送数据 |
| Socket.close() | 关闭连接 |
路径由控制器中代码决定:resources/templates/wms/websocket/websocket.html
<!DOCTYPE html><html lang="en"><head><meta charset="UTF-8"><title>websocket测试</title><script src="http://code.jquery.com/jquery-2.1.1.min.js"></script></head><body><button onclick="onSendButtonClick()">发送</button><button onclick="onJhButtonClick()">交互</button><div id="content"></div></body><script type="text/javascript"> var ws; // 检测浏览器是否支持webSocket if (typeof(WebSocket) == "undefined") { $("#content").html("您的浏览器不支持webSocket!"); console.log("您的浏览器不支持WebSocket!"); } else { $("#content").html("您的浏览器支持webSocket!"); console.log("您的浏览器支持WebSocket!"); //模拟产生clientID let clientID = Math.ceil(Math.random()*100); // 创建 WebSocket 对象, 注意请求路径!!!! ws = new WebSocket("ws://localhost:6300/WebSocketServer/1"); // 与服务端建立连接时触发 ws.onopen = function() { $("#content").append("<p>与服务端建立连接建立成功!您的客户端ID=" + clientID + "</p>"); console.log("Socket 已打开"); //模拟发送数据到服务器 ws.send("你好服务端!我是客户端 "+clientID); }; // 接收到服务端消息时触发 ws.onmessage = function(msg) { $("#content").append("<p>接收到服务端消息:" + msg.data + "</p>"); console.log("获得消息:" + msg.data); // 发现消息进入, 开始处理前端触发逻辑 }; // 关闭事件 ws.onclose = function() { console.log("Socket已关闭"); }; // 发生了错误事件 ws.onerror = function() { alert("Socket发生了错误"); // 此时可以尝试刷新页面 } } function onSendButtonClick(){ console.log("开始发送"); ws.send("这是来自客户端的消息" + location.href + " " + new Date()); } function onJhButtonClick(){ $.ajax({ url: "/wms/websocket/push/2", data: { "message" : "我是消息" }, type: "post", processData: false, contentType: false, success: function(result) { console.log(result); alert(result.msg); } }) } </script></html>
运行测试: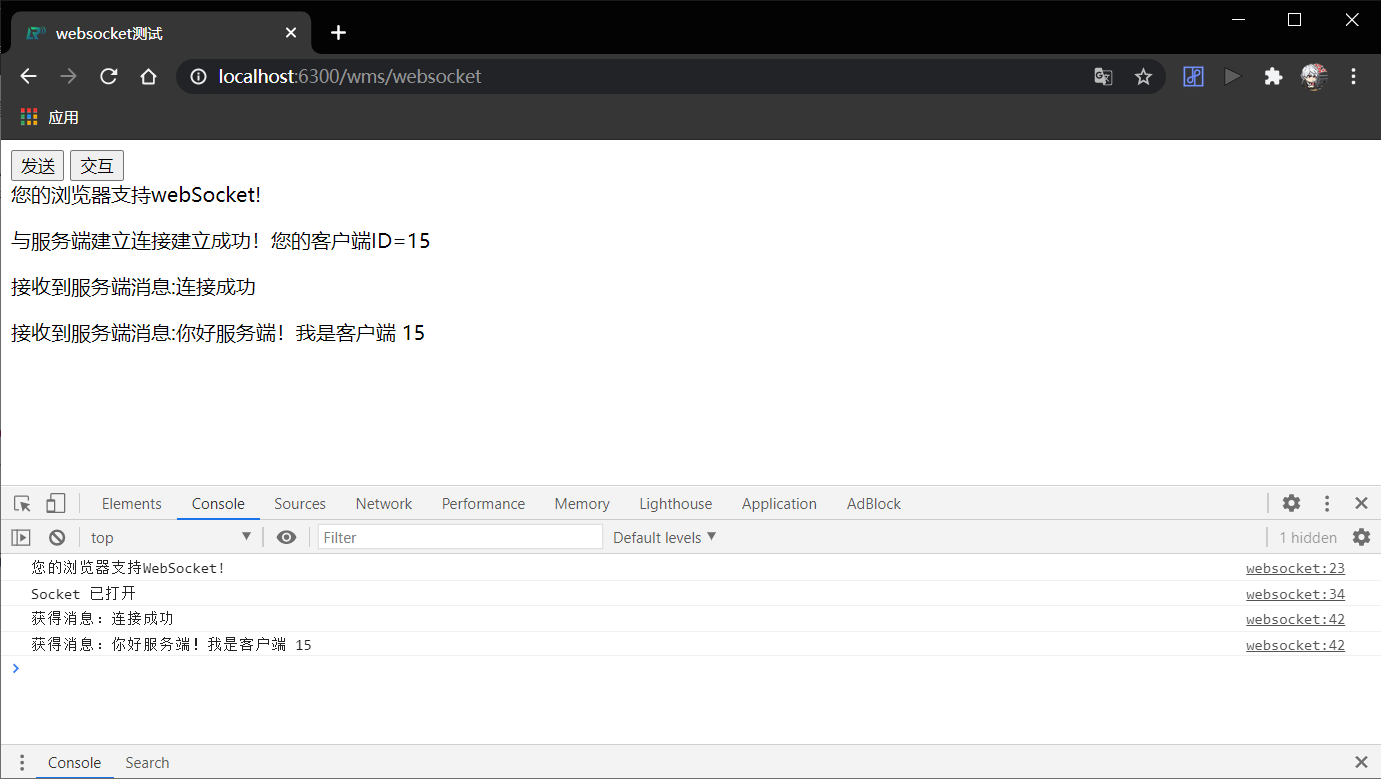
点击【发送】按钮: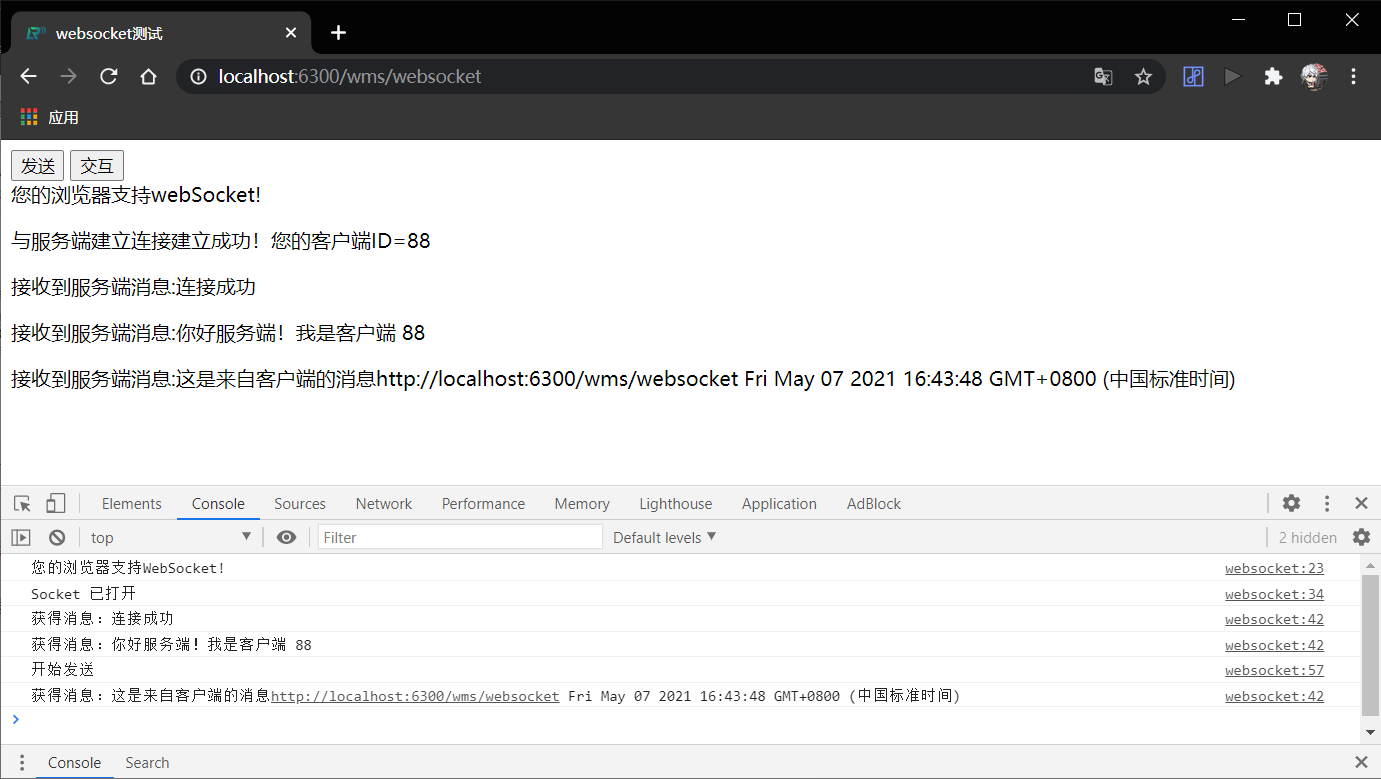
参考链接
- springboot2 集成 websocket,实现服务端推送消息到客户端
- 若依 springboot 集成 websocket


还没有评论,来说两句吧...