Springboot整合RestTemplate、java调用http请求方式、
目录
概述
方式一:使用JDK原生提供的net
1、HttpURLConnection类实现
2、URLConnection类实现
3、Socket类实现
方式二:apache的HttpClient开发
1、直接使用apache的HttpClient开发
2、通过Apache封装好的CloseableHttpClient
方式三:RestTemplate
1、简述RestTemplate
2.配置
3、使用
GET 请求
POST 请求
PUT 请求
DELETE 请求
通用方法 exchange
4、自定义设置
手动指定转换器(HttpMessageConverter)
设置底层连接方式
设置拦截器(ClientHttpRequestInterceptor)
设置请求头
概述
通过向指定的第三方地址发送对应格式的数据以便换取所需数据这一需求是平时开发经常碰到的需求。几种常见的方式如下
方式一:使用JDK原生提供的net
包下的HttpURLConnection、URLConnection、Socket三个类都可实现,无需其他jar包;
1、HttpURLConnection类实现
HttpURLConnection是URLConnection的子类,提供更多的方法,使用更方便。
比较原始的一种调用做法,这里把get请求和post请求都统一放在一个方法里面。
过程
GET:1、创建远程连接2、设置连接方式(get、post、put。。。)3、设置连接超时时间4、设置响应读取时间5、发起请求6、获取请求数据7、关闭连接POST:1、创建远程连接2、设置连接方式(get、post、put。。。)3、设置连接超时时间4、设置响应读取时间5、当向远程服务器传送数据/写数据时,需要设置为true(setDoOutput)6、当前向远程服务读取数据时,设置为true,该参数可有可无(setDoInput)7、设置传入参数的格式:(setRequestProperty)8、设置鉴权信息:Authorization:(setRequestProperty)9、设置参数10、发起请求11、获取请求数据12、关闭连接package com.riemann.springbootdemo.util.common.httpConnectionUtil;import org.springframework.lang.Nullable;import java.io.*;import java.net.HttpURLConnection;import java.net.MalformedURLException;import java.net.URL;import java.net.URLConnection;public class HttpURLConnectionUtil {/*** Http get请求* @param httpUrl 连接* @return 响应数据*/public static String doGet(String httpUrl){//链接HttpURLConnection connection = null;InputStream is = null;BufferedReader br = null;StringBuffer result = new StringBuffer();try {//创建连接URL url = new URL(httpUrl);connection = (HttpURLConnection) url.openConnection();//设置请求方式connection.setRequestMethod("GET");//设置连接超时时间connection.setReadTimeout(15000);//开始连接connection.connect();//获取响应数据if (connection.getResponseCode() == 200) {//获取返回的数据is = connection.getInputStream();if (null != is) {br = new BufferedReader(new InputStreamReader(is, "UTF-8"));String temp = null;while (null != (temp = br.readLine())) {result.append(temp);}}}} catch (IOException e) {e.printStackTrace();} finally {if (null != br) {try {br.close();} catch (IOException e) {e.printStackTrace();}}if (null != is) {try {is.close();} catch (IOException e) {e.printStackTrace();}}//关闭远程连接connection.disconnect();}return result.toString();}/*** Http post请求* @param httpUrl 连接* @param param 参数* @return*/public static String doPost(String httpUrl, @Nullable String param) {StringBuffer result = new StringBuffer();//连接HttpURLConnection connection = null;OutputStream os = null;InputStream is = null;BufferedReader br = null;try {//创建连接对象URL url = new URL(httpUrl);//创建连接connection = (HttpURLConnection) url.openConnection();//设置请求方法connection.setRequestMethod("POST");//设置连接超时时间connection.setConnectTimeout(15000);//设置读取超时时间connection.setReadTimeout(15000);//DoOutput设置是否向httpUrlConnection输出,DoInput设置是否从httpUrlConnection读入,此外发送post请求必须设置这两个//设置是否可读取connection.setDoOutput(true);connection.setDoInput(true);//设置通用的请求属性connection.setRequestProperty("accept", "*/*");connection.setRequestProperty("connection", "Keep-Alive");connection.setRequestProperty("user-agent", "Mozilla/4.0 (compatible; MSIE 6.0; Windows NT 5.1; SV1)");connection.setRequestProperty("Content-Type", "application/json;charset=utf-8");//拼装参数if (null != param && param.equals("")) {//设置参数os = connection.getOutputStream();//拼装参数os.write(param.getBytes("UTF-8"));}//设置权限//设置请求头等//开启连接//connection.connect();//读取响应if (connection.getResponseCode() == 200) {is = connection.getInputStream();if (null != is) {br = new BufferedReader(new InputStreamReader(is, "GBK"));String temp = null;while (null != (temp = br.readLine())) {result.append(temp);result.append("\r\n");}}}} catch (MalformedURLException e) {e.printStackTrace();} catch (IOException e) {e.printStackTrace();} finally {//关闭连接if(br!=null){try {br.close();} catch (IOException e) {e.printStackTrace();}}if(os!=null){try {os.close();} catch (IOException e) {e.printStackTrace();}}if(is!=null){try {is.close();} catch (IOException e) {e.printStackTrace();}}//关闭连接connection.disconnect();}return result.toString();}public static void main(String[] args) {String message = doPost("https://tcc.taobao.com/cc/json/mobile_tel_segment.htm?tel=13026194071", "");System.out.println(message);}}
2、URLConnection类实现
package uRLConnection;import java.io.BufferedReader;import java.io.InputStream;import java.io.InputStreamReader;import java.net.HttpURLConnection;import java.net.URL;import java.net.URLConnection;public class URLConnectionHelper {public static String sendRequest(String urlParam) {URLConnection con = null;BufferedReader buffer = null;StringBuffer resultBuffer = null;try {URL url = new URL(urlParam);con = url.openConnection();//设置请求需要返回的数据类型和字符集类型con.setRequestProperty("Content-Type", "application/json;charset=GBK");//允许写出con.setDoOutput(true);//允许读入con.setDoInput(true);//不使用缓存con.setUseCaches(false);//得到响应流InputStream inputStream = con.getInputStream();//将响应流转换成字符串resultBuffer = new StringBuffer();String line;buffer = new BufferedReader(new InputStreamReader(inputStream, "GBK"));while ((line = buffer.readLine()) != null) {resultBuffer.append(line);}return resultBuffer.toString();}catch(Exception e) {e.printStackTrace();}return "";}public static void main(String[] args) {String url ="http://int.dpool.sina.com.cn/iplookup/iplookup.php?ip=120.79.75.96";System.out.println(sendRequest(url));}}
3、Socket类实现
package socket;import java.io.BufferedInputStream;import java.io.BufferedReader;import java.io.BufferedWriter;import java.io.IOException;import java.io.InputStreamReader;import java.io.OutputStreamWriter;import java.net.Socket;import java.net.URLEncoder;import javax.net.ssl.SSLSocket;import javax.net.ssl.SSLSocketFactory;public class SocketForHttpTest {private int port;private String host;private Socket socket;private BufferedReader bufferedReader;private BufferedWriter bufferedWriter;public SocketForHttpTest(String host,int port) throws Exception{this.host = host;this.port = port;/*** http协议*/// socket = new Socket(this.host, this.port);/*** https协议*/socket = (SSLSocket)((SSLSocketFactory)SSLSocketFactory.getDefault()).createSocket(this.host, this.port);}public void sendGet() throws IOException{//String requestUrlPath = "/z69183787/article/details/17580325";String requestUrlPath = "/";OutputStreamWriter streamWriter = new OutputStreamWriter(socket.getOutputStream());bufferedWriter = new BufferedWriter(streamWriter);bufferedWriter.write("GET " + requestUrlPath + " HTTP/1.1\r\n");bufferedWriter.write("Host: " + this.host + "\r\n");bufferedWriter.write("\r\n");bufferedWriter.flush();BufferedInputStream streamReader = new BufferedInputStream(socket.getInputStream());bufferedReader = new BufferedReader(new InputStreamReader(streamReader, "utf-8"));String line = null;while((line = bufferedReader.readLine())!= null){System.out.println(line);}bufferedReader.close();bufferedWriter.close();socket.close();}public void sendPost() throws IOException{String path = "/";String data = URLEncoder.encode("name", "utf-8") + "=" + URLEncoder.encode("张三", "utf-8") + "&" +URLEncoder.encode("age", "utf-8") + "=" + URLEncoder.encode("32", "utf-8");// String data = "name=zhigang_jia";System.out.println(">>>>>>>>>>>>>>>>>>>>>"+data);OutputStreamWriter streamWriter = new OutputStreamWriter(socket.getOutputStream(), "utf-8");bufferedWriter = new BufferedWriter(streamWriter);bufferedWriter.write("POST " + path + " HTTP/1.1\r\n");bufferedWriter.write("Host: " + this.host + "\r\n");bufferedWriter.write("Content-Length: " + data.length() + "\r\n");bufferedWriter.write("Content-Type: application/x-www-form-urlencoded\r\n");bufferedWriter.write("\r\n");bufferedWriter.write(data);bufferedWriter.write("\r\n");bufferedWriter.flush();BufferedInputStream streamReader = new BufferedInputStream(socket.getInputStream());bufferedReader = new BufferedReader(new InputStreamReader(streamReader, "utf-8"));String line = null;while((line = bufferedReader.readLine())!= null){System.out.println(line);}bufferedReader.close();bufferedWriter.close();socket.close();}public static void main(String[] args) throws Exception {/*** http协议测试*///SocketForHttpTest forHttpTest = new SocketForHttpTest("www.baidu.com", 80);/*** https协议测试*/SocketForHttpTest forHttpTest = new SocketForHttpTest("www.baidu.com", 443);try {forHttpTest.sendGet();// forHttpTest.sendPost();} catch (IOException e) {e.printStackTrace();}}}
方式二:apache的HttpClient开发
1、直接使用apache的HttpClient开发
使用方便,但依赖于第三方jar包,相关maven依赖如下:
<!-- https://mvnrepository.com/artifact/commons-httpclient/commons-httpclient --><dependency><groupId>commons-httpclient</groupId><artifactId>commons-httpclient</artifactId><version>3.1</version></dependency
简单测试
package httpClient;import java.io.IOException;import org.apache.commons.httpclient.HttpClient;import org.apache.commons.httpclient.HttpException;import org.apache.commons.httpclient.methods.GetMethod;import org.apache.commons.httpclient.methods.PostMethod;import org.apache.commons.httpclient.params.HttpMethodParams;public class HttpClientHelper {public static String sendPost(String urlParam) throws HttpException, IOException {// 创建httpClient实例对象HttpClient httpClient = new HttpClient();// 设置httpClient连接主机服务器超时时间:15000毫秒httpClient.getHttpConnectionManager().getParams().setConnectionTimeout(15000);// 创建post请求方法实例对象PostMethod postMethod = new PostMethod(urlParam);// 设置post请求超时时间postMethod.getParams().setParameter(HttpMethodParams.SO_TIMEOUT, 60000);postMethod.addRequestHeader("Content-Type", "application/json");httpClient.executeMethod(postMethod);String result = postMethod.getResponseBodyAsString();postMethod.releaseConnection();return result;}public static String sendGet(String urlParam) throws HttpException, IOException {// 创建httpClient实例对象HttpClient httpClient = new HttpClient();// 设置httpClient连接主机服务器超时时间:15000毫秒httpClient.getHttpConnectionManager().getParams().setConnectionTimeout(15000);// 创建GET请求方法实例对象GetMethod getMethod = new GetMethod(urlParam);// 设置post请求超时时间getMethod.getParams().setParameter(HttpMethodParams.SO_TIMEOUT, 60000);getMethod.addRequestHeader("Content-Type", "application/json");httpClient.executeMethod(getMethod);String result = getMethod.getResponseBodyAsString();getMethod.releaseConnection();return result;}public static void main(String[] args) throws HttpException, IOException {String url ="http://int.dpool.sina.com.cn/iplookup/iplookup.php?ip=120.79.75.96";System.out.println(sendPost(url));System.out.println(sendGet(url));}}
比较全的工具类
导入jar
<dependency><groupId>com.alibaba</groupId><artifactId>fastjson</artifactId><version>1.2.32</version></dependency>import com.alibaba.fastjson.JSONObject;import org.apache.commons.httpclient.*;import org.apache.commons.httpclient.methods.GetMethod;import org.apache.commons.httpclient.methods.PostMethod;import org.apache.commons.httpclient.params.HttpMethodParams;import java.io.IOException;public class HttpClientUtil {/*** httpClient的get请求方式* 使用GetMethod来访问一个URL对应的网页实现步骤:* 1.生成一个HttpClient对象并设置相应的参数;* 2.生成一个GetMethod对象并设置响应的参数;* 3.用HttpClient生成的对象来执行GetMethod生成的Get方法;* 4.处理响应状态码;* 5.若响应正常,处理HTTP响应内容;* 6.释放连接。* @param url* @param charset* @return*/public static String doGet(String url, String charset) {//1.生成HttpClient对象并设置参数HttpClient httpClient = new HttpClient();//设置Http连接超时为5秒httpClient.getHttpConnectionManager().getParams().setConnectionTimeout(5000);//2.生成GetMethod对象并设置参数GetMethod getMethod = new GetMethod(url);//设置get请求超时为5秒getMethod.getParams().setParameter(HttpMethodParams.SO_TIMEOUT, 5000);//设置请求重试处理,用的是默认的重试处理:请求三次getMethod.getParams().setParameter(HttpMethodParams.RETRY_HANDLER, new DefaultHttpMethodRetryHandler());String response = "";//3.执行HTTP GET 请求try {int statusCode = httpClient.executeMethod(getMethod);//4.判断访问的状态码if (statusCode != HttpStatus.SC_OK) {System.err.println("请求出错:" + getMethod.getStatusLine());}//5.处理HTTP响应内容//HTTP响应头部信息,这里简单打印Header[] headers = getMethod.getResponseHeaders();for(Header h : headers) {System.out.println(h.getName() + "---------------" + h.getValue());}//读取HTTP响应内容,这里简单打印网页内容//读取为字节数组byte[] responseBody = getMethod.getResponseBody();response = new String(responseBody, charset);System.out.println("-----------response:" + response);//读取为InputStream,在网页内容数据量大时候推荐使用//InputStream response = getMethod.getResponseBodyAsStream();} catch (HttpException e) {//发生致命的异常,可能是协议不对或者返回的内容有问题System.out.println("请检查输入的URL!");e.printStackTrace();} catch (IOException e) {//发生网络异常System.out.println("发生网络异常!");} finally {//6.释放连接getMethod.releaseConnection();}return response;}/*** post请求* @param url* @param json* @return*/public static String doPost(String url, JSONObject json){HttpClient httpClient = new HttpClient();PostMethod postMethod = new PostMethod(url);postMethod.addRequestHeader("accept", "*/*");postMethod.addRequestHeader("connection", "Keep-Alive");//设置json格式传送postMethod.addRequestHeader("Content-Type", "application/json;charset=GBK");//必须设置下面这个HeaderpostMethod.addRequestHeader("User-Agent", "Mozilla/5.0 (Windows NT 10.0; Win64; x64) AppleWebKit/537.36 (KHTML, like Gecko) Chrome/58.0.3029.81 Safari/537.36");//添加请求参数postMethod.addParameter("commentId", json.getString("commentId"));String res = "";try {int code = httpClient.executeMethod(postMethod);if (code == 200){res = postMethod.getResponseBodyAsString();System.out.println(res);}} catch (IOException e) {e.printStackTrace();}return res;}public static void main(String[] args) {System.out.println(doGet("http://tcc.taobao.com/cc/json/mobile_tel_segment.htm?tel=13026194071", "GBK"));System.out.println("-----------分割线------------");System.out.println("-----------分割线------------");System.out.println("-----------分割线------------");JSONObject jsonObject = new JSONObject();jsonObject.put("commentId", "13026194071");System.out.println(doPost("http://tcc.taobao.com/cc/json/mobile_tel_segment.htm?tel=13026194071", jsonObject));}}
2、通过Apache封装好的CloseableHttpClient
CloseableHttpClient是在HttpClient的基础上修改更新而来的,这里还涉及到请求头token的设置(请求验证),利用fastjson转换请求或返回结果字符串为json格式,当然上面两种方式也是可以设置请求头token、json的,这里只在下面说明。
<!--CloseableHttpClient--><dependency><groupId>org.apache.httpcomponents</groupId><artifactId>httpclient</artifactId><version>4.5.2</version></dependency><!--fastjson--><dependency><groupId>com.alibaba</groupId><artifactId>fastjson</artifactId><version>1.2.32</version></dependency>import com.alibaba.fastjson.JSONObject;import org.apache.http.HttpResponse;import org.apache.http.HttpStatus;import org.apache.http.client.methods.CloseableHttpResponse;import org.apache.http.client.methods.HttpGet;import org.apache.http.client.methods.HttpPost;import org.apache.http.entity.StringEntity;import org.apache.http.impl.client.CloseableHttpClient;import org.apache.http.impl.client.HttpClientBuilder;import org.apache.http.util.EntityUtils;import java.io.IOException;import java.io.UnsupportedEncodingException;public class CloseableHttpClientUtil {private static String tokenString = "";private static String AUTH_TOKEN_EXPIRED = "AUTH_TOKEN_EXPIRED";private static CloseableHttpClient httpClient = null;/*** 以get方式调用第三方接口* @param url* @param token* @return*/public static String doGet(String url, String token) {//创建HttpClient对象CloseableHttpClient httpClient = HttpClientBuilder.create().build();HttpGet httpGet = new HttpGet(url);if (null != tokenString && !tokenString.equals("")) {tokenString = getToken();}//api_gateway_auth_token自定义header头,用于token验证使用httpGet.addHeader("api_gateway_auth_token",tokenString);httpGet.addHeader("User-Agent", "Mozilla/5.0 (Windows NT 10.0; Win64; x64) AppleWebKit/537.36 (KHTML, like Gecko) Chrome/58.0.3029.81 Safari/537.36");try {HttpResponse response = httpClient.execute(httpGet);if (response.getStatusLine().getStatusCode() == HttpStatus.SC_OK) {//返回json格式String res = EntityUtils.toString(response.getEntity());return res;}} catch (IOException e) {e.printStackTrace();}return null;}/*** 以post方式调用第三方接口* @param url* @param json* @return*/public static String doPost(String url, JSONObject json) {if (null == httpClient) {httpClient = HttpClientBuilder.create().build();}HttpPost httpPost = new HttpPost(url);if (null != tokenString && tokenString.equals("")) {tokenString = getToken();}//api_gateway_auth_token自定义header头,用于token验证使用httpPost.addHeader("api_gateway_auth_token", tokenString);httpPost.addHeader("User-Agent", "Mozilla/5.0 (Windows NT 10.0; Win64; x64) AppleWebKit/537.36 (KHTML, like Gecko) Chrome/58.0.3029.81 Safari/537.36");try {StringEntity se = new StringEntity(json.toString());se.setContentEncoding("UTF-8");//发送json数据需要设置contentTypese.setContentType("application/x-www-form-urlencoded");//设置请求参数httpPost.setEntity(se);HttpResponse response = httpClient.execute(httpPost);if (response.getStatusLine().getStatusCode() == HttpStatus.SC_OK) {//返回json格式String res = EntityUtils.toString(response.getEntity());return res;}} catch (IOException e) {e.printStackTrace();} finally {if (httpClient != null){try {httpClient.close();} catch (IOException e) {e.printStackTrace();}}}return null;}/*** 获取第三方接口的token*/public static String getToken() {String token = "";JSONObject object = new JSONObject();object.put("appid", "appid");object.put("secretkey", "secretkey");if (null == httpClient) {httpClient = HttpClientBuilder.create().build();}HttpPost httpPost = new HttpPost("http://localhost/login");httpPost.addHeader("User-Agent", "Mozilla/5.0 (Windows NT 10.0; Win64; x64) AppleWebKit/537.36 (KHTML, like Gecko) Chrome/58.0.3029.81 Safari/537.36");try {StringEntity se = new StringEntity(object.toString());se.setContentEncoding("UTF-8");//发送json数据需要设置contentTypese.setContentType("application/x-www-form-urlencoded");//设置请求参数httpPost.setEntity(se);HttpResponse response = httpClient.execute(httpPost);//这里可以把返回的结果按照自定义的返回数据结果,把string转换成自定义类//ResultTokenBO result = JSONObject.parseObject(response, ResultTokenBO.class);//把response转为jsonObjectJSONObject result = (JSONObject) JSONObject.parseObject(String.valueOf(response));if (result.containsKey("token")) {token = result.getString("token");}} catch (IOException e) {e.printStackTrace();}return token;}/*** 测试*/public static void test(String telephone) {JSONObject object = new JSONObject();object.put("telephone", telephone);//首先获取tokentokenString = getToken();String response = doPost("http://localhost/searchUrl", object);//如果返回的结果是list形式的,需要使用JSONObject.parseArray转换//List<Result> list = JSONObject.parseArray(response, Result.class);System.out.println(response);}public static void main(String[] args) {test("12345678910");}}
方式三:RestTemplate
1、简述RestTemplate
spring框架提供的RestTemplate类可用于在应用中调用rest服务,它简化了与http服务的通信方式,统一了RESTful的标准,封装了http链接,我们只需要传入url及返回值类型即可。相较于之前常用的HttpClient,RestTemplate是一种更优雅的调用RESTful服务的方式。RestTemplate默认依赖JDK提供http连接的能力(HttpURLConnection),如果有需要的话也可以通过setRequestFactory方法替换为例如Apache HttpComponents、Netty或OkHttp等其它HTTP library。其实spring并没有真正的去实现底层的http请求(3次握手),而是集成了别的http请求,spring只是在原有的各种http请求进行了规范标准,让开发者更加简单易用,底层默认用的是jdk的http请求。
2.配置
只需有以下jar就可使用
<dependency><groupId>org.springframework.boot</groupId><artifactId>spring-boot-starter-web</artifactId></dependency>
把 RestTemplate交给spring管理
package com.rails.travel.conf;import org.springframework.context.annotation.Bean;import org.springframework.context.annotation.Configuration;import org.springframework.http.client.ClientHttpRequestFactory;import org.springframework.http.client.SimpleClientHttpRequestFactory;import org.springframework.web.client.RestTemplate;/*** RestTemplate配置类*/@Configurationpublic class RestTemplateConfig {//2.0后使用下面没有注释的方式 在注入的同时设置连接时间,这种注释的也可以,但是没有设置超时时间/*@Beanpublic RestTemplate restTemplate(RestTemplateBuilder builder){return builder.build();}*/@Beanpublic RestTemplate restTemplate(ClientHttpRequestFactory factory){return new RestTemplate(factory);}@Beanpublic ClientHttpRequestFactory simpleClientHttpRequestFactory(){SimpleClientHttpRequestFactory factory = new SimpleClientHttpRequestFactory();factory.setReadTimeout(5000);//单位为msfactory.setConnectTimeout(5000);//单位为msreturn factory;}}
3、使用
GET 请求
在 RestTemplate 中,和 GET 请求相关的方法有如下几个:
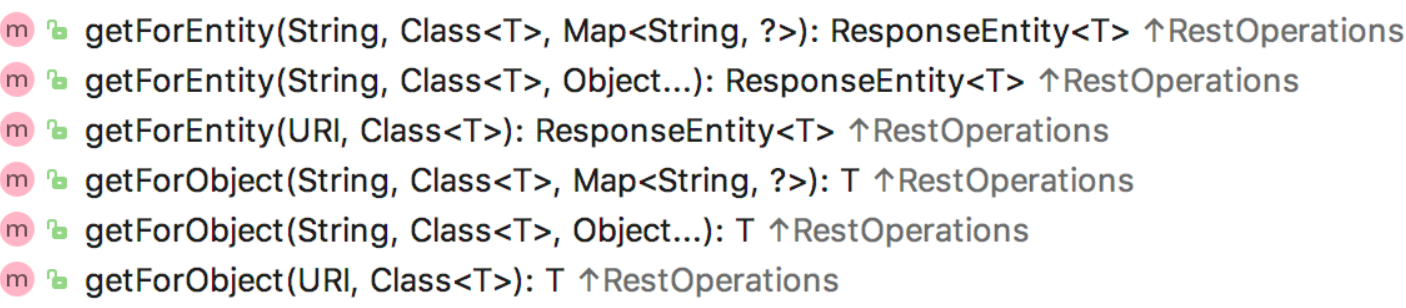
这里的方法一共有两类,getForEntity 和 getForObject,每一类有三个重载方法
getForEntity
既然 RestTemplate 发送的是 HTTP 请求,那么在响应的数据中必然也有响应头,如果开发者需要获取响应头的话,那么就需要使用 getForEntity 来发送 HTTP 请求,此时返回的对象是一个 ResponseEntity 的实例。这个实例中包含了响应数据以及响应头
第一个参数是 url ,url 中有一个占位符 {1} ,如果有多个占位符分别用 {2} 、 {3} … 去表示,第二个参数是接口返回的数据类型,最后是一个可变长度的参数,用来给占位符填值。在返回的 ResponseEntity 中,可以获取响应头中的信息,其中 getStatusCode 方法用来获取响应状态码, getBody 方法用来获取响应数据, getHeaders 方法用来获取响应头
String url = "http://localhost/hello?name={1}";ResponseEntity<String> responseEntity = restTemplate.getForEntity(url, String.class, "张三");StringBuffer sb = new StringBuffer();HttpStatus statusCode = responseEntity.getStatusCode();String body = responseEntity.getBody();
当然,这里参数的传递除了这一种方式之外,还有另外两种方式,也就是 getForEntity 方法的另外两个重载方法。
第一个是占位符不使用数字,而是使用参数的 key,同时将参数放入到一个 map 中。map 中的 key 和占位符的 key 相对应,map 中的 value 就是参数的具体值,例如还是上面的请求,利用 map 来传递参数,请求方式如下:
Map<String, Object> map = new HashMap<>();String url = "http://" + host + ":" + port + "/hello?name={name}";map.put("name", name);ResponseEntity<String> responseEntity = restTemplate.getForEntity(url, String.class, map);
这种方式传参可能看起来更直观一些。
第二个是使用 Uri 对象,使用 Uri 对象时,参数可以直接拼接在地址中,例如下面这样:
String url = "http://" + host + ":" + port + "/hello?name="+ URLEncoder.encode(name,"UTF-8");URI uri = URI.create(url);ResponseEntity<String> responseEntity = restTemplate.getForEntity(uri, String.class);
需要注意的是,这种传参方式,参数如果是中文的话,需要对参数进行编码,使用 URLEncoder.encode 方法来实现。
getForObject
getForObject 方法和 getForEntity 方法类似,getForObject 方法也有三个重载的方法,参数和 getForEntity 一样;主要说下 getForObject 和 getForEntity 的差异,这两个的差异主要体现在返回值的差异上, getForObject 的返回值就是服务提供者返回的数据,使用 getForObject 无法获取到响应头。例如,还是上面的请求,利用 getForObject 来发送 HTTP 请求,结果如下:
String url = "http://" + host + ":" + port + "/hello?name=" + URLEncoder.encode(name, "UTF-8");URI uri = URI.create(url);String s = restTemplate.getForObject(uri, String.class);
注意,这里返回的 s 就是 provider 的返回值,如果开发者只关心 provider 的返回值,并不关系 HTTP 请求的响应头,那么可以使用该方法。
POST 请求
和 GET 请求相比,RestTemplate 中的 POST 请求多了一个类型的方法,如下:

可以看到,post 请求的方法类型除了 postForEntity 和 postForObject 之外,还有一个 postForLocation。这里的方法类型虽然有三种,但是这三种方法重载的参数基本是一样的,因此这里我还是以 postForEntity 方法为例,来剖析三个重载方法的用法,最后再重点说下 postForLocation 方法。
postForEntity
在 POST 请求中,参数的传递可以是 key/value 的形式,也可以是 JSON 数据,分别来看:
a: 传递 key/value 形式的参数
int port = instance.getPort();String url = "http://" + host + ":" + port + "/hello2";MultiValueMap map = new LinkedMultiValueMap();map.add("name", name);ResponseEntity<String> responseEntity = restTemplate.postForEntity(url, map, String.class);return responseEntity.getBody();
postForEntity 方法第一个参数是请求地址,第二个参数 map 对象中存放着请求参数 key/value,第三个参数则是返回的数据类型。当然这里的第一个参数 url 地址也可以换成一个 Uri 对象,效果是一样的。这种方式传递的参数是以 key/value 形式传递的,在 post 请求中,也可以按照 get 请求的方式去传递 key/value 形式的参数,传递方式和 get 请求的传参方式基本一致
String host = "myhost";int port = "2020";String url = "http://" + host + ":" + port + "/hello2?name={1}";ResponseEntity<String> responseEntity = restTemplate.postForEntity(url, null, String.class,name);return responseEntity.getBody();
此时第二个参数可以直接传一个 null。
b:传递 JSON 数据
上面介绍的是 post 请求传递 key/value 形式的参数,post 请求也可以直接传递 json 数据,在 post 请求中,可以自动将一个对象转换成 json 进行传输,数据到达 provider 之后,再被转换为一个对象。具体操作步骤如下:
String url = "http://" + host + ":" + port + "/user";User u1 = new User();u1.setUsername("李四");u1.setAddress("深圳");ResponseEntity<User> responseEntity = restTemplate.postForEntity(url, u1, User.class);return responseEntity.getBody();
唯一的区别就是第二个参数的类型不同,这个参数如果是一个 MultiValueMap 的实例,则以 key/value 的形式发送,如果是一个普通对象,则会被转成 json 发送。
postForObject
postForObject 和 postForEntity 基本一致,就是返回类型不同而已
postForLocation
postForLocation 方法的返回值是一个 Uri 对象,因为 POST 请求一般用来添加数据,有的时候需要将刚刚添加成功的数据的 URL 返回来,此时就可以使用这个方法,一个常见的使用场景如用户注册功能,用户注册成功之后,可能就自动跳转到登录页面了,此时就可以使用该方法。
String url = "http://" + host + ":" + port + "/register";MultiValueMap map = new LinkedMultiValueMap();map.add("username", "李四");map.add("address", "深圳");URI uri = restTemplate.postForLocation(url, map);String s = restTemplate.getForObject(uri, String.class);return s;
注意:postForLocation 方法返回的 Uri 实际上是指响应头的 Location 字段,所以,provider 中 register 接口的响应头必须要有 Location 字段(即请求的接口实际上是一个重定向的接口),否则 postForLocation 方法的返回值为null
PUT 请求
只要将 GET 请求和 POST 请求搞定了,接下来 PUT 请求就会容易很多了,PUT 请求本身方法也比较少,只有三个,如下:

这三个重载的方法其参数其实和 POST 是一样的,可以用 key/value 的形式传参,也可以用 JSON 的形式传参,无论哪种方式,都是没有返回值的
String host ="myhost";int port = "8080";String url1 = "http://" + host + ":" + port + "/user/name";String url2 = "http://" + host + ":" + port + "/user/address";MultiValueMap map = new LinkedMultiValueMap();map.add("username", "李四");map.add("address", "深圳");restTemplate.put(url1, map);User u1 = new User();u1.setAddress("广州");u1.setUsername("张三");restTemplate.put(url2, u1);
DELETE 请求
和 PUT 请求一样,DELETE 请求也是比较简单的,只有三个方法,如下:

不同于 POST 和 PUT ,DELETE 请求的参数只能在地址栏传送,可以是直接放在路径中,也可以用 key/value 的形式传递,当然,这里也是没有返回值的。
String host = "myhost";int port = "8080";String url1 = "http://" + host + ":" + port + "/user/{1}";String url2 = "http://" + host + ":" + port + "/user/?username={username}";Map<String,String> map = new HashMap<>();map.put("username", "李四");restTemplate.delete(url1, 99);restTemplate.delete(url2, map);
这里参数的传递和 GET 请求基本一致
通用方法 exchange
在 RestTemplate 中还有一个通用的方法 exchange。为什么说它通用呢?因为这个方法需要你在调用的时候去指定请求类型,即它既能做 GET 请求,也能做 POST 请求,也能做其它各种类型的请求。如果开发者需要对请求进行封装,使用它再合适不过了
@GetMapping("/hello12")public void hello12() {List<ServiceInstance> list = discoveryClient.getInstances("provider");ServiceInstance instance = list.get(0);String host = instance.getHost();int port = instance.getPort();String url = "http://" + host + ":" + port + "/customheader";HttpHeaders headers = new HttpHeaders();headers.add("cookie","justdojava");HttpEntity<MultiValueMap<String,String>> request = new HttpEntity<>(null,headers);ResponseEntity<String> responseEntity = restTemplate.exchange(url, HttpMethod.GET, request, String.class);System.out.println(responseEntity.getBody());}
4、自定义设置
手动指定转换器(HttpMessageConverter)
我们知道,调用reseful接口传递的数据内容是json格式的字符串,返回的响应也是json格式的字符串。然而restTemplate.postForObject方法的请求参数RequestBean和返回参数ResponseBean却都是java类。是RestTemplate通过HttpMessageConverter自动帮我们做了转换的操作。
默认情况下RestTemplate自动帮我们注册了一组HttpMessageConverter用来处理一些不同的contentType的请求。
如StringHttpMessageConverter来处理text/plain;MappingJackson2HttpMessageConverter来处理application/json;MappingJackson2XmlHttpMessageConverter来处理application/xml。
你可以在org.springframework.http.converter包下找到所有spring帮我们实现好的转换器。
如果现有的转换器不能满足你的需求,你还可以实现org.springframework.http.converter.HttpMessageConverter接口自己写一个。详情参考官方api。
选好了HttpMessageConverter后怎么把它注册到我们的RestTemplate中呢。
RestTemplate restTemplate = new RestTemplate();//获取RestTemplate默认配置好的所有转换器List<HttpMessageConverter<?>> messageConverters = restTemplate.getMessageConverters();//默认的MappingJackson2HttpMessageConverter在第7个 先把它移除掉messageConverters.remove(6);//添加上GSON的转换器messageConverters.add(6, new GsonHttpMessageConverter());
这个简单的例子展示了如何使用GsonHttpMessageConverter替换掉默认用来处理application/json的MappingJackson2HttpMessageConverter。
设置底层连接方式
要创建一个RestTemplate的实例,您可以像上述例子中简单地调用默认的无参数构造函数。这将使用java.net包中的标准Java类作为底层实现来创建HTTP请求。
但很多时候我们需要像传统的HttpClient那样设置HTTP请求的一些属性。RestTemplate使用了一种很偷懒的方式实现了这个需求,那就是直接使用一个HttpClient作为底层实现……
//生成一个设置了连接超时时间、请求超时时间、异常最大重试次数的httpClientRequestConfig config = RequestConfig.custom().setConnectionRequestTimeout(10000).setConnectTimeout(10000).setSocketTimeout(30000).build();HttpClientBuilder builder = HttpClientBuilder.create().setDefaultRequestConfig(config).setRetryHandler(new DefaultHttpRequestRetryHandler(5, false));HttpClient httpClient = builder.build();//使用httpClient创建一个ClientHttpRequestFactory的实现ClientHttpRequestFactory requestFactory = new HttpComponentsClientHttpRequestFactory(httpClient);//ClientHttpRequestFactory作为参数构造一个使用作为底层的RestTemplateRestTemplate restTemplate = new RestTemplate(requestFactory);
设置拦截器(ClientHttpRequestInterceptor)
有时候我们需要对请求做一些通用的拦截设置,这就可以使用拦截器进行处理。拦截器需要我们实现org.springframework.http.client.ClientHttpRequestInterceptor接口自己写。
举个简单的例子,写一个在header中根据请求内容和地址添加令牌的拦截器。
public class TokenInterceptor implements ClientHttpRequestInterceptor{@Overridepublic ClientHttpResponse intercept(HttpRequest request, byte[] body, ClientHttpRequestExecution execution) throws IOException{//请求地址String checkTokenUrl = request.getURI().getPath();//token有效时间int ttTime = (int) (System.currentTimeMillis() / 1000 + 1800);//请求方法名 POST、GET等String methodName = request.getMethod().name();//请求内容String requestBody = new String(body);//生成令牌 此处调用一个自己写的方法,有兴趣的朋友可以自行google如何使用ak/sk生成token,此方法跟本教程无关,就不贴出来了String token = TokenHelper.generateToken(checkTokenUrl, ttTime, methodName, requestBody);//将令牌放入请求header中request.getHeaders().add("X-Auth-Token",token);return execution.execute(request, body);}}
创建RestTemplate实例的时候可以这样向其中添加拦截器
RestTemplate restTemplate = new RestTemplate();//向restTemplate中添加自定义的拦截器restTemplate.getInterceptors().add(new TokenInterceptor());
设置请求头
有的时候我们会有一些特殊的需求,例如模拟 cookie ,此时就需要我们自定义请求头了。自定义请求头可以通过拦截器的方式来实现(下篇文章我们会详细的说这个拦截器)。定义拦截器、自动修改请求数据、一些身份认证信息等,都可以在拦截器中来统一处理。具体操作步骤如下:
首先在 provider 中定义一个接口,在接口中获取客户端传来的 cookie 数据,如下:
@GetMapping("/customheader")public String customHeader(HttpServletRequest req) {return req.getHeader("cookie");}
这里简单处理,将客户端传来的 cookie 拿出来后再返回给客户端,然后在 consumer 中添加如下接口来测试:
@GetMapping("/hello11")public void hello11() {List<ServiceInstance> list = discoveryClient.getInstances("provider");ServiceInstance instance = list.get(0);String host = instance.getHost();int port = instance.getPort();String url = "http://" + host + ":" + port + "/customheader";restTemplate.setInterceptors(Collections.singletonList(new ClientHttpRequestInterceptor() {@Overridepublic ClientHttpResponse intercept(HttpRequest request, byte[] body, ClientHttpRequestExecution execution) throws IOException {HttpHeaders headers = request.getHeaders();headers.add("cookie","justdojava");return execution.execute(request,body);}}));String s = restTemplate.getForObject(url, String.class);System.out.println(s);}
这里通过调用 RestTemplate 的 setInterceptors 方法来给它设置拦截器,拦截器也可以有多个,我这里只有一个。在拦截器中,将请求拿出来,给它设置 cookie ,然后调用 execute 方法让请求继续执行。此时,在 /customheader 接口中,就能获取到 cookie了。


")


——LinearLayout、FrameLayout和AbsoulteLayout")
")


还没有评论,来说两句吧...