微信小程序自定义顶部导航栏navigationBar
自定义navigationBar怎么做?
去掉原生导航栏。
- 将需要自定义navigationBar页面的page.json的navigationBarTitleText去掉。
- 加上“navigationStyle”:”custom”,这样原生的导航栏就已经消失,甚至后退键也不会出现需要自定义。
- 另外,早在2016年微信已经开始适配沉浸式状态栏,目前几乎所有的机型里微信都是沉浸式状态栏,也就是说去掉原生导航栏的同时,整个屏幕已经成为可编程区域。
- 文档:https://developers.weixin.qq.com/miniprogram/dev/extended/weui/navigation.html
计算navigationBarHeight。
- 原生的胶囊按钮当然存在,那么下一步就需要你去定位出自定义的导航栏高度以及位置。
- 对于不同的机型,对于不同的系统,状态栏以及胶囊按钮的位置都不确定,所以需要用到一定的计算,从而面对任何机型都可以从容判定。
- 使用wx.getSystemInfo()获取到statusBarHeight,这样就确定了导航栏最基本的距离屏幕上方的据里。
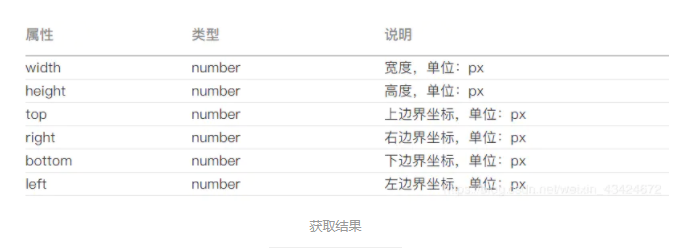
- 使用wx.getMenuButtonBoundingClientRect()获取到小程序的胶囊信息(注意这个api存在各种问题,在不同端表现不一致,后面会叙述这个api调用失败的处理情况),如下图,以下坐标信息以屏幕左上角为原点。
3.以下图为例,上面的红色框是statusBar,高度已知;下面的红色框是正文内容,夹在中间的就是求解之一navigationBarHeight;而黄色的是原生胶囊按钮也是在垂直居中位置,高度为胶囊按钮基于左上角的坐标信息已知,不难得出,navigationBarHeight = 蓝色框高度 × 2 + 胶囊按钮.height。(蓝色框高度 = 胶囊按钮.top - statusBarHeight)
4.最后的计算公式为:navigationBarHeight = (胶囊按钮.top - statusBarHeight) × 2 + 胶囊按钮.height。navigationBar 距屏幕上方的距离即为navigationBarHeight。
5.这种计算方法在各种机型以及安卓ios都适用。
6.针对”wx.getMenuButtonBoundingClientRect()“获取错误或者获取数据为0的极少数情况,只能够去模拟,对于android,一般navigationBarHeight为48px,而对于ios一般为40px,所有机型的胶囊按钮高度是32px笔者也是通过网上很多的文章和自测得出的,这种误差一般可以忽略。当然最理想的就是微信可以hold住所有机型,呵呵。最后提醒一下仅以真机为准,开发者工具的bug就更多不说了。
代码实现
获取本机信息,一般写在App的onLaunch中。
App.js
// App.js
…
onLaunch(){const { statusBarHeight, platform } = wx.getSystemInfoSync()const { top, height } = wx.getMenuButtonBoundingClientRect()// 状态栏高度wx.setStorageSync('statusBarHeight', statusBarHeight)// 胶囊按钮高度 一般是32 如果获取不到就使用32wx.setStorageSync('menuButtonHeight', height ? height : 32)// 判断胶囊按钮信息是否成功获取if (top && top !== 0 && height && height !== 0) {const navigationBarHeight = (top - statusBarHeight) * 2 + height// 导航栏高度wx.setStorageSync('navigationBarHeight', navigationBarHeight)} else {wx.setStorageSync('navigationBarHeight',platform === 'android' ? 48 : 40)}
}
…笔者将这几个高度信息储存在stroage中,之后创建navigationBar自定义组件,在组件中将会运用到这些数据。
navigationBar.js
// navigationBar.js...data: {// 状态栏高度statusBarHeight: wx.getStorageSync('statusBarHeight') + 'px',// 导航栏高度navigationBarHeight: wx.getStorageSync('navigationBarHeight') + 'px',// 胶囊按钮高度menuButtonHeight: wx.getStorageSync('menuButtonHeight') + 'px',// 导航栏和状态栏高度navigationBarAndStatusBarHeight:wx.getStorageSync('statusBarHeight') +wx.getStorageSync('navigationBarHeight') +'px'}...
- navigationBar.wxml中的布局就不多赘述,一般来说,导航栏使用fixed定位,里面再通过行内垂直居中的方式定位自定义的返回按钮,还有居中导航标题,以及字数过多显示省略号等。
navigationBar.wxml
<!--navigationBar.wxml--><view class="navigation-container" style="{{'height: ' + navigationBarAndStatusBarHeight}}"><!--空白来占位状态栏--><view style="{{'height: ' + statusBarHeight}}"></view><!--自定义导航栏--><view class="navigation-bar" style="{{'height:' + navigationBarHeight}}"><view class="navigation-buttons" style="{{'height:' + menuButtonHeight}}"><image class="nav-img" src='/images/back.svg'/>...其余自定义button</view><view class="navigation-title" style="{{'line-height:' + navigationBarHeight}}">{{title}}</view></view></view><!--空白占位fixed空出的位置--><view style="{{'height: ' + navigationBarAndStatusBarHeight}}; background: #ffffff"></view>
navigationBar.wxss
/* navigationBar.wxss */.navigation-container {position: fixed;width: 100%;z-index: 99;top: 0;left: 0;background-color: #ffffff;}.navigation-bar {position: relative;display: flex;flex-direction: row;align-items: center;}.navigation-buttons {display: flex;align-items: center;margin-left: 10px;border: 1px solid rgba(0, 0, 0, 0.05);box-sizing: border-box;border-radius: 15px;background-color: transparent;}.nav-img{height: 16px;width: 16px;}.navigation-title {position: absolute;left: 104px;right: 104px;text-align: center;font-size: 16px;font-weight: bold;color: #000000;overflow: hidden;text-overflow: ellipsis;white-space: nowrap;}


还没有评论,来说两句吧...