RestTemplate使用详解
RestTemplate使用详解
RestTemplate是Spring提供的用于访问Rest服务的客户端,RestTemplate提供了多种便捷访问远程Http服务的方法,能够大大提高客户端的编写效率。
我之前的HTTP开发是用apache的HttpClient开发,代码复杂,还得操心资源回收等。代码很复杂,冗余代码多,稍微截个图,这是我封装好的一个post请求工具:

本教程将带领大家实现Spring生态内RestTemplate的Get请求和Post请求还有exchange指定请求类型的实践和RestTemplate核心方法源码的分析,看完你就会用优雅的方式来发HTTP请求。
1. 简述RestTemplate
是
Spring用于同步client端的核心类,简化了与http服务的通信,并满足RestFul原则,程序代码可以给它提供URL,并提取结果。默认情况下,RestTemplate默认依赖jdk的HTTP连接工具。当然你也可以 通过setRequestFactory属性切换到不同的HTTP源,比如Apache HttpComponents、Netty和OkHttp。
RestTemplate能大幅简化了提交表单数据的难度,并且附带了自动转换JSON数据的功能,但只有理解了HttpEntity的组成结构(header与body),且理解了与uriVariables之间的差异,才能真正掌握其用法。这一点在Post请求更加突出,下面会介绍到。
该类的入口主要是根据HTTP的六个方法制定:
| HTTP method | RestTemplate methods |
|---|---|
| DELETE | delete |
| GET | getForObject |
| getForEntity | |
| HEAD | headForHeaders |
| OPTIONS | optionsForAllow |
| POST | postForLocation |
| postForObject | |
| PUT | put |
| any | exchange |
| execute |
此外,exchange和excute可以通用上述方法。
在内部,RestTemplate默认使用HttpMessageConverter实例将HTTP消息转换成POJO或者从POJO转换成HTTP消息。默认情况下会注册主mime类型的转换器,但也可以通过setMessageConverters注册其他的转换器。(其实这点在使用的时候是察觉不到的,很多方法有一个responseType 参数,它让你传入一个响应体所映射成的对象,然后底层用HttpMessageConverter将其做映射)
HttpMessageConverterExtractor<T> responseExtractor =new HttpMessageConverterExtractor<>(responseType, getMessageConverters(), logger);
HttpMessageConverter.java源码:
public interface HttpMessageConverter<T> {//指示此转换器是否可以读取给定的类。boolean canRead(Class<?> clazz, @Nullable MediaType mediaType);//指示此转换器是否可以写给定的类。boolean canWrite(Class<?> clazz, @Nullable MediaType mediaType);//返回List<MediaType>List<MediaType> getSupportedMediaTypes();//读取一个inputMessageT read(Class<? extends T> clazz, HttpInputMessage inputMessage)throws IOException, HttpMessageNotReadableException;//往output message写一个Objectvoid write(T t, @Nullable MediaType contentType, HttpOutputMessage outputMessage)throws IOException, HttpMessageNotWritableException;}
在内部,RestTemplate默认使用SimpleClientHttpRequestFactory和DefaultResponseErrorHandler来分别处理HTTP的创建和错误,但也可以通过setRequestFactory和setErrorHandler来覆盖。
2. get请求实践
2.1. getForObject()方法
public <T> T getForObject(String url, Class<T> responseType, Object... uriVariables){}public <T> T getForObject(String url, Class<T> responseType, Map<String, ?> uriVariables)public <T> T getForObject(URI url, Class<T> responseType)
getForObject()其实比getForEntity()多包含了将HTTP转成POJO的功能,但是getForObject没有处理response的能力。因为它拿到手的就是成型的pojo。省略了很多response的信息。
2.1.1 POJO:
public class Notice {private int status;private Object msg;private List<DataBean> data;}public class DataBean {private int noticeId;private String noticeTitle;private Object noticeImg;private long noticeCreateTime;private long noticeUpdateTime;private String noticeContent;}
示例:2.1.2 不带参的get请求
/*** 不带参的get请求*/@Testpublic void restTemplateGetTest(){RestTemplate restTemplate = new RestTemplate();Notice notice = restTemplate.getForObject("http://xxx.top/notice/list/1/5", Notice.class);System.out.println(notice);}
控制台打印:
INFO 19076 --- [ main] c.w.s.c.w.c.HelloControllerTest: Started HelloControllerTest in 5.532 seconds (JVM running for 7.233)Notice{status=200, msg=null, data=[DataBean{noticeId=21, noticeTitle='aaa', noticeImg=null,noticeCreateTime=1525292723000, noticeUpdateTime=1525292723000, noticeContent='<p>aaa</p>'},DataBean{noticeId=20, noticeTitle='ahaha', noticeImg=null, noticeCreateTime=1525291492000,noticeUpdateTime=1525291492000, noticeContent='<p>ah.......'
示例:2.1.3 带参数的get请求1
Notice notice = restTemplate.getForObject("http://fantj.top/notice/list/{1}/{2}", Notice.class,1,5);
明眼人一眼能看出是用了占位符{1}。
示例:2.1.4 带参数的get请求2
Map<String,String> map = new HashMap();map.put("start","1");map.put("page","5");Notice notice = restTemplate.getForObject("http://fantj.top/notice/list/", Notice.class,map);
明眼人一看就是利用map装载参数,不过它默认解析的是PathVariable的url形式。
2.2 getForEntity()方法
public <T> ResponseEntity<T> getForEntity(String url, Class<T> responseType, Object... uriVariables){}public <T> ResponseEntity<T> getForEntity(String url, Class<T> responseType, Map<String, ?> uriVariables){}public <T> ResponseEntity<T> getForEntity(URI url, Class<T> responseType){}
与getForObject()方法不同的是返回的是ResponseEntity对象,如果需要转换成pojo,还需要json工具类的引入,这个按个人喜好用。不会解析json的可以百度FastJson或者Jackson等工具类。然后我们就研究一下ResponseEntity下面有啥方法。
ResponseEntity、HttpStatus、BodyBuilder结构
ResponseEntity.java
public HttpStatus getStatusCode(){}public int getStatusCodeValue(){}public boolean equals(@Nullable Object other) {}public String toString() {}public static BodyBuilder status(HttpStatus status) {}public static BodyBuilder ok() {}public static <T> ResponseEntity<T> ok(T body) {}public static BodyBuilder created(URI location) {}...
HttpStatus.java
public enum HttpStatus {public boolean is1xxInformational() {}public boolean is2xxSuccessful() {}public boolean is3xxRedirection() {}public boolean is4xxClientError() {}public boolean is5xxServerError() {}public boolean isError() {}}
BodyBuilder.java
public interface BodyBuilder extends HeadersBuilder<BodyBuilder> {//设置正文的长度,以字节为单位,由Content-Length标头BodyBuilder contentLength(long contentLength);//设置body的MediaType 类型BodyBuilder contentType(MediaType contentType);//设置响应实体的主体并返回它。<T> ResponseEntity<T> body(@Nullable T body);}
可以看出来,ResponseEntity包含了HttpStatus和BodyBuilder的这些信息,这更方便我们处理response原生的东西。
示例:
@Testpublic void rtGetEntity(){RestTemplate restTemplate = new RestTemplate();ResponseEntity<Notice> entity = restTemplate.getForEntity("http://fantj.top/notice/list/1/5", Notice.class);HttpStatus statusCode = entity.getStatusCode();System.out.println("statusCode.is2xxSuccessful()"+statusCode.is2xxSuccessful());Notice body = entity.getBody();System.out.println("entity.getBody()"+body);ResponseEntity.BodyBuilder status = ResponseEntity.status(statusCode);status.contentLength(100);status.body("我在这里添加一句话");ResponseEntity<Class<Notice>> body1 = status.body(Notice.class);Class<Notice> body2 = body1.getBody();System.out.println("body1.toString()"+body1.toString());}statusCode.is2xxSuccessful()trueentity.getBody()Notice{status=200, msg=null, data=[DataBean{noticeId=21, noticeTitle='aaa', ...body1.toString()<200 OK,class com.waylau.spring.cloud.weather.pojo.Notice,{Content-Length=[100]}>
当然,还有getHeaders()等方法没有举例。
3. post请求实践
同样的,post请求也有
postForObject和postForEntity。
public <T> T postForObject(String url, @Nullable Object request, Class<T> responseType, Object... uriVariables)throws RestClientException {}public <T> T postForObject(String url, @Nullable Object request, Class<T> responseType, Map<String, ?> uriVariables)throws RestClientException {}public <T> T postForObject(URI url, @Nullable Object request, Class<T> responseType) throws RestClientException {}
示例
我用一个验证邮箱的接口来测试。
@Testpublic void rtPostObject(){RestTemplate restTemplate = new RestTemplate();String url = "http://47.xxx.xxx.96/register/checkEmail";HttpHeaders headers = new HttpHeaders();headers.setContentType(MediaType.APPLICATION_FORM_URLENCODED);MultiValueMap<String, String> map= new LinkedMultiValueMap<>();map.add("email", "844072586@qq.com");HttpEntity<MultiValueMap<String, String>> request = new HttpEntity<>(map, headers);ResponseEntity<String> response = restTemplate.postForEntity( url, request , String.class );System.out.println(response.getBody());}
执行结果:
{"status":500,"msg":"该邮箱已被注册","data":null}

代码中,MultiValueMap是Map的一个子类,它的一个key可以存储多个value,简单的看下这个接口:
public interface MultiValueMap<K, V> extends Map<K, List<V>> {...}
为什么用MultiValueMap?因为HttpEntity接受的request类型是它。
public HttpEntity(@Nullable T body, @Nullable MultiValueMap<String, String> headers){}我这里只展示它的一个construct,从它可以看到我们传入的map是请求体,headers是请求头。
为什么用HttpEntity是因为restTemplate.postForEntity方法虽然表面上接收的request是@Nullable Object request类型,但是你追踪下去会发现,这个request是用HttpEntity来解析。核心代码如下:
if (requestBody instanceof HttpEntity) {this.requestEntity = (HttpEntity<?>) requestBody;}else if (requestBody != null) {this.requestEntity = new HttpEntity<>(requestBody);}else {this.requestEntity = HttpEntity.EMPTY;}
我曾尝试用map来传递参数,编译不会报错,但是执行不了,是无效的url request请求(400 ERROR)。其实这样的请求方式已经满足post请求了,cookie也是属于header的一部分。可以按需求设置请求头和请求体。其它方法与之类似。
4. 使用exchange指定调用方式
exchange()方法跟上面的getForObject()、getForEntity()、postForObject()、postForEntity()等方法不同之处在于它可以指定请求的HTTP类型。
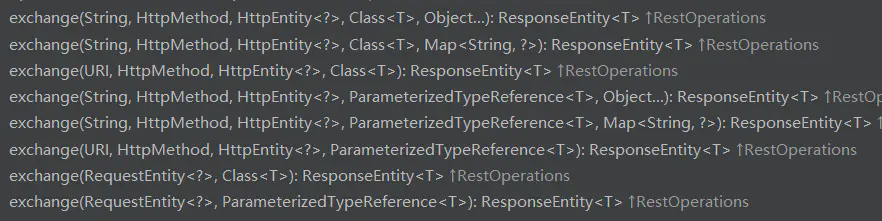
但是你会发现exchange的方法中似乎都有@Nullable HttpEntity<?> requestEntity这个参数,这就意味着我们至少要用HttpEntity来传递这个请求体,之前说过源码所以建议就使用HttpEntity提高性能。
示例
@Testpublic void rtExchangeTest() throws JSONException {RestTemplate restTemplate = new RestTemplate();String url = "http://xxx.top/notice/list";HttpHeaders headers = new HttpHeaders();headers.setContentType(MediaType.APPLICATION_FORM_URLENCODED);JSONObject jsonObj = new JSONObject();jsonObj.put("start",1);jsonObj.put("page",5);HttpEntity<String> entity = new HttpEntity<>(jsonObj.toString(), headers);ResponseEntity<JSONObject> exchange = restTemplate.exchange(url,HttpMethod.GET, entity, JSONObject.class);System.out.println(exchange.getBody());}
这次可以看到,我使用了JSONObject对象传入和返回。
当然,HttpMethod方法还有很多,用法类似。
5. excute()指定调用方式
excute()的用法与exchange()大同小异了,它同样可以指定不同的HttpMethod,不同的是它返回的对象是响应体所映射成的对象<T>,而不是ResponseEntity<T>。
需要强调的是,execute()方法是以上所有方法的底层调用。随便看一个:
@Override@Nullablepublic <T> T postForObject(String url, @Nullable Object request, Class<T> responseType, Map<String, ?> uriVariables)throws RestClientException {RequestCallback requestCallback = httpEntityCallback(request, responseType);HttpMessageConverterExtractor<T> responseExtractor =new HttpMessageConverterExtractor<>(responseType, getMessageConverters(), logger);return execute(url, HttpMethod.POST, requestCallback, responseExtractor, uriVariables);}
在项目中,当我们需要远程调用一个HTTP接口时,我们经常会用到RestTemplate这个类。这个类是Spring框架提供的一个工具类。Spring官网对它的介绍如下:
RestTemplate: The original Spring REST client with a synchronous, template method API.
从上面的介绍中我们可以知道:RestTemplate是一个同步的Rest API客户端。下面我们就来介绍下RestTemplate的常用功能。
RestTemplate简单使用#
RestTemplate提供高度封装的接口,可以让我们非常方便地进行Rest API调用。常见的方法如下:
表格:RestTemplate的方法
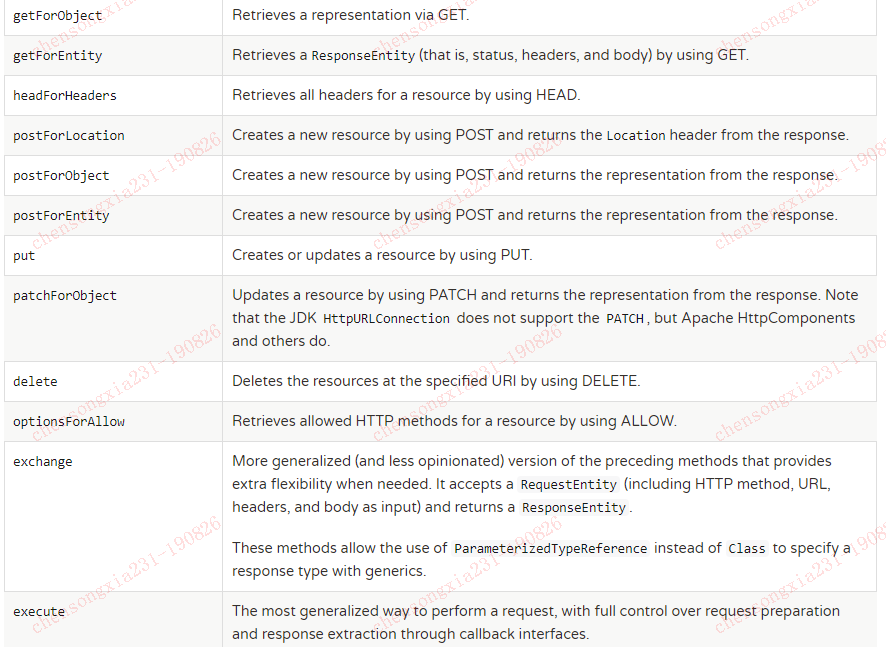
上面的方法我们大致可以分为三组:
- getForObject —- optionsForAllow分为一组,这类方法是常规的Rest API(GET、POST、DELETE等)方法调用;
- exchange:接收一个
RequestEntity参数,可以自己设置HTTP method, URL, headers和body。返回ResponseEntity。 - execute:通过callback 接口,可以对请求和返回做更加全面的自定义控制。
一般情况下,我们使用第一组和第二组方法就够了。
创建RestTemplate#
@Beanpublic RestTemplate restTemplate(ClientHttpRequestFactory factory) {RestTemplate restTemplate = new RestTemplate(factory);return restTemplate;}@Beanpublic ClientHttpRequestFactory simpleClientHttpRequestFactory() {SimpleClientHttpRequestFactory factory = new SimpleClientHttpRequestFactory();factory.setReadTimeout(5000);factory.setConnectTimeout(15000);//设置代理//factory.setProxy(null);return factory;}
创建RestTemplate时需要一个ClientHttpRequestFactory,通过这个请求工厂,我们可以统一设置请求的超时时间,设置代理以及一些其他细节。通过上面代码配置后,我们直接在代码中注入RestTemplate就可以使用了。
接口调用#
1. 普通接口调用
Map<String, String> vars = Collections.singletonMap("hotel", "42");//通过GET方式调用,返回一个String值,还可以给URL变量设置值(也可通过uriTemplateHandler这个属性自定义)String result = restTemplate.getForObject("https://example.com/hotels/{hotel}/rooms/{hotel}", String.class, vars);String url = "http://127.0.0.1:8080/hello";JSONObject param = new JSONObject();//restTemplate会根据params的具体类型,调用合适的HttpMessageConvert将请求参数写到请求体body中,并在请求头中添加合适的content-type;//也会根据responseType的类型(本列子中是JSONObject),设置head中的accept字段,当响应返回的时候再调用合适的HttpMessageConvert进行响应转换ResponseEntity<JSONObject> responseEntity=restTemplate.postForEntity(url,params,JSONObject.class);int statusCodeValue = responseEntity.getStatusCodeValue();HttpHeaders headers = responseEntity.getHeaders();JSONObject body = responseEntity.getBody();
2. 添加Header和Cookie
有时候,我们需要在请求中的Head中添加值或者将某些值通过cookie传给服务端,那么上面这种调用形式就不太满足要求了。
UriComponents uriComponents = UriComponentsBuilder.fromHttpUrl("127.0.0.1:8080").path("/test").build(true);URI uri = uriComponents.toUri();RequestEntity<JSONObject> requestEntity = RequestEntity.post(uri).//添加cookie(这边有个问题,假如我们要设置cookie的生命周期,作用域等参数我们要怎么操作)header(HttpHeaders.COOKIE,"key1=value1").//添加headerheader(("MyRequestHeader", "MyValue")accept(MediaType.APPLICATION_JSON).contentType(MediaType.APPLICATION_JSON).body(requestParam);ResponseEntity<JSONObject> responseEntity = restTemplate.exchange(requestEntity,JSONObject.class);//响应结果JSONObject responseEntityBody = responseEntity.getBody();
3. 文件上传
上面两个列子基本能覆盖我们平时开发的大多数功能了。这边再讲个文件上传的列子(RestTemplate功能还是蛮全的)。
public Object uplaod(@RequestBody JSONObject params) throws Exception{final String url = "http://localhost:8888/hello/m3";//设置请求头HttpHeaders headers = new HttpHeaders();headers.setContentType(MediaType.MULTIPART_FORM_DATA);//设置请求体,注意是LinkedMultiValueMapFileSystemResource resource1 = new FileSystemResource("D:\\dir1\\ss\\pic1.jpg");FileSystemResource resource2 = new FileSystemResource("D:\\dir1\\ss\\pic2.jpg");MultiValueMap<String, Object> form = new LinkedMultiValueMap<>();form.add("file", resource1);form.add("file", resource2);form.add("param1","value1");HttpEntity<MultiValueMap<String, Object>> files = new HttpEntity<>(form, headers);JSONObject s = restTemplate.postForObject(url, files, JSONObject.class);return s;}
上面的代码中上传了两个本地图片,通过下面代码可以顺利接收。
@RequestMapping("/m3")public Object fileUpload(@RequestParam("file") MultipartFile[] files, HttpServletRequest request) throws Exception {//携带的其他参数可以使用getParameter方法接收String param1 = request.getParameter("param1");Response response = new Response();if (files == null) {response.failure("文件上传错误,服务端未拿到上传的文件!");return response;}for (MultipartFile file : files) {if (!file.isEmpty() && file.getSize() > 0) {String fileName = file.getOriginalFilename();//参考FileCopyUtils这个工具类file.transferTo(new File("D:\\" + fileName));logger.info("文件:{} 上传成功...",fileName);}}response.success("文件上传成功");return response;}
但是我们发现上面的上传代码中,上传文件的类必须使用FileSystemResource。有时我们会碰到这种情况:文件我们会从文件服务下载到内存中一个InputStream的形式存在,那此时在使用FileSystemResource就不行了。
当然,我们使用讨巧一点的办法也是可以的:先将下载下来的InputStream保存到本地,然后再读取到FileSystemResource,上传后再删除本地临时文件。
但是总觉得这个方法不够完美。最后发现有个同事已经写了相关的实现。这边就直接拿来用了。
//自己实现了一个Resourcepublic class InMemoryResource extends ByteArrayResource {private final String filename;private final long lastModified;public InMemoryResource(String filename, String description, byte[] content, long lastModified) {super(content, description);this.lastModified = lastModified;this.filename = filename;}@Overridepublic long lastModified() throws IOException {return this.lastModified;}@Overridepublic String getFilename() {return this.filename;}}
调整后的上传代码
@PostMapping("/m3")public Object m3(@RequestBody JSONObject params) throws Exception{final String url = "http://localhost:8888/hello/m3";//设置请求头HttpHeaders headers = new HttpHeaders();headers.setContentType(MediaType.MULTIPART_FORM_DATA);//设置请求体,注意是LinkedMultiValueMap//下面两个流从文件服务下载,这边省略(注意最后关闭流)InputStream fis1 =InputStream fis2 =InMemoryResource resource1 = new InMemoryResource("file1.jpg","description1", FileCopyUtils.copyToByteArray(fis1), System.currentTimeMillis());InMemoryResource resource2 = new InMemoryResource("file2.jpg","description2", FileCopyUtils.copyToByteArray(fis2), System.currentTimeMillis());MultiValueMap<String, Object> form = new LinkedMultiValueMap<>();form.add("file", resource1);form.add("file", resource2);form.add("param1","value1");HttpEntity<MultiValueMap<String, Object>> files = new HttpEntity<>(form, headers);JSONObject s = restTemplate.postForObject(url, files, JSONObject.class);return s;}
一些其他设置#
1. 拦截器配置
RestTemplate也可以设置拦截器做一些统一处理。这个功能感觉和Spring MVC的拦截器类似。配置也很简单:
class MyInterceptor implements ClientHttpRequestInterceptor{@Overridepublic ClientHttpResponse intercept(HttpRequest request, byte[] body, ClientHttpRequestExecution execution) throws IOException {logger.info("enter interceptor...");return execution.execute(request,body);}}@Beanpublic RestTemplate restTemplate(ClientHttpRequestFactory factory) {RestTemplate restTemplate = new RestTemplate(factory);MyInterceptor myInterceptor = new MyInterceptor();List<ClientHttpRequestInterceptor> list = new ArrayList<>();list.add(myInterceptor);restTemplate.setInterceptors(list);return restTemplate;}
2. ErrorHandler配置
ErrorHandler用来对调用错误对统一处理。
public class MyResponseErrorHandler extends DefaultResponseErrorHandler {@Overridepublic boolean hasError(ClientHttpResponse response) throws IOException {return super.hasError(response);}@Overridepublic void handleError(ClientHttpResponse response) throws IOException {HttpStatus statusCode = HttpStatus.resolve(response.getRawStatusCode());if (statusCode == null) {throw new UnknownHttpStatusCodeException(response.getRawStatusCode(), response.getStatusText(),response.getHeaders(), getResponseBody(response), getCharset(response));}handleError(response, statusCode);}@Overrideprotected void handleError(ClientHttpResponse response, HttpStatus statusCode) throws IOException {switch (statusCode.series()) {case CLIENT_ERROR:HttpClientErrorException exp1 = new HttpClientErrorException(statusCode, response.getStatusText(), response.getHeaders(), getResponseBody(response), getCharset(response));logger.error("客户端调用异常",exp1);throw exp1;case SERVER_ERROR:HttpServerErrorException exp2 = new HttpServerErrorException(statusCode, response.getStatusText(),response.getHeaders(), getResponseBody(response), getCharset(response));logger.error("服务端调用异常",exp2);throw exp2;default:UnknownHttpStatusCodeException exp3 = new UnknownHttpStatusCodeException(statusCode.value(), response.getStatusText(),response.getHeaders(), getResponseBody(response), getCharset(response));logger.error("网络调用未知异常");throw exp3;}}}@Beanpublic RestTemplate restTemplate(ClientHttpRequestFactory factory) {RestTemplate restTemplate = new RestTemplate(factory);MyResponseErrorHandler errorHandler = new MyResponseErrorHandler();restTemplate.setErrorHandler(errorHandler);List<HttpMessageConverter<?>> messageConverters = restTemplate.getMessageConverters();//通过下面代码可以添加新的HttpMessageConverter//messageConverters.add(new );return restTemplate;}
3. HttpMessageConverter配置
RestTemplate 也可以配置HttpMessageConverter,配置的原理和Spring MVC中类似。
简单总结#
通过RestTemplate,我们可以非常方便的进行Rest API调用。但是在Spring 5中已经不再建议使用RestTemplate,而是建议使用WebClient。WebClient是一个支持异步调用的Client。所以喜欢研究新东西的同学可以开始研究下新东西了。
同步RestTemplate和异步AsyncRestTemplate
我编写了以下代码来测试同步RestTemplate和AsyncRestTemplate的性能.我只是在POSTMAN上手动运行了几次.
我们只是将10个引用传递给GET调用,以便我们可以返回10个链接:
RestTemplate – 同步并在2806ms返回:
ArrayList<String> references = new ArrayList<>();ArrayList<String> links = new ArrayList<>();RestTemplate restTemplate = new RestTemplate();restTemplate.getMessageConverters().add(new StringHttpMessageConverter());for (int i = 0; i < 10; i++) {ResponseEntity<String> resource = restTemplate.getForEntity(references.get(i), String.class);links.add(resource.getBody().toString());}复制代码
RestTemplate – 异步并返回2794ms:
//Creating a synchronizedList so that when the async resttemplate returns, there will be no concurrency issuesList<String> links = Collections.synchronizedList(new ArrayList<String>());//CustomClientHttpRequestFactory just extends SimpleClientHttpRequestFactory but disables automatic redirects in SimpleClientHttpRequestFactoryCustomClientHttpRequestFactory customClientHttpRequestFactory = new CustomClientHttpRequestFactory();//Setting the ThreadPoolTaskExecutor for the Async callsorg.springframework.scheduling.concurrent.ThreadPoolTaskExecutor pool = new org.springframework.scheduling.concurrent.ThreadPoolTaskExecutor();pool.setCorePoolSize(5);pool.setMaxPoolSize(10);pool.setWaitForTasksToCompleteOnShutdown(true);pool.initialize();//Setting the TaskExecutor to the ThreadPoolTaskExecutorcustomClientHttpRequestFactory.setTaskExecutor(pool);ArrayList<String> references = new ArrayList<>();ArrayList<String> links = new ArrayList<>();AsyncRestTemplate asyncRestTemplate = new AsyncRestTemplate(customClientHttpRequestFactory);restTemplate.getMessageConverters().add(new StringHttpMessageConverter());for (int i = 0; i < 10; i++) {Future<ResponseEntity<String>> resource = asyncRestTemplate.getForEntity(references.get(i), String.class);ResponseEntity<String> entity = resource.get(); //this should start up 10 threads to get the links asynchronouslylinks.add(entity.getBody().toString());}复制代码
在大多数情况下,两种方法实际上都以非常相似的时间返回结果,在异步和同步调用中平均为2800ms.
我做错了什么,因为我希望异步调用更快?
最佳答案
我会说你在这里错过了AsyncRest的真正好处.
您应该为要发送的每个请求添加回调,以便响应仅在可用时进行处理.
实际上,AsyncRestTemplate的getForEntity方法返回一个可以连接回调任务的ListenableFuture.有关详细信息,请参阅官方文档ListenableFuture.
例如,在您的情况下,它可能是:
for (int i = 0; i < 10; i++) {ListenableFuture<ResponseEntity<String>> response = asyncRestTemplate.getForEntity(references.get(i), String.class);response.addCallback(new ListenableFutureCallback<ResponseEntity<String>>() {@Overridepublic void onSuccess(ResponseEntity<String> result) {// Do stuff onSuccesslinks.add(result.getBody().toString());}@Overridepublic void onFailure(Throwable ex) {log.warn("Error detected while submitting a REST request. Exception was {}", ex.getMessage());}});}
#
RestTemplate整合HttpClient、Okhttp
HttpClient入门
确定maven环境
<parent><groupId>org.springframework.boot</groupId><artifactId>spring-boot-starter-parent</artifactId><version>2.1.4.RELEASE</version></parent><dependencies><!--web起步依赖--><dependency><groupId>org.springframework.boot</groupId><artifactId>spring-boot-starter-web</artifactId></dependency><!--httpclient--><dependency><groupId>org.apache.httpcomponents</groupId><artifactId>httpclient</artifactId><version>4.5.6</version></dependency><!--支持lombok--><dependency><groupId>lombok</groupId><artifactId>lombok</artifactId><version>1.0</version></dependency><!--fastjson--><dependency><groupId>com.alibaba</groupId><artifactId>fastjson</artifactId><version>1.2.49</version></dependency><dependency><groupId>org.springframework.boot</groupId><artifactId>spring-boot-starter-test</artifactId></dependency></dependencies>
使用HttpClient发送Get请求
CloseableHttpClient httpClient = null;
CloseableHttpResponse response = null;try {//1 创建Httpclient对象(默认连接),相当于打开了浏览器CloseableHttpClient httpClient = HttpClients.createDefault();//2 确定请求方式和请求路径,相当于在浏览器输入地址HttpGet httpGet = new HttpGet("http://localhost:9090/user");//3 执行请求并获取响应,相当于敲完地址后按下回车。CloseableHttpResponse response = httpClient.execute(httpGet);//4 判断状态码if(response.getStatusLine().getStatusCode() == 200){//5.1 获得响应数据的类型System.out.println(response.getEntity().getContentType());//5.2 获得响应体内容并使用EntityUtils工具进行处理String str = EntityUtils.toString(response.getEntity(),"UTF-8");System.out.println(str);}} catch (IOException e) {e.printStackTrace();}finally {//6 释放资源response.close();httpClient.close();}
使用HttpClient发送Post请求
CloseableHttpClient httpClient = null;CloseableHttpResponse response = null;try {httpClient = HttpClients.createDefault();HttpPost httpPost = new HttpPost("http://localhost:9090/user");// 设置请求头httpPost.setHeader("content-type","application/json;charset=utf-8");// 设置并处理请求体String str = "{\"username\":\"jack\",\"password\":\"1111\"}";httpPost.setEntity(new StringEntity(str,"utf-8"));response = httpClient.execute(httpPost);if (response.getStatusLine().getStatusCode() == 200){System.out.println(EntityUtils.toString(response.getEntity()));}} catch (IOException e) {e.printStackTrace();}finally {response.close();httpClient.close();}
使用HttpClient发送Put请求
CloseableHttpClient httpClient = null;CloseableHttpResponse response = null;try {httpClient = HttpClients.createDefault();HttpPut httpPut = new HttpPut("http://localhost:9090/user");httpPut.setHeader("content-type","application/json;charset=utf-8");String jsonStr = JSON.toJSONString(new User(1, "jack", "1111", 18));httpPut.setEntity(new StringEntity(jsonStr,"utf-8"));response = httpClient.execute(httpPut);if (response.getStatusLine().getStatusCode() == 200){System.out.println(EntityUtils.toString(response.getEntity()));}} catch (IOException e) {e.printStackTrace();} finally {response.close();httpClient.close();}
使用HttpClient发送Delete请求
CloseableHttpClient httpClient = null;CloseableHttpResponse response = null;try {//1, 创建客户端httpClient = HttpClients.createDefault();//2, 创建DELETE实例HttpDelete httpDelete = new HttpDelete("http://localhost:9090/user/1");//3, 发送请求response = httpClient.execute(httpDelete);//4, 判断状态码if (response.getStatusLine().getStatusCode() == 200){//5, 实用工具处理响应数据System.out.println(EntityUtils.toString(response.getEntity()));}} catch (IOException e) {e.printStackTrace();} finally {//6, 释放资源response.close();httpClient.close();}
4.RestTemplate
RestTemplate是Spring提供的用于访问Rest服务的客户端,
RestTemplate提供了多种便捷访问远程Http服务的方法,能够大大提高客户端的编写效率
Get请求
[@Test](https://my.oschina.net/azibug)public void testGet(){RestTemplate restTemplate = new RestTemplate();// 设置url,返回值类型ResponseEntity<BaseResult> entity = restTemplate.getForEntity("http://localhost:9090/user", BaseResult.class);// 返回状态码System.out.println(entity.getStatusCode());// 返回响应体System.out.println(entity.getBody().getData());}
Post请求
[@Test](https://my.oschina.net/azibug)public void testLogin(){RestTemplate restTemplate = new RestTemplate();// 设置url,请求体(自动处理),返回值类型ResponseEntity<User> entity = restTemplate.postForEntity("http://localhost:9090/user/login", new User(1,"jack","1234",18), User.class);System.out.println(entity.getStatusCodeValue());System.out.println(entity.getBody());}
Put请求
[@Test](https://my.oschina.net/azibug)public void testPut(){RestTemplate restTemplate = new RestTemplate();// 设置urlrestTemplate.put("http://localhost:9090/user",new User(1,"jack","1234",18));System.out.println("修改成功");}
Delete请求
[@Test](https://my.oschina.net/azibug)public void testDelete(){RestTemplate restTemplate = new RestTemplate();// 设置urlrestTemplate.delete("http://localhost:9090/user/1");System.out.println(" 删除成功");}
5.SpringBoot 整合 HttpClient及RestTemplate自定义连接池
package com.czxy.config;import org.apache.http.client.HttpClient;import org.apache.http.client.config.RequestConfig;import org.apache.http.impl.client.CloseableHttpClient;import org.apache.http.impl.client.HttpClients;import org.apache.http.impl.conn.PoolingHttpClientConnectionManager;import org.springframework.context.annotation.Bean;import org.springframework.context.annotation.Configuration;import org.springframework.http.client.ClientHttpRequestFactory;import org.springframework.http.client.HttpComponentsClientHttpRequestFactory;import org.springframework.http.converter.HttpMessageConverter;import org.springframework.http.converter.StringHttpMessageConverter;import org.springframework.web.client.RestTemplate;import java.nio.charset.Charset;import java.util.List;/*** Created by 澈 on 2019/12/3.*/@Configurationpublic class HttpClientConfig {//1. 自定义连接 httpClient@Beanpublic CloseableHttpClient httpClient(PoolingHttpClientConnectionManager connectionManager,RequestConfig requestConfig){return HttpClients.custom().setConnectionManager(connectionManager).setDefaultRequestConfig(requestConfig).build();}//2. 配置PoolingHttpClientConnectionManager@Beanpublic PoolingHttpClientConnectionManager connectionManager(){//1. HttpClient连接管理器PoolingHttpClientConnectionManager connectionManager = new PoolingHttpClientConnectionManager();//1.1. 最大连接数connectionManager.setMaxTotal(1000);//1.2. 设置并发访问数connectionManager.setDefaultMaxPerRoute(20);return connectionManager;}//3. 配置RequestConfig@Beanpublic RequestConfig requestConfig(){//1.3. 请求配置RequestConfigreturn RequestConfig.custom().setConnectTimeout(1000).setConnectionRequestTimeout(500).setSocketTimeout(10 * 1000).build();}//4. 创建一个工厂@Beanpublic ClientHttpRequestFactory requestFactory(HttpClient httpClient){return new HttpComponentsClientHttpRequestFactory(httpClient);}//5. 配置restTemplate@Beanpublic RestTemplate restTemplate(ClientHttpRequestFactory requestFactory){RestTemplate template = new RestTemplate(requestFactory);//乱码处理List<HttpMessageConverter<?>> list = template.getMessageConverters();for (HttpMessageConverter<?> mc : list) {if (mc instanceof StringHttpMessageConverter) {((StringHttpMessageConverter) mc).setDefaultCharset(Charset.forName("UTF-8"));}}return template;}}
6.整合SpringBoot测试类
在测试代码中可以进行Spring容器的注册
package com.czxy;
import com.alibaba.fastjson.JSON;
import com.czxy.domain.User;
import org.apache.http.client.config.RequestConfig;
import org.apache.http.client.methods.CloseableHttpResponse;
import org.apache.http.client.methods.HttpPost;
import org.apache.http.entity.StringEntity;
import org.apache.http.impl.client.CloseableHttpClient;
import org.apache.http.impl.conn.PoolingHttpClientConnectionManager;
import org.apache.http.util.EntityUtils;
import org.junit.Test;
import org.junit.runner.RunWith;
import org.springframework.boot.test.context.SpringBootTest;
import org.springframework.web.client.RestTemplate;import javax.annotation.Resource;
import java.io.IOException;/**
Created by 澈 on 2019/12/4.
*/
@RunWith(SpringRunner.class) //spring 整合junit
@SpringBootTest(classes = HttpClientApplication.class) //spring整合启动类
public class Test04 {@Resource
private CloseableHttpClient httpClient;
@Resource
private RestTemplate restTemplate;
@Resource
private PoolingHttpClientConnectionManager connectionManager;
@Resource
private RequestConfig requestConfig;@Test
public void testDemo02(){System.out.println(httpClient);System.out.println(restTemplate);System.out.println(connectionManager);System.out.println(requestConfig);
}
}
springboot装配OkHttp组件
在SpringBoot应用中,发送Http通常我们使用RestTemplate,但有部分组件底层是使用OkHttp进行Http的操作,而且OKHttp也是一个很优秀的HTTP组件。
RestTempate的springboot封装参考:https://www.cnblogs.com/yangzhilong/p/6640207.html
application.yml
okhttp:connect-timeout-ms: 500keep-alive-duration-sec: 5000max-idle: 100read-timeout-ms: 500write-timeout-ms: 500
Configuration:

import java.util.concurrent.TimeUnit;import javax.annotation.Resource;import javax.validation.constraints.NotNull;import org.springframework.boot.context.properties.ConfigurationProperties;import org.springframework.context.annotation.Bean;import org.springframework.stereotype.Component;import org.springframework.validation.annotation.Validated;import com.longge.gateway.util.OkHttpUtils;import lombok.Getter;import lombok.Setter;import okhttp3.ConnectionPool;import okhttp3.OkHttpClient;/*** @author roger yang* @date 9/16/2019*/public class OkHttpConfiguration {@Resourceprivate OkHttpConfig okHttpConfig;@Beanpublic OkHttpClient okHttpClient() {OkHttpClient client = new OkHttpClient.Builder().retryOnConnectionFailure(false).connectionPool(pool()).connectTimeout(okHttpConfig.getConnectTimeoutMs(), TimeUnit.MILLISECONDS).readTimeout(okHttpConfig.getReadTimeoutMs(), TimeUnit.MILLISECONDS).writeTimeout(okHttpConfig.getWriteTimeoutMs(),TimeUnit.MILLISECONDS).build();OkHttpUtils.setOkHttpClient(client);return client;}@Beanpublic ConnectionPool pool() {return new ConnectionPool(okHttpConfig.getMaxIdle(), okHttpConfig.getKeepAliveDurationSec(), TimeUnit.SECONDS);}@Component@ConfigurationProperties(prefix = "okhttp")@Getter@Setter@Validatedstatic class OkHttpConfig {@NotNullprivate Long connectTimeoutMs;@NotNullprivate Long readTimeoutMs;@NotNullprivate Long writeTimeoutMs;@NotNullprivate Integer maxIdle;@NotNullprivate Long keepAliveDurationSec;}}
Util帮助类:
import java.io.IOException;import java.net.MalformedURLException;import java.net.URL;import java.util.Map;import java.util.Objects;import com.alibaba.fastjson.JSONObject;import lombok.NonNull;import okhttp3.Callback;import okhttp3.FormBody;import okhttp3.Headers;import okhttp3.MediaType;import okhttp3.OkHttpClient;import okhttp3.Request;import okhttp3.RequestBody;import okhttp3.Response;/*** 参数中Callback表示发送异步请求* @author roger yang* @date 9/16/2019*/public class OkHttpUtils {private static OkHttpClient okHttpClient;public static void setOkHttpClient(OkHttpClient client) {okHttpClient = client;}/*** GET Method begin---------------------------------*/public static <T> T get(@NonNull String url, Class<T> clasz) {return get(url, null, null, clasz);}public static void get(@NonNull String url, Callback callback) {get(url, null, null, callback);}public static <T> T get(@NonNull String url, Map<String, String> queryParameter, Class<T> clasz) {return get(url, null, queryParameter, clasz);}public static void get(@NonNull String url, Map<String, String> queryParameter, Callback callback) {get(url, null, queryParameter, callback);}public static <T> T get(@NonNull String url, Map<String, String> headerParameter, Map<String, String> queryParameter, Class<T> clasz) {Request request = processGetParameter(url, headerParameter, queryParameter);try (Response resp = okHttpClient.newCall(request).execute();) {return processResponse(resp, clasz);} catch (Exception e) {throw new RuntimeException(e);}}public static void get(@NonNull String url, Map<String, String> headerParameter, Map<String, String> queryParameter, Callback callback) {Request request = processGetParameter(url, headerParameter, queryParameter);okHttpClient.newCall(request).enqueue(callback);}private static Request processGetParameter(String url, Map<String, String> headerParameter, Map<String, String> queryParameter) {Request.Builder builder = new Request.Builder();if (!isEmptyMap(headerParameter)) {builder.headers(Headers.of(headerParameter));}if (isEmptyMap(queryParameter)) {builder.url(url);} else {boolean hasQuery = false;try {hasQuery = new URL(url).getQuery().isEmpty();} catch (MalformedURLException e) {throw new RuntimeException("url is illegal");}StringBuilder sb = new StringBuilder(url);if (!hasQuery) {sb.append("?1=1");}queryParameter.forEach((k, v) -> {sb.append("&").append(k).append("=").append(v);});builder.url(sb.toString());}return builder.build();}/*** POST Method With JSON begin---------------------------------*/public static <T> T postJson(@NonNull String url, Class<T> clasz) {return postJson(url, null, null, clasz);}public static void postJson(@NonNull String url, Callback callback) {postJson(url, null, null, callback);}public static <T> T postJson(@NonNull String url, Map<String, String> headerParameter, Class<T> clasz) {return postJson(url, headerParameter, null, clasz);}public static void postJson(@NonNull String url, Map<String, String> headerParameter, Callback callback) {postJson(url, headerParameter, null, callback);}public static <T> T postJson(@NonNull String url, Map<String, String> headerParameter, Object bodyObj, Class<T> clasz) {Request request = processPostJsonParameter(url, headerParameter, bodyObj);try (Response resp = okHttpClient.newCall(request).execute();) {return processResponse(resp, clasz);} catch (Exception e) {throw new RuntimeException(e);}}public static void postJson(@NonNull String url, Map<String, String> headerParameter, Object bodyObj, Callback callback) {Request request = processPostJsonParameter(url, headerParameter, bodyObj);okHttpClient.newCall(request).enqueue(callback);}private static Request processPostJsonParameter(String url, Map<String, String> headerParameter, Object bodyObj) {Request.Builder builder = new Request.Builder().url(url);if(!Objects.isNull(bodyObj)) {RequestBody body = RequestBody.create(MediaType.parse("application/json; charset=utf-8"), JSONObject.toJSONString(bodyObj));builder.post(body);} else {RequestBody body = RequestBody.create(MediaType.parse("application/json; charset=utf-8"), "{}");builder.post(body);}if (!isEmptyMap(headerParameter)) {builder.headers(Headers.of(headerParameter));}return builder.build();}/*** POST Method With Form begin---------------------------------*/public static <T> T postForm(@NonNull String url, Class<T> clasz) {return postForm(url, null, null, clasz);}public static void postForm(@NonNull String url, Callback callback) {postForm(url, null, null, callback);}public static <T> T postForm(@NonNull String url, Map<String, String> headerParameter, Class<T> clasz) {return postForm(url, headerParameter, null, clasz);}public static void postForm(@NonNull String url, Map<String, String> headerParameter, Callback callback) {postForm(url, headerParameter, null, callback);}public static <T> T postForm(@NonNull String url, Map<String, String> headerParameter, Map<String, String> parameters, Class<T> clasz) {Request request = processPostFormParameter(url, headerParameter, parameters);try (Response resp = okHttpClient.newCall(request).execute();) {return processResponse(resp, clasz);} catch (Exception e) {throw new RuntimeException(e);}}public static void postForm(@NonNull String url, Map<String, String> headerParameter, Map<String, String> parameters, Callback callback) {Request request = processPostFormParameter(url, headerParameter, parameters);okHttpClient.newCall(request).enqueue(callback);}private static Request processPostFormParameter(String url, Map<String, String> headerParameter, Map<String, String> parameters) {Request.Builder builder = new Request.Builder().url(url);if(!Objects.isNull(parameters)) {FormBody.Builder formBuilder = new FormBody.Builder();parameters.forEach((k, v) -> {formBuilder.add(k, v);});builder.post(formBuilder.build());}if (!isEmptyMap(headerParameter)) {builder.headers(Headers.of(headerParameter));}return builder.build();}@SuppressWarnings("unchecked")private static <T> T processResponse(Response resp, Class<T> clasz) throws IOException {if (resp.isSuccessful()) {if (Objects.equals(Void.class, clasz)) {return null;}String respStr = resp.body().string();if(Objects.equals(String.class, clasz)) {return (T)respStr;}return JSONObject.parseObject(respStr, clasz);}return null;}private static boolean isEmptyMap(Map<? extends Object, ? extends Object> map) {return Objects.isNull(map) || map.isEmpty();}}
GitHub地址:https://github.com/yangzhilong/new-gateway-test.git
如果想要OkHttp的装配是非自动的,可以采用自定义@EnableXX注解来实现。
import java.lang.annotation.Documented;import java.lang.annotation.ElementType;import java.lang.annotation.Retention;import java.lang.annotation.RetentionPolicy;import java.lang.annotation.Target;import org.springframework.context.annotation.Import;import com.longge.gateway.configuration.OkHttpConfiguration;/*** @author roger yang* @date 9/16/2019*/@Target(ElementType.TYPE)@Retention(RetentionPolicy.RUNTIME)@Documented@Import(OkHttpConfiguration.class)public @interface EnableOkHttp {}
然后把OkHttpConfiguration类的@Configuration注解去掉,当你要用时在启动类加上@EnableOkHttp即可。
对于OKhttp的设置还可参考:
1、简介
OkHttp是一个高效的HTTP客户端,允许所有同一个主机地址的请求共享同一个socket连接;连接池减少请求延时;透明的GZIP压缩减少响应数据的大小;缓存响应内容,避免一些完全重复的请求
当网络出现问题的时候OkHttp依然坚守自己的职责,它会自动恢复一般的连接问题,如果你的服务有多个IP地址,当第一个IP请求失败时,OkHttp会交替尝试你配置的其他IP,OkHttp使用现代TLS技术(SNI, ALPN)初始化新的连接,当握手失败时会回退到TLS 1.0。
1)使用:它的请求/响应 API 使用构造器模式builders来设计,它支持阻塞式的同步请求和带回调的异步请求。
<dependency><groupId>com.squareup.okhttp3</groupId><artifactId>okhttp</artifactId><version>3.10.0</version></dependency>import okhttp3.ConnectionPool;import okhttp3.OkHttpClient;import org.springframework.context.annotation.Bean;import org.springframework.context.annotation.Configuration;import org.springframework.http.client.ClientHttpRequestFactory;import org.springframework.http.client.OkHttp3ClientHttpRequestFactory;import org.springframework.web.client.RestTemplate;import javax.net.ssl.SSLContext;import javax.net.ssl.SSLSocketFactory;import javax.net.ssl.TrustManager;import javax.net.ssl.X509TrustManager;import java.security.KeyManagementException;import java.security.NoSuchAlgorithmException;import java.security.SecureRandom;import java.security.cert.CertificateException;import java.security.cert.X509Certificate;import java.util.concurrent.TimeUnit;@Configurationpublic class OkHttpRestTemplateConfig {@Bean("okHttpRestTemplate")public RestTemplate okHttpRestTemplate() {OkHttpClient httpClient = okHttpClient();ClientHttpRequestFactory factory = new OkHttp3ClientHttpRequestFactory(httpClient);RestTemplate restTemplate = new RestTemplate(factory);// 可以添加消息转换//restTemplate.setMessageConverters(...);// 可以增加拦截器//restTemplate.setInterceptors(...);return restTemplate;}@Beanpublic OkHttpClient okHttpClient() {return new OkHttpClient.Builder()//.sslSocketFactory(sslSocketFactory(), x509TrustManager()).retryOnConnectionFailure(false).connectionPool(pool()).connectTimeout(30, TimeUnit.SECONDS).readTimeout(30, TimeUnit.SECONDS).writeTimeout(30,TimeUnit.SECONDS).build();}@Beanpublic X509TrustManager x509TrustManager() {return new X509TrustManager() {@Overridepublic void checkClientTrusted(X509Certificate[] x509Certificates, String s) throws CertificateException {}@Overridepublic void checkServerTrusted(X509Certificate[] x509Certificates, String s) throws CertificateException {}@Overridepublic X509Certificate[] getAcceptedIssuers() {return new X509Certificate[0];}};}@Beanpublic SSLSocketFactory sslSocketFactory() {try {//信任任何链接SSLContext sslContext = SSLContext.getInstance("TLS");sslContext.init(null, new TrustManager[]{x509TrustManager()}, new SecureRandom());return sslContext.getSocketFactory();} catch (NoSuchAlgorithmException e) {e.printStackTrace();} catch (KeyManagementException e) {e.printStackTrace();}return null;}/*** Create a new connection pool with tuning parameters appropriate for a single-user application.* The tuning parameters in this pool are subject to change in future OkHttp releases. Currently*/@Beanpublic ConnectionPool pool() {return new ConnectionPool(200, 5, TimeUnit.MINUTES);}}


还没有评论,来说两句吧...