原生微信小程序,搜索框(search)组件
原生微信小程序,搜索框(search)组件
首先创建组件及两个跳转页面,第一个是搜索框所在的页面(首页),第二个是搜索详细页
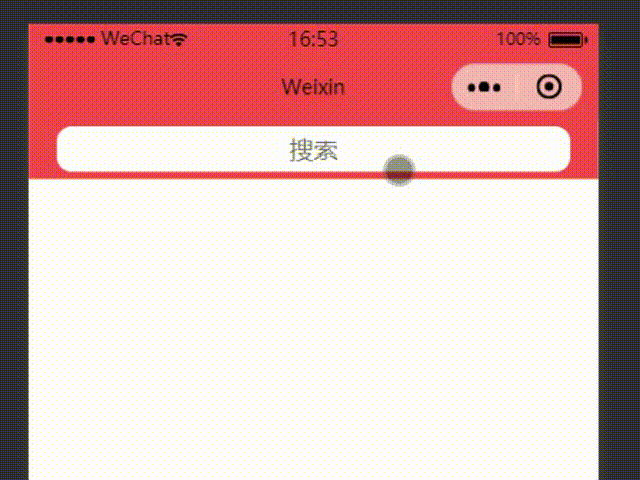
搜索框的本质是:搜索框不是input,而是navigate,跳转到专门的搜索页,搜索结果会呈现在这一页
先创建三个文件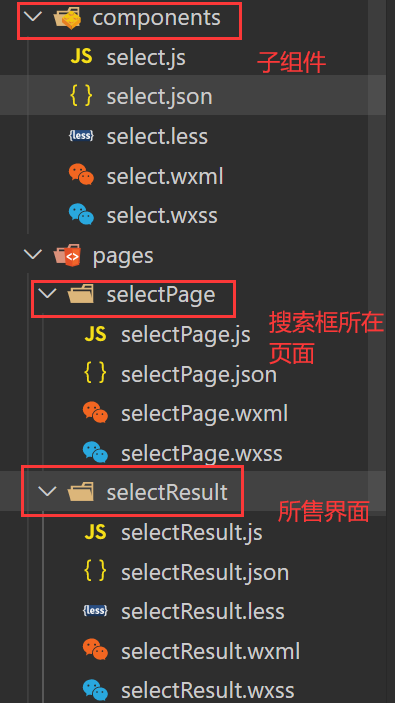
标题selectPage页面的编写
在 selectPage.wxml 文件里引入搜索框组件
引入组件之前记得在 selectPage.json 文件中配置 组件
{"usingComponents": {"search": "../../components/select"}}<!-- 父组件向子组件传递参数,使用属性的形式,子组件通过 properties进行参数接收 --><search urlPath="{ {urlPath}}" url="../selectResult/selectResult"></search>
最后在 JS 文件中 设置url路径,因为我们的目的是制作组件,所以参数这块都由父组件传递过去
到这里,selectPage 的任务基本完成了
Page({data: {urlPath: "../selectResult/selectResult"},onLoad: function (options) {}})
组件的编写
搜索组件的基本 结构层 写一下
<view class="search_wrap"><navigator url="{ {urlPath}}">搜索</navigator></view>
css样式也随便改一改,自己看的舒服就行,这里用的是less语言
/* components/select.wxss */.search_wrap {width: 100%;height: 80rpx;background-color: #eb4450;display: flex;justify-content: center;align-items: center; navigator {text-align: center;padding: 10rpx;width: 90%;background-color: #fff;color: #6b6b6b;border-radius: 20rpx;}}
JS文件中接收一下来自父元素传递过来的URL路径参数
// components/select.jsComponent({properties: {urlPath: {type: String}},data: {},methods: {}})
selectResult 页面的编写
结构层
<view class="search_row"><input value="{ {inputValue}}" bindinput="handleInput" class="inp" placeholder="请输入"></input><button class="btn" bind:tap="handleCanle">取消</button></view><view class="search_content"><view class="search_item" wx:for="{ {searchResult}}">{{item.goods_name}}</view></view>
表示层
page {background-color: #ebebeb;padding: 20rpx;}.search_row {height: 60rpx;display: flex; .inp {background-color: #fff;height: 100%;padding-left: 20rpx;flex: 4;border-radius: 5rpx;}.btn {width: 110rpx;height: 100%;font-size: 26rpx;font-weight: normal;padding: 0;margin: 0 0 0 10rpx;display: flex;justify-content: center;align-items: center;}}.search_content {margin-top: 30rpx; .search_item {overflow: hidden;white-space: nowrap;text-overflow: ellipsis;background-color: #fff;border-bottom: 1px solid #7e7e7e;height: 60rpx;padding: 10rpx;font-size: 26rpx;}}
行为层
// pages/selectResult/selectResult.jsPage({data: {// 定义搜索结果变量,初始化为空数组searchResult: [],// 定义inputValue,输入框的input值,初始化为空inputValue: ""},handleInput: function (e) {// 获取输入框的值const { value } = e.detail// 合法性验证,去除前后空格,防止打很多空格也会发送请求// 去除空格后的值是合法值了,再取反,为不合法值,不合法搜索结果清空if (!value.trim()) {this.setData({searchResult: [],})// 值不合法,直接return掉,不用执行下面的了return;}/** * 防抖动功能 * 1 如果第一次输入的值合法,会执行this.TimeId这个定时器,然后一秒钟之后发送请求 * 2 如果在这1秒钟的延迟内,用户重新做了输入,重新触发handleInput方法时,会执行clearTimeout * 将上一个定时器请求杀掉,然后再执行新的定时器函数,直到用户1庙后都没有新的输入后,才会发送请求 */clearTimeout(this.TimeId)this.TimeId = setTimeout(() => {this.qSearch(value)}, 1000)},// qSearch 发送请求函数(参数为输入框中的值)qSearch: function (query) {// 定义一个加载中的提示wx.showLoading({title: '加载中...',})// 发送请求wx.request,微信封装好的ajax请求// 参数有两个需要传递的// url,接口地址// data,搜索的关键词,这边接口会自动处理并返回带有关键词的内容,// 不是因为wx.request又会发送ajax,还会给你自动筛选wx.request({url: 'https://api-hmugo-web.itheima.net/api/public/v1/goods/qsearch',data: { query },// 请求成功时调用success: (result) => {// 将获取的值,赋值给定义的searchResult,WXML文件获取渲染this.setData({searchResult: result.data.message})// 成功获取数据后,把加载中的提示关掉wx.hideLoading({complete: (res) => { },})}});},// 取消按钮函数handleCanle: function () {this.setData({searchResult: [],inputValue: ""})}})
gitee代码地址:https://gitee.com/chenminghuisir/wechat-applet-component.git
代码保存在仓库,WXDoubleScroller文件里


还没有评论,来说两句吧...