Vue中使用swiper插件实现轮播图
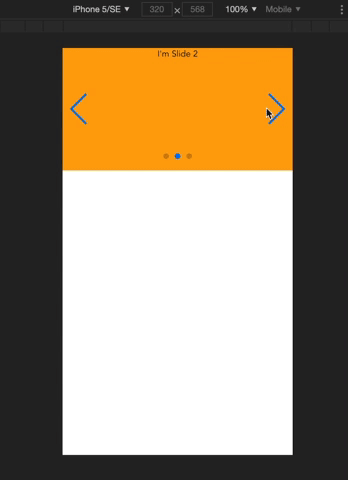
最终效果如图:
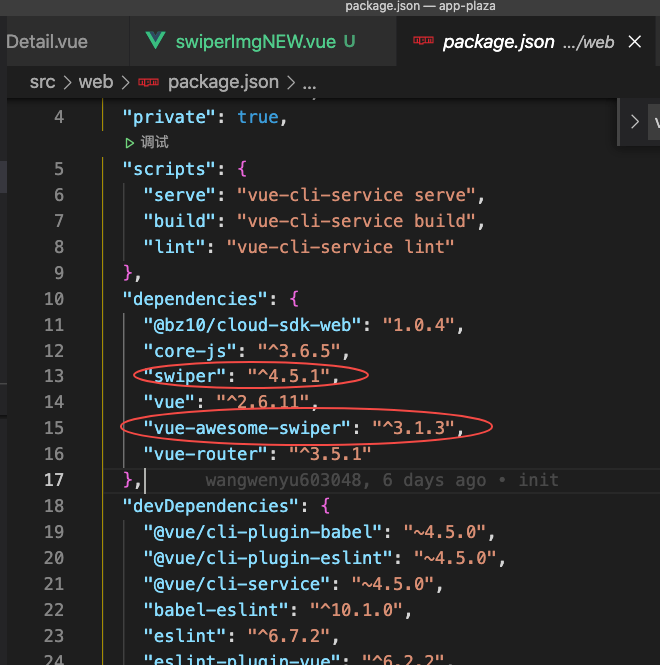
为了更稳定不建议使用最新版本swiper
下载指定版本如下图:
用到vue-awesome-swiper组件支持vue的写法:
终端输入如下命令下载vue-awesome-swiper和swiper
npm install vue-awesome-swiper@3 swiper@4 —save
组件内的使用: 重点是引入这两个文件:
import “swiper/dist/css/swiper.css”;
import { swiper, swiperSlide } from “vue-awesome-swiper”;
<template><!-- 帖子图片轮播 --><div class="swiperImgPage"><swiper :options="swiperOption" ref="mySwiper"><swiper-slide>I'm Slide 1</swiper-slide><swiper-slide>I'm Slide 2</swiper-slide><swiper-slide>I'm Slide 3</swiper-slide><divclass="swiper-pagination"slot="pagination"></div><div class="swiper-button-prev" slot="button-prev"></div><div class="swiper-button-next" slot="button-next"></div></swiper></div></template><script>import "swiper/dist/css/swiper.css";import { swiper, swiperSlide } from "vue-awesome-swiper";let vm = null;export default {name: "swiperImg",data() {return {activeSlide: 0, //获取当前的索引值//里面的自定义的需求配置去看swiper文档的 基本的样式都出来了swiperOption: {/* 设定初始化时slide的索引。Swiper默认初始化时显示第一个slide,有时想初始化时直接显示其他slide,可以做此设置。*/initialSlide: 0, //初始化索引loop: true,// allowTouchMove:true,// 显示分页pagination: {el: ".swiper-pagination",clickable: true, //允许分页点击跳转},on: {//滑动触发的事件slideChange() {console.log(this.activeIndex);console.log(this);vm.activeSlide = this.activeIndex;},//点击触发事件tap(swiper, event) {console.log("你碰了Swiper", swiper.target.currentSrc, event);},},autoplay: {delay: 3000,stopOnLastSlide: false,disableOnInteraction: false,},// 设置点击箭头navigation: {nextEl: ".swiper-button-next",prevEl: ".swiper-button-prev",},},};},created() {vm = this;},computed: {swiper() {return this.$refs.mySwiper.swiper;},},components: {swiper,swiperSlide,},mounted() {// // 然后你就可以使用当前上下文内的swiper对象去做你想做的事了console.log("this is current swiper instance object", this.swiper);},methods: {},};</script><!-- Add "scoped" attribute to limit CSS to this component only --><style lang="scss">$myPadding: rpx(30);.swiperImgPage {box-sizing: border-box;width: 100%;position: relative;// 轮播图.swiper-container {width: 100%;// overflow: visible;.swiper-wrapper {display: flex;align-items: center;.swiper-slide {width: 100%;// display: none;height: rpx(400);color: #000;font-size: rpx(16);text-align: center;&:nth-child(1) {background: yellowgreen;}&:nth-child(2) {background: cyan;}&:nth-child(3) {background: orange;}&:nth-child(4) {background: rosybrown;}&:nth-child(5) {background: burlywood;}&:nth-child(6) {background: yellowgreen;}}}}}</style>
想要做逻辑处理看swiper文档 按照我说的基本就可以实现下面的效果 如果你没成功swiper和vue-awesome-swiper版本按照我说的来 (别自己发挥)


- 找指定长度的目标子串+哈希")
")


还没有评论,来说两句吧...