FFmpeg实现获取USB摄像头视频流测试代码
通过USB摄像头(注:windows7/10下使用内置摄像头,linux下接普通的usb摄像头(Logitech))获取视频流用到的模块包括avformat和avdevice。头文件仅include avdevice.h即可,因为avdevice.h中会include avformat.h。libavdevice库是libavformat的一个补充库(complementary library)。主要涉及到的接口函数包括:
avdevice_register_all:初始化libavdevice库并注册所有输入输出设备;
av_find_input_format:根据输入格式的名字查找AVInputFormat,在测试代码中,windows平台使用”vfwcap”(video for windows capture),linux平台使用”v4l2”(Video4Linux2);
avformat_alloc_context:分配AVFormatContext;
avformat_open_input:打开输入流并读取header;
avformat_find_stream_info:读取媒体文件的数据包以获取流信息;
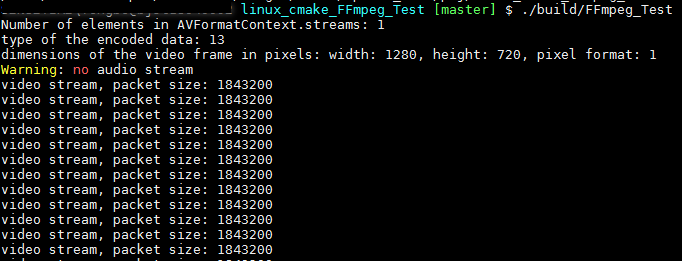
通过AVFormatContext中AVStream查找视频/音频流索引,这里在windows10下获取到的编码类型为mjpeg即AV_CODEC_ID_MJPEG,像素格式为yuv422p即AV_PIX_FMT_YUVJ422P;在linux或windows7下获取到的编码类型为rawvideo即AV_CODEC_ID_RAWVIDEO,像素格式yuyv422即AV_PIX_FMT_YUYV422;可见摄像头类型不同、系统不同获取到的编码类型和像素格式可能也不同;
av_read_frame:获取流即packet(AVPacket);
av_packet_unref:释放packet引用的缓冲区;
avformat_close_input:关闭打开的输入AVFormatContext。
测试代码如下(test_ffmpeg_usb_stream.cpp):
#include "funset.hpp"#include <iostream>#ifdef __cplusplusextern "C" {#endif#include <libavdevice/avdevice.h>#ifdef __cplusplus}#endifint test_ffmpeg_usb_stream(){avdevice_register_all();#ifdef _MSC_VERconst char* input_format_name = "vfwcap";const char* url = "";#elseconst char* input_format_name = "v4l2";const char* url = "/dev/video0";#endifAVInputFormat* fmt = av_find_input_format(input_format_name);AVFormatContext* ctx = avformat_alloc_context();int ret = avformat_open_input(&ctx, url, fmt, nullptr);if (ret != 0) {fprintf(stderr, "fail to open input stream: %d\n", ret);return -1;}// read packets of a media file to get stream informationret = avformat_find_stream_info(ctx, nullptr);if (ret < 0) {fprintf(stderr, "fail to get stream information: %d\n", ret);return -1;}// find audio/video stream indexint video_stream_index = -1;int audio_stream_index = -1;fprintf(stdout, "Number of elements in AVFormatContext.streams: %d\n", ctx->nb_streams);for (int i = 0; i < ctx->nb_streams; ++i) {const AVStream* stream = ctx->streams[i];fprintf(stdout, "type of the encoded data: %d\n", stream->codecpar->codec_id);if (stream->codecpar->codec_type == AVMEDIA_TYPE_VIDEO) {video_stream_index = i;fprintf(stdout, "dimensions of the video frame in pixels: width: %d, height: %d, pixel format: %d\n",stream->codecpar->width, stream->codecpar->height, stream->codecpar->format);}else if (stream->codecpar->codec_type == AVMEDIA_TYPE_AUDIO) {audio_stream_index = i;fprintf(stdout, "audio sample format: %d\n", stream->codecpar->format);}}if (video_stream_index == -1) {fprintf(stderr, "Error: no video stream\n");return -1;}if (audio_stream_index == -1) {fprintf(stdout, "Warning: no audio stream\n");}int cnt = 0;AVPacket pkt;while (1) {if (++cnt > 100) break;ret = av_read_frame(ctx, &pkt);if (ret < 0) {fprintf(stderr, "error or end of file: %d\n", ret);continue;}if (pkt.stream_index == video_stream_index) {fprintf(stdout, "video stream, packet size: %d\n", pkt.size);}if (pkt.stream_index == audio_stream_index) {fprintf(stdout, "audio stream, packet size: %d\n", pkt.size);}av_packet_unref(&pkt);}avformat_close_input(&ctx);fprintf(stdout, "test finish\n");return 0;}
Linux下执行结果如下:
GitHub:https://github.com/fengbingchun/OpenCV_Test


")


还没有评论,来说两句吧...