5.SpringCloud -- 配置中心 Config、消息总线 Bus、链路追踪 Sleuth、配置中心 Nacos
5.SpringCloud — 配置中心 Config、消息总线 Bus、链路追踪 Sleuth、配置中心 Nacos
- 一、引入配置中心
- 1.1 问题 与 解决
- 二、配置中心 — Config
- 2.1 Config 是什么?
- (1)Config 是什么?
- (2)Config 功能
- 2.2 搭建配置中心(Config Server)
- (1)建立一个 Git 仓库
- (2)新建一个子工程 config_server_9100,作为 Config Server
- 2.3 获取 Git 中配置文件的常见 HTTP 格式
- (1)格式说明
- 2.4 搭建客户端(Config Client)
- (1)新建一个子工程 config_client_9200,作为 Config Client
- 2.5 存在的问题(刷新问题)
- (1)问题
- (2)解决方案一(使用 actuator):
- 三、引入消息总线
- 3.1 问题与解决
- 四、消息总线 — Bus
- 4.1 Bus 是什么?
- (1)Bus 是什么?
- (2)如何实现?
- 4.2 使用 RabbitMQ 作为消息中间件
- 4.3 Config 整合 Bus
- 五、分布式链路追踪
- 5.1 问题 与 解决
- 5.2 分布式链路追踪 — Sleuth
- (1)Sleuth 是什么?
- (2)下载、启动 Zipkin Server
- 5.3 简单整合 Sleuth
- (1)说明
- (2)改造 config_server_9100
- (3)改造 config_client_9200
- (4)改造 config_client_9201
- (5)测试
- (6)演示服务调用错误
- 5.4 链路标识、日志整合
- (1)链路标识
- (2)日志整合
六、配置中心 Nacos
SpringCloud (一)— 从单体架构到微服务架构、代码拆分(maven 聚合)
- SpringCloud (二)— 服务注册中心 Eureka、Zookeeper、Consul、Nacos
- SpringCloud (三)— 服务调用、负载均衡 Ribbon、OpenFeign
- SpringCloud (四)— 服务降级、熔断 Hystrix、Sentinel
- SpringCloud (五)— 配置中心 Config、消息总线 Bus、链路追踪 Sleuth、配置中心 Nacos
- SpringCloud (六)— 注册中心与配置中心 Nacos、网关 Gateway
一、引入配置中心
1.1 问题 与 解决
【问题:】通过前面几篇博客介绍,完成了基本项目创建、服务注册中心、服务调用、负载均衡、服务降级 以及 服务熔断。即 各个模块 已经能正常通信、共同对外提供服务了,且有了一定的容错能力。对于一个复杂的分布式系统来说,可能存在数十个模块,每个模块都有不同的配置信息。而这就带来了一个问题 -- 如何修改配置信息?【如何修改配置信息:】一般修改配置信息后,都得重新启动一下服务以应用新的配置。在开发阶段,频繁修改配置信息、启动服务是很正常的,但是对于一个正在运行的系统,每次修改配置信息,都得重新启动一下服务,这期间的损失必然是很大的。举个例子:游戏中的停服维护,你玩某个游戏玩得正嗨,结果接到通知需停服 3 天进行维护,那岂不很蛋疼,瞬间失去了玩游戏的兴趣。对于一个复杂的分布式系统来说,可能存在数十个模块,若一个模块一个模块的进行 修改、重启服务,这将是一个非常繁琐、且易出错的工作。所以需要一款软件,用来 集中式的管理 配置信息、并实现动态修改配置信息。【解决:】集中式管理配置信息、动态修改配置信息。注:集中式管理,类似于 Eureka 服务注册中心进行理解,即可以在某个地方进行配置信息的处理(可以查看到所有的微服务的配置信息)。动态修改,即不需要重启微服务,修改后可以直接应用到正在运行的系统上。相关技术:ConfigNacos(推荐使用)
二、配置中心 – Config
2.1 Config 是什么?
(1)Config 是什么?
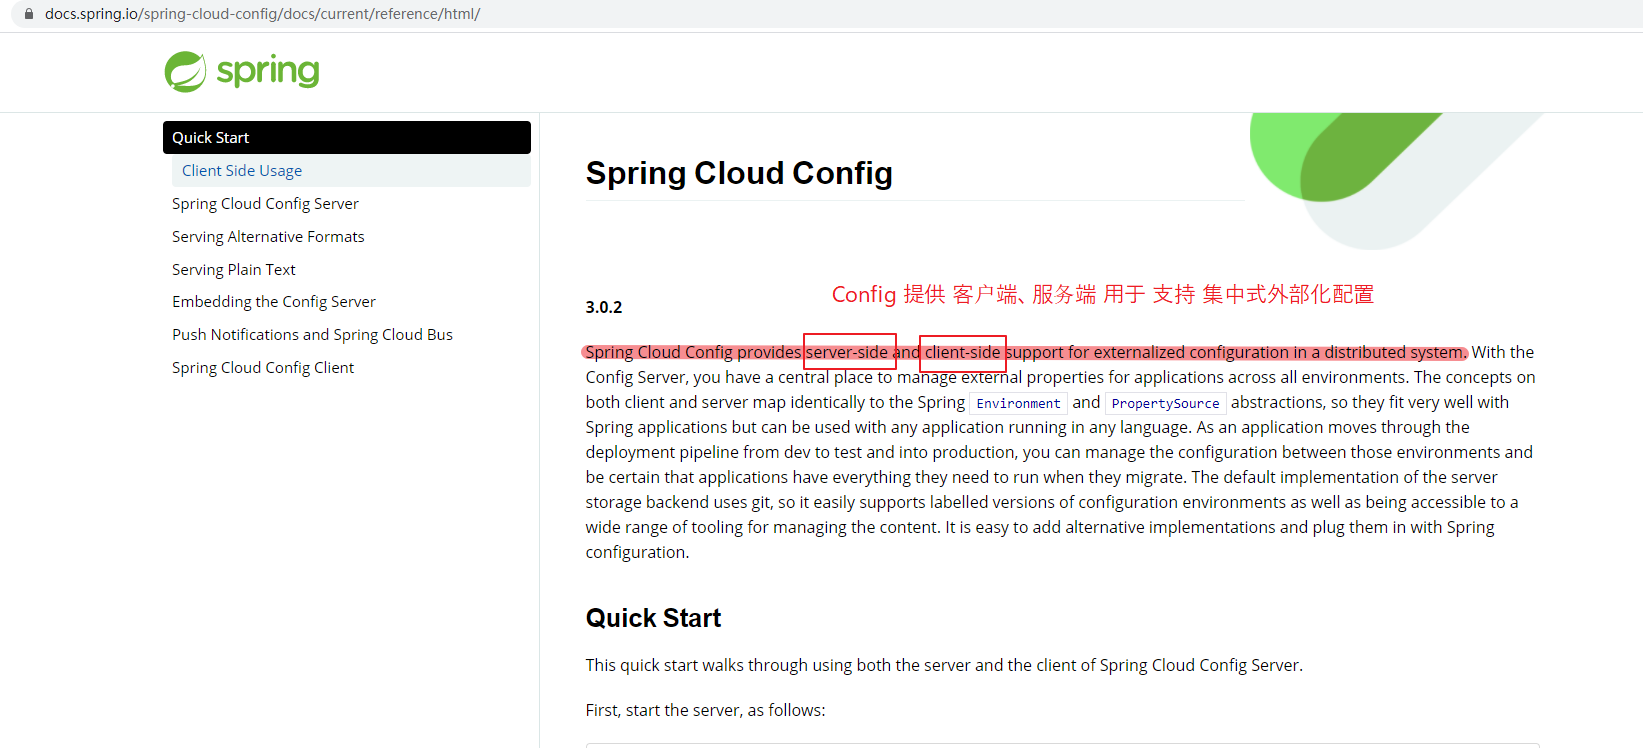
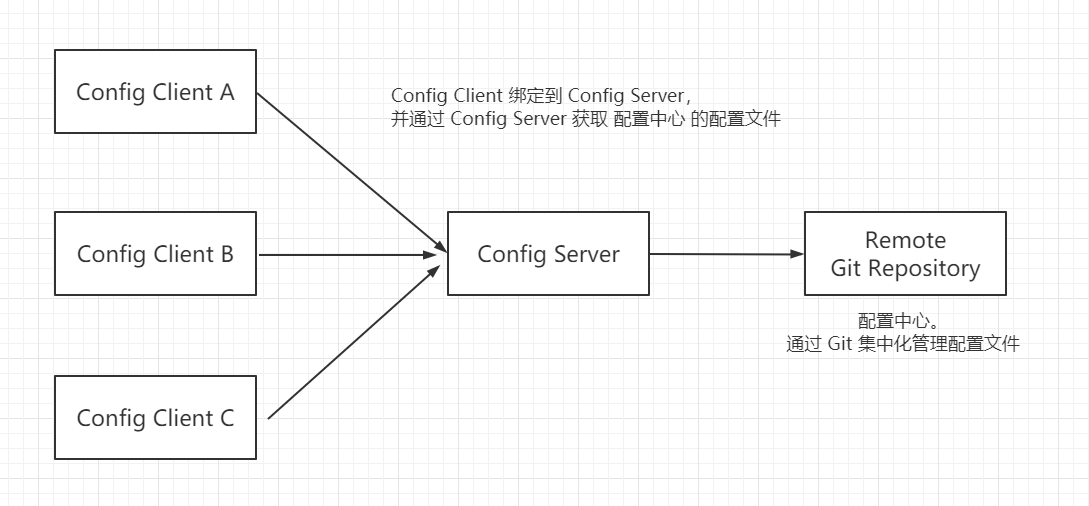
【Config:】SpringCloud Config 为分布式系统提供了集中式的外部配置支持。分为 服务器端(Config Server) 以及 客户端(Config Client)。Config Server:服务端也称为 分布式配置中心,属于一个独立的 微服务应用。其用于连接配置服务器,并向客户端提供配置信息。即使用 Config Server 可以集中管理所有环境的配置信息,其默认使用 Git 实现集中化管理的功能。注:使用 Git 管理配置信息,便于进行版本控制(可以使用 Git 客户端工具进行操作)。Config Client:客户端绑定指定的服务端,从配置中心获取配置信息。【官网地址:】https://spring.io/projects/spring-cloud-confighttps://docs.spring.io/spring-cloud-config/docs/current/reference/html/
(2)Config 功能
【功能:】集中式的管理配置文件。可以指定环境进行配置。比如:dev、test、prod、release 等。运行期间动态修改配置(在配置中心修改后,微服务从配置中心获取配置信息,微服务无需重启)。配置信息以 Rest 接口的形式对外暴露。
2.2 搭建配置中心(Config Server)
(1)建立一个 Git 仓库
Config Server 默认使用 Git 实现集中化管理配置信息,即 使用 Git 存储配置信息,
所以需要建立一个 Git 仓库,用于存储配置信息。
如下:
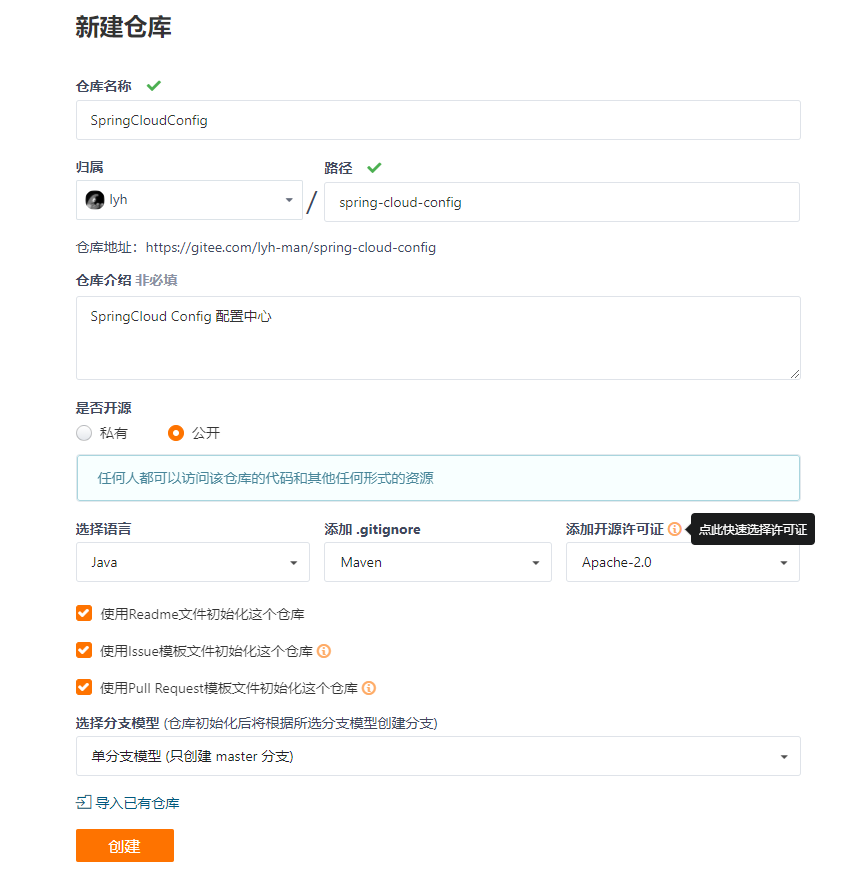
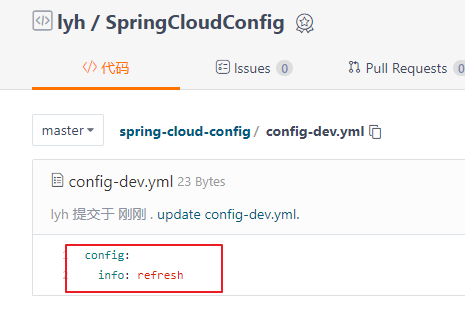
进入 码云 (或者 Github) 中,创建一个名为 SpringCloudConfig 的 Git 仓库。
仓库地址为:https://gitee.com/lyh-man/spring-cloud-config.git
(2)新建一个子工程 config_server_9100,作为 Config Server
Step1:
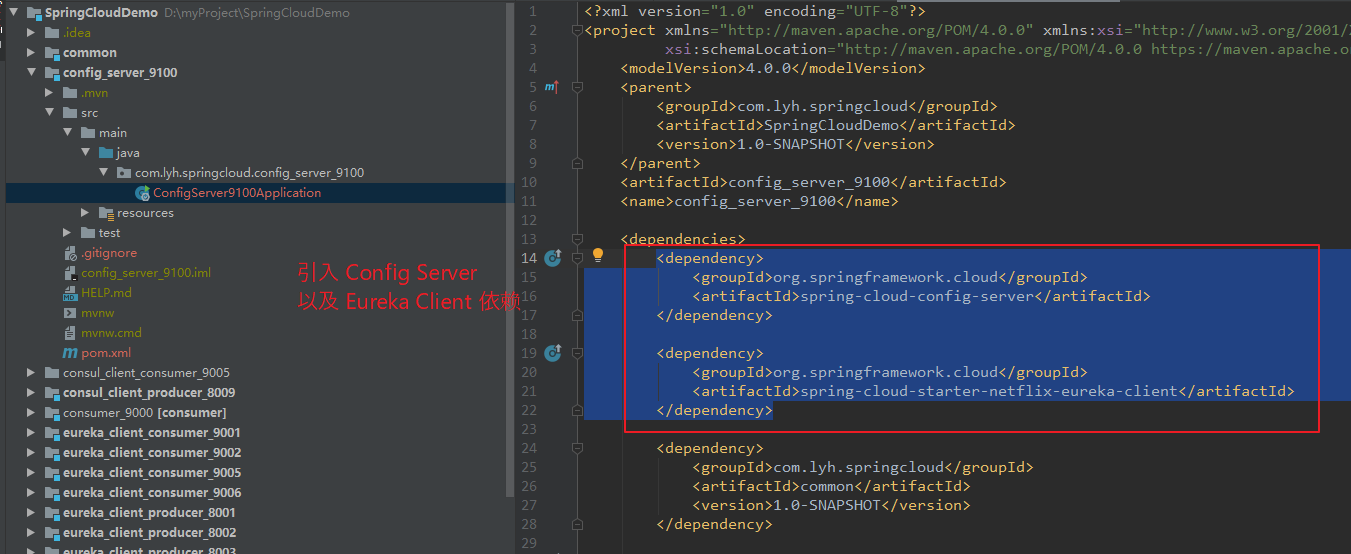
修改 父工程、当前工程 pom.xml 文件,并引入相关依赖。
此处以 Eureka 作为服务注册中心,需要引入相关依赖。
【依赖:】<dependency><groupId>org.springframework.cloud</groupId><artifactId>spring-cloud-config-server</artifactId></dependency><dependency><groupId>org.springframework.cloud</groupId><artifactId>spring-cloud-starter-netflix-eureka-client</artifactId></dependency>
Step2:
修改配置文件。
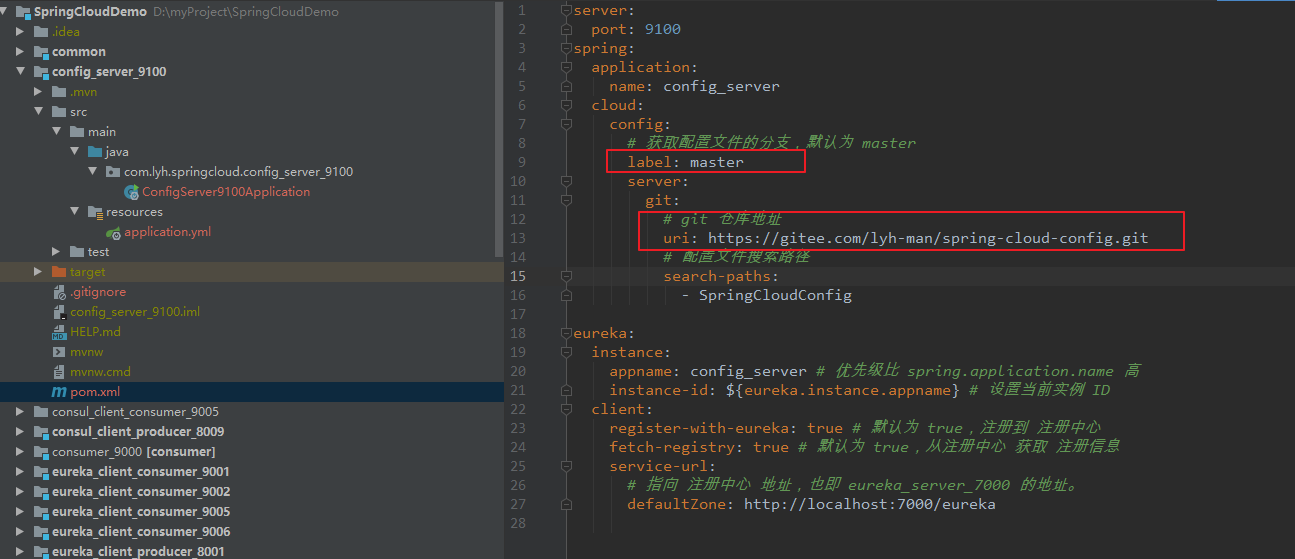
【application.yml】server:port: 9100spring:application:name: config_servercloud:config:# 获取配置文件的分支,默认为 masterlabel: masterserver:git:# git 仓库地址uri: https://gitee.com/lyh-man/spring-cloud-config.git# 配置文件搜索路径search-paths:- SpringCloudConfigeureka:instance:appname: config_server # 优先级比 spring.application.name 高instance-id: ${ eureka.instance.appname} # 设置当前实例 IDclient:register-with-eureka: true # 默认为 true,注册到 注册中心fetch-registry: true # 默认为 true,从注册中心 获取 注册信息service-url:# 指向 注册中心 地址,也即 eureka_server_7000 的地址。defaultZone: http://localhost:7000/eureka
Step3:
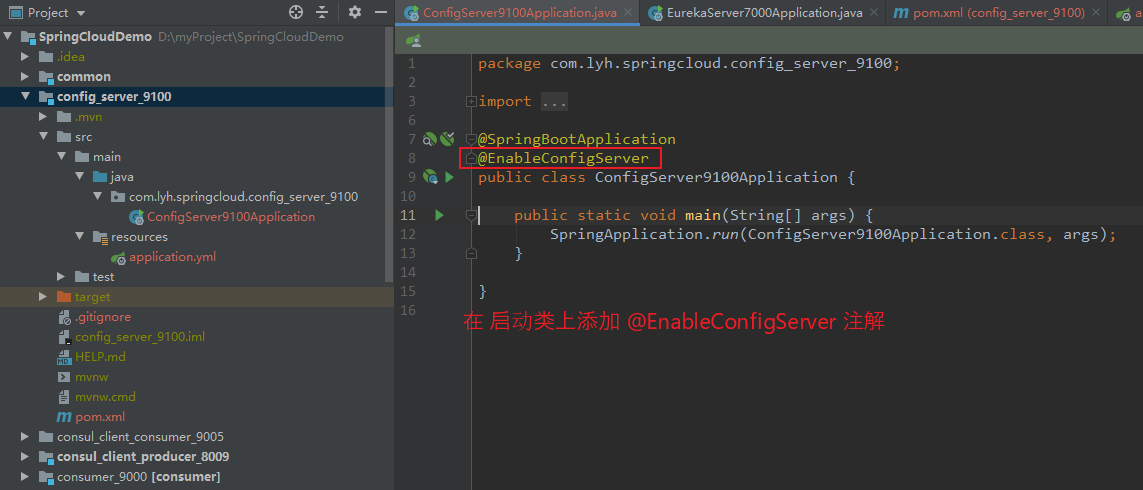
在 config_server_9100 启动类上添加 @EnableConfigServer 注解。
Step4:
启动 eureka_server_7000 以及 config_server_9100。
新增一个文件 config-dev.yml,并提交到 master 分支,内容如下:
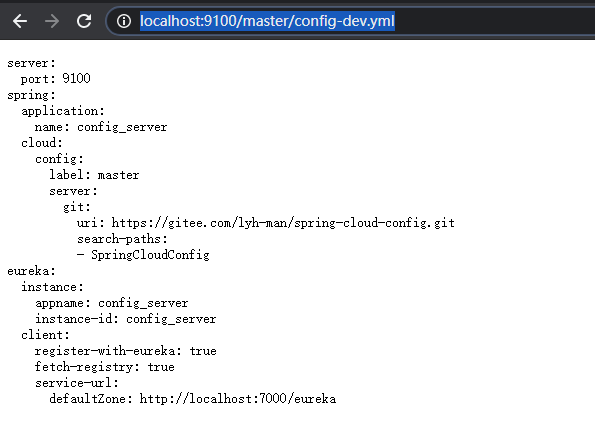
【config-dev.yml:】server:port: 9100spring:application:name: config_servercloud:config:# 获取配置文件的分支,默认为 masterlabel: masterserver:git:# git 仓库地址uri: https://gitee.com/lyh-man/spring-cloud-config.git# 配置文件搜索路径search-paths:- SpringCloudConfigeureka:instance:appname: config_server # 优先级比 spring.application.name 高instance-id: ${ eureka.instance.appname} # 设置当前实例 IDclient:register-with-eureka: true # 默认为 true,注册到 注册中心fetch-registry: true # 默认为 true,从注册中心 获取 注册信息service-url:# 指向 注册中心 地址,也即 eureka_server_7000 的地址。defaultZone: http://localhost:7000/eureka
此时访问:http://localhost:9100/master/config-dev.yml,即可获取到 master 分支下的 config-dev.yml 文件内容。
2.3 获取 Git 中配置文件的常见 HTTP 格式
(1)格式说明
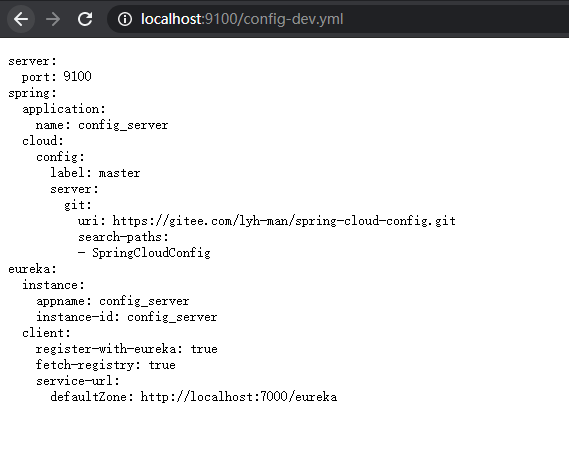
【三个参数:】label: 分支名application: 应用名(服务名)profile: 环境注:提交到 Git 的配置文件名 一般由 application 与 profile 组成。其命名风格一般为: application-profile.yml 或者 application-profile.properties。比如:config-dev.yml 、config-prod.yml 等。【HTTP 格式:】/{label}/{application}-{profile}.yml 或者 /{label}/{application}-{profile}.properties/{application}/{profile}/{label}比如:/master/config-dev.yml等价于/config/dev/master注:master 可以省略,默认为 master,即 也等价于 /config-dev.yml

2.4 搭建客户端(Config Client)
(1)新建一个子工程 config_client_9200,作为 Config Client
Step1:
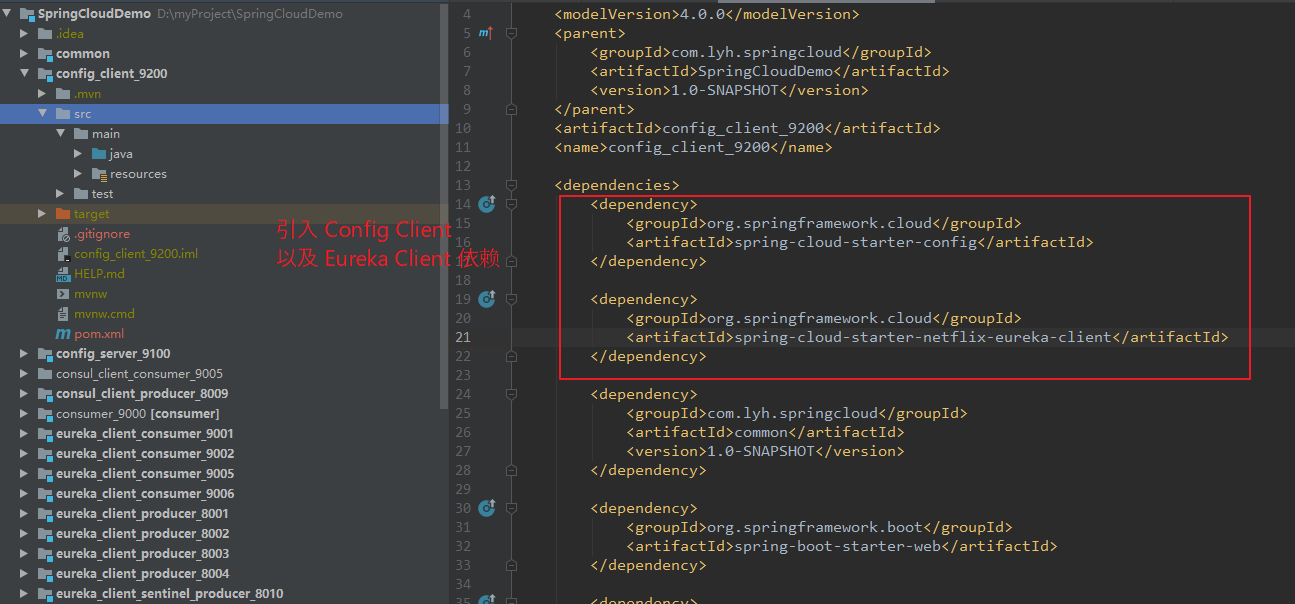
修改 父工程、当前工程 pom.xml 文件,并引入相关依赖。
此处以 Eureka 作为服务注册中心,需要引入相关依赖。
【依赖:】<dependency><groupId>org.springframework.cloud</groupId><artifactId>spring-cloud-config-server</artifactId></dependency><dependency><groupId>org.springframework.cloud</groupId><artifactId>spring-cloud-starter-netflix-eureka-client</artifactId></dependency>
Step2:
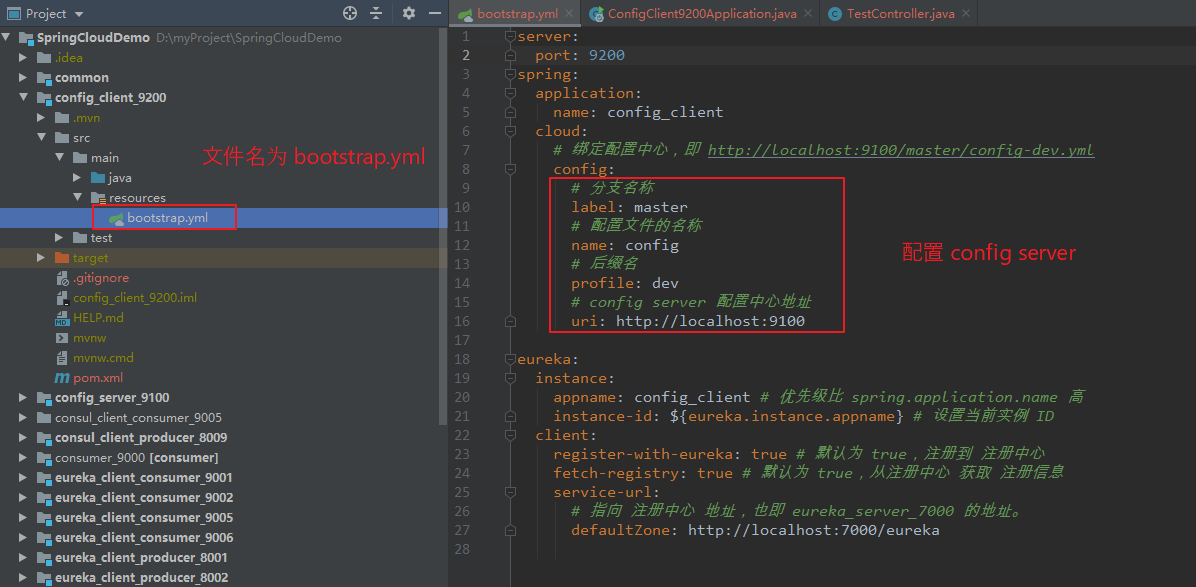
修改配置文件(bootstrap.yml)。
【注意:】Config Client 配置文件是 bootstrap.yml,而非 application.yml。注:bootstrap.yml 优先级比 application.yml 高(即 bootstrap.yml 先加载)。Config Client 启动后,会根据 bootstrap.yml 配置的 Config Server 信息与 Config Server 进行绑定,从而获取到 Config Server 中存储在 Git 的配置信息。【bootstrap.yml】server:port: 9200spring:application:name: config_clientcloud:# 绑定配置中心,即 http://localhost:9100/master/config-dev.ymlconfig:# 分支名称label: master# 配置文件的名称name: config# 后缀名profile: dev# config server 配置中心地址uri: http://localhost:9100eureka:instance:appname: config_client # 优先级比 spring.application.name 高instance-id: ${ eureka.instance.appname} # 设置当前实例 IDclient:register-with-eureka: true # 默认为 true,注册到 注册中心fetch-registry: true # 默认为 true,从注册中心 获取 注册信息service-url:# 指向 注册中心 地址,也即 eureka_server_7000 的地址。defaultZone: http://localhost:7000/eureka
Step3:
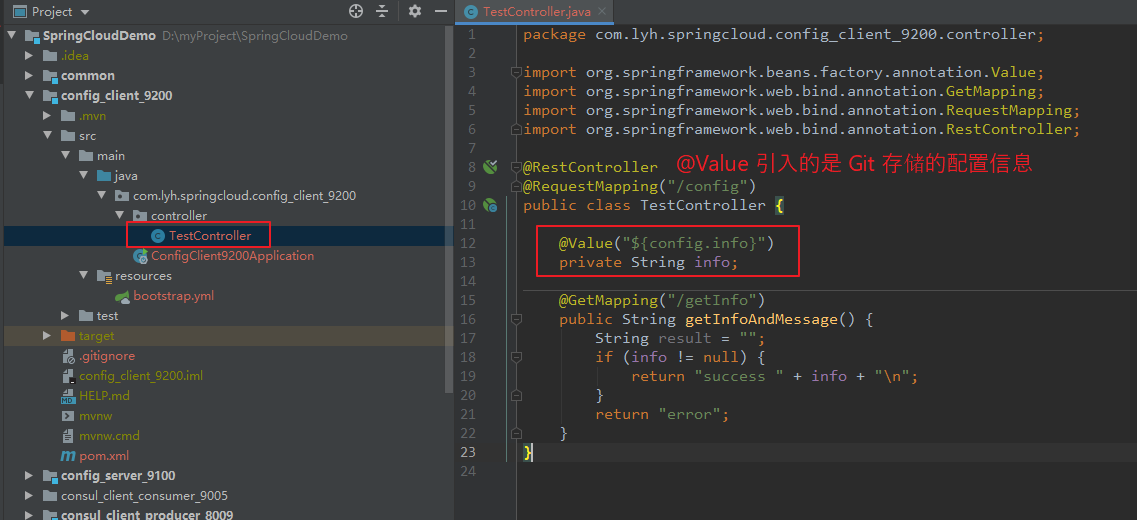
编写 TestController 进行测试,
其中使用 @Value 注解用于 引入 Git 中存储的配置文件中的内容。
注:
初始启动服务时,若 config client 绑定 config server 失败,即获取不到 Git 中的配置信息时,@Value 将会导致服务启动失败。
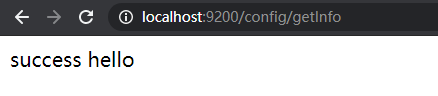
【TestController】package com.lyh.springcloud.config_client_9200.controller;import org.springframework.beans.factory.annotation.Value;import org.springframework.web.bind.annotation.GetMapping;import org.springframework.web.bind.annotation.RequestMapping;import org.springframework.web.bind.annotation.RestController;@RestController@RequestMapping("/config")public class TestController {@Value("${config.info}")private String info;@GetMapping("/getInfo")public String getInfoAndMessage() {String result = "";if (info != null) {return "success " + info + "\n";}return "error";}}
Step4:
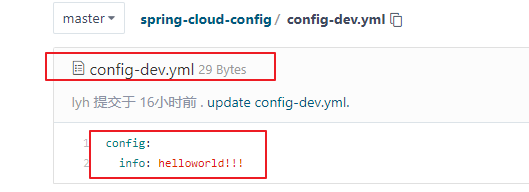
修改 Git 仓库中 config-dev.yml 文件如下:
【config-dev.yml:】config:info: helloworld!!!
Step5:
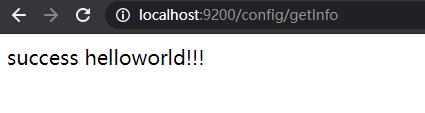
测试。启动 eureka_server_7000、config_server_9100、config_client_9200。
前面 bootstrap.yml 配置的是 获取 http://localhost:9100/master/config-dev.yml 中的内容。
config client 成功启动后,即可获取 config-dev.yml 内容,从而 @Value 注入成功,成功返回。
注:
若 config client 启动时,可能由于 @Value 注入失败,从而导致 服务将启动失败。
可能原因:
config server 配置错误,config client 不能正常绑定 config server。
config server 正常,但是 config-dev.yml 文件不存在。
config-dev.yml 文件存在,但其中并不存在 config.info。
2.5 存在的问题(刷新问题)
(1)问题
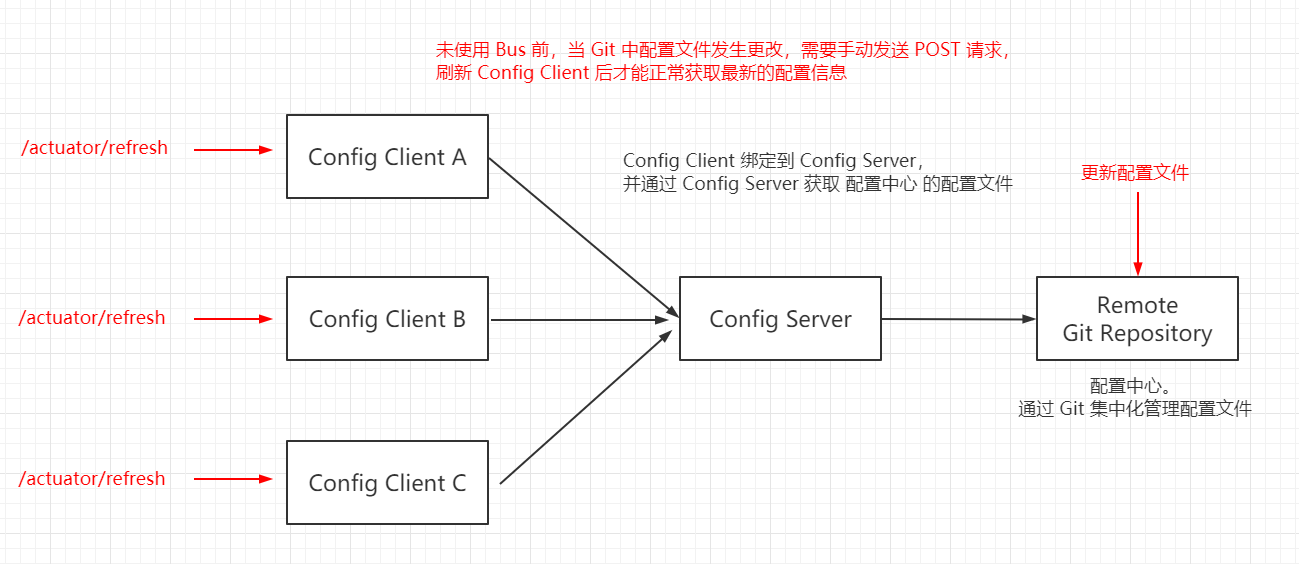
【问题:】通过上面 config server 以及 config client 搭建,config client 已经能成功通过 config server 获取到 Git 存储的配置信息。但是存在一个问题:在 config client 以及 config server 服务均启动后,再去修改 Git 中的配置文件,此时会发现 config server 能正常获取最新的 配置信息,但是 config client 获取的仍是原来的值。只有重启 config client 服务后才能正常获取到最新的配置信息。重启肯定是不可取的方案,那么如何解决呢?【解决方案一:】引入 actuator,借助其进行刷新,重新加载。缺点:需要手动触发 POST 请求,访问 refresh 端口(http://localhost:9200/actuator/refresh)。当然可以写个脚本,定时发送请求,进行刷新。【解决方案二:】方案一对于每个微服务可能都需要执行一次或多次 POST 请求,用于刷新配置信息。实现起来还是有点麻烦的,那么是否存在一种机制,使其一次通知,处处生效?这里就需要使用一下消息总线 SpringCloud Bus(后续介绍,此处暂时略过)。
(2)解决方案一(使用 actuator):
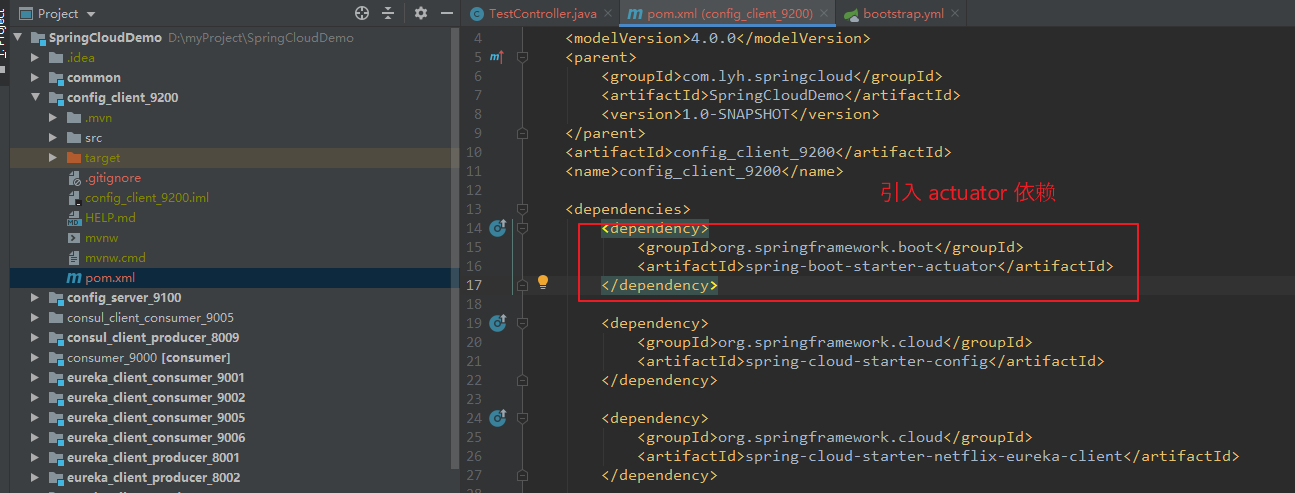
Step1:
引入 actuator 依赖。
【依赖:】<dependency><groupId>org.springframework.boot</groupId><artifactId>spring-boot-starter-actuator</artifactId></dependency>
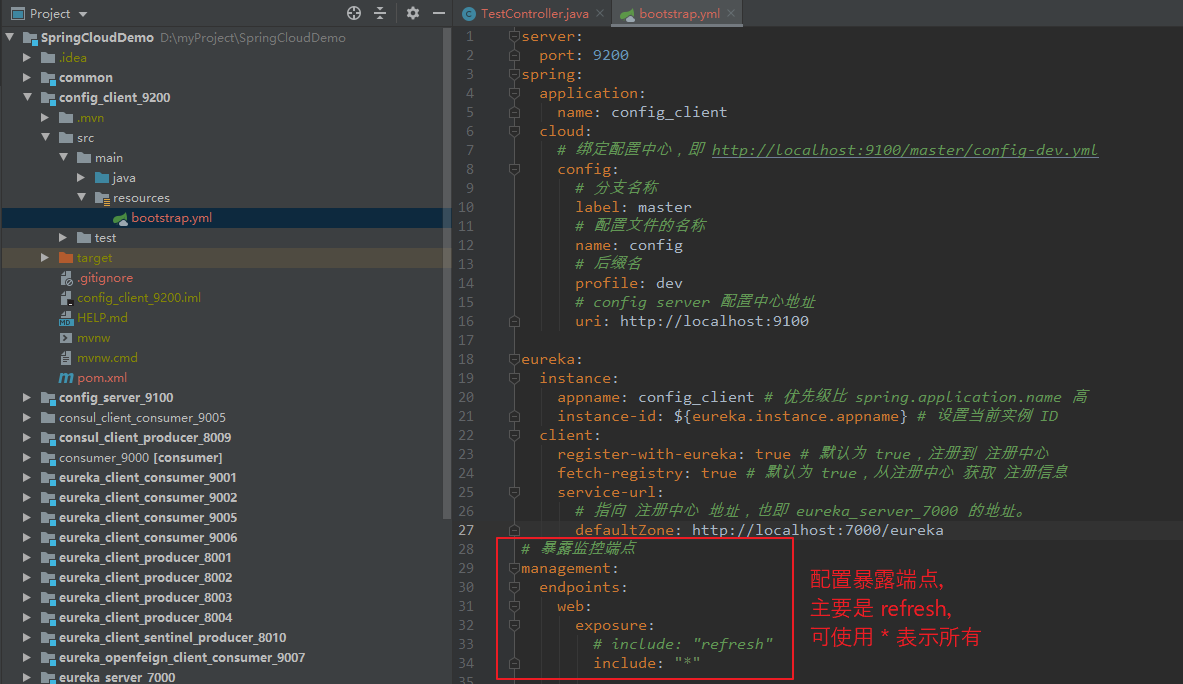
Step2:
配置暴露端口,主要是 refresh,其余的随意(可以直接用 * 表示所有)。
# 暴露监控端点management:endpoints:web:exposure:# include: "refresh"include: "*"
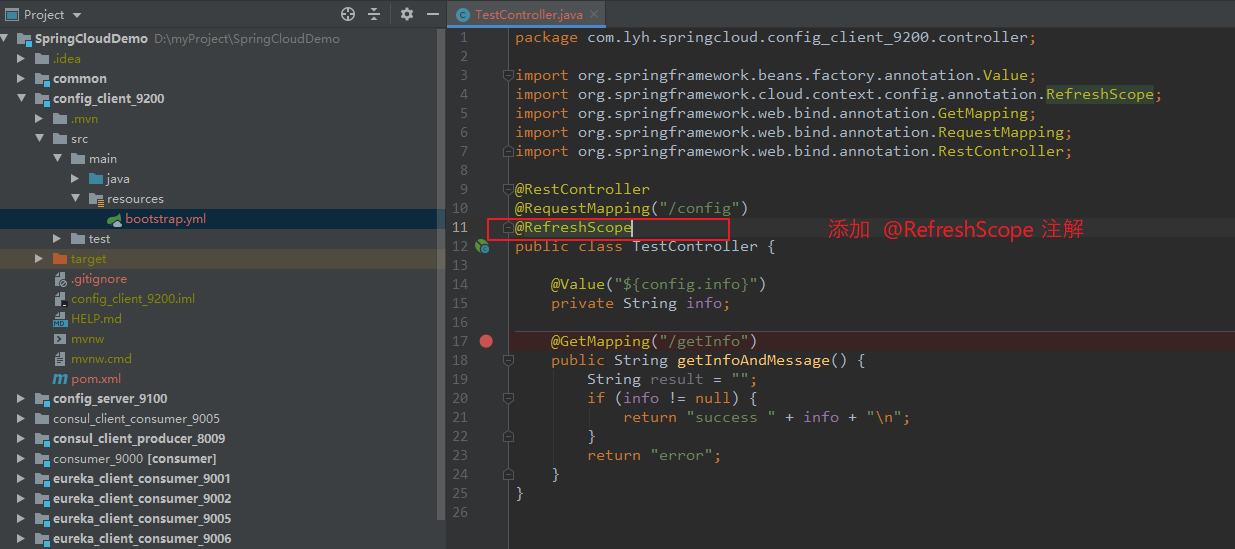
Step3:
在 TestController 上添加 @RefreshScope 注解。
@RestController@RequestMapping("/config")@RefreshScopepublic class TestController {@Value("${config.info}")private String info;@GetMapping("/getInfo")public String getInfoAndMessage() {String result = "";if (info != null) {return "success " + info + "\n";}return "error";}}
Step4:
重新启动 config client,此时获取到的是最新的配置信息。

再次修改 config-dev.yml 内容如下:
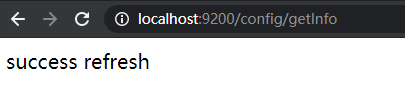
config:info: refresh
此时 config server 访问到的是最新的配置信息
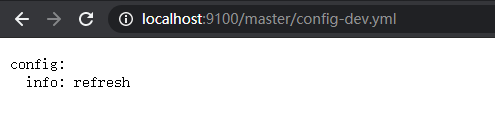
但 config client 获取的仍为上一次的配置信息
使用 Postman 发送 POST 请求 http://localhost:9200/actuator/refresh 后,
config client 再次获取的为最新的配置信息。
三、引入消息总线
3.1 问题与解决
【问题:】前面使用 Spring Cloud Config 作为配置中心时,留了一个坑:更新 Git 存储的配置文件后, Config Client 并不能实时的获取到最新的配置,Config Client 需要重启服务 或者 借助 actuator 刷新配置,从而获取到最新的配置文件信息。而微服务中,Config Client 数量将会越来越多,若每个 Config Client 都需要重启 或者 发送 refresh 请求,其伴随的影响还是有一些的。那么能否实现自动刷新? 即修改完 Git 的配置文件后,Config Client 自动刷新获取最新的配置。【解决:】使用 Spring Cloud Bus 配合 Spring Cloud Config 可以实现配置的 自动刷新功能。
四、消息总线 – Bus
4.1 Bus 是什么?
(1)Bus 是什么?
【Spring Cloud Bus 是什么:】Spring Cloud Bus 是将 轻量级消息系统 链接到 分布式系统节点 的框架,整合了 事件处理机制 和 消息中间件的功能。其能 管理、传播 需要在分布式系统中传递的消息,可用于 广播状态变化(比如: 配置修改)、事件推送等,也可以作为微服务应用间的通信通道。【Bus 支持的 消息系统:】Spring Cloud Bus 目前支持两种消息系统: RabbitMQ 和 Kafka。使用时需要引入对应的依赖: spring-cloud-starter-bus-amqp 或 spring-cloud-starter-bus-kafka。【理解一下消息总线:】消息总线 可以理解为 一个消息中心(RabbitMQ、Kafka),系统中所有微服务实例 连接到 总线上,微服务实例可以向消息中心发送消息 或者 接收消息(监听消息中心的消息),消息中心 产生的消息被 所有微服务实例 监听并消费。比如:微服务实例 A 发送一条消息到总线上,其余微服务实例 可以监听到 这个消息,并进行相应处理。【官网地址:】https://spring.io/projects/spring-cloud-bushttps://docs.spring.io/spring-cloud-bus/docs/current/reference/html/
(2)如何实现?
方式一:
客户端 Config Client 刷新。
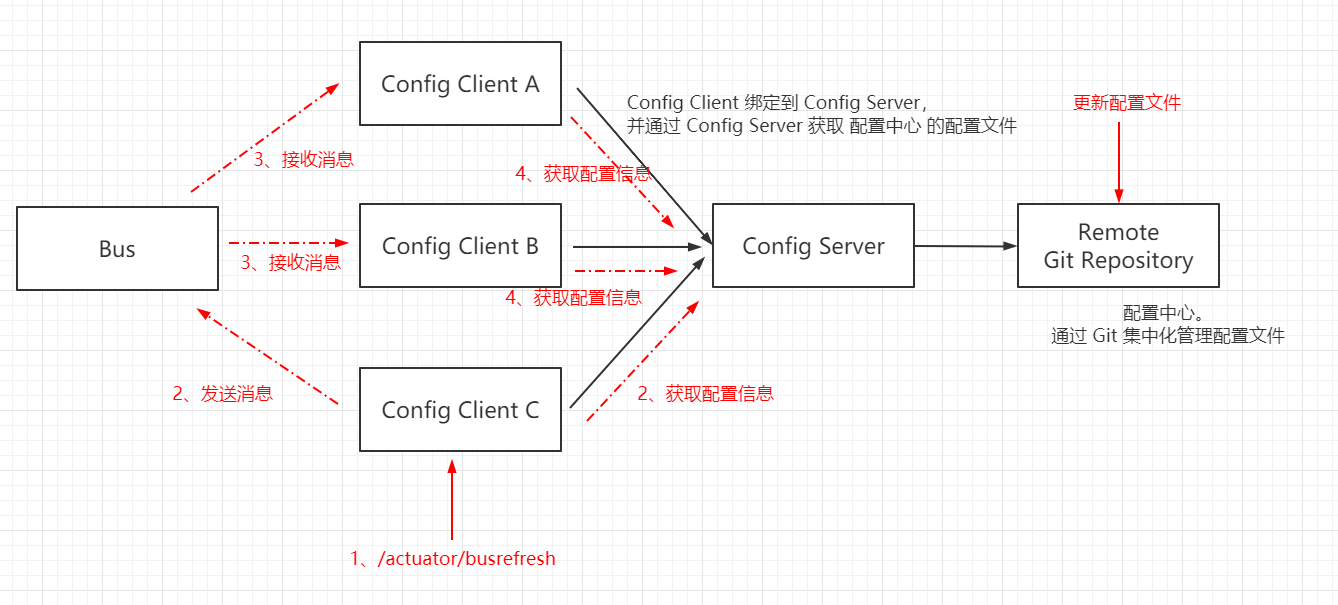
【基本流程:】Step1:更新 Git Repository 中的配置文件。Step2:向客户端 Config Client C 发送 POST 请求: /actuator/busrefresh,此时 Config Client C 根据 Config Server 获取最新的配置文件。并且 Config Client C 向 消息总线 Bus 发送一条消息(即 表示需要 刷新)。Step3:Bus 接收消息后,将消息通知给其他 客户端实例(Config Client A、Config Client B)。Step4:其他客户端实例 接收到信息后,即相当于刷新,根据 Config Server 获取最新的配置文件。至此,所有客户端实例均可获得最新的配置信息。【问题:】一般不使用 客户端刷新, 因为 客户端本身属于 业务模块,刷新功能并不属于其业务功能,会破坏了其职责单一性。
方式二:
服务端 Config Server 刷新。
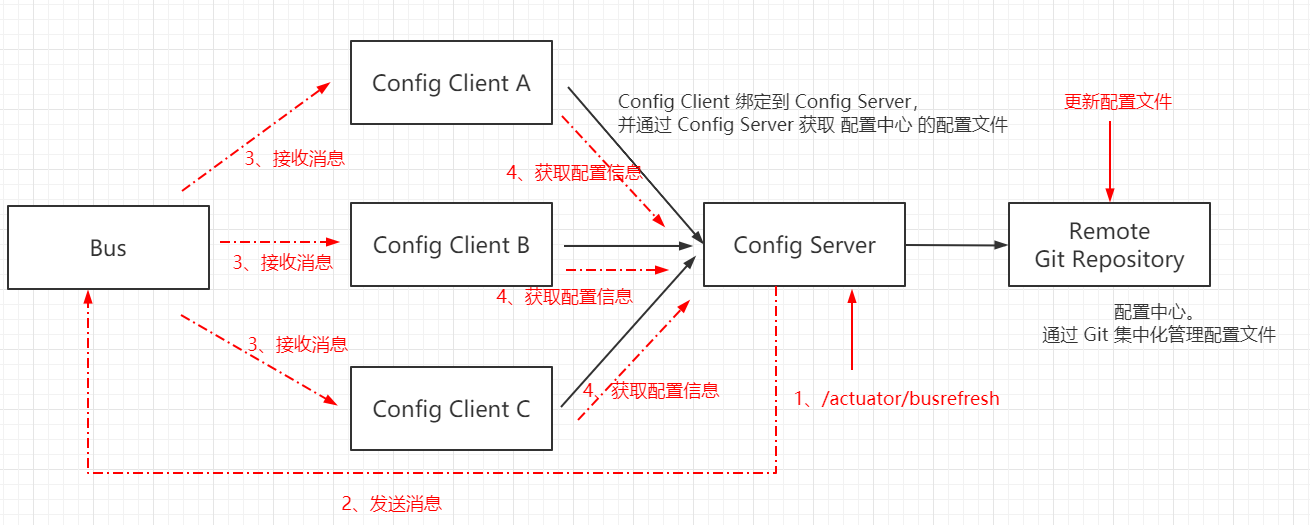
【基本流程:】Step1:更新 Git Repository 中的配置文件。Step2:向服务端 Config Server 发送 POST 请求: /actuator/busrefresh,并且 Config Server 向 消息总线 Bus 发送一条消息(即 表示需要 刷新)。Step3:Bus 接收消息后,将消息通知给所有客户端实例(Config Client A、Config Client B、Config Client C)。Step4:客户端实例 接收到信息后,即相当于刷新,根据 Config Server 获取最新的配置文件。至此,所有客户端实例均可获得最新的配置信息。
4.2 使用 RabbitMQ 作为消息中间件
(1)使用 docker-compose 在 CentOS7 上构建基本环境
docker-compose 基本使用可参照:https://www.cnblogs.com/l-y-h/p/12622730.html\#\_label8\_2
【构建 docker-compose.yml 如下:】# 指定 compose 文件版本,与 docker 兼容,高版本的 docker 一般使用 3.x。version: '3.7'# 定义需要管理的 所有服务 信息services:# 此处指的是服务的名称rabbitmq:# 指定镜像路径(可以是远程仓库镜像 或者 本地镜像)image: rabbitmq:3.8.3-management# 指定容器的名称(等同于 docker run --name)container_name: rabbitmq# 定义容器重启策略,no 表示任何情况下都不重启(默认),always 表示总是重新启动。restart: alwayshostname: myRabbitmq# 定义 宿主机 与 容器的端口映射ports:- 15672:15672- 5672:5672# 定义 宿主机 与 容器的数据卷映射volumes:- /usr/mydata/rabbitmq/data:/var/lib/rabbitmq# 设置环境变量environment:# 设置 RabbitMQ 登陆用户为 root,登陆密码为 root(若未配置,默认为 guest)- RABBITMQ_DEFAULT_USER=root- RABBITMQ_DEFAULT_PASS=root
(2)启动 RabbitMQ
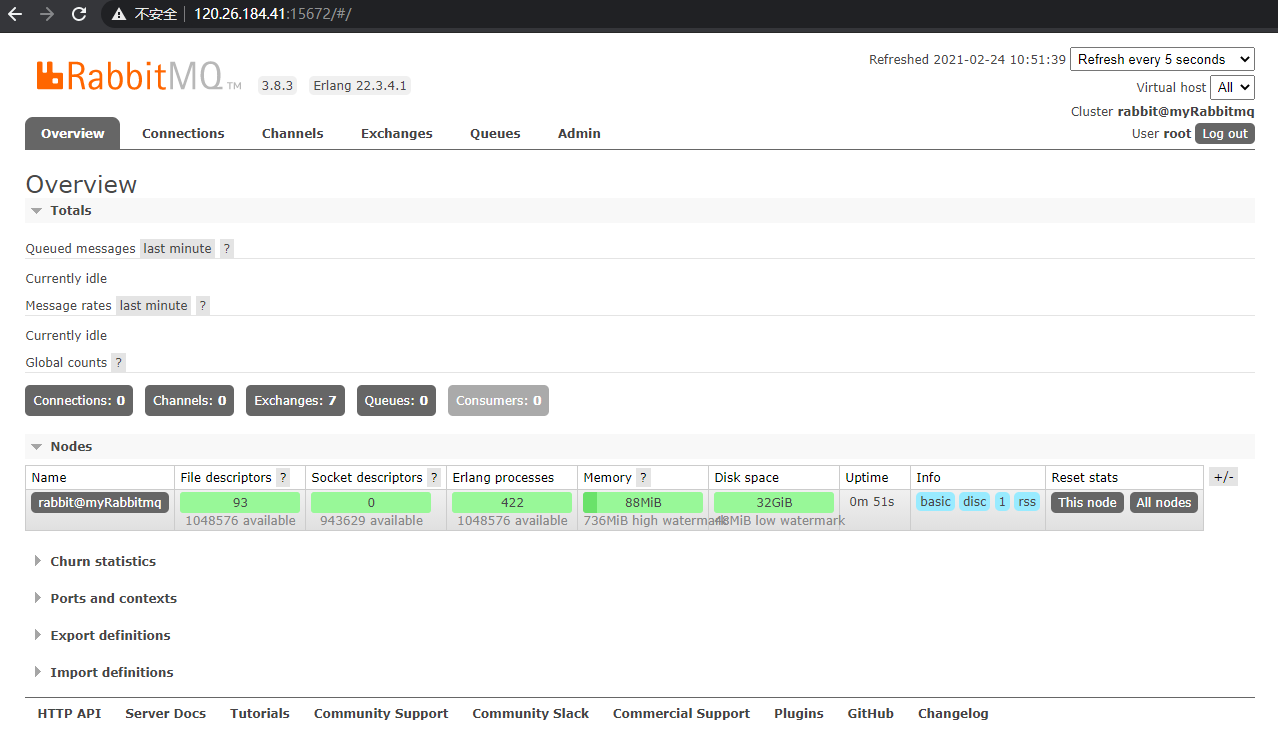
通过 docker-compose up -d 启动 RabbitMQ 后,可以通过 15672 端口号访问其 Web 页面。
注:
若为云服务器,需要配置安全组规则,开放 15672、5672 端口。
15672 是 RabbitMQ 可视化 web 界面访问端口。
5672 是 RabbitMQ 访问端口。
4.3 Config 整合 Bus
(1)Config Server 整合 Bus(RabbitMQ)
此处采用方案二,在 服务端进行 刷新,所以 Config Server 需要引入 actuator 依赖。
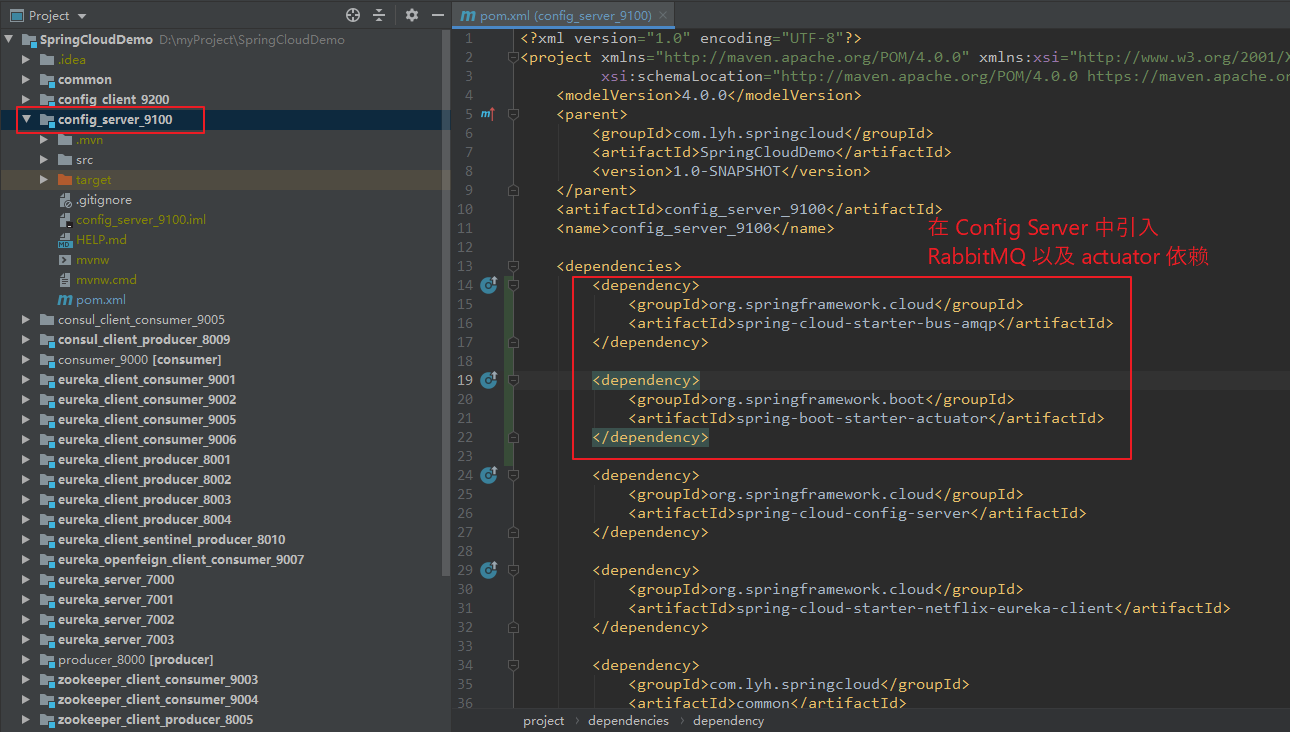
Step1:
在 config_server_9100 中引入 RabbitMQ 以及 actuator 依赖。
【依赖:】<dependency><groupId>org.springframework.cloud</groupId><artifactId>spring-cloud-starter-bus-amqp</artifactId></dependency><dependency><groupId>org.springframework.boot</groupId><artifactId>spring-boot-starter-actuator</artifactId></dependency>
Step2:
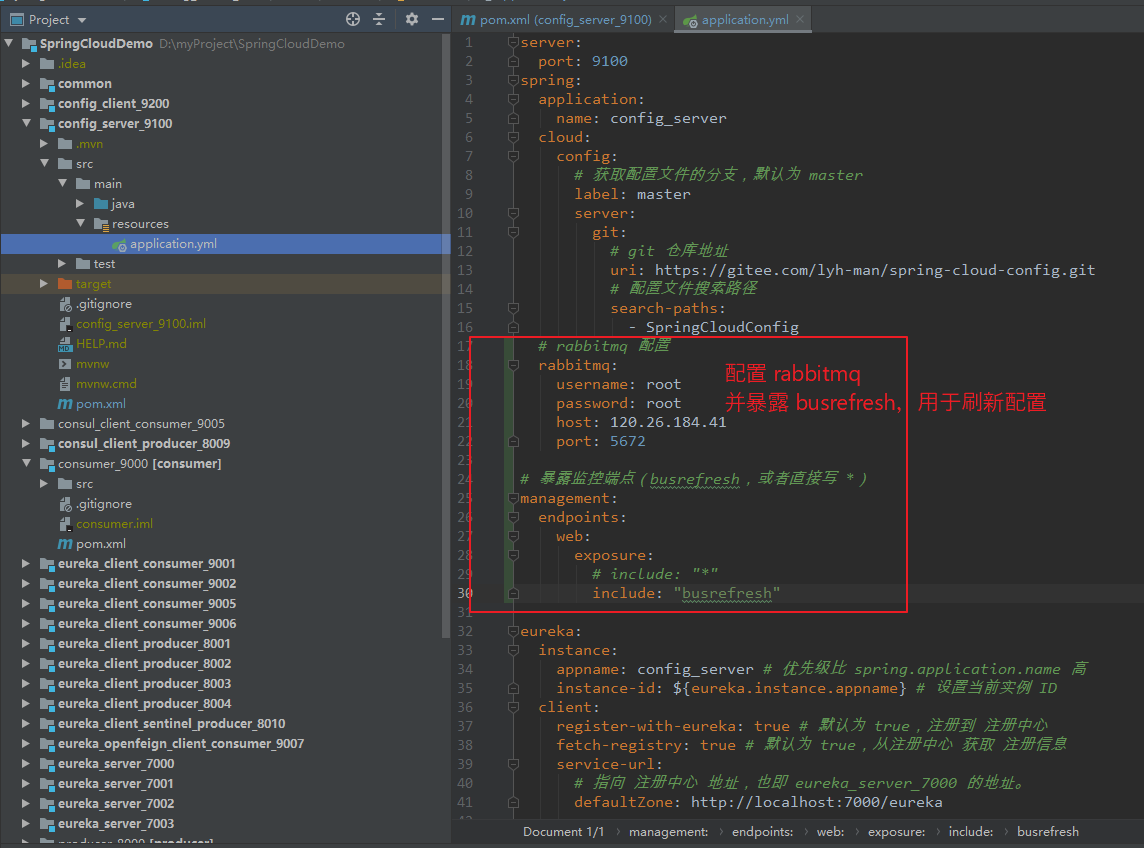
在配置文件中,添加 RabbitMQ 配置,并暴露 Bus 刷新的端口(busrefresh)。
通过 /actuator/bus-refresh 访问 busrefresh。
【application.yml:】spring:# rabbitmq 配置rabbitmq:username: rootpassword: roothost: 120.26.184.41port: 5672# 暴露监控端点(busrefresh,或者直接写 *)management:endpoints:web:exposure:# include: "*"include: "busrefresh"
(2)Config Client 整合 Bus(RabbitMQ)
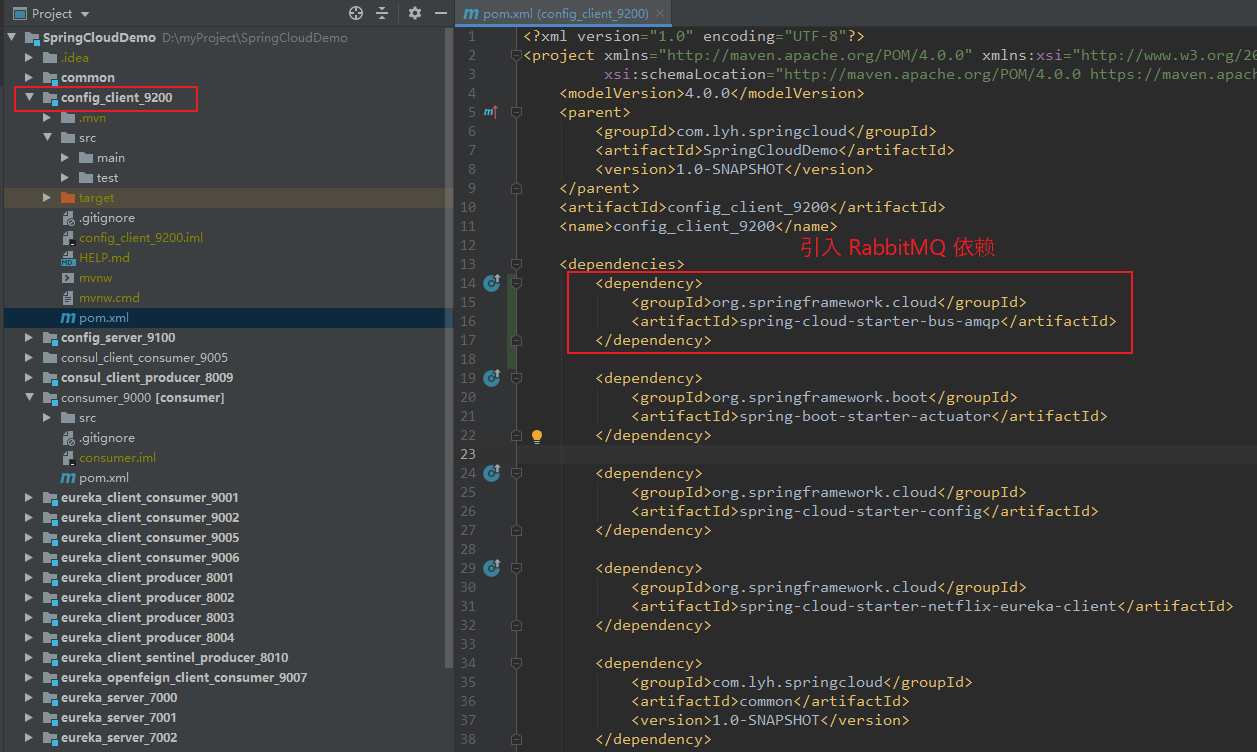
Step1:
config_client_9200 同样需要引入 RabbitMQ 依赖。
【依赖:】<dependency><groupId>org.springframework.cloud</groupId><artifactId>spring-cloud-starter-bus-amqp</artifactId></dependency>
Step2:
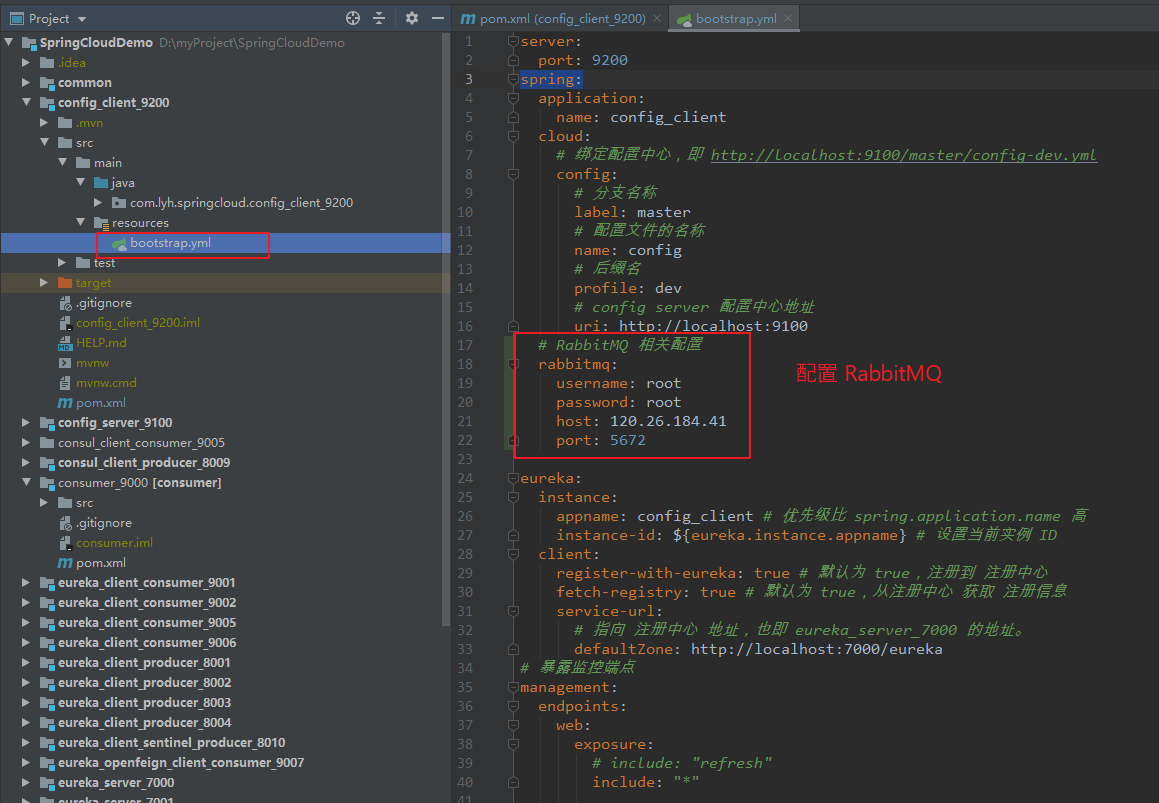
在配置文件中,添加 RabbitMQ 配置。
【bootstrap.yml:】spring:# RabbitMQ 相关配置rabbitmq:username: rootpassword: roothost: 120.26.184.41port: 5672
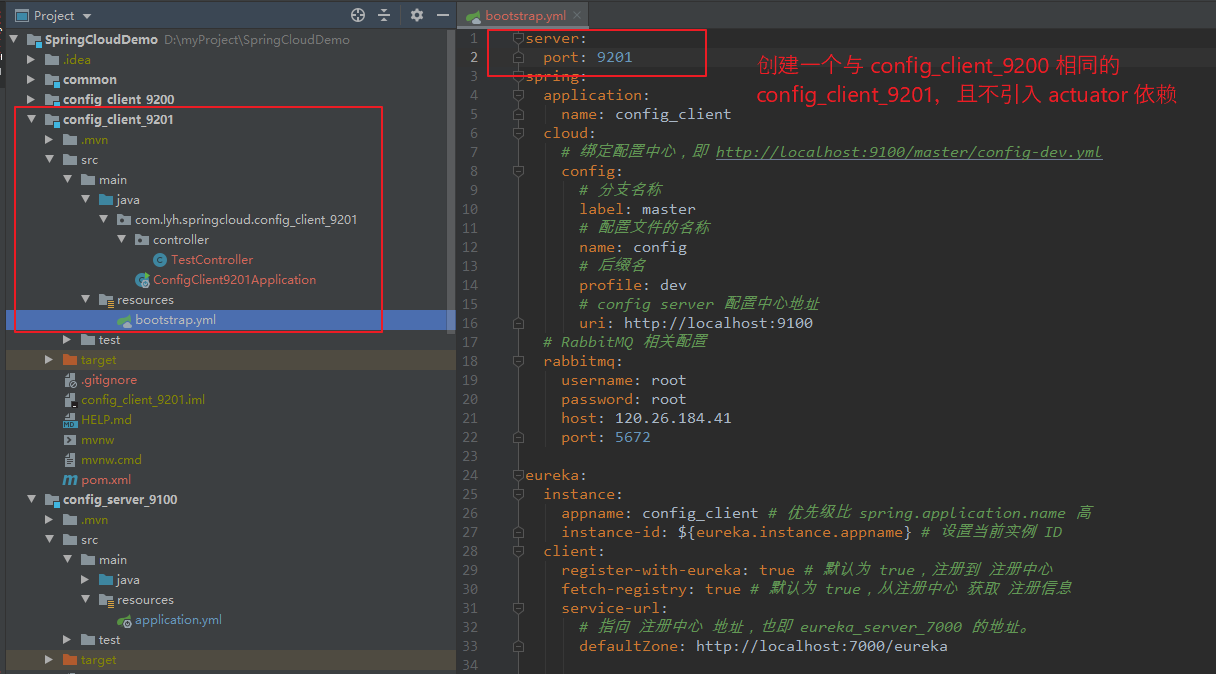
(3)新增一个 Config Client
新增一个与 config_client_9200 类似的 config_client_9201,模拟多实例刷新。
构建步骤与 config_client_9200 相同,仅修改 端口号即可。
为了与 config_client_9200 区别,config_client_9201 中不引入 actuator 依赖。
(4)测试。
分别启动:eureka_server_7000、config_server_9100、config_client_9200、config_client_9201。
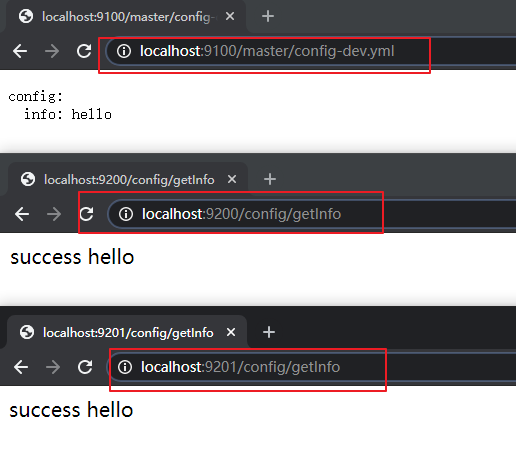
Step1:
初始访问配置文件情况如下:
http://localhost:9100/master/config-dev.ymlhttp://localhost:9200/config/getInfohttp://localhost:9201/config/getInfo
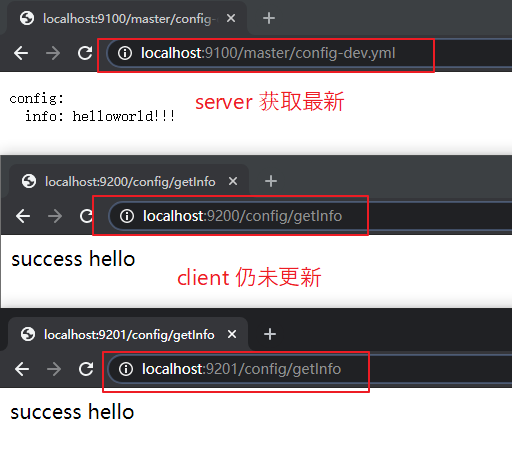
Step2:
修改配置文件后,再次获取配置文件如下:
http://localhost:9100/master/config-dev.ymlhttp://localhost:9200/config/getInfohttp://localhost:9201/config/getInfo
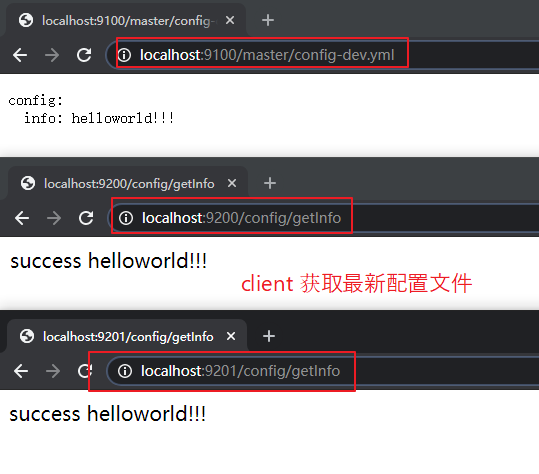
Step3:
向 Config Server 发送 POST 请求 /actuator/bus-refresh,再次获取配置文件:
POST 请求: http://localhost:9100/actuator/bus-refreshhttp://localhost:9100/master/config-dev.ymlhttp://localhost:9200/config/getInfohttp://localhost:9201/config/getInfo
Step4(方案一:客户端刷新,仅供参考):
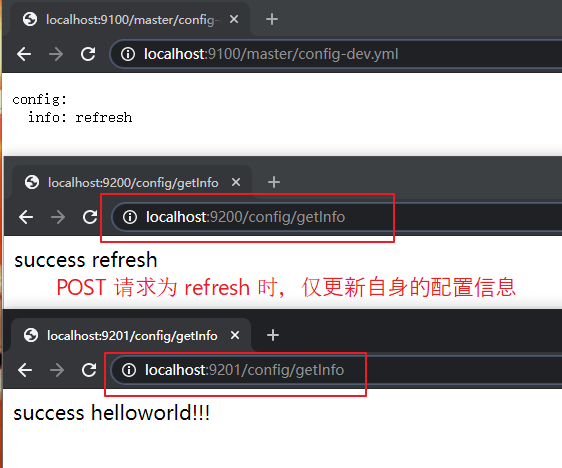
再次修改配置文件,此次给 9200 发送 POST 请求。
由于 9200 配置了 actuator,且暴露端点为 *,可以执行 refresh、bus-refresh。
当发送的 POST 请求为 refersh 时,此时只会更新自己的配置文件,9201 不会更改。
POST 请求: http://localhost:9200/actuator/refreshhttp://localhost:9100/master/config-dev.ymlhttp://localhost:9200/config/getInfohttp://localhost:9201/config/getInfo
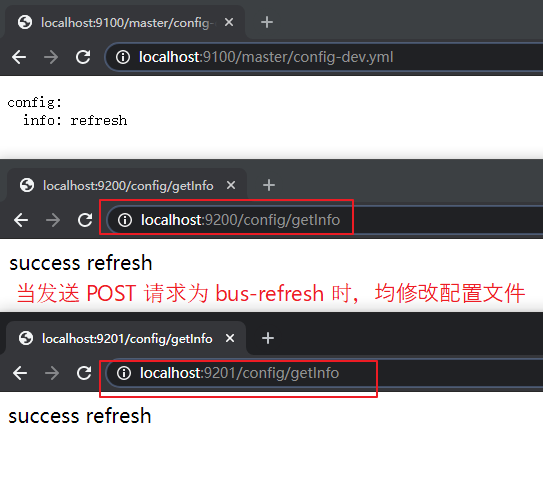
当发送的 POST 请求为 bus-refresh 时,9201 配置文件也会修改。
POST 请求: http://localhost:9200/actuator/bus-refreshhttp://localhost:9100/master/config-dev.ymlhttp://localhost:9200/config/getInfohttp://localhost:9201/config/getInfo
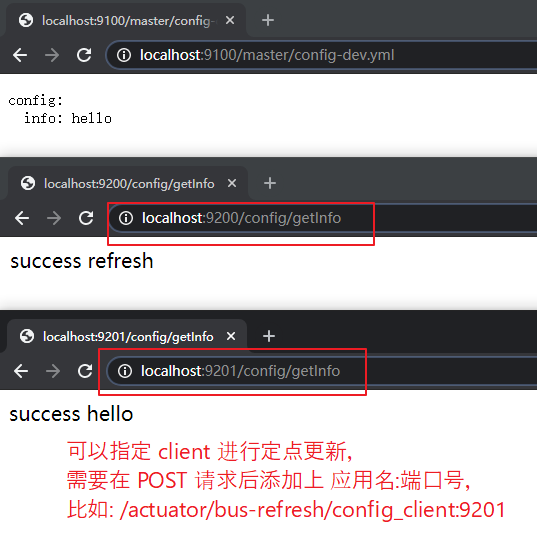
Step5:
指定端点进行更新,在 POST 请求后加上需要加上相关 微服务实例的信息,
一般为: spring.application.name:server.port
比如:
config_client:9201 表示仅指定 config_cliet_9201 这个微服务进行更新。
config_client:** 表示 config_client 相关所有微服务进行更新。
POST 请求: http://localhost:9100/actuator/bus-refresh/config_client:9201http://localhost:9100/master/config-dev.ymlhttp://localhost:9200/config/getInfohttp://localhost:9201/config/getInfo
五、分布式链路追踪
5.1 问题 与 解决
【问题:】在一个复杂的微服务系统中,一个客户端发送的请求 可能会经过 多个服务节点,这些服务节点协同工作产生最终的请求结果。此时可以将请求经过的微服务 看成一条 服务调用链路(分布式服务调用链路),链路中任何一个服务出现了 高延迟 或者 错误 都将引起 整个请求失败。当某个请求失败,如何确定是哪个服务出现了问题?逐行看日志肯定是不可取的方法,是否存在简便的工具帮助我们快速定位错误服务?【解决:】采用 SpringCloud Sleuth,追踪并展示服务调用链路。
5.2 分布式链路追踪 – Sleuth
(1)Sleuth 是什么?
【什么是 Sleuth:】Spring Cloud Sleuth 提供了一套完整的分布式服务追踪解决方案,兼容 Zipkin。在一个复杂的微服务系统中,若某时处理了多个请求,那么仅通过 日志 很难判断出 一个请求 需要被哪些微服务关联,一般解决方法是 对于每个请求都传递一个唯一的 ID,并根据 ID 查找其日志。而 Sleuth 可以与 日志框架(Logback、SLF4J) 轻松集成,并通过独特的标识符来使用 日志跟踪,从而便于分析服务调用链路。Sleuth 在分布式系统中追踪 一个请求的处理过程(数据采集、数据传输、数据存储、数据分析、数据可视化),通过可视化界面,可以便于监控微服务调用链路。【官网地址:】https://spring.io/projects/spring-cloud-sleuthhttps://docs.spring.io/spring-cloud-sleuth/docs/current/reference/html/getting-started.html
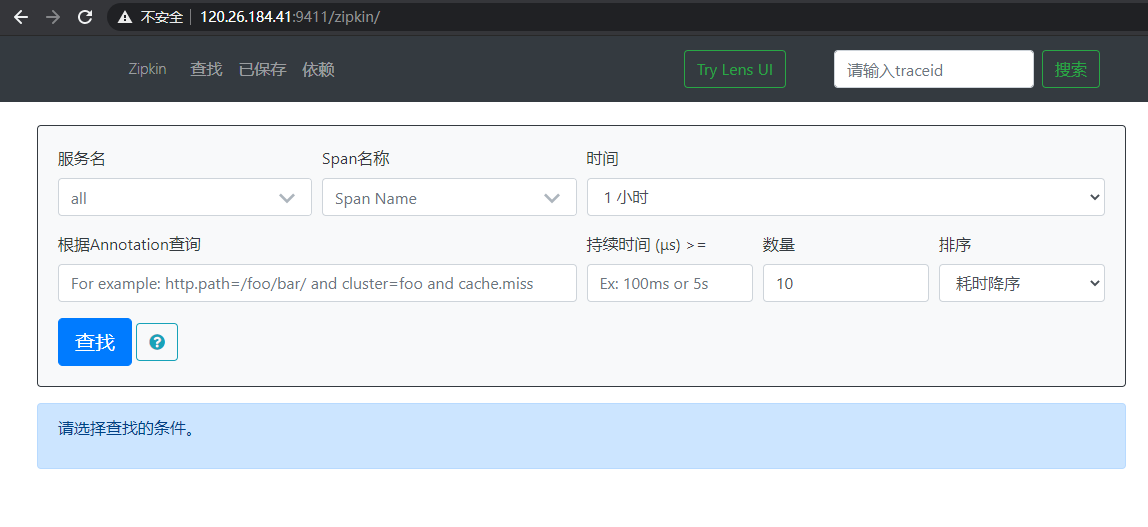
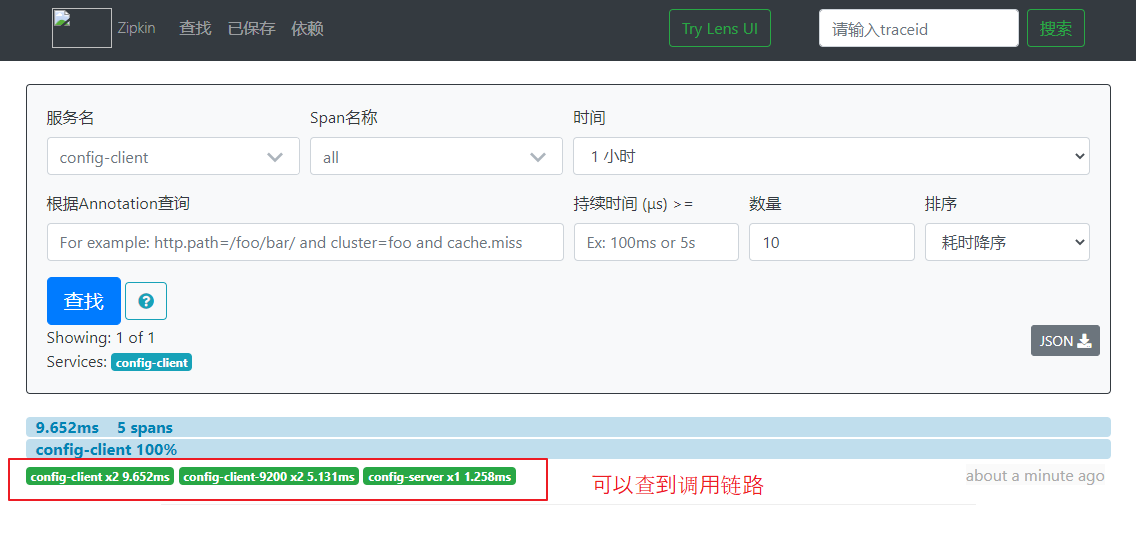
(2)下载、启动 Zipkin Server
Zipkin 用于可视化界面,下载 jar 包直接启动即可。
【下载地址:】http://dl.bintray.com/openzipkin/maven/io/zipkin/java/zipkin-server/比如:http://dl.bintray.com/openzipkin/maven/io/zipkin/java/zipkin-server/2.12.9/zipkin-server-2.12.9-exec.jar
通过 java -jar zipkin-server-2.12.9-exec.jar 可以直接启动。
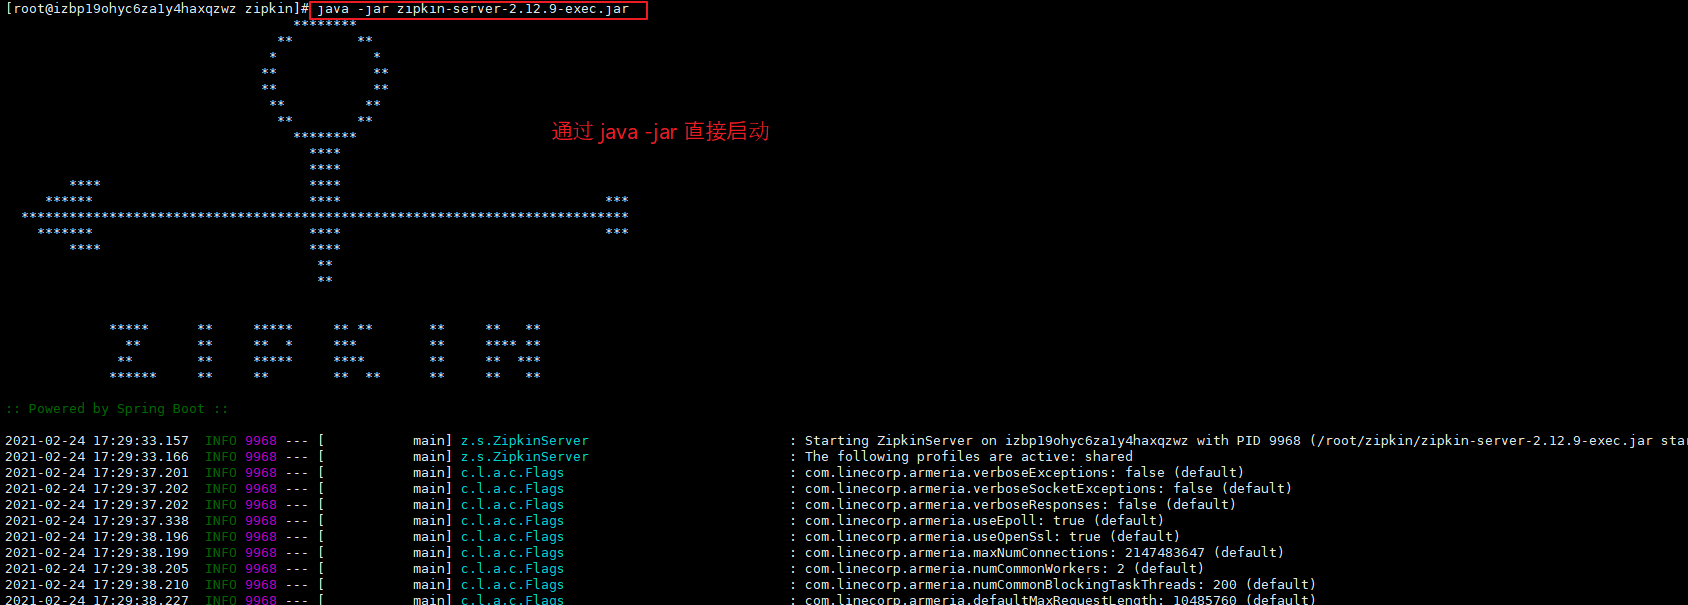
通过 9411 端口即可进入可视化 Web 界面。
比如:http://120.26.184.41:9411/
5.3 简单整合 Sleuth
(1)说明
【说明:】此处使用 eureka_server_7000、config_server_9100、config_client_9200、config_client_9201 进行演示。其中:为了演示链路调用,请求经过 config_client_9201,调用 config_client_9200,再调用 config_server_9100。使用 openfeign 进行服务远程调用。
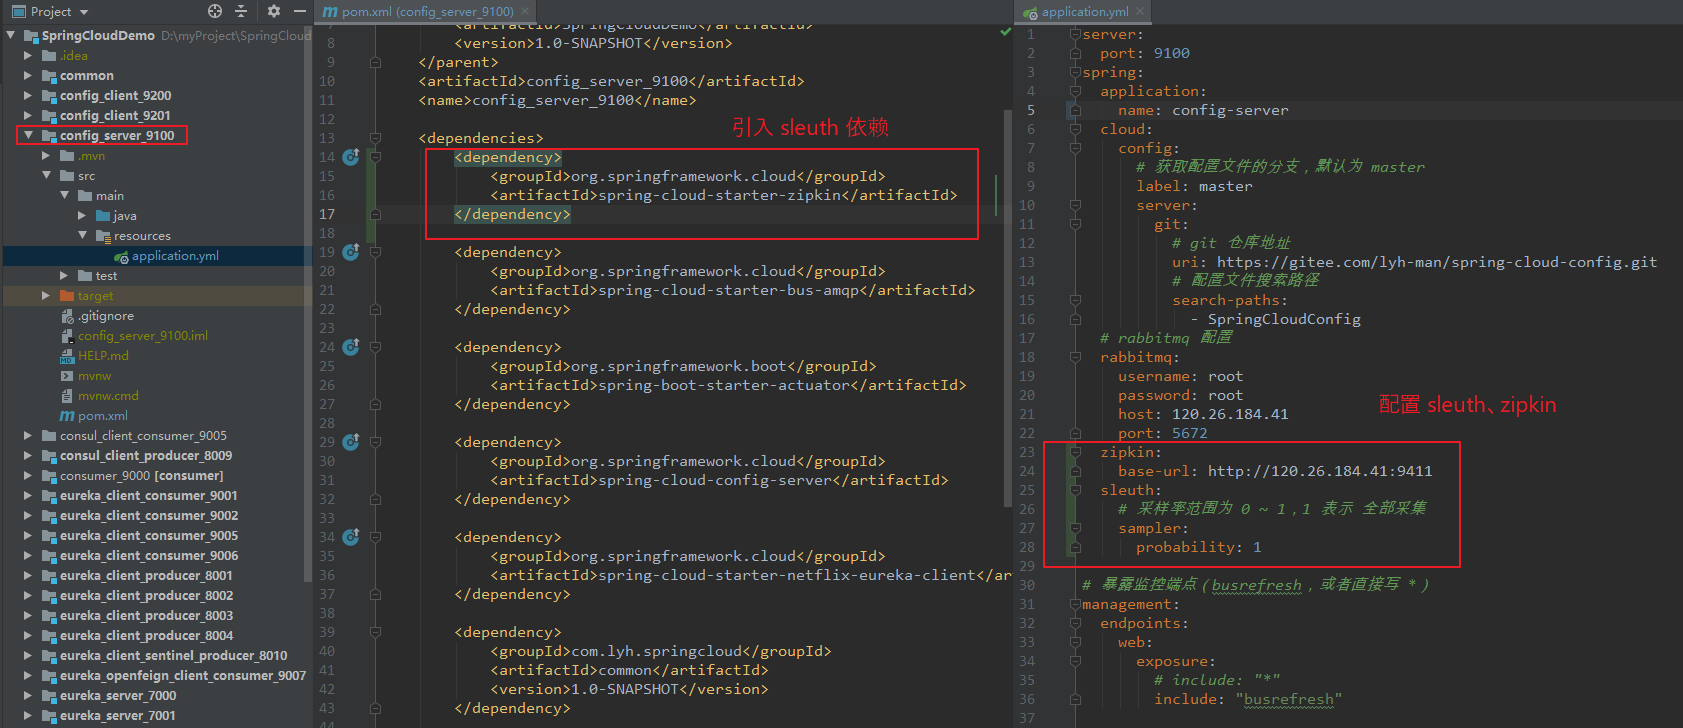
(2)改造 config_server_9100
Step1:
引入 sleuth 依赖,并修改配置文件。
【依赖:】<dependency><groupId>org.springframework.cloud</groupId><artifactId>spring-cloud-starter-zipkin</artifactId></dependency>【bootstrap.yml:】spring:zipkin:base-url: http://120.26.184.41:9411sleuth:# 采样率范围为 0 ~ 1,1 表示 全部采集sampler:probability: 1
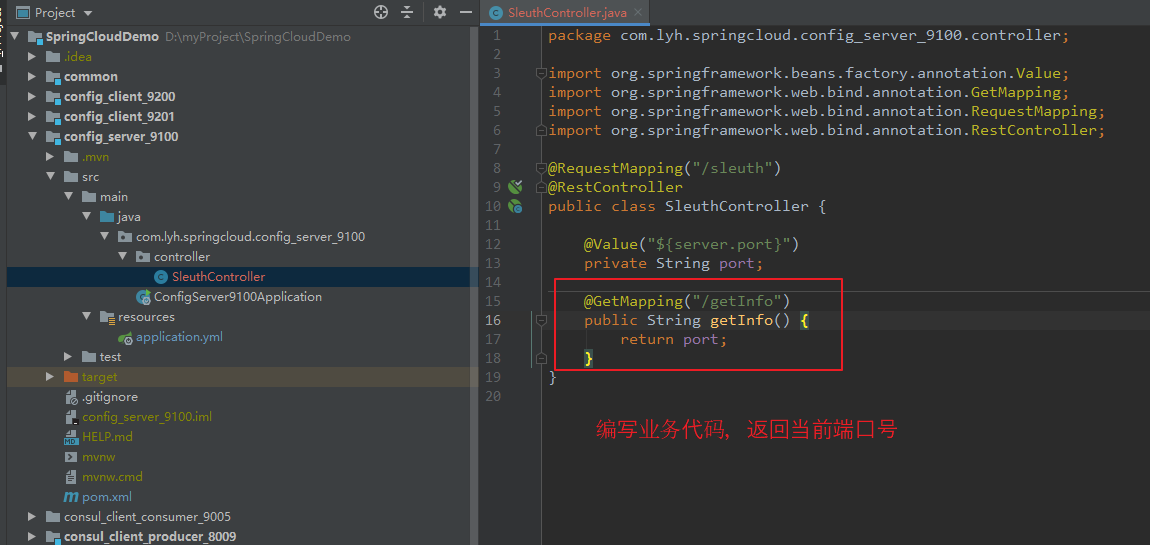
Step2:
编写业务代码。
【SleuthController】package com.lyh.springcloud.config_server_9100.controller;import org.springframework.beans.factory.annotation.Value;import org.springframework.web.bind.annotation.GetMapping;import org.springframework.web.bind.annotation.RequestMapping;import org.springframework.web.bind.annotation.RestController;@RequestMapping("/sleuth")@RestControllerpublic class SleuthController {@Value("${server.port}")private String port;@GetMapping("/getInfo")public String getInfo() {return port;}}
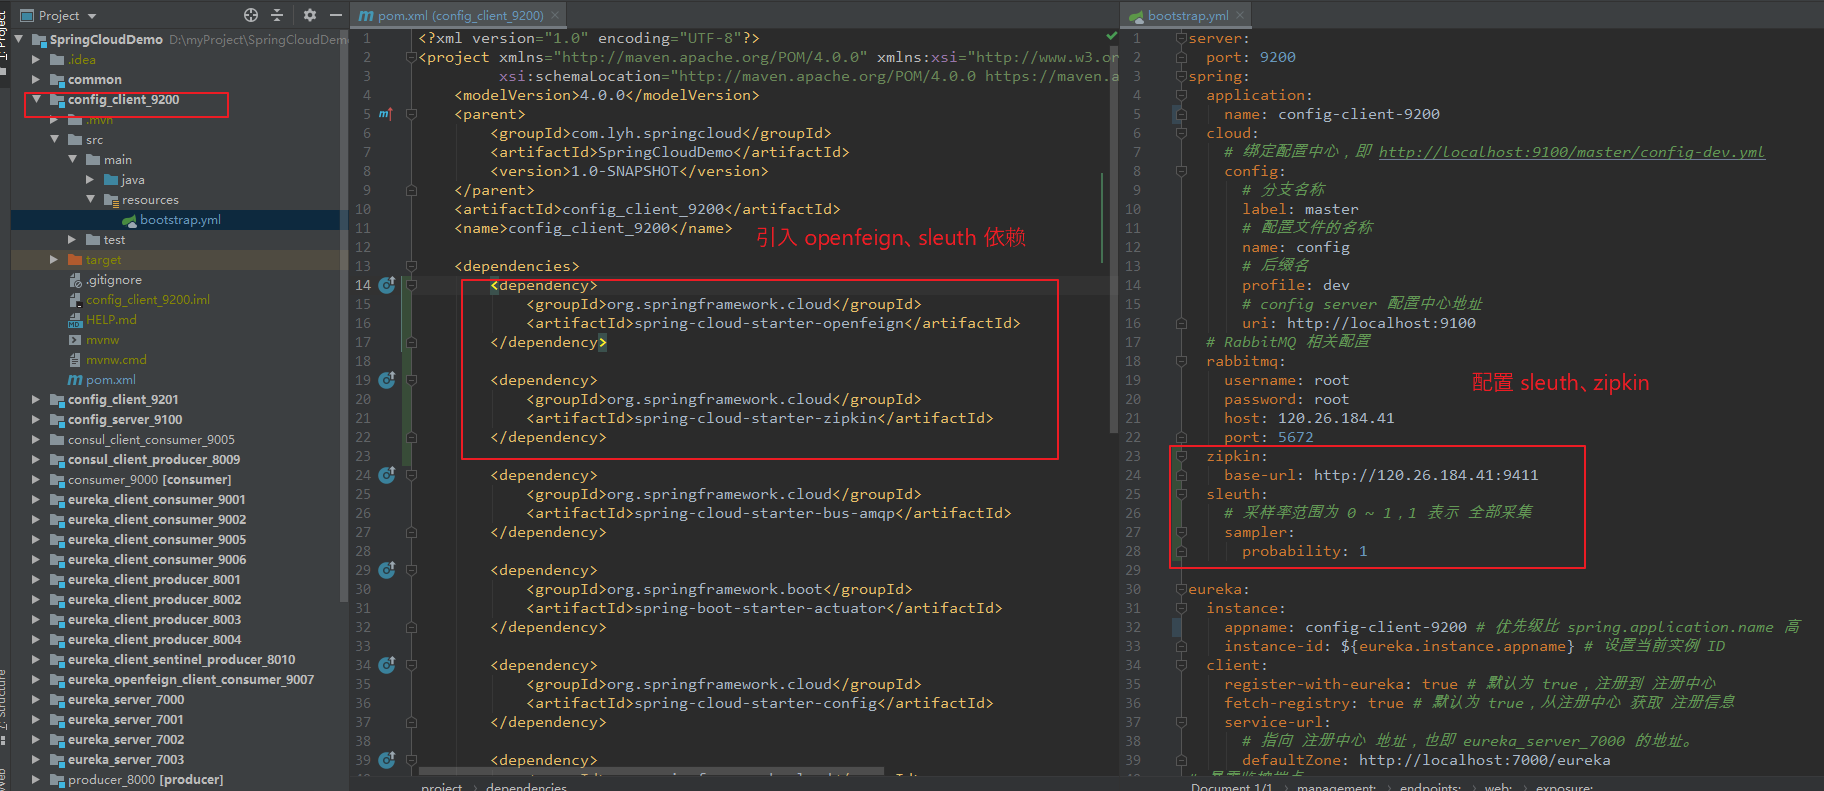
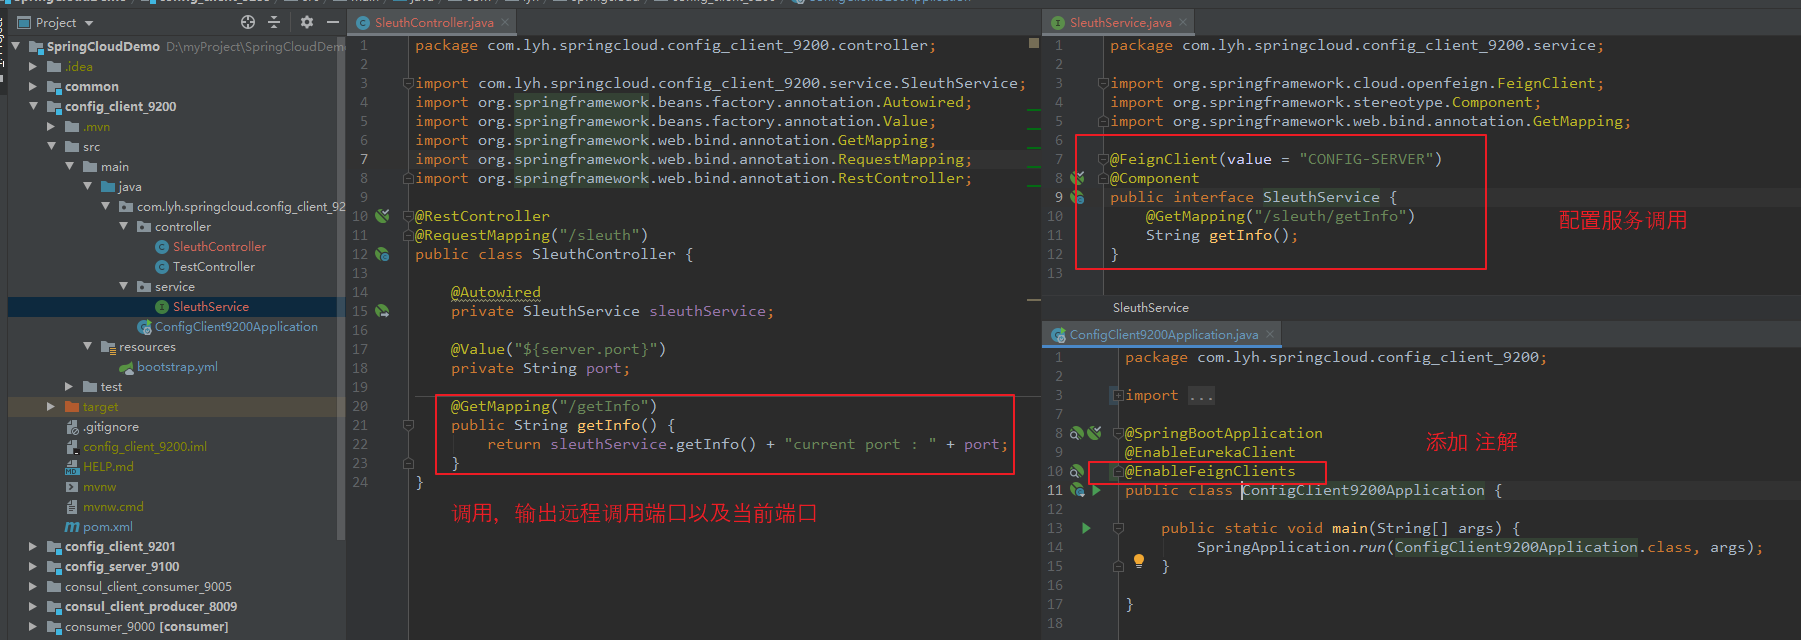
(3)改造 config_client_9200
Step1:
引入 openfeign、sleuth 依赖,并修改配置文件。
【依赖:】<dependency><groupId>org.springframework.cloud</groupId><artifactId>spring-cloud-starter-openfeign</artifactId></dependency><dependency><groupId>org.springframework.cloud</groupId><artifactId>spring-cloud-starter-zipkin</artifactId></dependency>【bootstrap.yml】spring:zipkin:base-url: http://120.26.184.41:9411sleuth:# 采样率范围为 0 ~ 1,1 表示 全部采集sampler:probability: 1
Step2:
编写业务代码,
config_client_9200 远程调用 config_server 服务。
在启动类上添加 @EnableFeignClients 注解。
【SleuthService:】package com.lyh.springcloud.config_client_9200.service;import org.springframework.cloud.openfeign.FeignClient;import org.springframework.stereotype.Component;import org.springframework.web.bind.annotation.GetMapping;@FeignClient(value = "CONFIG-SERVER")@Componentpublic interface SleuthService {@GetMapping("/sleuth/getInfo")String getInfo();}【SleuthController】package com.lyh.springcloud.config_client_9200.controller;import com.lyh.springcloud.config_client_9200.service.SleuthService;import org.springframework.beans.factory.annotation.Autowired;import org.springframework.beans.factory.annotation.Value;import org.springframework.web.bind.annotation.GetMapping;import org.springframework.web.bind.annotation.RequestMapping;import org.springframework.web.bind.annotation.RestController;@RestController@RequestMapping("/sleuth")public class SleuthController {@Autowiredprivate SleuthService sleuthService;@Value("${server.port}")private String port;@GetMapping("/getInfo")public String getInfo() {return sleuthService.getInfo() + "current port : " + port;}}
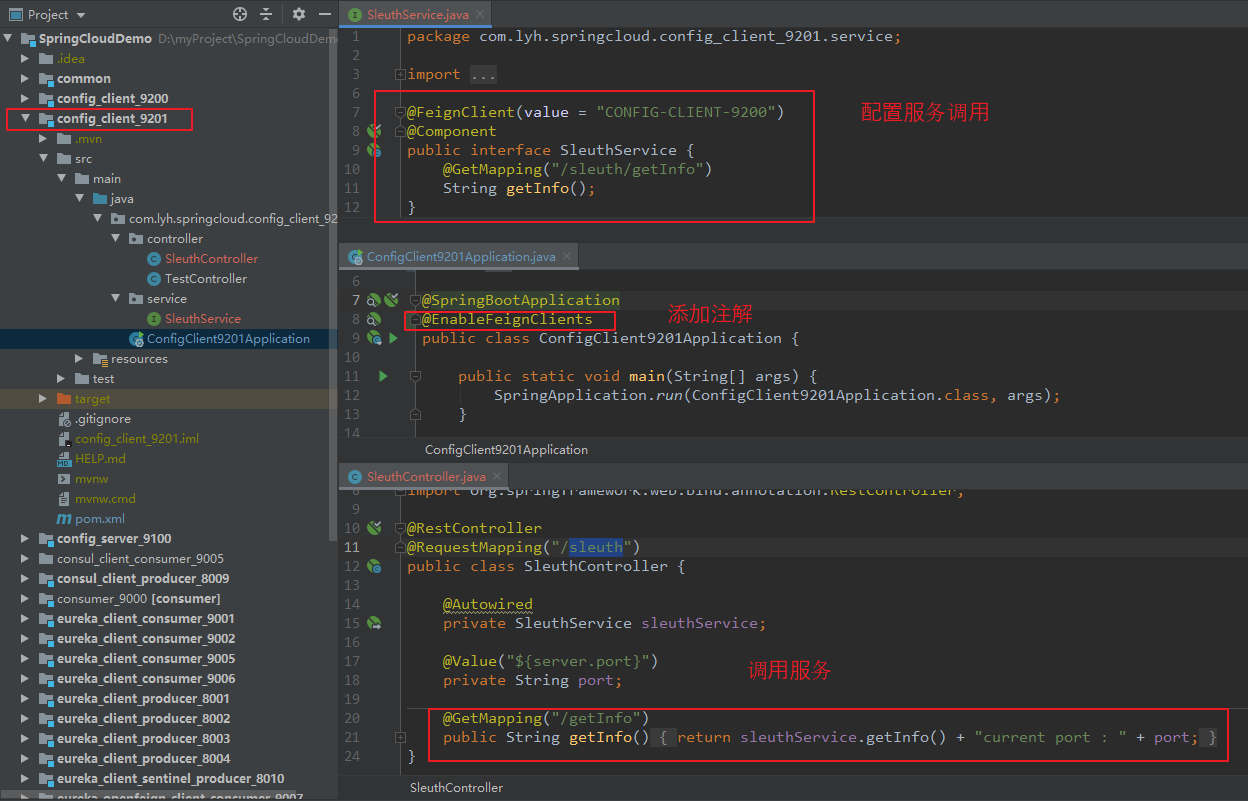
(4)改造 config_client_9201
config_client_9201 与 config_client_9200 修改代码类似,只是 config_client_9201 远程调用的是 config_client_9200 服务。
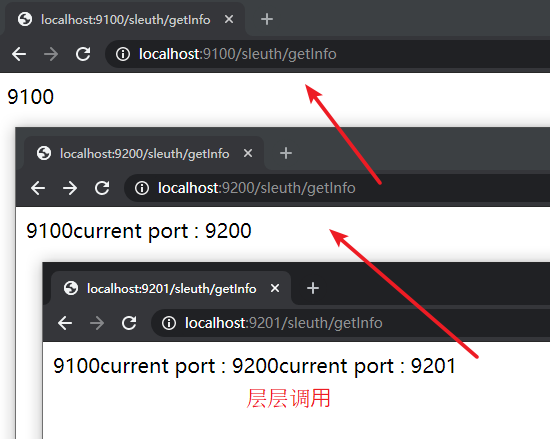
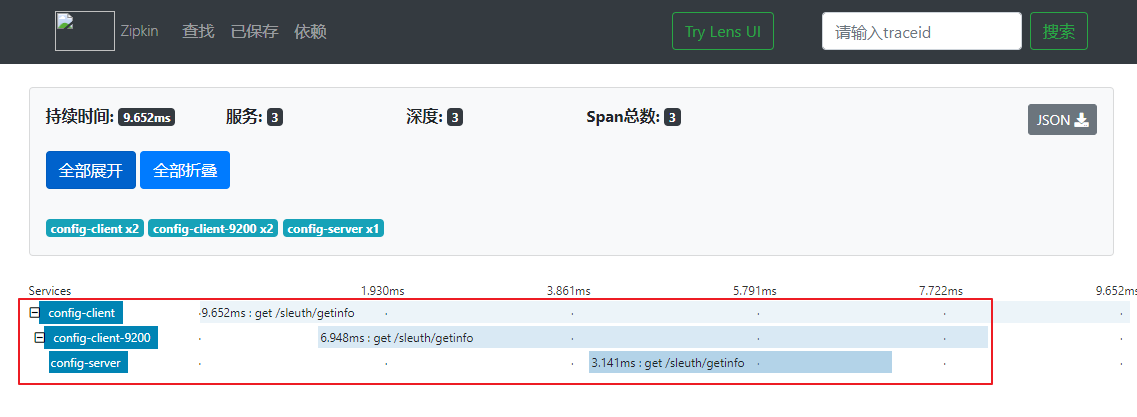
(5)测试
依次启动 eureka_server_7000、config_server_9100、config_client_9200、config_client_9201 服务,并调用其方法。
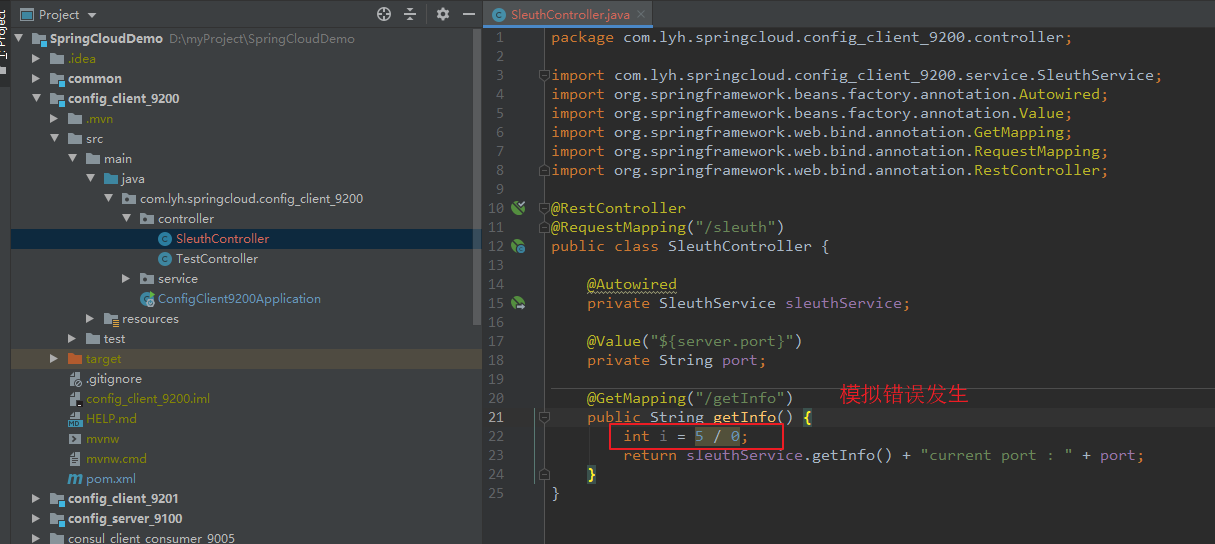
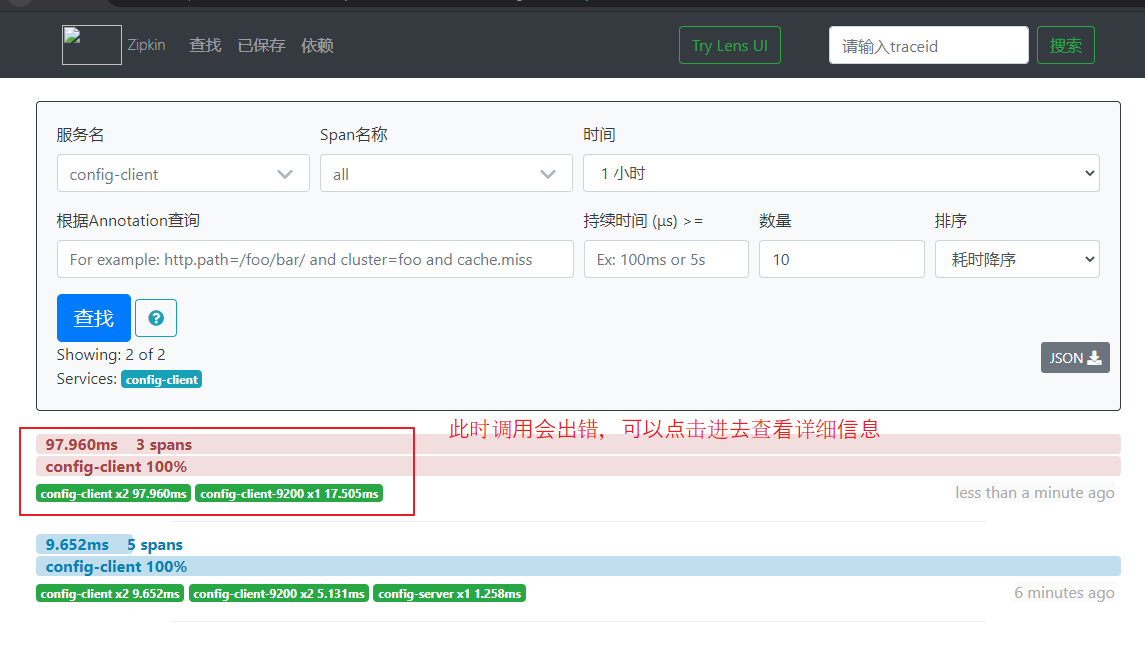
(6)演示服务调用错误
如下图,在 config_client_9200 中模拟错误调用,并再次发送请求给 config_client_9201。
5.4 链路标识、日志整合
(1)链路标识
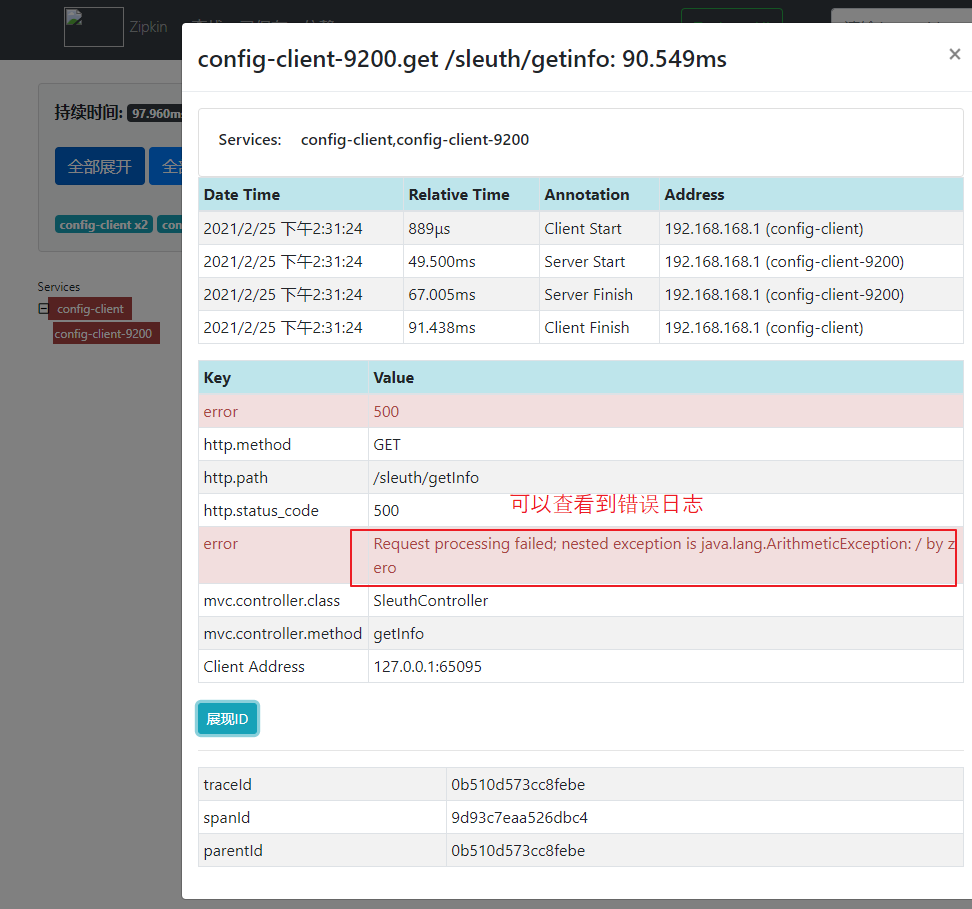
通过上面的截图,每个链路点开后,均有三个 ID:traceID,spanID,parentID。
【ID:】traceID 表示请求链路的唯一标识,当前链路中,每个服务节点均包含同一个 traceID,表示属于当前链路。spanID 表示每个服务节点的 ID,用于区分链路中的每个请求。parentID 表示当前请求的父服务 ID,即用于关联链路中的请求。

(2)日志整合
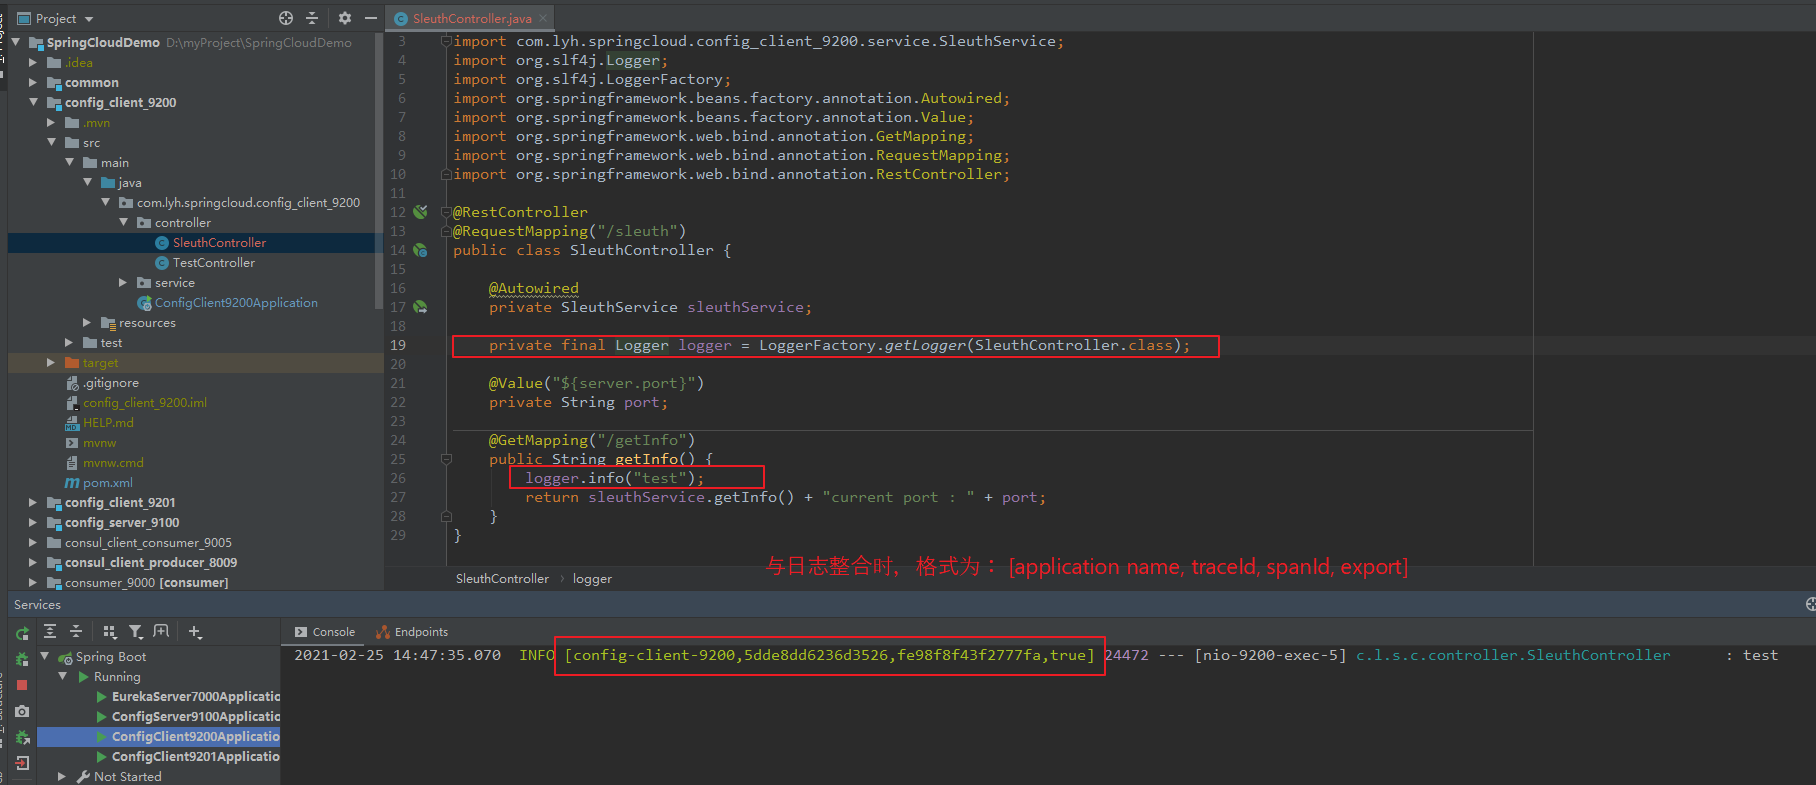
如下图,在 config_client_9200 中打印日志,并再次发送请求给 config_client_9201。
日志输出格式为:[application name, traceId, spanId, export]。
注:
application name 表示应用名。
export 布尔类型,表示是否将信息输出到 zipkin 进行收集与展示。
【SleuthController:】package com.lyh.springcloud.config_client_9200.controller;import com.lyh.springcloud.config_client_9200.service.SleuthService;import org.slf4j.Logger;import org.slf4j.LoggerFactory;import org.springframework.beans.factory.annotation.Autowired;import org.springframework.beans.factory.annotation.Value;import org.springframework.web.bind.annotation.GetMapping;import org.springframework.web.bind.annotation.RequestMapping;import org.springframework.web.bind.annotation.RestController;@RestController@RequestMapping("/sleuth")public class SleuthController {@Autowiredprivate SleuthService sleuthService;private final Logger logger = LoggerFactory.getLogger(SleuthController.class);@Value("${server.port}")private String port;@GetMapping("/getInfo")public String getInfo() {logger.info("test");return sleuthService.getInfo() + "current port : " + port;}}
六、配置中心 Nacos
参考:https://www.cnblogs.com/l-y-h/p/14604209.html\#\_label1


")


还没有评论,来说两句吧...