SpringCloud学习笔记(1)- Spring Cloud Netflix
文章目录
- SpringCloud学习笔记(1)- Spring Cloud Netflix
- 单体应用存在的问题
- Spring Cloud Eureka
- Eureka Server代码实现
- Eureka Client 代码实现
- RestTemplate 的使用
- 服务消费者 consumer
- 服务网关
- Ribbon 负载均衡
- Feign
- Hystrix 容错机制
- Spring Cloud 配置中心
- 本地文件系统
- 创建客户端读取本地配置中心的配置文件
- Spring Cloud Config 远程配置
- 创建 Config Client
- 服务跟踪
- 创建 Zipkin Server
- 创建 Zipkin Client
SpringCloud学习笔记(1)- Spring Cloud Netflix
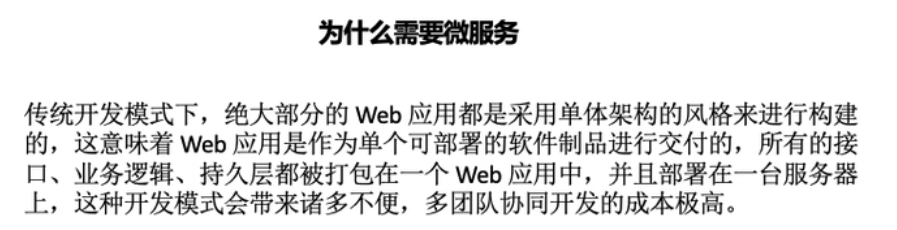
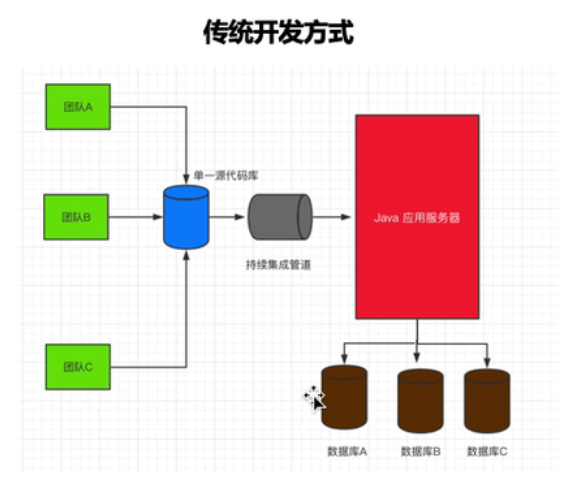


单体应用存在的问题
- 随着业务的发展,开发变得越来越复杂。
- 修改、新增某个功能,需要对整个系统进行测试、重新部署。
- 一个模块出现问题,很可能导致整个系统崩溃。
- 多个开发团队同时对数据进行管理,容易产生安全漏洞。
- 各个模块使用同一种技术进行开发,各个模块很难根据实际情况选择更合适的技术框架,局限性很大。
- 模块内容过于复杂,如果员工离职,可能需要很长时间才能完成工作交接。
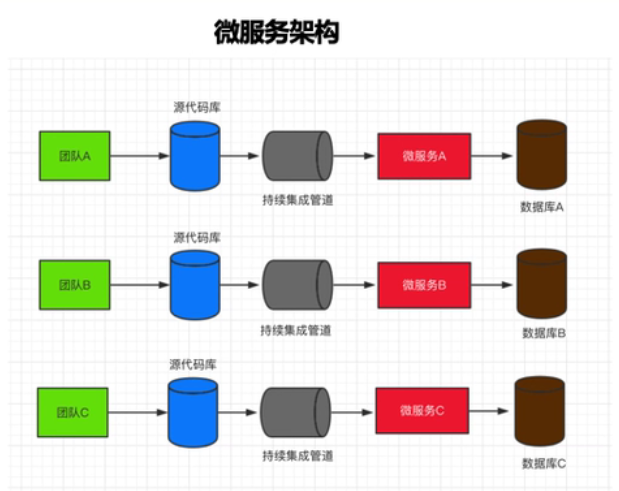
分布式、集群
集群:一台服务器无法负荷高并发的数据访问量,那么就设置十台服务器一起分担压力,十台不行就设置一百台(物理层面)。很多人干同一件事情,来分摊压力。
分布式:将一个复杂问题拆分成若干个简单的小问题,将一个大型的项目架构拆分成若干个微服务来协同完成。(软件设计层面)。将一个庞大的工作拆分成若干个小步骤,分别由不同的人完成这些小步骤,最终将所有的结果进行整合实现大的需求。
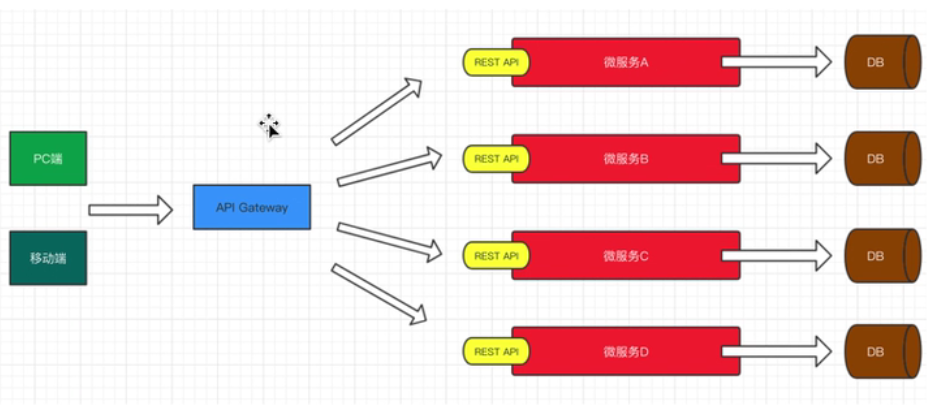
服务治理的核心由三部分组成:服务提供者、服务消费者、注册中心。
在分布式系统架构中,每个微服务在启动时,将自己的信息存储在注册中心,叫做服务注册。
服务消费者从注册中心获取服务提供者的网络信息,通过该信息调用服务,叫做服务发现。
Spring Cloud 的服务治理使用 Eureka 来实现,Eureka 是 Netflix 开源的基于 REST 的服务治理解决方案,Spring Cloud 集成了 Eureka,提供服务注册和服务发现的功能,可以和基于 Spring Boot 搭建的微服务应用轻松完成整合,开箱即用,Spring Cloud Eureka。
Spring Cloud Eureka
- Eureka Server,注册中心
- Eureka Client,所有要进行注册的微服务通过 Eureka Client 连接到 Eureka Server,完成注册。
Eureka Server代码实现
创建父工程,pom.xml
org.springframework.boot
spring-boot-starter-parent
2.0.7.RELEASE
org.springframework.boot
spring-boot-starter-web
javax.xml.bind
jaxb-api
2.3.0
com.sun.xml.bind
jaxb-impl
2.3.0
com.sun.xml.bind
jaxb-core
2.3.0
javax.activation
activation
1.1.1
org.springframework.cloud
spring-cloud-dependencies
Finchley.SR2
pom
import
在父工程下创建 Module,pom.xml
org.springframework.cloud
spring-cloud-starter-netflix-eureka-server
2.0.2.RELEASE
创建配置文件 application.yml,添加 Eureka Server 相关配置。
server:
port: 8761
eureka:
client:register-with-eureka: falsefetch-registry: falseservice-url:defaultZone: http://localhost:8761/eureka/
属性说明
server.port:当前 Eureka Server 服务端口。
eureka.client.register-with-eureka:是否将当前的 Eureka Server 服务作为客户端进行注册。
eureka.client.fetch-fegistry:是否获取其他 Eureka Server 服务的数据。
eureka.client.service-url.defaultZone:注册中心的访问地址。
创建启动类
package com.southwind;
import org.springframework.boot.SpringApplication;
import org.springframework.boot.autoconfigure.SpringBootApplication;
import org.springframework.cloud.netflix.eureka.server.EnableEurekaServer;@SpringBootApplication
@EnableEurekaServer
public class EurekaServerApplication {public static void main(String[] args) {SpringApplication.run(EurekaServerApplication.class,args);}
}
注解说明:
@SpringBootApplication:声明该类是 Spring Boot 服务的入口。
@EnableEurekaServer:声明该类是一个 Eureka Server 微服务,提供服务注册和服务发现功能,即注册中心。
Eureka Client 代码实现
创建 Module ,pom.xml
org.springframework.cloud
spring-cloud-starter-netflix-eureka-client
2.0.2.RELEASE
创建配置文件 application.yml,添加 Eureka Client 相关配置
server:
port: 8010
spring:
application:name: provider
eureka:
client:service-url:defaultZone: http://localhost:8761/eureka/
instance:
prefer-ip-address: true
属性说明:
spring.application.name:当前服务注册在 Eureka Server 上的名称。
eureka.client.service-url.defaultZone:注册中心的访问地址。
eureka.instance.prefer-ip-address:是否将当前服务的 IP 注册到 Eureka Server。
创建启动类
package com.southwind;
import org.springframework.boot.SpringApplication;
import org.springframework.boot.autoconfigure.SpringBootApplication;@SpringBootApplication
public class ProviderApplication {public static void main(String[] args) {SpringApplication.run(ProviderApplication.class,args);}
}
实体类
package com.southwind.entity;
import lombok.AllArgsConstructor;
import lombok.Data;
import lombok.NoArgsConstructor;@Data
@AllArgsConstructor
@NoArgsConstructor
public class Student {private long id;private String name;private int age;
}
Repository
package com.southwind.repository;
import com.southwind.entity.Student;
import java.util.Collection;
public interface StudentRepository {
public Collection<Student> findAll();public Student findById(long id);public void saveOrUpdate(Student student);public void deleteById(long id);
}
RepositoryImpl
package com.southwind.repository.impl;
import com.southwind.entity.Student;
import com.southwind.repository.StudentRepository;
import org.springframework.stereotype.Repository;import java.util.Collection;
import java.util.HashMap;
import java.util.Map;@Repository
public class StudentRepositoryImpl implements StudentRepository {private static Map<Long,Student> studentMap;static {studentMap = new HashMap<>();studentMap.put(1L,new Student(1L,"张三",22));studentMap.put(2L,new Student(2L,"李四",23));studentMap.put(3L,new Student(3L,"王五",24));}@Overridepublic Collection<Student> findAll() {return studentMap.values();}@Overridepublic Student findById(long id) {return studentMap.get(id);}@Overridepublic void saveOrUpdate(Student student) {studentMap.put(student.getId(),student);}@Overridepublic void deleteById(long id) {studentMap.remove(id);}
}
Handler
package com.southwind.controller;
import com.southwind.entity.Student;
import com.southwind.repository.StudentRepository;
import org.springframework.beans.factory.annotation.Autowired;
import org.springframework.web.bind.annotation.*;import java.util.Collection;
@RestController
@RequestMapping(“/student”)
public class StudentHandler {@Autowiredprivate StudentRepository studentRepository;@GetMapping("/findAll")public Collection<Student> findAll(){return studentRepository.findAll();}@GetMapping("/findById/{id}")public Student findById(@PathVariable("id") long id){return studentRepository.findById(id);}@PostMapping("/save")public void save(@RequestBody Student student){studentRepository.saveOrUpdate(student);}@PutMapping("/update")public void update(@RequestBody Student student){studentRepository.saveOrUpdate(student);}@DeleteMapping("/deleteById/{id}")public void deleteById(@PathVariable("id") long id){studentRepository.deleteById(id);}
}
RestTemplate 的使用
- 什么是 RestTemplate?
RestTemplate 是 Spring 框架提供的基于 REST 的服务组件,底层是对 HTTP 请求及响应进行了封装,提供了很多访问 RETS 服务的方法,可以简化代码开发。
- 如何使用 RestTemplate?
1、创建 Maven 工程,pom.xml。
2、创建实体类
package com.southwind.entity;import lombok.AllArgsConstructor;import lombok.Data;import lombok.NoArgsConstructor;@Data@AllArgsConstructor@NoArgsConstructorpublic class Student {private long id;private String name;private int age;}
3、Handler
package com.southwind.controller;import com.southwind.entity.Student;import org.springframework.beans.factory.annotation.Autowired;import org.springframework.web.bind.annotation.*;import org.springframework.web.client.RestTemplate;import java.util.Collection;@RestController@RequestMapping("/rest")public class RestHandler {@Autowiredprivate RestTemplate restTemplate;@GetMapping("/findAll")public Collection<Student> findAll(){return restTemplate.getForEntity("http://localhost:8010/student/findAll",Collection.class).getBody();}@GetMapping("/findAll2")public Collection<Student> findAll2(){return restTemplate.getForObject("http://localhost:8010/student/findAll",Collection.class);}@GetMapping("/findById/{id}")public Student findById(@PathVariable("id") long id){return restTemplate.getForEntity("http://localhost:8010/student/findById/{id}",Student.class,id).getBody();}@GetMapping("/findById2/{id}")public Student findById2(@PathVariable("id") long id){return restTemplate.getForObject("http://localhost:8010/student/findById/{id}",Student.class,id);}@PostMapping("/save")public void save(@RequestBody Student student){restTemplate.postForEntity("http://localhost:8010/student/save",student,null).getBody();}@PostMapping("/save2")public void save2(@RequestBody Student student){restTemplate.postForObject("http://localhost:8010/student/save",student,null);}@PutMapping("/update")public void update(@RequestBody Student student){restTemplate.put("http://localhost:8010/student/update",student);}@DeleteMapping("/deleteById/{id}")public void deleteById(@PathVariable("id") long id){restTemplate.delete("http://localhost:8010/student/deleteById/{id}",id);}}
4、启动类
package com.southwind;import org.springframework.boot.SpringApplication;import org.springframework.boot.autoconfigure.SpringBootApplication;import org.springframework.context.annotation.Bean;import org.springframework.web.client.RestTemplate;@SpringBootApplicationpublic class RestTemplateApplication {public static void main(String[] args) {SpringApplication.run(RestTemplateApplication.class,args);}@Beanpublic RestTemplate restTemplate(){return new RestTemplate();}}
服务消费者 consumer
创建 Maven 工程,pom.xml
org.springframework.cloud
spring-cloud-starter-netflix-eureka-client
2.0.2.RELEASE
创建配置文件 application.yml
server:
port: 8020
spring:
application:name: consumer
eureka:
client:service-url:defaultZone: http://localhost:8761/eureka/
instance:
prefer-ip-address: true
创建启动类
package com.southwind;
import org.springframework.boot.SpringApplication;
import org.springframework.boot.autoconfigure.SpringBootApplication;
import org.springframework.context.annotation.Bean;
import org.springframework.web.client.RestTemplate;@SpringBootApplication
public class ConsumerApplication {public static void main(String[] args) {SpringApplication.run(ConsumerApplication.class,args);}@Beanpublic RestTemplate restTemplate(){return new RestTemplate();}
}
Handler
package com.southwind.controller;
import com.southwind.entity.Student;
import org.springframework.beans.factory.annotation.Autowired;
import org.springframework.web.bind.annotation.*;
import org.springframework.web.client.RestTemplate;import java.util.Collection;
@RestController
@RequestMapping(“/consumer”)
public class ConsumerHandler {@Autowiredprivate RestTemplate restTemplate;@GetMapping("/findAll")public Collection<Student> findAll(){return restTemplate.getForEntity("http://localhost:8010/student/findAll",Collection.class).getBody();}@GetMapping("/findAll2")public Collection<Student> findAll2(){return restTemplate.getForObject("http://localhost:8010/student/findAll",Collection.class);}@GetMapping("/findById/{id}")public Student findById(@PathVariable("id") long id){return restTemplate.getForEntity("http://localhost:8010/student/findById/{id}",Student.class,id).getBody();}@GetMapping("/findById2/{id}")public Student findById2(@PathVariable("id") long id){return restTemplate.getForObject("http://localhost:8010/student/findById/{id}",Student.class,id);}@PostMapping("/save")public void save(@RequestBody Student student){restTemplate.postForEntity("http://localhost:8010/student/save",student,null).getBody();}@PostMapping("/save2")public void save2(@RequestBody Student student){restTemplate.postForObject("http://localhost:8010/student/save",student,null);}@PutMapping("/update")public void update(@RequestBody Student student){restTemplate.put("http://localhost:8010/student/update",student);}@DeleteMapping("/deleteById/{id}")public void deleteById(@PathVariable("id") long id){restTemplate.delete("http://localhost:8010/student/deleteById/{id}",id);}
}
服务网关
Spring Cloud 集成了 Zuul 组件,实现服务网关。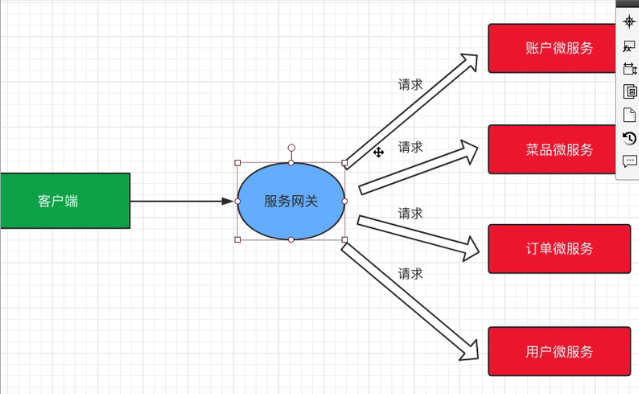
- 什么是 Zuul?
Zuul 是 Netflix 提供的一个开源的 API 网关服务器,是客户端和网站后端所有请求的中间层,对外开放一个 API,将所有请求导入统一的入口,屏蔽了服务端的具体实现逻辑,Zuul 可以实现反向代理的功能,在网关内部实现动态路由、身份认证、IP 过滤、数据监控等。
创建 Maven 工程,pom.xml
org.springframework.cloud
spring-cloud-starter-netflix-eureka-client
2.0.2.RELEASE
org.springframework.cloud
spring-cloud-starter-netflix-zuul
2.0.2.RELEASE
创建配置文件 application.yml
server:
port: 8030
spring:
application:name: gateway
eureka:
client:service-url:defaultZone: http://localhost:8761/eureka/
zuul:
routes:provider: /p/**
属性说明:
zuul.routes.provider:给服务提供者 provider 设置映射
创建启动类
package com.southwind;
import org.springframework.boot.SpringApplication;
import org.springframework.boot.autoconfigure.EnableAutoConfiguration;
import org.springframework.cloud.netflix.zuul.EnableZuulProxy;@EnableZuulProxy
@EnableAutoConfiguration
public class ZuulApplication {public static void main(String[] args) {SpringApplication.run(ZuulApplication.class,args);}
}
注解说明:
@EnableZuulProxy:包含了 @EnableZuulServer,设置该类是网关的启动类。
@EnableAutoConfiguration:可以帮助 Spring Boot 应用将所有符合条件的 @Configuration 配置加载到当前 Spring Boot 创建并使用的 IoC 容器中。
Zuul 自带了负载均衡功能,修改 provider 的代码。
package com.southwind.controller;
import com.southwind.entity.Student;
import com.southwind.repository.StudentRepository;
import org.springframework.beans.factory.annotation.Autowired;
import org.springframework.beans.factory.annotation.Value;
import org.springframework.web.bind.annotation.*;import java.util.Collection;
@RestController
@RequestMapping(“/student”)
public class StudentHandler {@Autowiredprivate StudentRepository studentRepository;@Value("${server.port}")private String port;@GetMapping("/findAll")public Collection<Student> findAll(){return studentRepository.findAll();}@GetMapping("/findById/{id}")public Student findById(@PathVariable("id") long id){return studentRepository.findById(id);}@PostMapping("/save")public void save(@RequestBody Student student){studentRepository.saveOrUpdate(student);}@PutMapping("/update")public void update(@RequestBody Student student){studentRepository.saveOrUpdate(student);}@DeleteMapping("/deleteById/{id}")public void deleteById(@PathVariable("id") long id){studentRepository.deleteById(id);}@GetMapping("/index")public String index(){return "当前端口:"+this.port;}
}
Ribbon 负载均衡
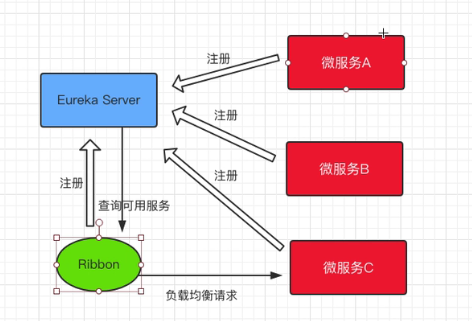
- 什么是 Ribbon?
Spring Cloud Ribbon 是一个负载均衡解决方案,Ribbon 是 Netflix 发布的负载均衡器,Spring Cloud Ribbon 是基于 Netflix Ribbon 实现的,是一个用于对 HTTP 请求进行控制的负载均衡客户端。
在注册中心对 Ribbon 进行注册之后,Ribbon 就可以基于某种负载均衡算法,如轮询、随机、加权轮询、加权随机等自动帮助服务消费者调用接口,开发者也可以根据具体需求自定义 Ribbon 负载均衡算法。实际开发中,Spring Cloud Ribbon 需要结合 Spring Cloud Eureka 来使用,Eureka Server 提供所有可以调用的服务提供者列表,Ribbon 基于特定的负载均衡算法从这些服务提供者中选择要调用的具体实例。
创建 Module,pom.xml
org.springframework.cloud
spring-cloud-starter-netflix-eureka-client
2.0.2.RELEASE
创建配置文件 application.yml
server:
port: 8040
spring:
application:name: ribbon
eureka:
client:service-url:defaultZone: http://localhost:8761/eureka/
instance:
prefer-ip-address: true
创建启动类
package com.southwind;
import org.springframework.boot.SpringApplication;
import org.springframework.boot.autoconfigure.SpringBootApplication;
import org.springframework.cloud.client.loadbalancer.LoadBalanced;
import org.springframework.context.annotation.Bean;
import org.springframework.web.client.RestTemplate;@SpringBootApplication
public class RibbonApplication {public static void main(String[] args) {SpringApplication.run(RibbonApplication.class,args);}@Bean@LoadBalancedpublic RestTemplate restTemplate(){return new RestTemplate();}
}
@LoadBalanced:声明一个基于 Ribbon 的负载均衡。
Handler
package com.southwind.controller;
import com.southwind.entity.Student;
import org.springframework.beans.factory.annotation.Autowired;
import org.springframework.web.bind.annotation.GetMapping;
import org.springframework.web.bind.annotation.RequestMapping;
import org.springframework.web.bind.annotation.RestController;
import org.springframework.web.client.RestTemplate;import java.util.Collection;
@RestController
@RequestMapping(“/ribbon”)
public class RibbonHandler {@Autowiredprivate RestTemplate restTemplate;@GetMapping("/findAll")public Collection<Student> findAll(){return restTemplate.getForObject("http://provider/student/findAll",Collection.class);}@GetMapping("/index")public String index(){return restTemplate.getForObject("http://provider/student/index",String.class);}
}
Feign
- 什么是 Feign?
与 Ribbon 一样,Feign 也是由 Netflix 提供的,Feign 是一个声明式、模版化的 Web Service 客户端,它简化了开发者编写 Web 服务客户端的操作,开发者可以通过简单的接口和注解来调用 HTTP API,Spring Cloud Feign,它整合了 Ribbon 和 Hystrix,具有可插拔、基于注解、负载均衡、服务熔断等一系列便捷功能。
相比较于 Ribbon + RestTemplate 的方式,Feign 大大简化了代码的开发,Feign 支持多种注解,包括 Feign 注解、JAX-RS 注解、Spring MVC 注解等,Spring Cloud 对 Feing 进行了优化,整合了 Ribbon 和 Eureka,从而让 Feign 的使用更加方便。
- Ribbon 和 Feign 的区别
Ribbon 是一个通用的 HTTP 客户端工具,Feign 是基于 Ribbon 实现的。
- Feign 的tedian
1、Feign 是一个声明式的 Web Service 客户端。
2、支持 Feign 注解、Spring MVC 注解、JAX-RS 注解。
3、Feign 基于 Ribbon 实现,使用起来更加简单。
4、Feign 集成了 Hystrix,具备服务熔断的功能。
创建 Module,pom.xml
org.springframework.cloud
spring-cloud-starter-netflix-eureka-client
2.0.2.RELEASE
org.springframework.cloud
spring-cloud-starter-openfeign
2.0.2.RELEASE
创建配置文件 application.yml
server:
port: 8050
spring:
application:name: feign
eureka:
client:service-url:defaultZone: http://localhost:8761/eureka/
instance:
prefer-ip-address: true
创建启动类
package com.southwind;
import org.springframework.boot.SpringApplication;
import org.springframework.boot.autoconfigure.SpringBootApplication;
import org.springframework.cloud.openfeign.EnableFeignClients;@SpringBootApplication
@EnableFeignClients
public class FeignApplication {public static void main(String[] args) {SpringApplication.run(FeignApplication.class,args);}
}
创建声明式接口
package com.southwind.feign;
import com.southwind.entity.Student;
import org.springframework.cloud.openfeign.FeignClient;
import org.springframework.web.bind.annotation.GetMapping;import java.util.Collection;
@FeignClient(value = “provider”)
public interface FeignProviderClient {@GetMapping("/student/findAll")public Collection<Student> findAll();@GetMapping("/student/index")public String index();
}
Handler
package com.southwind.controller;
import com.southwind.entity.Student;
import com.southwind.feign.FeignProviderClient;
import org.springframework.beans.factory.annotation.Autowired;
import org.springframework.web.bind.annotation.GetMapping;
import org.springframework.web.bind.annotation.RequestMapping;
import org.springframework.web.bind.annotation.RestController;import java.util.Collection;
@RestController
@RequestMapping(“/feign”)
public class FeignHandler {@Autowiredprivate FeignProviderClient feignProviderClient;@GetMapping("/findAll")public Collection<Student> findAll(){return feignProviderClient.findAll();}@GetMapping("/index")public String index(){return feignProviderClient.index();}
}
服务熔断,application.yml 添加熔断机制。
server:
port: 8050
spring:
application:name: feign
eureka:
client:service-url:defaultZone: http://localhost:8761/eureka/
instance:
prefer-ip-address: true
feign:
hystrix:enabled: true
feign.hystrix.enabled:是否开启熔断器。
创建 FeignProviderClient 接口的实现类 FeignError,定义容错处理逻辑,通过
@Component注解将 FeignError 实例注入 IoC 容器中。package com.southwind.feign.impl;
import com.southwind.entity.Student;
import com.southwind.feign.FeignProviderClient;
import org.springframework.stereotype.Component;import java.util.Collection;
@Component
public class FeignError implements FeignProviderClient {@Overridepublic Collection<Student> findAll() {return null;}@Overridepublic String index() {return "服务器维护中......";}
}
在 FeignProviderClient 定义处通过
@FeignClient的 fallback 属性设置映射。package com.southwind.feign;
import com.southwind.entity.Student;
import com.southwind.feign.impl.FeignError;
import org.springframework.cloud.openfeign.FeignClient;
import org.springframework.web.bind.annotation.GetMapping;import java.util.Collection;
@FeignClient(value = “provider”,fallback = FeignError.class)
public interface FeignProviderClient {@GetMapping("/student/findAll")public Collection<Student> findAll();@GetMapping("/student/index")public String index();
}
Hystrix 容错机制
在不改变各个微服务调用关系的前提下,针对错误情况进行预先处理。
- 设计原则
1、服务隔离机制
2、服务降级机制
3、熔断机制
4、提供实时的监控和报警功能
5、提供实时的配置修改功能
Hystrix 数据监控需要结合 Spring Boot Actuator 来使用,Actuator 提供了对服务的健康健康、数据统计,可以通过 hystrix.stream 节点获取监控的请求数据,提供了可视化的监控界面。
创建 Maven,pom.xml
org.springframework.cloud
spring-cloud-starter-netflix-eureka-client
2.0.2.RELEASE
org.springframework.cloud
spring-cloud-starter-openfeign
2.0.2.RELEASE
org.springframework.boot
spring-boot-starter-actuator
2.0.7.RELEASE
org.springframework.cloud
spring-cloud-starter-netflix-hystrix
2.0.2.RELEASE
org.springframework.cloud
spring-cloud-starter-netflix-hystrix-dashboard
2.0.2.RELEASE
创建配置文件 application.yml
server:
port: 8060
spring:
application:name: hystrix
eureka:
client:service-url:defaultZone: http://localhost:8761/eureka/
instance:
prefer-ip-address: true
feign:
hystrix:enabled: true
management:
endpoints:web:exposure:include: 'hystrix.stream'
创建启动类
package com.southwind;
import org.springframework.boot.SpringApplication;
import org.springframework.boot.autoconfigure.SpringBootApplication;
import org.springframework.cloud.client.circuitbreaker.EnableCircuitBreaker;
import org.springframework.cloud.netflix.hystrix.dashboard.EnableHystrixDashboard;
import org.springframework.cloud.openfeign.EnableFeignClients;@SpringBootApplication
@EnableFeignClients
@EnableCircuitBreaker
@EnableHystrixDashboard
public class HystrixApplication {public static void main(String[] args) {SpringApplication.run(HystrixApplication.class,args);}
}
注解说明:
@EnableCircuitBreaker:声明启用数据监控
@EnableHystrixDashboard:声明启用可视化数据监控
Handler
package com.southwind.controller;
import com.southwind.entity.Student;
import com.southwind.feign.FeignProviderClient;
import org.springframework.beans.factory.annotation.Autowired;
import org.springframework.web.bind.annotation.GetMapping;
import org.springframework.web.bind.annotation.RequestMapping;
import org.springframework.web.bind.annotation.RestController;import java.util.Collection;
@RestController
@RequestMapping(“/hystrix”)
public class HystrixHandler {@Autowiredprivate FeignProviderClient feignProviderClient;@GetMapping("/findAll")public Collection<Student> findAll(){return feignProviderClient.findAll();}@GetMapping("/index")public String index(){return feignProviderClient.index();}
}
启动成功之后,访问
http://localhost:8060/actuator/hystrix.stream可以监控到请求数据,- 访问
http://localhost:8060/hystrix,可以看到可视化的监控界面,输入要监控的地址节点即可看到该节点的可视化数据监控。
Spring Cloud 配置中心
Spring Cloud Config,通过服务端可以为多个客户端提供配置服务。Spring Cloud Config 可以将配置文件存储在本地,也可以将配置文件存储在远程 Git 仓库,创建 Config Server,通过它管理所有的配置文件。
本地文件系统
创建 Maven 工程,pom.xml
org.springframework.cloud
spring-cloud-config-server
2.0.2.RELEASE
创建 application.yml
server:
port: 8762
spring:
application:name: nativeconfigserver
profiles:
active: native
cloud:
config:server:native:search-locations: classpath:/shared
注解说明
profiles.active:配置文件的获取方式
cloud.config.server.native.search-locations:本地配置文件存放的路径
resources 路径下创建 shared 文件夹,并在此路径下创建 configclient-dev.yml。
server:
port: 8070
foo: foo version 1创建启动类
package com.southwind;
import org.springframework.boot.SpringApplication;
import org.springframework.boot.autoconfigure.SpringBootApplication;
import org.springframework.cloud.config.server.EnableConfigServer;@SpringBootApplication
@EnableConfigServer
public class NativeConfigServerApplication {public static void main(String[] args) {SpringApplication.run(NativeConfigServerApplication.class,args);}
}
注解说明
@EnableConfigServer:声明配置中心。
创建客户端读取本地配置中心的配置文件
创建 Maven 工程,pom.xml
org.springframework.cloud
spring-cloud-starter-config
2.0.2.RELEASE
创建 bootstrap.yml,配置读取本地配置中心的相关信息。
spring:
application:name: configclient
profiles:
active: dev
cloud:
config:uri: http://localhost:8762fail-fast: true
注解说明
cloud.config.uri:本地 Config Server 的访问路径
cloud.config.fail-fase:设置客户端优先判断 Config Server 获取是否正常。
通过spring.application.name 结合spring.profiles.active拼接目标配置文件名,configclient-dev.yml,去 Config Server 中查找该文件。
创建启动类
package com.southwind;
import org.springframework.boot.SpringApplication;
import org.springframework.boot.autoconfigure.SpringBootApplication;@SpringBootApplication
public class NativeConfigClientApplication {public static void main(String[] args) {SpringApplication.run(NativeConfigClientApplication.class,args);}
}
Handler
package com.southwind.controller;
import org.springframework.beans.factory.annotation.Value;
import org.springframework.web.bind.annotation.GetMapping;
import org.springframework.web.bind.annotation.RequestMapping;
import org.springframework.web.bind.annotation.RestController;@RestController
@RequestMapping(“/native”)
public class NativeConfigHandler {@Value("${server.port}")private String port;@Value("${foo}")private String foo;@GetMapping("/index")public String index(){return this.port+"-"+this.foo;}
}
Spring Cloud Config 远程配置
创建配置文件,上传至 GitHub
server:
port: 8070
eureka:
client:serviceUrl:defaultZone: http://localhost:8761/eureka/
spring:
application:name: configclient
创建 Config Server,新建 Maven 工程,pom.xml
org.springframework.cloud
spring-cloud-config-server
2.0.2.RELEASE
创建配置文件 application.yml
server:
port: 8888
spring:
application:name: configserver
cloud:
config:server:git:uri: https://github.com/southwind9801/aispringcloud.gitsearchPaths: configusername: rootpassword: rootlabel: master
eureka:
client:serviceUrl:defaultZone: http://localhost:8761/eureka/
创建启动类
package com.southwind;
import org.springframework.boot.SpringApplication;
import org.springframework.boot.autoconfigure.SpringBootApplication;
import org.springframework.cloud.config.server.EnableConfigServer;@SpringBootApplication
@EnableConfigServer
public class ConfigServerApplication {public static void main(String[] args) {SpringApplication.run(ConfigServerApplication.class,args);}
}
创建 Config Client
创建 Maven 工程,pom.xml
org.springframework.cloud
spring-cloud-starter-config
2.0.2.RELEASE
org.springframework.cloud
spring-cloud-starter-netflix-eureka-client
2.0.2.RELEASE
创建 bootstrap.yml
spring:
cloud:config:name: configclientlabel: masterdiscovery:enabled: trueservice-id: configserver
eureka:
client:service-url:defaultZone: http://localhost:8761/eureka/
注解说明
spring.cloud.config.name:当前服务注册在 Eureka Server 上的名称,与远程仓库的配置文件名对应。
spring.cloud.config.label:Git Repository 的分支。
spring.cloud.config.discovery.enabled:是否开启 Config 服务发现支持。
spring.cloud.config.discovery.service-id:配置中心在 Eureka Server 上注册的名称。
创建启动类
package com.southwind;
import org.springframework.boot.SpringApplication;
import org.springframework.boot.autoconfigure.SpringBootApplication;@SpringBootApplication
public class ConfigClientApplication {public static void main(String[] args) {SpringApplication.run(ConfigClientApplication.class,args);}
}
Handler
package com.southwind.controller;
import org.springframework.beans.factory.annotation.Value;
import org.springframework.web.bind.annotation.GetMapping;
import org.springframework.web.bind.annotation.RequestMapping;
import org.springframework.web.bind.annotation.RestController;@RestController
@RequestMapping(“/hello”)
public class HelloHandler {@Value("${server.port}")private String port;@GetMapping("/index")public String index(){return this.port;}
}
服务跟踪
Spring Cloud Zipkin
Zipkin 是一个可以采集并且跟踪分布式系统中请求数据的组件,让开发者可以更加直观的监控到请求在各个微服务所耗费的时间等,Zipkin:Zipkin Server、Zipkin Client。
创建 Zipkin Server
创建 Maven 工程,pom.xml
org.springframework.boot
spring-boot-starter-web
io.zipkin.java
zipkin-server
2.9.4
io.zipkin.java
zipkin-autoconfigure-ui
2.9.4
创建配置文件 application.yml
server:
port: 9090创建启动类
package com.southwind;
import org.springframework.boot.SpringApplication;
import org.springframework.boot.autoconfigure.SpringBootApplication;
import zipkin.server.internal.EnableZipkinServer;@SpringBootApplication
@EnableZipkinServer
public class ZipkinApplication {public static void main(String[] args) {SpringApplication.run(ZipkinApplication.class,args);}
}
注解说明
@EnableZipkinServer:声明启动 Zipkin Server
创建 Zipkin Client
创建 Maven 工程,pom.xml
org.springframework.cloud
spring-cloud-starter-zipkin
2.0.2.RELEASE
创建配置文件 application.yml
server:
port: 8090
spring:
application:name: zipkinclient
sleuth:
web:client:enabled: truesampler:probability: 1.0
zipkin:
base-url: http://localhost:9090/
eureka:
client:service-url:defaultZone: http://localhost:8761/eureka/
属性说明
spring.sleuth.web.client.enabled:设置开启请求跟踪
spring.sleuth.sampler.probability:设置采样比例,默认是 1.0
srping.zipkin.base-url:Zipkin Server 地址
创建启动类
package com.southwind;
import org.springframework.boot.SpringApplication;
import org.springframework.boot.autoconfigure.SpringBootApplication;@SpringBootApplication
public class ZipkinClientApplication {public static void main(String[] args) {SpringApplication.run(ZipkinClientApplication.class,args);}
}
Handler
package com.southwind.controller;
import org.springframework.beans.factory.annotation.Value;
import org.springframework.web.bind.annotation.GetMapping;
import org.springframework.web.bind.annotation.RequestMapping;
import org.springframework.web.bind.annotation.RestController;@RestController
@RequestMapping(“/zipkin”)
public class ZipkinHandler {@Value("${server.port}")private String port;@GetMapping("/index")public String index(){return this.port;}
}
访问zipkin可视化界面:http://localhost:9090/zipkin/
然后去访问客户端8090,即可在可视化界面看到请求记录。
【视频参考】https://www.bilibili.com/video/BV1p4411K7pz
【代码参考】https://github.com/monkeyhlj/spring-study


及SPRO的使用技巧")


还没有评论,来说两句吧...