Android 框架学习2:源码分析 EventBus 3.0 如何实现事件总线
- Go beyond yourself rather than beyond others.
上篇文章 深入理解 EventBus 3.0 之使用篇 我们了解了 EventBus 的特性以及如何使用,这篇文章我们来揭开它神秘的面纱,看看在繁华的背后究竟是怎样的沧桑。
读完本文你将了解:
- 注解修饰订阅方法
- 编译时处理注解生成索引
创建 EventBus
- 最关键的两个属性
- SubscriberMethod 订阅方法信息
- Subscription 事件订阅总体
- SubscriberMethodFinder 订阅方法查找类
注册事件
- 拿到类中使用 Subscribe 注解修饰的订阅方法
- 保存订阅方法
- 注册流程图
取消注册
- 取消注册普通事件
- 取消注册粘性事件
- 取消注册流程图
发送事件
- 将要发送的事件添加到当前线程的发送队列
- 遍历处理事件队列中的事件发送前的准备工作
- 找到订阅该事件的所有订阅者
- 发送事件给订阅者
- 一个反射调用方法和三种发送者
- HandlerPoster 主线程的事件发送者
- BackgroundPoster 单一子线程发送者
- AsyncPoster 异步发送者
- 发送流程图
- 总结
- 带有注释的源码地址
- Thanks
注解修饰订阅方法
EventBus 使用的 Subscribe 注解如下:
@Documented@Retention(RetentionPolicy.RUNTIME)@Target({ElementType.METHOD})public @interface Subscribe {ThreadMode threadMode() default ThreadMode.POSTING;boolean sticky() default false;int priority() default 0;}
可以看到,由于后面需要在运行时反射获取方法信息,这个注解的 Retention 为运行时,同时只用于修饰方法。
默认 ThreadMode 为 POSTING,即与发送消息者在统一线程。
编译时处理注解生成索引
在注册 EventBus 之前,我们需要创建事件实体类,以及创建订阅方法,比如这样:
@Subscribe(threadMode = ThreadMode.POSTING, priority = 1)public void readMessage(MessageEvent event) {mTvEventInfo.setText("\n" + event.getMessage() + ", " + event.getTime());}
订阅方法使用 @Subscribe 修饰,在编译时,EventBus 的注解处理器 EventBusAnnotationProcessor 会处理这个方法,然后生成一个实现 SubscriberInfoIndex 接口的类。
SubscriberInfoIndex 代码如下:
public interface SubscriberInfoIndex {SubscriberInfo getSubscriberInfo(Class<?> subscriberClass);}public interface SubscriberInfo {Class<?> getSubscriberClass(); //订阅事件的 Class 对象SubscriberMethod[] getSubscriberMethods(); //这个类中的订阅方法数组SubscriberInfo getSuperSubscriberInfo(); //父类的订阅信息boolean shouldCheckSuperclass();}
这个接口定义了生成索引需要实现的关键方法,即通过一个 Class 对象获取这个类中的订阅方法数组,父类的订阅信息等等。
注解处理器的代码我们挑重点看一下:
private void createInfoIndexFile(String index) {BufferedWriter writer = null;try {JavaFileObject sourceFile = processingEnv.getFiler().createSourceFile(index);int period = index.lastIndexOf('.');String myPackage = period > 0 ? index.substring(0, period) : null;String clazz = index.substring(period + 1);writer = new BufferedWriter(sourceFile.openWriter());if (myPackage != null) {writer.write("package " + myPackage + ";\n\n");}writer.write("import org.greenrobot.eventbus.meta.SimpleSubscriberInfo;\n");writer.write("import org.greenrobot.eventbus.meta.SubscriberMethodInfo;\n");writer.write("import org.greenrobot.eventbus.meta.SubscriberInfo;\n");writer.write("import org.greenrobot.eventbus.meta.SubscriberInfoIndex;\n\n");writer.write("import org.greenrobot.eventbus.ThreadMode;\n\n");writer.write("import java.util.HashMap;\n");writer.write("import java.util.Map;\n\n");writer.write("/** This class is generated by EventBus, do not edit. */\n");writer.write("public class " + clazz + " implements SubscriberInfoIndex {\n");writer.write(" private static final Map<Class<?>, SubscriberInfo> SUBSCRIBER_INDEX;\n\n");writer.write(" static {\n");writer.write(" SUBSCRIBER_INDEX = new HashMap<Class<?>, SubscriberInfo>();\n\n");writeIndexLines(writer, myPackage);writer.write(" }\n\n");writer.write(" private static void putIndex(SubscriberInfo info) {\n");writer.write(" SUBSCRIBER_INDEX.put(info.getSubscriberClass(), info);\n");writer.write(" }\n\n");writer.write(" @Override\n");writer.write(" public SubscriberInfo getSubscriberInfo(Class<?> subscriberClass) {\n");writer.write(" SubscriberInfo info = SUBSCRIBER_INDEX.get(subscriberClass);\n");writer.write(" if (info != null) {\n");writer.write(" return info;\n");writer.write(" } else {\n");writer.write(" return null;\n");writer.write(" }\n");writer.write(" }\n");writer.write("}\n");//...}
可以看到是根据一个 index 创建一个索引类,index 就是这个类的包名和类名。
跟着上篇文章 EventBus 3.0 的使用 配置注解处理器,编译后,就会在 build 文件夹中生成你在 gradle 中配置的索引类。
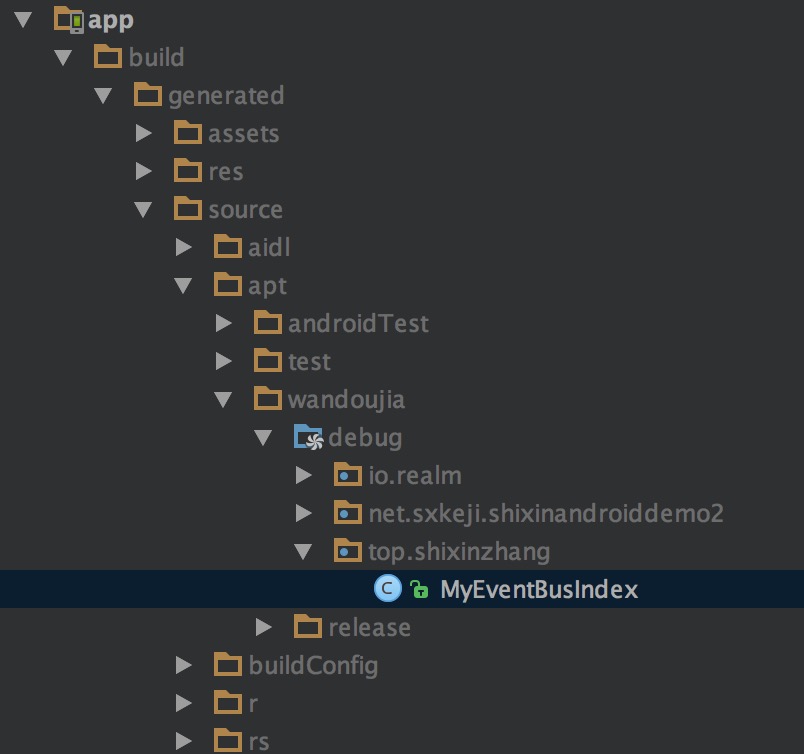
看看这个索引类长什么样吧:
public class MyEventBusIndex implements SubscriberInfoIndex {//实现了前面提到的接口private static final Map<Class<?>, SubscriberInfo> SUBSCRIBER_INDEX; //保存类和订阅信息的缓存表static {SUBSCRIBER_INDEX = new HashMap<Class<?>, SubscriberInfo>();//记录每个类中的订阅方法信息putIndex(new SimpleSubscriberInfo(net.sxkeji.shixinandroiddemo2.activity.eventbus.EventBusRegisterActivity.class,true, new SubscriberMethodInfo[] {new SubscriberMethodInfo("readMessageFirst",net.sxkeji.shixinandroiddemo2.activity.eventbus.MessageEvent.class, ThreadMode.POSTING, 5, false),new SubscriberMethodInfo("readMessage", net.sxkeji.shixinandroiddemo2.activity.eventbus.MessageEvent.class,ThreadMode.POSTING, 1, false),}));putIndex(new SimpleSubscriberInfo(net.sxkeji.shixinandroiddemo2.activity.eventbus.EventBusStickyActivity.class,true, new SubscriberMethodInfo[] {new SubscriberMethodInfo("readStickyMsg",net.sxkeji.shixinandroiddemo2.activity.eventbus.MessageEvent.class, ThreadMode.MAIN, 0, true),}));}private static void putIndex(SubscriberInfo info) {SUBSCRIBER_INDEX.put(info.getSubscriberClass(), info);}@Overridepublic SubscriberInfo getSubscriberInfo(Class<?> subscriberClass) {SubscriberInfo info = SUBSCRIBER_INDEX.get(subscriberClass);if (info != null) {return info;} else {return null;}}}
可以看到,编译时生成的索引类将我们项目中使用 @Subscribe 修饰的订阅方法信息和所在 Class 都保存在 SUBSCRIBER_INDEX 这个映射表中,这样运行时就可以调用 getSubscriberInfo 方法根据 Class 对象获得订阅信息。
正是这个索引类的存在,在一定程度上减轻了之前版本使用反射获取订阅方法信息的性能问题,大大提高了 EventBus 的运行效率。
创建 EventBus
使用 EventBus 第一步基本都是 EventBus.getDefault() 获取默认配置的 EventBus,先来看看它的源码。
/** Convenience singleton for apps using a process-wide EventBus instance. */public static EventBus getDefault() {if (defaultInstance == null) {synchronized (EventBus.class) {if (defaultInstance == null) {defaultInstance = new EventBus();}}}return defaultInstance;}
单例模式调用 EventBus 的构造函数:
private static final EventBusBuilder DEFAULT_BUILDER = new EventBusBuilder();public EventBus() {this(DEFAULT_BUILDER);}EventBus(EventBusBuilder builder) {subscriptionsByEventType = new HashMap<>();typesBySubscriber = new HashMap<>();stickyEvents = new ConcurrentHashMap<>();mainThreadPoster = new HandlerPoster(this, Looper.getMainLooper(), 10);backgroundPoster = new BackgroundPoster(this);asyncPoster = new AsyncPoster(this);indexCount = builder.subscriberInfoIndexes != null ? builder.subscriberInfoIndexes.size() : 0;subscriberMethodFinder = new SubscriberMethodFinder(builder.subscriberInfoIndexes,builder.strictMethodVerification, builder.ignoreGeneratedIndex);logSubscriberExceptions = builder.logSubscriberExceptions;logNoSubscriberMessages = builder.logNoSubscriberMessages;sendSubscriberExceptionEvent = builder.sendSubscriberExceptionEvent;sendNoSubscriberEvent = builder.sendNoSubscriberEvent;throwSubscriberException = builder.throwSubscriberException;eventInheritance = builder.eventInheritance;executorService = builder.executorService;}
getDefault() 使用默认的 EventBusBuilder 构建了一个 EventBus,从上面的代码我们可以看到,EventBus 类中包含的关键属性如下:
eventTypesCache:保存事件类型的缓存,HashMapsubscriptionsByEventType:事件类型与订阅者列表的映射,HashMaptypesBySubscriber:订阅的类与订阅的事件关联列表,HashMapstickyEvents:粘性事件,ConcurrentHashMapcurrentPostingThreadState:当前发送线程的状态,ThreadLocalmainThreadPoster:主线程的消息发送者,HandlerbackgroundPoster:子线程的消息发送者,RunnableasyncPoster:异步消息发送者,RunnablesubscriberMethodFinder:订阅方法查找executorService:线程池
这里介绍几个关键的类。
最关键的两个属性
EventBus 中最关键的两个属性是:
// 事件与对应的订阅者关联列表,private final Map<Class<?>, CopyOnWriteArrayList<Subscription>> subscriptionsByEventType;// 订阅者与订阅的事件关联列表private final Map<Object, List<Class<?>>> typesBySubscriber;
它俩分别保存了事件与对应的订阅者关联列表、订阅者与订阅事件的关联列表。
在后面的 注册、解除注册中,最后都是在操作它们。注册时添加、解除注册时移除。
至于为什么要用两种映射关系,我们在后面看完整个流程总结。
SubscriberMethod 订阅方法信息
SubscriberMethod 这个类保存了我们写的订阅方法的信息,包括以下信息:
final Method method; //订阅方法本身final ThreadMode threadMode; //执行在哪个线程final Class<?> eventType; //事件类型?final int priority; //优先级final boolean sticky; //是否为粘性事件String methodString; //方法名称,用于内部比较两个订阅方法是否相等
Subscription 事件订阅总体
final class Subscription {final Object subscriber;final SubscriberMethod subscriberMethod;/*** Becomes false as soon as {@link EventBus#unregister(Object)} is called, which is checked by queued event delivery* {@link EventBus#invokeSubscriber(PendingPost)} to prevent race conditions.*/volatile boolean active;Subscription(Object subscriber, SubscriberMethod subscriberMethod) {this.subscriber = subscriber;this.subscriberMethod = subscriberMethod;active = true;}//...}
可以看到 Subscription 中保存了类与其中一个订阅方法,在后面发送事件时,是以它为基本事件发送单位。
SubscriberMethodFinder 订阅方法查找类
这个类用来查找和缓存该类中订阅方法信息的类,关键代码如下:
private static final Map<Class<?>, List<SubscriberMethod>> METHOD_CACHE = new ConcurrentHashMap<>();//根据 Class 对象获取订阅方法列表List<SubscriberMethod> findSubscriberMethods(Class<?> subscriberClass) {List<SubscriberMethod> subscriberMethods = METHOD_CACHE.get(subscriberClass);if (subscriberMethods != null) {return subscriberMethods;}if (ignoreGeneratedIndex) { //使用 EventBus.getDefault() 时默认是 falsesubscriberMethods = findUsingReflection(subscriberClass); //反射获取 class 中的订阅的方法} else {subscriberMethods = findUsingInfo(subscriberClass); //从 index 中查询订阅方法}if (subscriberMethods.isEmpty()) {throw new EventBusException("Subscriber " + subscriberClass+ " and its super classes have no public methods with the @Subscribe annotation");} else {METHOD_CACHE.put(subscriberClass, subscriberMethods);return subscriberMethods;}}
findSubscriberMethods 方法的的作用就是:根据 Class 对象获取订阅方法列表,流程如下:
- 先从
METHOD_CACHE这个 map 中看有没有,有就直接返回 - 没有的话就根据
ignoreGeneratedIndex是否为 true 决定使用反射还是使用注解生成的索引来获取订阅方法 - 找到后将这次的结果放到
METHOD_CACHE中,便于下次快速查找
由于 EventBus.getDefault() 使用的默认 Builder 中 ignoreGeneratedIndex 是 false 的,所以我们直接看后一种获取订阅方法 findUsingInfo():
/*** 先从注解处理器生成的 index 文件中查找,找不到就使用反射获取* @param subscriberClass* @return*/private List<SubscriberMethod> findUsingInfo(Class<?> subscriberClass) {FindState findState = prepareFindState();findState.initForSubscriber(subscriberClass);while (findState.clazz != null) {findState.subscriberInfo = getSubscriberInfo(findState); //去 index 文件中获取if (findState.subscriberInfo != null) {SubscriberMethod[] array = findState.subscriberInfo.getSubscriberMethods();//将订阅方法转存到 findState 中for (SubscriberMethod subscriberMethod : array) {if (findState.checkAdd(subscriberMethod.method, subscriberMethod.eventType)) {findState.subscriberMethods.add(subscriberMethod);}}} else { //index 文件不存在,还是得去反射获取findUsingReflectionInSingleClass(findState);}findState.moveToSuperclass();}return getMethodsAndRelease(findState);}/*** 从 index 中获取* @param findState* @return*/private SubscriberInfo getSubscriberInfo(FindState findState) {//已经有订阅信息,并且父订阅信息的 Class 就是当前 Classif (findState.subscriberInfo != null && findState.subscriberInfo.getSuperSubscriberInfo() != null) {SubscriberInfo superclassInfo = findState.subscriberInfo.getSuperSubscriberInfo();if (findState.clazz == superclassInfo.getSubscriberClass()) {return superclassInfo;}}//如果有 index 文件,就去 index 文件中查找,没有就返回 nullif (subscriberInfoIndexes != null) {for (SubscriberInfoIndex index : subscriberInfoIndexes) {SubscriberInfo info = index.getSubscriberInfo(findState.clazz);if (info != null) {return info;}}}return null;}
可以看到 findUsingInfo () 方法中使用复用的 FindState 对象来查询订阅信息,先从注解处理器生成的 index 文件中查找,找不到就使用反射获取。
注册事件
拿到 EventBus 实例后,就可以注册订阅方法,普通事件和粘性事件的注册都是调用:EventBus.getDefault().register(this);。
看下这个方法代码:
public void register(Object subscriber) {Class<?> subscriberClass = subscriber.getClass();//通过 index 文件或者反射来获得该类中的订阅方法List<SubscriberMethod> subscriberMethods = subscriberMethodFinder.findSubscriberMethods(subscriberClass);synchronized (this) {for (SubscriberMethod subscriberMethod : subscriberMethods) {////遍历这个类中的所有订阅方法,挨个添加到订阅列表subscribe(subscriber, subscriberMethod);}}}
可以看到注册主要分为两步:
- 通过 index 文件或者反射来获得该类中的订阅方法
- 遍历这个类中的所有订阅方法,挨个添加到订阅列表
拿到类中使用 Subscribe 注解修饰的订阅方法
register() 方法中调用了我们前面介绍的 subscriberMethodFinder.findSubscriberMethods() 方法得到注册类中使用 Subscribe 注解修饰的方法。
由于 EventBus.getDefault() 默认其实使用的还是反射,这里还是看下它的反射获取订阅方法:
/*** 使用反射获取* @param findState*/private void findUsingReflectionInSingleClass(FindState findState) {Method[] methods;try {// This is faster than getMethods, especially when subscribers are fat classes like Activitiesmethods = findState.clazz.getDeclaredMethods();} catch (Throwable th) {methods = findState.clazz.getMethods();findState.skipSuperClasses = true;}for (Method method : methods) { //遍历这个类里的所有方法int modifiers = method.getModifiers();//检查是否是 public 非 static 非抽象的方法if ((modifiers & Modifier.PUBLIC) != 0 && (modifiers & MODIFIERS_IGNORE) == 0) {Class<?>[] parameterTypes = method.getParameterTypes();if (parameterTypes.length == 1) { //参数必须只能有一个Subscribe subscribeAnnotation = method.getAnnotation(Subscribe.class);if (subscribeAnnotation != null) {Class<?> eventType = parameterTypes[0];if (findState.checkAdd(method, eventType)) {ThreadMode threadMode = subscribeAnnotation.threadMode();findState.subscriberMethods.add(new SubscriberMethod(method, eventType, threadMode,subscribeAnnotation.priority(), subscribeAnnotation.sticky()));}}} else if (strictMethodVerification && method.isAnnotationPresent(Subscribe.class)) {String methodName = method.getDeclaringClass().getName() + "." + method.getName();throw new EventBusException("@Subscribe method " + methodName +"must have exactly 1 parameter but has " + parameterTypes.length);}} else if (strictMethodVerification && method.isAnnotationPresent(Subscribe.class)) {String methodName = method.getDeclaringClass().getName() + "." + method.getName();throw new EventBusException(methodName +" is a illegal @Subscribe method: must be public, non-static, and non-abstract");}}}
先使用反射获取这个类中的所有方法,不清楚 getDeclaredMethods() 和 getMethods() 区别的同学可以看这篇文章:反射获取成员方法
然后遍历类中的所有方法,将符合条件的订阅方法保存到方法参数 findState 中。
如果遇到使用 Subscribe 注解修饰但是不满足这个条件的方法:
- public 、非 static 、非抽象的
- 参数只有一个,多了少了都不行
就会抛出异常。
保存订阅方法
下一步就是:遍历这个类中的所有订阅方法,挨个添加到订阅列表,调用 subscribe() 方法:
private void subscribe(Object subscriber, SubscriberMethod subscriberMethod) {Class<?> eventType = subscriberMethod.eventType;Subscription newSubscription = new Subscription(subscriber, subscriberMethod);//获取这个事件对应的订阅者列表CopyOnWriteArrayList<Subscription> subscriptions = subscriptionsByEventType.get(eventType);if (subscriptions == null) { //如果之前没有这个事件的订阅者,添加进去subscriptions = new CopyOnWriteArrayList<>();subscriptionsByEventType.put(eventType, subscriptions);} else { //如果之前这个方法已经订阅过这个事件,再次订阅就报错if (subscriptions.contains(newSubscription)) {throw new EventBusException("Subscriber " + subscriber.getClass() + " already registered to event "+ eventType);}}int size = subscriptions.size();for (int i = 0; i <= size; i++) {//遍历这个事件的订阅方法,调整它在订阅列表中的顺序,高优先级的放if (i == size || subscriberMethod.priority > subscriptions.get(i).subscriberMethod.priority) {subscriptions.add(i, newSubscription);break;}}//保存这个类与订阅事件的映射关系List<Class<?>> subscribedEvents = typesBySubscriber.get(subscriber);if (subscribedEvents == null) {subscribedEvents = new ArrayList<>();typesBySubscriber.put(subscriber, subscribedEvents);}subscribedEvents.add(eventType);//如果是粘性事件,立即发送出去if (subscriberMethod.sticky) {if (eventInheritance) {Set<Map.Entry<Class<?>, Object>> entries = stickyEvents.entrySet();for (Map.Entry<Class<?>, Object> entry : entries) {Class<?> candidateEventType = entry.getKey();if (eventType.isAssignableFrom(candidateEventType)) {Object stickyEvent = entry.getValue();checkPostStickyEventToSubscription(newSubscription, stickyEvent);}}} else {Object stickyEvent = stickyEvents.get(eventType);checkPostStickyEventToSubscription(newSubscription, stickyEvent);}}}
方法中具体做了什么可以看注解,这里简单概括一下,subscribe() 方法主要做了这些事:
- 判断这个方法之前是否订阅过这个事件,重复订阅会抛出异常
- 之前没订阅过的话就把方法的参数,也就是我们订阅的事件 与当前类以及该事件的订阅方法的映射关系保存到
EventBus.subscriptionsByEventType中 - 然后按照订阅方法的优先级,调整它在
subscriptionsByEventType中的顺序,高优先级的放后面 - 然后保存这个类与订阅事件的映射关系,即前面介绍过的,
EventBus的另外一个关键属性,typesBySubscriber - 最后如果是粘性事件的话,立即发送出去,发送的方法我们后续分析
注册流程图
总结一下,注册的流程图如下:
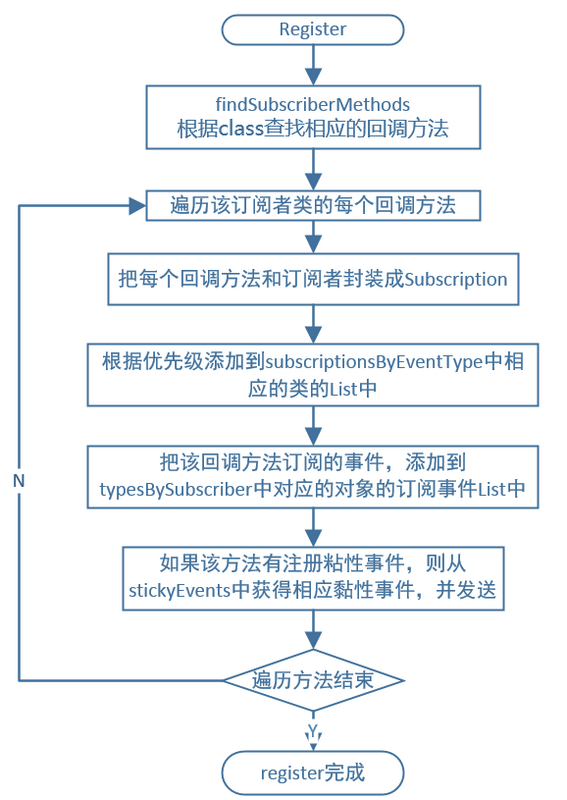
结合前面的介绍,现在看这个图是否清晰了不少呢。
取消注册
注册事件订阅后,记得在不需要的时候解除注册,尤其是在 Activity Fragment 这种主线程运行的组件,在它们的 onDestory() 时记得取消注册。
在之前的版本如果不取消注册,下次再注册就会导致注册两回,一旦有发送消息,就会回调两回。我就遇到过这种问题。
从前面注册的源码我们可以看到,现在 3.0 重复注册 EventBus 会抛异常,因此还是要注意。
普通事件和粘性事件解除注册调用的方法不同,我们分开介绍。
取消注册普通事件
取消注册普通事件调用的是 EventBus.getDefault().unregister(this) 方法,看一下源码:
/*** 解除注册很简单,就从两个属性中移除当前类* @param subscriber*/public synchronized void unregister(Object subscriber) {List<Class<?>> subscribedTypes = typesBySubscriber.get(subscriber);if (subscribedTypes != null) {//找到这个类中所有的订阅方法,挨个取消注册for (Class<?> eventType : subscribedTypes) {unsubscribeByEventType(subscriber, eventType);}//移除这个订阅记录typesBySubscriber.remove(subscriber);} else {Log.w(TAG, "Subscriber to unregister was not registered before: " + subscriber.getClass());}}private void unsubscribeByEventType(Object subscriber, Class<?> eventType) {//获取订阅这个事件的订阅者列表List<Subscription> subscriptions = subscriptionsByEventType.get(eventType);if (subscriptions != null) {int size = subscriptions.size(); //只调用一次 subscriptions.size(),比在循环里每次都调用 subscriptions.size() 好for (int i = 0; i < size; i++) {Subscription subscription = subscriptions.get(i);if (subscription.subscriber == subscriber) { //将当前订阅者从订阅这个事件的订阅者列表中删除subscription.active = false;subscriptions.remove(i);i--;size--;}}}}
可以看到,取消注册普通事件很简单,就是从前面强调的,EventBus 的两个属性中移除当前类、类中注册方法、注册事件的关联数据。
取消注册粘性事件
取消注册粘性事件调用的是 EventBus.getDefault().removeStickyEvent() 和 removeAllStickyEvents() 方法,看一下源码:
private final Map<Class<?>, Object> stickyEvents;//传入的是 Class 对象public <T> T removeStickyEvent(Class<T> eventType) {synchronized (stickyEvents) {return eventType.cast(stickyEvents.remove(eventType));}}//传入的是事件对象public boolean removeStickyEvent(Object event) {synchronized (stickyEvents) {Class<?> eventType = event.getClass();Object existingEvent = stickyEvents.get(eventType);if (event.equals(existingEvent)) {stickyEvents.remove(eventType);return true;} else {return false;}}//移除所有粘性事件public void removeAllStickyEvents() {synchronized (stickyEvents) {stickyEvents.clear();}}
可以看到,removeStickyEvent()方法有两个重载,参数分别为 Class 对象和事件对象,但最终都是从 EventBus.stickyEvents 属性中移除当前事件。
取消注册流程图
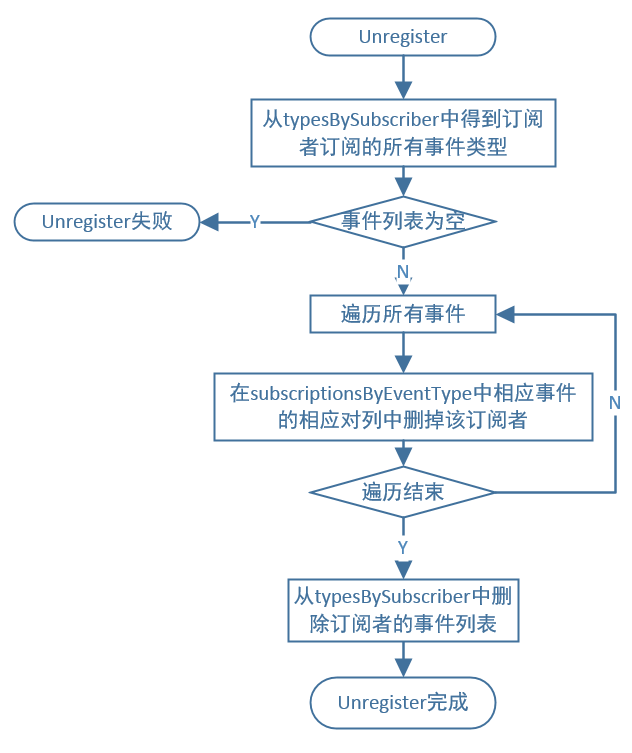
可以看到,其中主要就是对两个关键属性的操作。
原文地址:张拭心的博客
发送事件
终于来到发送事件这一步了,胜利就在眼前!
发送普通事件调用的是 EventBus.getDefault().post(...) 方法;
发送粘性事件调用的是 EventBus.getDefault().postSticky(...) 方法。
public void postSticky(Object event) {synchronized (stickyEvents) {stickyEvents.put(event.getClass(), event);}// Should be posted after it is putted, in case the subscriber wants to remove immediatelypost(event);}
可以看到,发送粘性事件和普通事件的区别就是它先把事件放到了 stickyEvents 属性中,然后再调用的 post():
/** Posts the given event to the event bus. */public void post(Object event) {//获取当前线程的发送状态PostingThreadState postingState = currentPostingThreadState.get();List<Object> eventQueue = postingState.eventQueue;//将当前事件添加到队列中eventQueue.add(event);if (!postingState.isPosting) {postingState.isMainThread = Looper.getMainLooper() == Looper.myLooper();postingState.isPosting = true;if (postingState.canceled) {throw new EventBusException("Internal error. Abort state was not reset");}try {while (!eventQueue.isEmpty()) {//将队列中的事件都发送出去postSingleEvent(eventQueue.remove(0), postingState);}} finally { //发送完重置状态postingState.isPosting = false;postingState.isMainThread = false;}}}
可以看到,发送主要分为几步:
- 获取当前线程的发送状态
- 将当前事件添加到队列中
- 将队列中的事件挨个发送出去
将要发送的事件添加到当前线程的发送队列
EventBus.currentPostingThreadState 属性保存了每个线程的相关状态,是一个 ThreadLocal:
private final ThreadLocal<PostingThreadState> currentPostingThreadState = new ThreadLocal<PostingThreadState>() {@Overrideprotected PostingThreadState initialValue() {return new PostingThreadState();}};/*** 线程的发送状态*/final static class PostingThreadState {final List<Object> eventQueue = new ArrayList<Object>(); //当前线程的事件队列boolean isPosting;boolean isMainThread;Subscription subscription;Object event;boolean canceled;}
它保存了每个线程中的事件队列 eventQueue,是否正在遍历事件的 isPosting,是否为主线程 isMainThread 等信息。
关于
ThreadLocal你可以查看 这篇文章中的介绍。
将要发送的事件添加到事件队列中后,只要当前线程不是正在遍历发送,就开始发送!
遍历处理事件队列中的事件,发送前的准备工作
try {while (!eventQueue.isEmpty()) {//将队列中的事件都发送出去postSingleEvent(eventQueue.remove(0), postingState);}} finally { //发送完重置状态postingState.isPosting = false;postingState.isMainThread = false;}
可以看到,每个事件都要通过 postSingleEvent() 方法的处理才能发出去。
private void postSingleEvent(Object event, PostingThreadState postingState) throws Error {Class<?> eventClass = event.getClass();boolean subscriptionFound = false;if (eventInheritance) {List<Class<?>> eventTypes = lookupAllEventTypes(eventClass); //找到这个事件的所有父类和接口int countTypes = eventTypes.size();for (int h = 0; h < countTypes; h++) {Class<?> clazz = eventTypes.get(h);subscriptionFound |= postSingleEventForEventType(event, postingState, clazz);}} else {subscriptionFound = postSingleEventForEventType(event, postingState, eventClass);}if (!subscriptionFound) { //如果没有订阅者,调用失败,根据配置,抛出一个 NoSubscriberEvent 事件if (logNoSubscriberMessages) {Log.d(TAG, "No subscribers registered for event " + eventClass);}if (sendNoSubscriberEvent && eventClass != NoSubscriberEvent.class &&eventClass != SubscriberExceptionEvent.class) {post(new NoSubscriberEvent(this, event));}}}
由于 EventBus 中有事件继承的概念,所以在 postSingleEvent() 方法中,先找到了这个事件的所有父类和接口,然后把这些亲戚都发出去,调用的是 postSingleEventForEventType() 方法。
找到订阅该事件的所有订阅者
/*** 发送该事件给所有订阅者* @param event* @param postingState* @param eventClass 事件的 Class 对象* @return 是否调用成功*/private boolean postSingleEventForEventType(Object event, PostingThreadState postingState, Class<?> eventClass) {CopyOnWriteArrayList<Subscription> subscriptions;synchronized (this) { //拿到事件的订阅者列表 ,数据有可能在操作的同时添加,考虑使用 CopyOnWriteArrayList 与 synchronizedsubscriptions = subscriptionsByEventType.get(eventClass);}if (subscriptions != null && !subscriptions.isEmpty()) {for (Subscription subscription : subscriptions) {postingState.event = event;postingState.subscription = subscription;boolean aborted = false;try {postToSubscription(subscription, event, postingState.isMainThread);aborted = postingState.canceled;} finally {postingState.event = null;postingState.subscription = null;postingState.canceled = false;}if (aborted) {break;}}return true;}return false;}
可以看到,subscriptionsByEventType 的确是 EventBus 最重要的两个属性之一,在发送消息时,需要通过它拿到订阅该事件的所有订阅者。
然后调用 postToSubscription() 方法挨个给订阅者发送事件。
发送事件给订阅者
订阅方法中会指定被调用时所在的线程 ThreadMode,因此我们在发送事件给订阅方法时,需要在指定的线程里调用它:
/*** 根据 threadMode 发送事件给该订阅者* @param subscription* @param event* @param isMainThread*/private void postToSubscription(Subscription subscription, Object event, boolean isMainThread) {switch (subscription.subscriberMethod.threadMode) {case POSTING: //直接在当前线程调用invokeSubscriber(subscription, event);break;case MAIN: //订阅方法要在主线程执行if (isMainThread) { //当前就在主线程,直接调用invokeSubscriber(subscription, event);} else { //入队,handler 发送消息到主线程,在主线程中反射调用mainThreadPoster.enqueue(subscription, event);}break;case BACKGROUND:if (isMainThread) { //放到子线程线程池中执行backgroundPoster.enqueue(subscription, event);} else {invokeSubscriber(subscription, event);}break;case ASYNC: //直接在子线程中执行asyncPoster.enqueue(subscription, event);break;default:throw new IllegalStateException("Unknown thread mode: " + subscription.subscriberMethod.threadMode);}}
可以看到,对应 EventBus 的四种 ThreadMode,有一个反射调用方法和三种发送者。
一个反射调用方法和三种发送者
反射调用方法为:invokeSubscriber(),先看它的代码:
/*** 反射调用订阅方法* @param subscription* @param event*/void invokeSubscriber(Subscription subscription, Object event) {try {subscription.subscriberMethod.method.invoke(subscription.subscriber, event);} catch (InvocationTargetException e) {handleSubscriberException(subscription, event, e.getCause());} catch (IllegalAccessException e) {throw new IllegalStateException("Unexpected exception", e);}}
它的代码很简单,就是直接使用反射调用订阅者的方法,参数是调用对象和参数。
如果订阅方法要求被调用的线程和发送者在同一线程,就会直接调用 invokeSubscriber() 方法。
否则就交给三种发送者:
HandlerPoster mainThreadPoster:主线程的事件发送者BackgroundPoster backgroundPoster:单一子线程发送者AsyncPoster asyncPoster:异步发送者
HandlerPoster 主线程的事件发送者
主线程调用,根据我们的经验,应该是使用 Handler 把事件以消息的形势发到主线程吧,看看mainThreadPoster 的源码是不是:
final class HandlerPoster extends Handler {private final PendingPostQueue queue;private final int maxMillisInsideHandleMessage;private final EventBus eventBus;private boolean handlerActive;//...}
HandlerPoster 中持有一个 PendingPostQueue 对象,它是 PendingPost 双向链表,具体内容
/*** 待发送消息的双向链表,生产者-消费者模型, 出队 wait - 入队 nofityAll*/final class PendingPostQueue {private PendingPost head;private PendingPost tail;synchronized void enqueue(PendingPost pendingPost) {if (pendingPost == null) {throw new NullPointerException("null cannot be enqueued");}if (tail != null) {tail.next = pendingPost;tail = pendingPost;} else if (head == null) {head = tail = pendingPost;} else {throw new IllegalStateException("Head present, but no tail");}notifyAll();}synchronized PendingPost poll() {PendingPost pendingPost = head;if (head != null) {head = head.next;if (head == null) {tail = null;}}return pendingPost;}synchronized PendingPost poll(int maxMillisToWait) throws InterruptedException {if (head == null) {wait(maxMillisToWait); //最大等待超时}return poll();}}
而 PendingPost 就是对要发送事件和订阅者的又一次封装,和之前查找订阅者使用的 FindState 一样,都是为了避免在多个方法传递参数时传递参数太多,比如包一起用一个对象得了。此外还做了对象复用池,对象使用后不销毁,加入复用池中,就不用创建太多对象。
PendingPost 代码如下:
/*** 等待发送的事件队列,就是一个对象复用池*/final class PendingPost {private final static List<PendingPost> pendingPostPool = new ArrayList<PendingPost>(); //对象复用池Object event;Subscription subscription;PendingPost next;}
我们回去看 HandlerPoster 的关键代码:
{//...void enqueue(Subscription subscription, Object event) {PendingPost pendingPost = PendingPost.obtainPendingPost(subscription, event); //为什么要包裹成 PendingPost 呢?synchronized (this) {queue.enqueue(pendingPost); //事件入队if (!handlerActive) {handlerActive = true;if (!sendMessage(obtainMessage())) { //入一次队,发送一个空消息throw new EventBusException("Could not send handler message");}}}}
可以看到, HandlerPoster 在接收到新的要发送事件后,将要发送事件包成 PendingPost 入队,然后给 Looper 发一个空消息,触发调用 handleMessage() 。
@Overridepublic void handleMessage(Message msg) { //这里运行在主线程boolean rescheduled = false;try {long started = SystemClock.uptimeMillis();while (true) {PendingPost pendingPost = queue.poll(); //取消息if (pendingPost == null) { //如果当前队列中没有消息,就阻塞等待synchronized (this) {// Check again, this time in synchronizedpendingPost = queue.poll();if (pendingPost == null) {handlerActive = false;return;}}}eventBus.invokeSubscriber(pendingPost); //应该也是反射long timeInMethod = SystemClock.uptimeMillis() - started;if (timeInMethod >= maxMillisInsideHandleMessage) {if (!sendMessage(obtainMessage())) {throw new EventBusException("Could not send handler message");}rescheduled = true;return;}}} finally {handlerActive = rescheduled;}}
由于EventBus 中的 HandlerPoster 对象初始化中使用的是主线程的 Looper:
mainThreadPoster = new HandlerPoster(this, Looper.getMainLooper(), 10); //主线程发送者
因此这里的 handleMessage() 就已经运行在主线程了。
在这个方法中我们不停地从队列中取出 PendingPost ,然后调用eventBus.invokeSubscriber(pendingPost) 发出去:
void invokeSubscriber(PendingPost pendingPost) {Object event = pendingPost.event;Subscription subscription = pendingPost.subscription;PendingPost.releasePendingPost(pendingPost);if (subscription.active) {invokeSubscriber(subscription, event);}}
可以看到,取出其中的事件和订阅者后,最终还是调用我们的反射调用方法。
BackgroundPoster 单一子线程发送者
BackgroundPoster 代码如下:
/*** Posts events in background.* 使用线程池循环执行任务* @author Markus*/final class BackgroundPoster implements Runnable {private final PendingPostQueue queue;private final EventBus eventBus;private volatile boolean executorRunning;BackgroundPoster(EventBus eventBus) {this.eventBus = eventBus;queue = new PendingPostQueue();}public void enqueue(Subscription subscription, Object event) {PendingPost pendingPost = PendingPost.obtainPendingPost(subscription, event);synchronized (this) { //一个线程中可能会同时入队多个事件,需要同步queue.enqueue(pendingPost); //入队,执行任务if (!executorRunning) {executorRunning = true;eventBus.getExecutorService().execute(this); //使用线程池执行}}}//...}
可以看到,BackgroundPoster 是一个 Runnable ,在入队事件后,调用eventBus.getExecutorService().execute(this) 分配一个线程执行自己,触发调用 run() 方法:
{//...@Overridepublic void run() {try {try {while (true) {PendingPost pendingPost = queue.poll(1000); //有可能阻塞if (pendingPost == null) {synchronized (this) {// Check again, this time in synchronizedpendingPost = queue.poll();if (pendingPost == null) {executorRunning = false;return;}}}eventBus.invokeSubscriber(pendingPost);}} catch (InterruptedException e) {Log.w("Event", Thread.currentThread().getName() + " was interruppted", e);}} finally {executorRunning = false;}}
BackgroundPoster.run() 类似 HandlerPoster.handleMessage() ,不停地从队列中取出 PendingPost ,然后调用eventBus.invokeSubscriber(pendingPost) ,最终还是通过反射调用订阅方法。
由于 BackgroundPoster 是在一个线程中不停地发射调用订阅方法,如果某个订阅方法太耗时,会影响其他订阅方法的调用。
AsyncPoster 异步发送者
AsyncPoster 代码很简单:
class AsyncPoster implements Runnable {private final PendingPostQueue queue;private final EventBus eventBus;AsyncPoster(EventBus eventBus) {this.eventBus = eventBus;queue = new PendingPostQueue();}public void enqueue(Subscription subscription, Object event) {PendingPost pendingPost = PendingPost.obtainPendingPost(subscription, event);queue.enqueue(pendingPost);eventBus.getExecutorService().execute(this);}//...}
可以看到,AsyncPoster 和 BackgroundPoster 有一些相似,都是 Runnable,都通过 EventBus 的线程池中分配一个线程执行。
不同的是 BackgroundPoster在 run() 方法中串行调用队列中的所有订阅方法,为了保证在调用过程中另外入队情况的同步性,入队方法和 run() 方法都需要使用 synchronized 同步块做同步处理。
而 AsyncPoster.run() 方法就简单多了,每次只执行一个订阅方法的调用。有新的订阅方法就新建一个 AsyncPoster.run()。
因此官方建议要控制 ThreadMode 为 ASYNC的订阅方法数量,避免创建大量线程。
@Overridepublic void run() {PendingPost pendingPost = queue.poll();if(pendingPost == null) {throw new IllegalStateException("No pending post available");}eventBus.invokeSubscriber(pendingPost);}
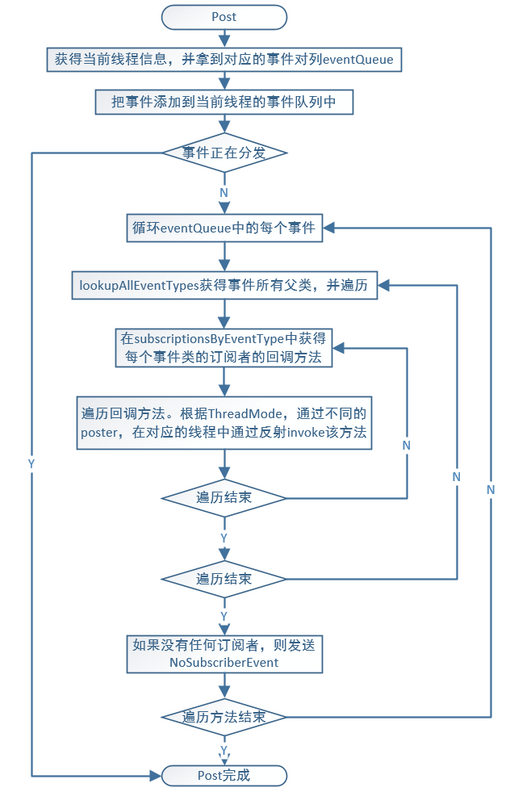
发送流程图
发送的流程看似复杂,其实经过前面的介绍,结合下面这幅图,也很清晰了:
总结
本篇文章根据源码详细地了解了 EventBus 3.0 的源码,经过前面对源码的分析,现在看这个类图理解了吧:
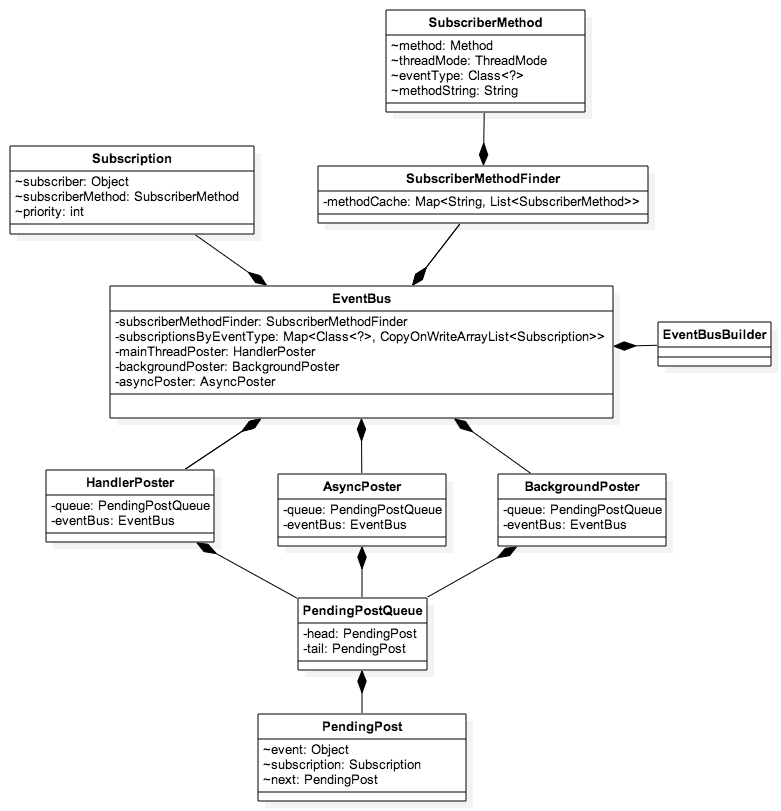
一句话来总结 EventBus 3.0 的实现原理:
- 注册时有两种方式获取类中的订阅方法
* 从编译时注解处理器生成的索引文件中获取* 反射遍历类中的方法,检查注解是否合格
- 发送时,根据不同的 ThreadMode 调用不同的 Poster 在不同的线程反射调用订阅方法
就是酱紫!!
读源码最好是打着断点走一遍,然后边走边写注释,最后整理成文章。
在这个过程中发现了很多小细节是我之前所忽略的,比如一些并发容器的使用,对象复用池,还有一些状态的判断,具体学习心得还有很多,我们下一篇文章总结。
带有注释的源码地址
Thanks
本来打算自己画流程图和类图的,但发现前辈画的已经很完美的,而且我也有点困,就借用一下吧 -。-。
本文中的三张流程图引用自 老司机教你 “飙” EventBus 3 ,表示感谢!
最后类图引用自 EventBus 源码解析,表示感谢!
https://segmentfault.com/a/1190000005089229
http://www.jianshu.com/p/f057c460c77e
http://liuwangshu.cn/application/eventbus/2-eventbus-sourcecode.html
http://blog.csdn.net/z609933542/article/details/50953166


—— 图和会话")
—— 保存和恢复")
—— 开始Python之旅")
—— 变量和数据类型")


还没有评论,来说两句吧...