Spring整合Redis之哨兵与故障转移
前言
上篇博客谈到了Spring整合redis集群以及故障转移演示,会发现redis集群模式存在一个很明显的问题:当某个主节点及其所有从节点挂掉,整个集群因为缺少该节点负责范围的哈希槽(hash slot)而宕掉,不具高可用性。redis引入了哨兵(sentinel)模式,能很好解决集群模式存在的不足。引用官网,redis哨兵系统有三个作用:
- 监控(Monitoring): Sentinel 会不断地检查你的主服务器和从服务器是否运作正常。
- 提醒(Notification): 当被监控的某个 Redis 服务器出现问题时, Sentinel 可以通过 API 向管理员或者其他应用程序发送通知。
- 自动故障迁移(Automatic failover): 当一个主服务器不能正常工作时, Sentinel 会开始一次自动故障迁移操作, 它会将失效主服务器的其中一个从服务器升级为新的主服务器, 并让失效主服务器的其他从服务器改为复制新的主服务器; 当客户端试图连接失效的主服务器时, 集群也会向客户端返回新主服务器的地址, 使得集群可以使用新主服务器代替失效服务器。
本文主要讲解spring整合redis sentinel及故障转移示例,以此加深理解。
环境准备
笔者已经预先搭建好Redis Sentinel,环境如下:
- OS:CentOS release 6.5 (Final)
- Redis版本:4.0.1
| role | ip | port |
|---|---|---|
| Redis Master | 192.168.48.31 | 6379 |
| Redis Slave1 | 192.168.48.32 | 6379 |
| Redis Slave0 | 192.168.48.33 | 6379 |
| Redis Sentinel | 192.168.48.31 | 26379 |
| Redis Sentinel | 192.168.48.32 | 26379 |
| Redis Sentinel | 192.168.48.33 | 26379 |
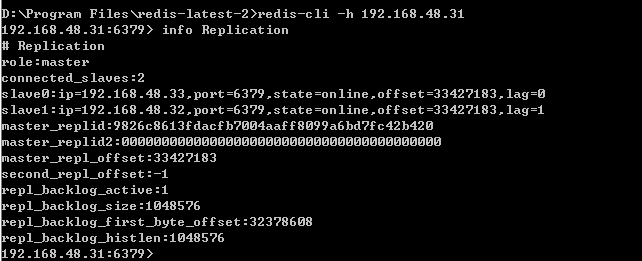
客户端连接主节点,查看Redis Master相关信息
redis-cli -h 192.168.48.31 info Replication
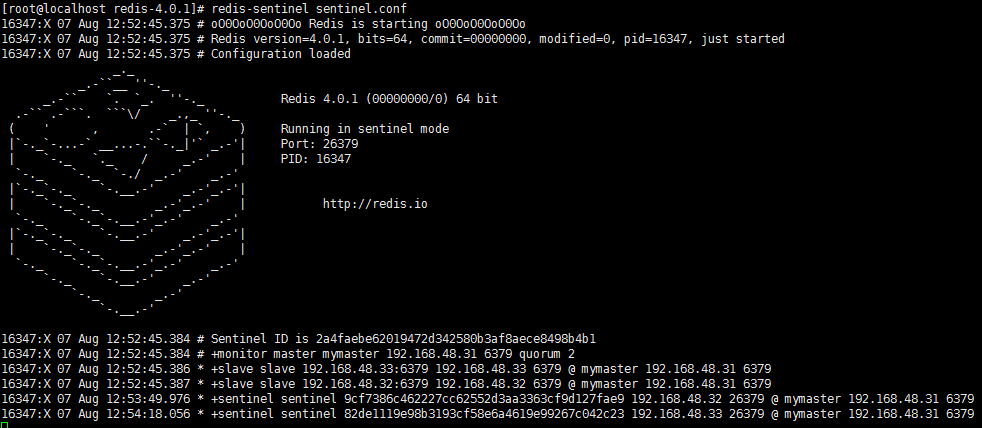
Redis Sentinel启动信息
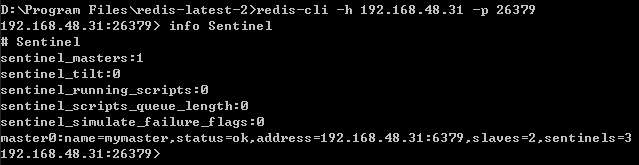
客户端连接sentinel节点,查看Redis Sentinel相关信息
redis-cli -h 192.168.48.31 -p 26379 info Sentinel
spring整合redis sentinel
step1、maven依赖引入
<dependencies><dependency><groupId>org.springframework.data</groupId><artifactId>spring-data-redis</artifactId><version>1.8.6.RELEASE</version></dependency><dependency><groupId>redis.clients</groupId><artifactId>jedis</artifactId><version>2.9.0</version></dependency></dependencies>
step2、配置ConnectionFactory
构造JedisConnectionFactory实例,注入池配置poolConfig和哨兵配置sentinelConfig
<bean id="jedisConnectionFactory" class="org.springframework.data.redis.connection.jedis.JedisConnectionFactory"><constructor-arg name="sentinelConfig" ref="redisSentinelConfiguration"/><constructor-arg name="poolConfig" ref="jedisPoolConfig" /></bean>
step3、配置JedisPoolConfig
<bean id="jedisPoolConfig" class="redis.clients.jedis.JedisPoolConfig" ><property name="minIdle" value="${redis.minIdle}" /><property name="maxIdle" value="${redis.maxIdle}" /><property name="maxTotal" value="${redis.maxActive}" /><property name="maxWaitMillis" value="${redis.maxWait}" /><property name="testOnBorrow" value="${redis.testOnBorrow}" /><property name="testOnReturn" value="true" /><property name="testWhileIdle" value="true" /></bean>
配置文件spring-redis.properties内容
redis.minIdle=50redis.maxIdle=200redis.maxActive=100redis.maxWait=3000redis.testOnBorrow=true
step4、配置RedisSentinelConfiguration
和集群配置一样,sentinel也有两种配置方式
1.sentinels设值注入
<bean id="redisSentinelConfiguration" class="org.springframework.data.redis.connection.RedisSentinelConfiguration"><property name="sentinels"><set><bean name="sentinelNode1" class="org.springframework.data.redis.connection.RedisNode"><constructor-arg name="host" value="192.168.48.31"/><constructor-arg name="port" value="26379"/></bean><bean name="sentinelNode2" class="org.springframework.data.redis.connection.RedisNode"><constructor-arg name="host" value="192.168.48.32"/><constructor-arg name="port" value="26379"/></bean><bean name="sentinelNode3" class="org.springframework.data.redis.connection.RedisNode"><constructor-arg name="host" value="192.168.48.33"/><constructor-arg name="port" value="26379"/></bean></set></property><property name="master"><bean name="masterNode" class="org.springframework.data.redis.connection.RedisNode"><!--必须指定主节点名称--><property name="name" value="mymaster"/><constructor-arg name="host" value="192.168.48.31"/><constructor-arg name="port" value="6379"/></bean></property></bean>
2.propertySource构造注入
<bean id="redisSentinelConfiguration" class="org.springframework.data.redis.connection.RedisSentinelConfiguration"><constructor-arg name="propertySource" ref="propertySource"/></bean><bean name="propertySource" class="org.springframework.core.io.support.ResourcePropertySource"><constructor-arg name="location" value="classpath:spring-redis-sentinel.properties" /></bean>
spring-redis-sentinel.properties内容:
#哨兵监控主redis节点名称,必选spring.redis.sentinel.master=mymaster#哨兵节点spring.redis.sentinel.nodes=192.168.48.31:26379,192.168.48.32:26379,192.168.48.33:26379
RedisSentinelConfiguration源码中这两个配置属性常量:
private static final String REDIS_SENTINEL_MASTER_CONFIG_PROPERTY = "spring.redis.sentinel.master";private static final String REDIS_SENTINEL_NODES_CONFIG_PROPERTY = "spring.redis.sentinel.nodes";

step5、配置RedisTemplate
然后配置RedisTemplate,用于redis命令操作
<bean id="stringRedisTemplate" class="org.springframework.data.redis.core.StringRedisTemplate" p:connection-factory-ref="jedisConnectionFactory"/>
step6、测试
package example;import org.springframework.context.support.ClassPathXmlApplicationContext;import org.springframework.data.redis.core.StringRedisTemplate;import org.springframework.data.redis.core.ValueOperations;public class SpringMain {public static void main(String[] args) throws InterruptedException {ClassPathXmlApplicationContext context = new ClassPathXmlApplicationContext("classpath:spring-redis.xml");StringRedisTemplate template = context.getBean(StringRedisTemplate.class);ValueOperations<String, String> valueOperations = template.opsForValue();valueOperations.set("foo","bar");context.destroy();}}
由于主从复制,Master(48.31)、Slave1(48.32)、Slave0(48.33)能查看到相同的结果:


到此,spring整合redis sentinel完成,完整配置如下:
<?xml version="1.0" encoding="UTF-8"?><beans xmlns="http://www.springframework.org/schema/beans" xmlns:xsi="http://www.w3.org/2001/XMLSchema-instance" xmlns:p="http://www.springframework.org/schema/p" xmlns:redis="http://www.springframework.org/schema/redis" xmlns:context="http://www.springframework.org/schema/context" xsi:schemaLocation="http://www.springframework.org/schema/beans http://www.springframework.org/schema/beans/spring-beans.xsd http://www.springframework.org/schema/redis http://www.springframework.org/schema/redis/spring-redis.xsd http://www.springframework.org/schema/context http://www.springframework.org/schema/context/spring-context.xsd"><context:property-placeholder location="classpath:*.properties" ignore-unresolvable="true" /><!-- Jedis ConnectionFactory --><bean id="jedisConnectionFactory" class="org.springframework.data.redis.connection.jedis.JedisConnectionFactory"><constructor-arg name="sentinelConfig" ref="redisSentinelConfiguration"/><constructor-arg name="poolConfig" ref="jedisPoolConfig" /></bean><bean id="redisSentinelConfiguration" class="org.springframework.data.redis.connection.RedisSentinelConfiguration"><constructor-arg name="propertySource" ref="propertySource"/><!-- <property name="sentinels"> <set> <bean name="sentinelNode1" class="org.springframework.data.redis.connection.RedisNode"> <constructor-arg name="host" value="192.168.48.31"/> <constructor-arg name="port" value="26379"/> </bean> <bean name="sentinelNode2" class="org.springframework.data.redis.connection.RedisNode"> <constructor-arg name="host" value="192.168.48.32"/> <constructor-arg name="port" value="26379"/> </bean> <bean name="sentinelNode3" class="org.springframework.data.redis.connection.RedisNode"> <constructor-arg name="host" value="192.168.48.33"/> <constructor-arg name="port" value="26379"/> </bean> </set> </property> <property name="master"> <bean name="masterNode" class="org.springframework.data.redis.connection.RedisNode"> <!–必须指定主节点名称–> <property name="name" value="mymaster"/> <constructor-arg name="host" value="192.168.48.31"/> <constructor-arg name="port" value="6379"/> </bean> </property>--></bean><bean name="propertySource" class="org.springframework.core.io.support.ResourcePropertySource"><constructor-arg name="location" value="classpath:spring-redis-sentinel.properties" /></bean><!-- JedisPoolConfig definition --><bean id="jedisPoolConfig" class="redis.clients.jedis.JedisPoolConfig" ><property name="minIdle" value="${redis.minIdle}" /><property name="maxIdle" value="${redis.maxIdle}" /><property name="maxTotal" value="${redis.maxActive}" /><property name="maxWaitMillis" value="${redis.maxWait}" /><property name="testOnBorrow" value="${redis.testOnBorrow}" /><property name="testOnReturn" value="true" /><property name="testWhileIdle" value="true" /></bean><!-- redis template definition --><bean id="stringRedisTemplate" class="org.springframework.data.redis.core.StringRedisTemplate" p:connection-factory-ref="jedisConnectionFactory"/>
sentinel故障转移
为验证故障转移,我们关闭Master节点
shutdown

Sentinel监控日志:
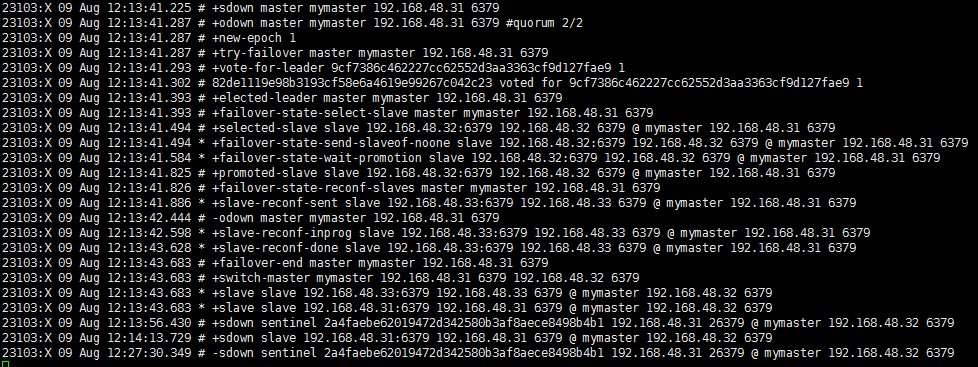
简单解释下日志信息:
- +sdown 表示监控节点主观下线(单个Sentinel实例对服务器做出的下线判断)
- +odown 表示监控节点客观下线(多个Sentinel实例对服务器做出的sdown判断),sentinel.config中配置达到2个sdown(quorum参数配置)便判断为客观下线
- +switch-master 从slave节点中选个作为新的主节点,Slave1(192.168.48.32:6379)
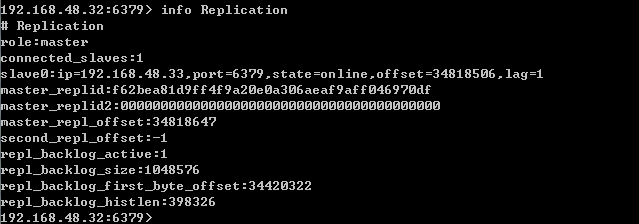
查看该节点信息,发现他的角色已经变为master,原先的Slave0(192.168.48.33:6379)变成新master的slave:
redis-cli -h 192.168.48.32 info Replication
接下来再来测试一种情况:在故障节点重启之前发送写命令,故障节点重启后数据是否会复制过来?
valueOperations.set("foo1","bar1");
结果:

重启原来的Master节点(192.168.48.31:6379)
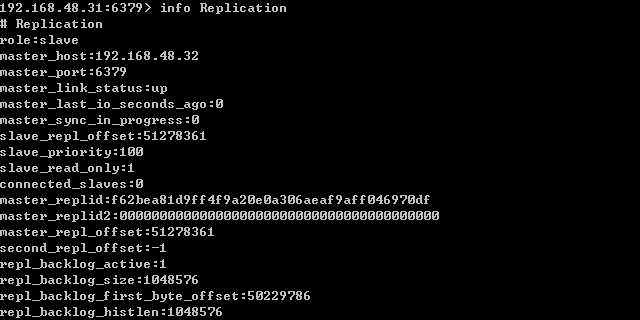
原先的Master重启后变成了新Master的从节点了,试着查看foo1的值

可见,重启后,新的从节点会复制新的master节点,保证数据一致性。
参考
spring-data-redis sentinel //docs.spring.io/spring-data/redis/docs/2.0.0.RC2/reference/html/\#redis:sentinel
中文官网:http://www.redis.cn/topics/sentinel.html


")


还没有评论,来说两句吧...