Android自定义View
如何自定义控件
- 自定义属性的声明和获取
- 测量onMeasure:测量自定义控件的尺寸
- 绘制onDraw:绘制自定义控件
- 状态的存储与恢复:在Activity进入后台时,我们需要保存自定义控件的重要状态;当Activity从后台恢复时,我们就可以恢复自定义控件的重要状态,例如文本内容等。
自定义属性的声明和获取总共分成四步:
- 分析需要的自定义属性
- 在res/values/attrs.xml文件中声明
- 在布局文件中进行使用
- 在View的构造方法中进行获取
关于测量onMeasure:
- onMeasure()会从父控件返回测量值和测量模式,这两个重要数据封装在MeasureSpec类中
- 测量模式分成EXACTLY、AT_MOST、UNSPECIFIED
- EXACTLY:精确模式,父容器已经测量出子View所需要的大小,返回的测量值就是子View的最终尺寸
- AT_MOST:最大模式,父容器返回的测量值是子View能够达到的最大值
- UNSPECIFIED:无限制模式,不对子View的尺寸做任何限制
- 在onMeasure方法中需要调用setMeasuredDimension()方法来为子View设置测量后的高度和宽度
- requestLayout()方法用来重新测量和布局
关于状态的存储于恢复:
- 有两个重要的需要重写的方法:onSaveInstanceState和onRestoreInstanceState
创建自定义View
创建自定义View的方法很简单,创建一个类,令其继承View,重写View的三个构造方法,我们需要清楚这三个不同构造函数的区别:
public class TestView extends View {//一般用于我们平时编码时动态new一个TestViewpublic TestView(Context context) {super(context);}//布局文件中用到TestView时系统会调用这个构造方法public TestView(Context context, @Nullable AttributeSet attrs) {super(context, attrs);}//一般有固定的style属性时才会用这个,经常是在两个参数的构造方法中调用这个方法public TestView(Context context, @Nullable AttributeSet attrs, int defStyleAttr) {super(context, attrs, defStyleAttr);}}
自定义属性的声明与获取
我们需要为我们的自定义View声明自定义的属性,首先在values文件夹下新建一个叫attrs.xml的文件(名字任意),在<declare-styleable>标签中再使用<attr>标签声明自定义属性,注意<declare-styleable>标签的name属性最好与对应的自定义控件名一致:
<?xml version="1.0" encoding="utf-8"?><resources><declare-styleable name="TestView"><attr name="test_boolean" format="boolean"/><attr name="test_string" format="string"/><attr name="test_integer" format="integer"/><attr name="test_enum" format="boolean"><enum name="top" value="1"/><enum name="bottom" value="2"/></attr><attr name="test_dimension" format="dimension"/></declare-styleable></resources>
我们在上面的代码中,声明了五个自定义属性test_boolean、test_string、test_integer、test_enum、test_dimension,format属性,并使用format属性定义了它们的数据类型。
现在我们在布局文件中调用这个自定义View,并为其自定义属性赋值:
<RelativeLayout xmlns:android="http://schemas.android.com/apk/res/android"xmlns:tools="http://schemas.android.com/tools"xmlns:testview="http://schemas.android.com/apk/res-auto"android:layout_width="match_parent"android:layout_height="match_parent"android:paddingBottom="16dp"android:paddingLeft="16dp"android:paddingRight="16dp"android:paddingTop="16dp"tools:context="com.example.xwx.myview.MainActivity"><com.example.xwx.myview.TestViewtestview:test_boolean="true"testview:test_enum="top"testview:test_dimension="100dp"testview:test_integer="5"testview:test_string="Hey"android:layout_width="200dp"android:background="#44ff0000"android:layout_height="200dp"android:layout_centerInParent="true"/></RelativeLayout>
可以看到所有自定义属性的前面都有一个新的命名空间testview,这是我们在开头声明的一个新的命名空间,所有自定义属性都不能使用android这个命名空间,因此我们需要新建一个命名空间,一般是以app命名,这里为了凸显效果将名字改为了testview。
最后我们需要在TestView的构造函数中获取自定义属性的值,根据之前的三种构造函数的区别我们知道,由于我们需要在布局文件中使用自定义View,因此需要完成有两个参数的构造函数:
//布局文件中用到TestView时系统会调用这个构造方法public TestView(Context context, @Nullable AttributeSet attrs) {super(context, attrs);//使用TypedArray获取控件的自定义属性值TypedArray typedArray = context.obtainStyledAttributes(attrs, R.styleable.TestView);boolean booleanTest = typedArray.getBoolean(R.styleable.TestView_test_boolean, false);int integerTest = typedArray.getInteger(R.styleable.TestView_test_integer, -1);float dimensionTest = typedArray.getDimension(R.styleable.TestView_test_dimension, 0);int enumTest = typedArray.getInt(R.styleable.TestView_test_enum, 1);String stringTest = typedArray.getString(R.styleable.TestView_test_string);//输出查看结果Log.d("TestView", "boolean:" + booleanTest + " integer:" + integerTest + " dimension" + dimensionTest + " enum:" + enumTest + " String:" + stringTest);//回收TypedArraytypedArray.recycle();}
在上面的代码中我们首先使用了构造函数中传入的context对象下的obtainStyledAttributes()方法拿到了可以获取自定义属性值的TypedArray,这个方法需要传入两个参数,第一个参数是调用构造方法时传入的参数attrs,第二个参数是自定义属性的集合,我们用R.styleable.TestView来获取,之后就是通过TypedArray对象的一系列方法getXXX()来获取TestView的自定义属性值,这些方法的第一个参数是自定义属性值的索引,第二个参数是默认值。同时最后不要忘了用recycle()方法回收TypedArray。
最终效果如下,说明我们获取自定义属性的值成功!
D/TestView: boolean:true integer:5 dimension262.5 enum:1 String:Hey
在获取自定义属性的值时有一个需要注意的问题,使用TypedArray的getString方法获取String类型的自定义属性的值时是没有第二个参数的,也就是不能用getString方法指定默认值的。这样就造成了一个问题,当用户在布局文件中没有为String类型的自定义属性赋值的时候,getString方法会返回一个null值,此时若在之前我们为stringTest变量设置了一个默认值的话,这个null会覆盖我们之前设置的默认值从而产生bug,因此在获取String类型自定义属性的时候我推荐使用下列这种方式获取:
//获取自定义属性的数量int count = typedArray.getIndexCount();//循环判断每一个自定义属性是否为String类型for (int i = 0; i<count; i++) {//获取当前自定义属性的indexint index = typedArray.getIndex(i);switch (index) {case R.styleable.TestView_test_string: {stringTest = typedArray.getString(R.styleable.TestView_test_string);break;}}}
使用这种方式就不会在不设置值的情况下覆盖之前为String类型变量设置的默认值了。
自定义控件大小的测量
重写View的onMeasure方法:
//重写测量方法@Overrideprotected void onMeasure(int widthMeasureSpec, int heightMeasureSpec) {//获取父控件传入的测量模式和测量大小int widthMode = MeasureSpec.getMode(widthMeasureSpec);int widthSize = MeasureSpec.getSize(widthMeasureSpec);//最终测量宽度int width = 0;//判断测量模式if (widthMode == MeasureSpec.EXACTLY) {//如果是EXACTLY模式,那么就直接是父控件传回的大小width = widthSize;}else {//如果不是EXACTLY模式就需要自己测量int needWidth = measureWidth() + getPaddingLeft() + getPaddingRight();if (widthMode == MeasureSpec.AT_MOST) {//如果是AT_MOST模式就取最小值width = Math.min(needWidth, widthSize);}else {//如果是UNSPECIFIED模式就无限制width = needWidth;}}//高度 同上int heightMode = MeasureSpec.getMode(heightMeasureSpec);int heightSize = MeasureSpec.getSize(heightMeasureSpec);//最终测量高度int height = 0;//判断测量模式if (heightMode == MeasureSpec.EXACTLY) {//如果是EXACTLY模式,那么就直接是父控件传回的大小height = heightSize;}else {//如果不是EXACTLY模式就需要自己测量int needheight = measureHeight() + getPaddingTop() + getPaddingBottom();if (widthMode == MeasureSpec.AT_MOST) {//如果是AT_MOST模式就取最小值height = Math.min(needheight, heightSize);}else {//如果是UNSPECIFIED模式就无限制height = needheight;}}//将最终测量得到的高宽应用到ViewsetMeasuredDimension(width, height);}
分析上面的代码,首先通过父控件传回的widthMeasureSpec参数取出测量模式和尺寸,接着根据测量模式来得出最终的测量值,如果是EXACTLY模式,那么父控件传回的测量大小就是自定义控件的最终大小,如果不是EXACTLY模式那么就需要我们自行测量,在支持padding的情况下我们还需要加上用户设置的padding值,若是AT_MOST模式,那么就取父控件传回的测量值和我们实际测量值的最小值即可(因为在不是EXACTLY模式的情况下,父控件传回的测量值就是自定义控件的限制最大值),若是UNSPECIFIED模式就不做限制。
自定义控件的绘制
重写View下的onDraw方法:
//初始化画笔private void initPaint () {mPaint = new Paint();//画空心圆mPaint.setStyle(Paint.Style.STROKE);//线宽mPaint.setStrokeWidth(6);//设置画笔颜色mPaint.setColor(0xFFFF0000);//设置抗锯齿mPaint.setAntiAlias(true);}//画笔绘制的文字初始值private String mText = "FromFarEast";@Overrideprotected void onDraw(Canvas canvas) {//初始化画笔initPaint();//画一个圆canvas.drawCircle(getWidth() / 2, getHeight() / 2, getWidth() / 2 - mPaint.getStrokeWidth(), mPaint);//画一个穿过圆心的细线mPaint.setStrokeWidth(1);canvas.drawLine(0, getHeight() / 2, getWidth(), getHeight() / 2, mPaint);//画一个文本mPaint.setTextSize(72);mPaint.setStyle(Paint.Style.FILL);mPaint.setStrokeWidth(0);canvas.drawText(mText, 0, mText.length(), 0, getHeight(), mPaint);}
onDraw方法内部主要是利用传进来的Canvas对象进行一系列的绘制,Canvas的用法在这里就不花时间赘述了,需要注意的是getHeight和getWidth方法获取的是控件的高度和宽度,这个高度和宽度在onMeasure方法中已经实现,mText变量是声明在全局的一个String类型的变量。
最终效果: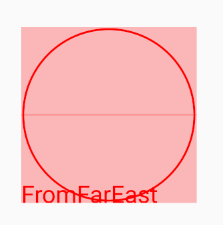
状态的存储与恢复
当我们旋转屏幕时,系统会对当前Activity进行重建,如果我们在之前对自定义View进行了一系列操作造成了View的UI发生了变化,那么在Activity重建后View又会回到最初的状态,这是一个很不好的用户体验,因此我们需要使用onSaveInstanceState()和onRestoreInstanceState()方法来实现View状态的存储与恢复。
为了展现这个不好的用户体验,我们为View增加一个点击事件,点击后将View里的文字FromFarEast改为8888,之后我们旋转屏幕,看看旋转屏幕后文字是否还是8888:
@Overridepublic boolean onTouchEvent(MotionEvent event) {mText = "8888";//View重绘,invalidate会回调onDraw()方法invalidate();return true;}

很明显旋转屏幕造成Activity的重建后,View的状态发生了丢失,也没有进行恢复。
那么接下来我们就完成View状态的保存与恢复:
//保存父控件状态的keyprivate static final String INSTANCE = "instance";//保存该控件状态的keyprivate static final String KEY_TEXT = "key_text";//View的状态存储@Nullable@Overrideprotected Parcelable onSaveInstanceState() {//使用Bundle来保存View的状态Bundle bundle = new Bundle();//保存文本bundle.putString(KEY_TEXT, mText);//保存父控件的状态bundle.putParcelable(INSTANCE, super.onSaveInstanceState());//返回Bundlereturn bundle;}//View的状态恢复@Overrideprotected void onRestoreInstanceState(Parcelable state) {if (state instanceof Bundle) {//如果是Bundle那么就是我们在onSaveInstanceState中自己保存的自定义View的状态Bundle bundle = (Bundle) state;//恢复父控件的状态Parcelable parcelable = bundle.getParcelable(INSTANCE);super.onRestoreInstanceState(parcelable);//恢复该View的状态mText = bundle.getString(KEY_TEXT);return;}super.onRestoreInstanceState(state);}
分析上面的代码,我们首先在onSaveInstanceState方法中完成保存View状态的逻辑,这里View的状态其实就是显示的文本mText,通常使用Bundle来进行保存,这里需要特别注意,由于自定义View是有可能有父控件的,因此在保存View的状态的同时还需要保存其父控件的状态,而onSaveInstanceState()方法本身返回的就是保存当前View状态的对象,因此我们使用bundle.putParcelable(INSTANCE, super.onSaveInstanceState());来保存父控件的状态。
接着在onRestoreInstanceState()方法中完成View状态恢复的逻辑,首先判断回调该函数时传入的参数是否为Bundle类型,如果是Bundle类型说明我们在onSaveInstanceState()方法中执行了状态保存的逻辑,因此我们就需要取出View和父控件的状态并恢复即可。
当然这里还不算完,由于Android系统是根据View的ID来进行状态的存储和恢复的,因此每一个需要进行状态存储和恢复的View都需要设置一个ID,千万不能忘了在布局文件中为这个View设置一个ID。
最终效果: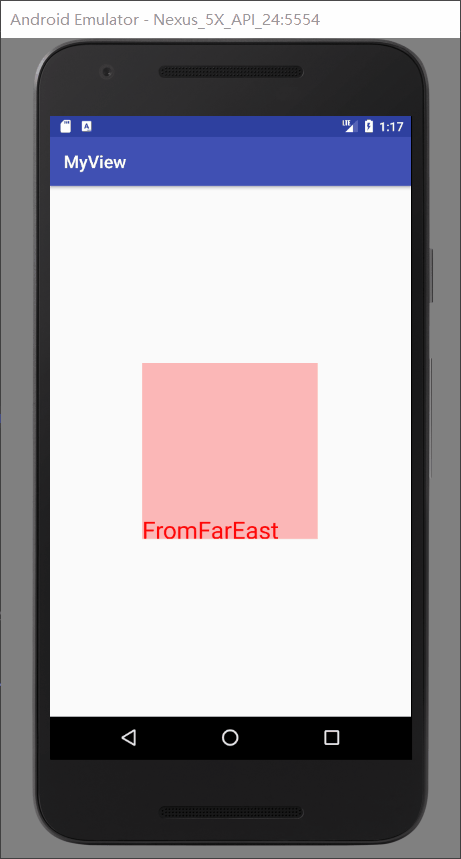


还没有评论,来说两句吧...